Selenium is one of the most used tools for Web automation in the IT industry these days. While the user base is continuously increasing, new features continually added, and over time new version(s) of Selenium is being launched. Lately, with the introduction of Selenium 3 and 4, Gecko Driver usage has become a necessity. Subsequently, in this article, we'll learn everything about Selenium GeckoDriver and see how we can use it in our selenium scripts. We will primarily focus on the below points in this article:
- What is GeckoDriver?
- How GeckoDriver works?
- Why use it?
- How to install GeckoDriver on Windows?
- How to download GeckoDriver on Windows?
- Similarly, how to set it up on Windows?
- How to install GeckoDriver on macOS?
- How to download GeckoDriver in macOS?
- Similarly, how to setup GeckoDriver on macOS?
- How to run tests in Headless mode using GeckoDriver?
- What are the Common exceptions raised while using GeckoDriver?
What is GeckoDriver?
Let us first understand Gecko before understanding the GeckoDriver. Gecko is a web browser engine that has been developed by Mozilla. Different applications developed by Mozilla Foundation or Mozilla Corporation use it. The GeckoDriver is in C++ and JavaScript, as well in Rust since 2016. Additionally, we can use it on Windows, macOS, Linux, Unix & BSD operating systems.
GeckoDriver is the link between Selenium tests and the Firefox browser. In other words, GeckoDriver is a proxy that interacts between W3C WebDriver-compatible clients and Gecko-based browsers like Firefox. Therefore, sometimes people often refer to it as Firefox driver when they mean it is the GeckoDriver. In simple words, GeckoDriver or Firefox driver links our Selenium tests with the Mozilla Firefox browser. Moreover, it is an executable file that the system paths for your test required.
How GeckoDriver works?
The WebDriver connects with the firefox browser using the GeckoDriver. Just like the other drivers(e.g., ChromeDriver), a local server is started by this executable, which runs your selenium tests. It works as a proxy between the local and remote end to translate calls into Marionette automation protocol. Additionally, to understand more about how it interacts, refer to the diagram below:
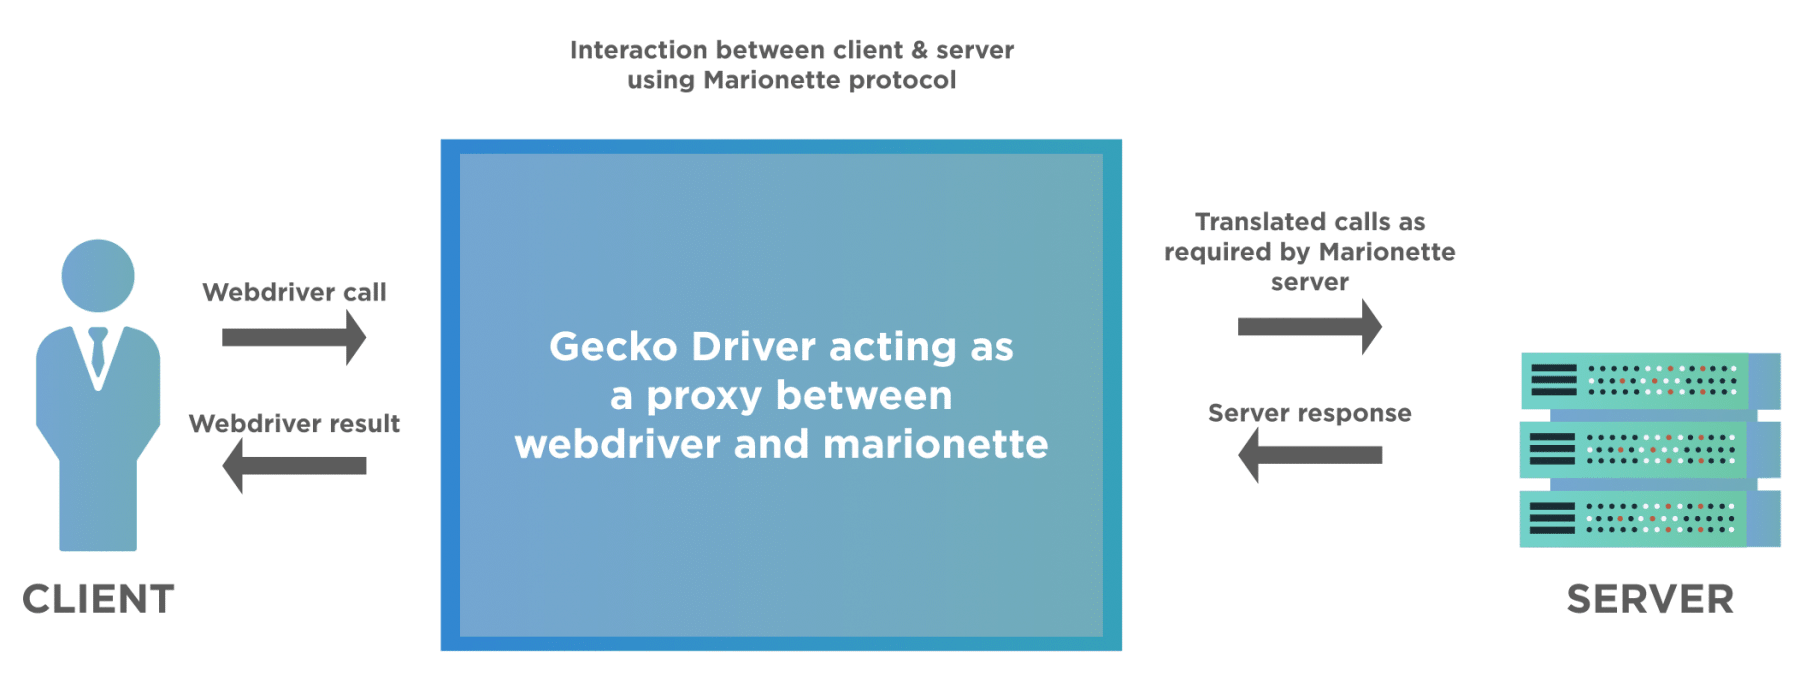
The client or the local system sends a request, which is the WebDriver call to the GeckoDriver. The GeckoDriver converts these request(s) into Marionette Protocol and transfers to Marionette Driver. Now, the server sends back the response to the client via the GeckoDriver. Hence, the execution happens inside the browser. Now that we know the working of the firefox driver let us understand why we need it to execute our Selenium tests.
Why use Gecko Driver?
With earlier versions of Selenium (like version 2.53 & below ), launching the Firefox browser was straightforward. Additionally, this could be done directly by using the below line of code, and you could instantiate Firefox driver using the WebDriver reference like below:
WebDriver driver = new FirefoxDriver();
To understand it more, refer below diagram:

Before Marionette became a part of Firefox, the default browser of WebDriver was Firefox, and it had its inbuilt driver to launch the Firefox browser. Moreover, the WebDriver directly implements the FirefoxDriver, due to which there was no need to use any executable to launch Firefox. Just a simple line of code, as shown above, would open the Firefox browser. But after Firefox v47.0+, we need to use a proxy to interact with the browser.
Also, with Firefox 47.0+, it is not possible to have any third party driver interact directly with the browser. As a result, it is challenging to use Selenium 2 with the latest Firefox versions. So, we have to use Selenium 3, which has the MarionetteDriver. Marionette driver is an automation driver for Mozilla, which can directly control the UI or internal JavaScript of a Gecko platform like Firefox. Hence, we need GeckoDriver to instantiate an object and launch Firefox. Let us see what happens if we do not use GeckoDriver with Selenium 3 or latest through below example-
package gecko;

import org.openqa.selenium.WebDriver;
import org.openqa.selenium.firefox.FirefoxDriver;

public class GeckoDriver {

	public static void main(String[] args) {

		WebDriver driver = new FirefoxDriver();
		driver.get("https://demoqa.com/");

	}

}
On running the above code, you will get IllegalStateException, as shown below:
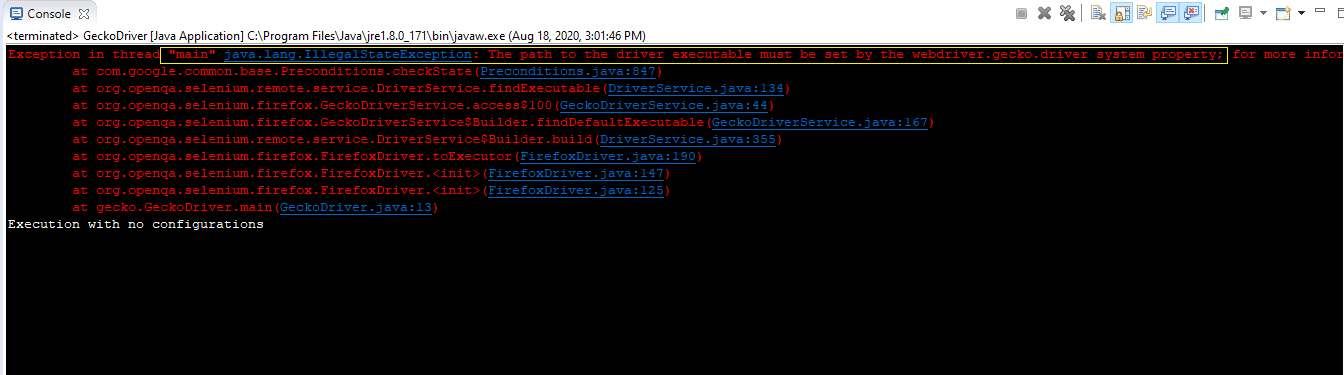
Note: If you have GeckoDriver set up in your system already, you will not get any error like this.
We can resolve the above exception by using GeckoDriver in place of the regular FirefoxDriver. In the next section, we will see how we can set up GeckoDriver in our system.
How to install GeckoDriver on Windows?
In this section, we will see how we can download, setup, and use GeckoDriver on the Windows operating system. There are different ways to set it up for your selenium scripts, which we will be discussing in detail. Consequently, let's first start with downloading the driver executable for the Windows platform:
How To Download GeckoDriver on Windows?
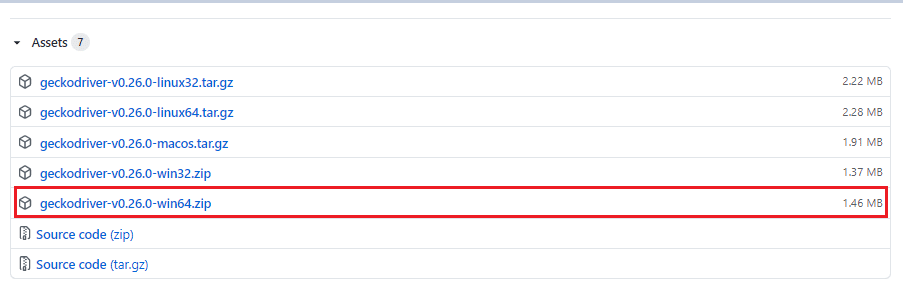
- Firstly, you can download the platform-specific GeckoDriver (preferably the latest version) directly from Github. As we are downloading it for the Windows 64-bit platform, so we will download the file "geckodriver-<latest-version>-win64.zip" as shown in the below screenshot:
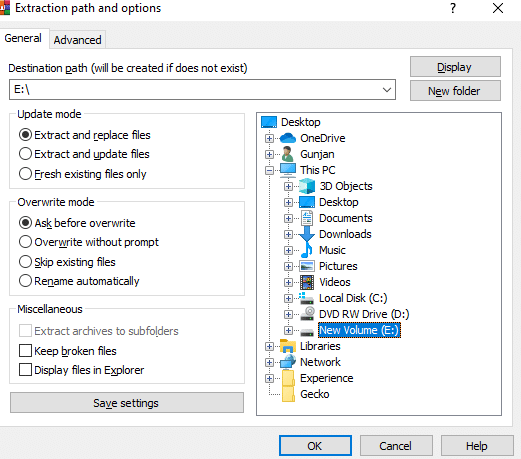
- Secondly, extract the downloaded gecko driver zip file.

- Thirdly, please select a destination to save it.
You are now all set to use the GeckoDriver in your test scripts. As a next step, we need to set up the driver on our system.
How To Setup GeckoDriver on Windows?
Unlike the earlier implementation of Firefox driver, GeckoDriver can't directly instantiate. We need to initialize it before creating the instance of the WebDriver explicitly. The path of the GeckoDriver executable file should be accessible to the FirefoxDriver, so as when the User creates an instance of the WebDriver using the FirefoxDriver, it should be able to find the path of the GeckoDriver executable file. It will lead to successful initialization. We can follow any of the below-mentioned approaches to setup GeckoDriver:
- Setup GeckoDriver using System Properties in Environment Variables.
- Setup GeckoDriver using System Properties in the test script.
- Similarly, setup GeckoDriver by initializing the Desired capabilities for the browser.
Let's understand all of these and try running our test code with Selenium 3 or Selenium 4.
How to setup GeckoDriver using System Properties in Environment Variables?
On Windows, Environment Variables are one of the easiest ways to declare any global system level variable, which will be accessible to all the programs running on the system. Using the same way, we can use the Environment Variables to set the path of the GeckoDriver. Hence, as when we create the instance of the WebDriver, it automatically finds the path of the GeckoDriver in the System's PATH variable and executes the same. We can follow the steps mentioned below to add the path of the GeckoDriver in the System's PATH variable:
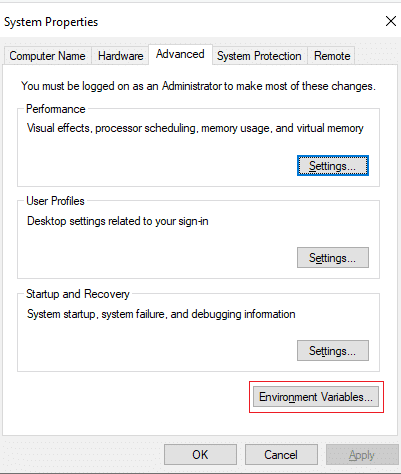
- Firstly, open properties by right-clicking on This PC.
- Secondly, open Advanced System Settings and click on Environment Variables.
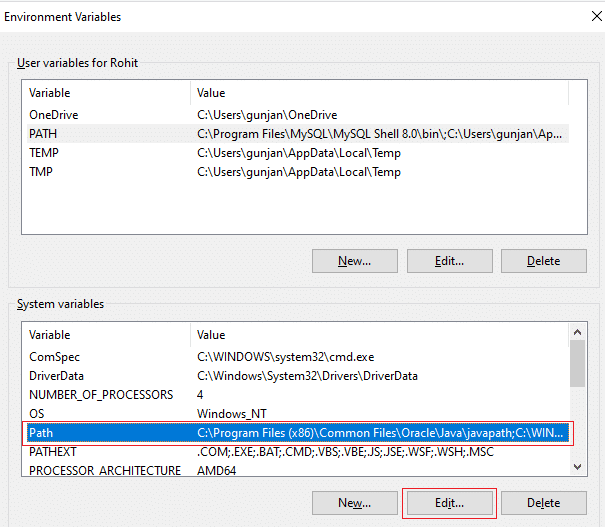
- Thirdly, under the System variables, select Path and click on Edit.
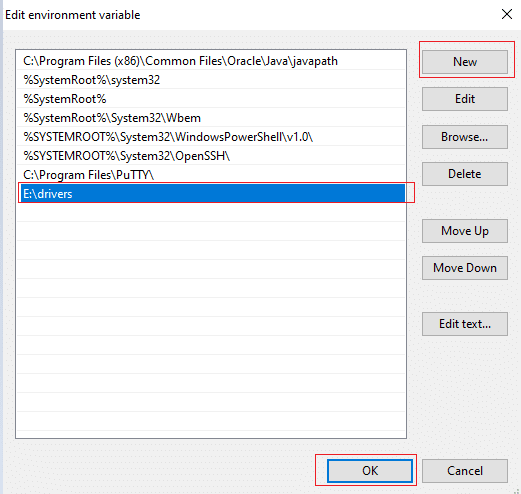
- After that, you need to append the path of the GeckoDriver. Click on New and paste the path at the last editable row and click on OK. Moreover, we need to specify the folder path where the GeckoDriver executable file resides. In our case, it was "E:\drivers"
After closing all the subsequent windows, you can use GeckoDriver without using the system property code. Note that you might have to restart your system for the Environment Variables changes to take effect. You can now update the test code to instantiate the WebDriver directly, as shown below:
package gecko;

import org.openqa.selenium.WebDriver;
import org.openqa.selenium.firefox.FirefoxDriver;

public class GeckoDriver {

	public static void main(String[] args) throws InterruptedException{

		System.out.println("Execution after setting driver path in system variables");
		WebDriver driver = new FirefoxDriver();
		driver.get("https://demoqa.com");
		Thread.sleep(3000);
		driver.quit();
		System.out.println("Execution complete");

	}
}
On executing the above code, you will see the results like below-
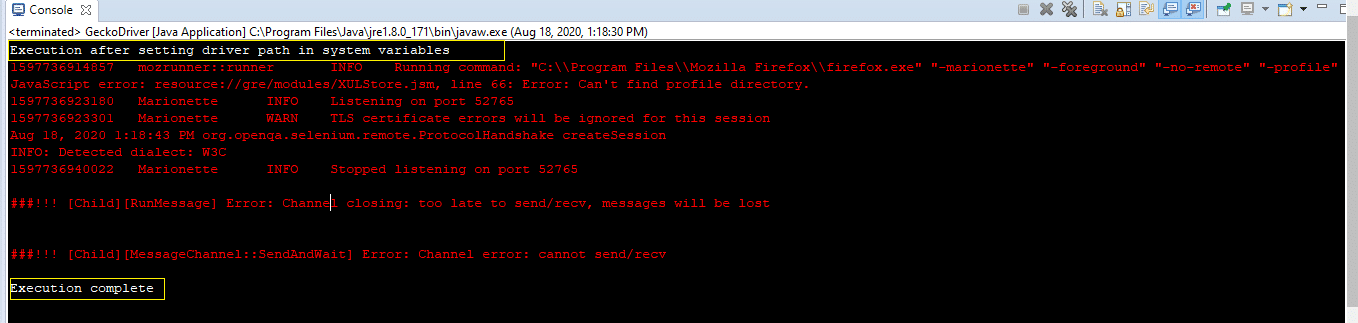
As is clear from the console results, there is no WebDriver error, which implies that the WebDriver set up is correct. You can see the print statements as the entry and exit points of our execution. Correspondingly you will be able to see the execution in your system.
How to initialize Gecko Driver using System Properties in the Selenium test script?
We need to add a single line of code to set up the system properties for the GeckoDriver-
System.setProperty("webdriver.gecko.driver","<Path to geckodriver.exe>)");
Let us modify the code we used above and see that we can launch the Firefox browser successfully. The modified code would look like this:
package gecko;

import org.openqa.selenium.WebDriver;
import org.openqa.selenium.firefox.FirefoxDriver;

public class GeckoDriver {

	public static void main(String[] args) throws InterruptedException {

                System.out.println("Execution started-- Opening Firefox browser.");
		System.setProperty("webdriver.gecko.driver", "E:\\drivers\\geckodriver.exe");
		WebDriver driver = new FirefoxDriver();
		driver.get("https://demoqa.com/");
		Thread.sleep(3000);
		driver.quit();
		System.out.println("Execution ending-- Webdriver session is closed.");

	}
}
You will see that demoqa.com opens in the Firefox browser without any error and exception.
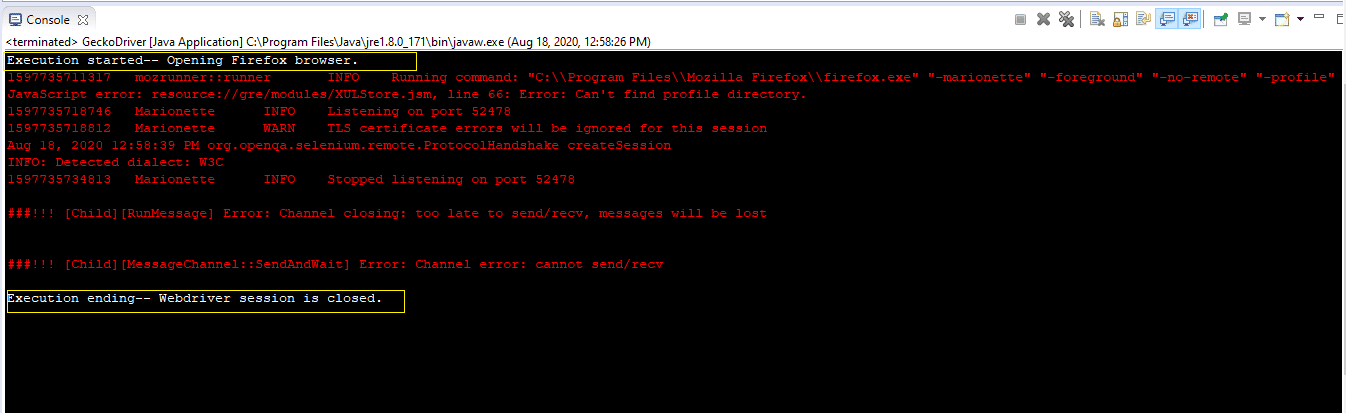
The execution logs indicate that our WebDriver session started with the print statement being displayed right at the beginning. The lines in red are some browser logs corresponding to the browser session. You can see the browser opening up in your system, and after the website opens, the browser session is closed.
How to setup Selenium GeckoDriver by Setting up Desired capabilities for the browser?
Desired Capabilities help Selenium understand the browser details, like its name, version, and OS. We can use the Desired Capabilities and set Marionette to true to launch Firefox. You need to add the below lines to your code:
DesiredCapabilities cap = DesiredCapabilities.firefox();
cap.setCapability("marionette", true);
WebDriver driver = new FirefoxDriver(cap);
The complete code would look like this:
package gecko;

import org.openqa.selenium.WebDriver;
import org.openqa.selenium.firefox.FirefoxDriver;
import org.openqa.selenium.remote.DesiredCapabilities;

public class GeckoDriver {

	public static void main(String[] args) throws InterruptedException {

		System.out.println("Execution with desired capabilities");
                DesiredCapabilities cap = DesiredCapabilities.firefox();
		cap.setCapability("marionette", true);
		WebDriver driver = new FirefoxDriver(cap);
		driver.get("https://demoqa.com");
		Thread.sleep(3000);
		driver.quit();
                System.out.println("Execution completed");

	}

}
On executing the above code, you will see results like below-
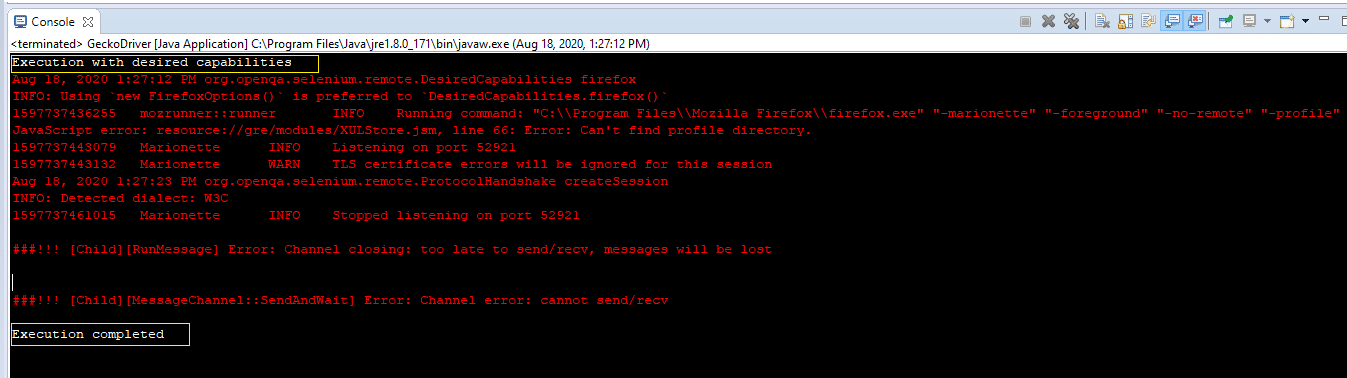
Just like the executions above, using desired capabilities, you will be able to see successful execution with no exceptions. You can see that our test passed, and the complete code runs without any halt.
How to install GeckoDriver on macOS?
The installation and setup of GeckoDriver on macOS is almost the same as that of the Windows platform, the only difference being the executable for macOS will be different, and the way we can include the GeckoDriver executable in the System's PATH variable is bit different. Let's see how we can install and setup the GeckoDriver on macOS:
How To Download GeckoDriver in macOS?
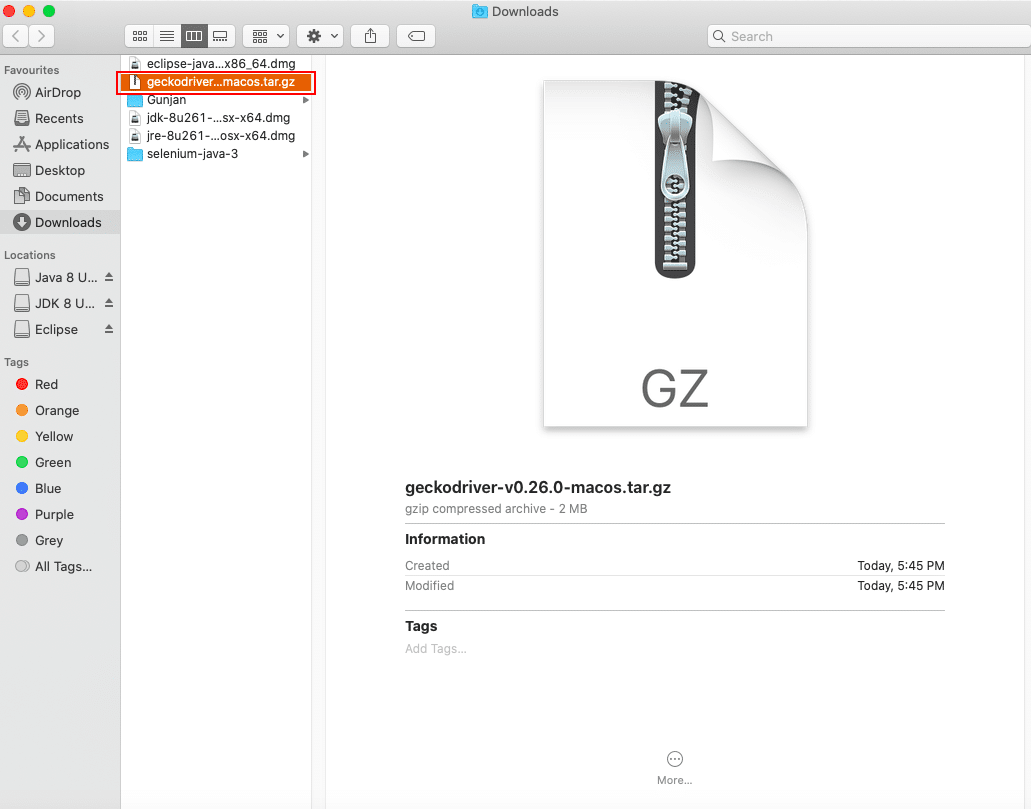
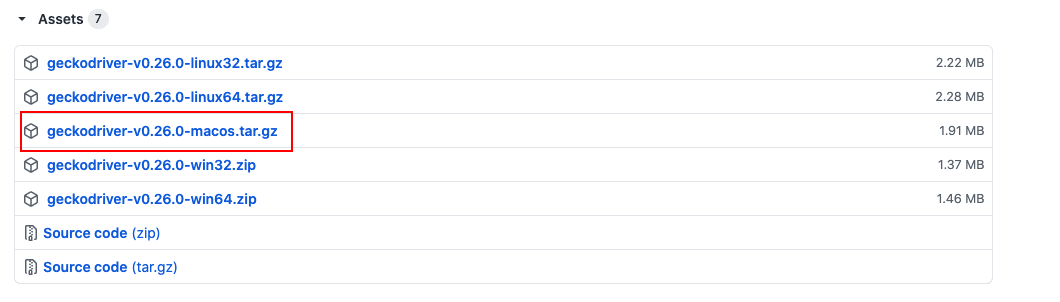
Similar to Windows, You can navigate to GitHub and download the macos.tar.gz file, as shown below:
By default, the tar file will be downloaded under the Downloads folder as shown below:

Note: You can download the file in any folder of your choice, depending on your system's settings.
Next, You will need to extract the driver from the tar file that we downloaded in the previous step. To do so, double-click the macos.tar.gz file, and you will notice that a Unix executable file named "geckodriver" is extracted at the same location as shown below:
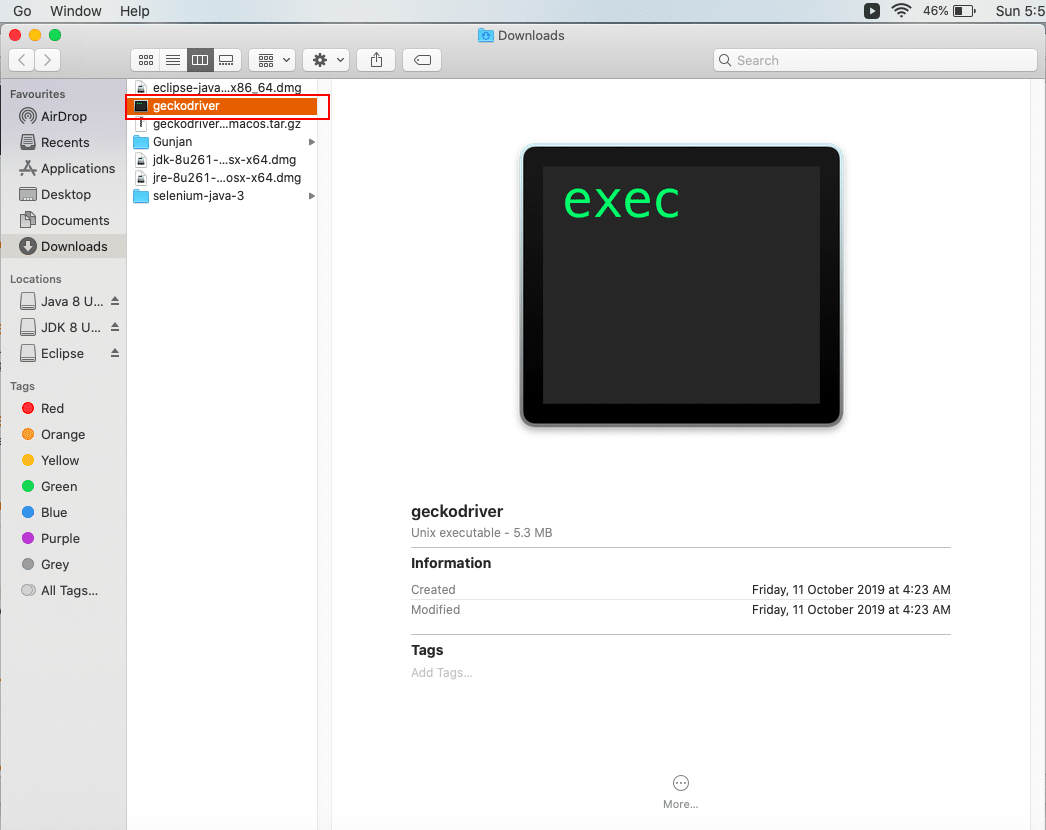
So, now we do have the GeckoDriver executable file on or system, let's see how to set up and use the same in our test scripts.
How To Set Up Selenium GeckoDriver on macOS?
Now that you have downloaded the Selenium GeckoDriver, the next step is to set it up so that you can use it in your test scripts. On macOS also, we can follow the same ways, as on Windows, to set up the GeckoDriver:
- Setup GeckoDriver using the System's PATH variable.
- Setup GeckoDriver using System Properties in the test script.
- Similarly, setup GeckoDriver by initializing the Desired capabilities for the browser.
The last 2 points, being directly embedded in the JAVA Code, are the same on all the platforms, So we can follow the same steps as we mentioned above for the Windows platform. For the 1st point, as it depends on the operating system, how a global variable can set, and how can we exposed to all the applications on the platform. Even though there are many ways to set up the GeckoDriver's executable path in the System's PATH variable, one of the easiest way is to copy the executable under any of the folders, which are already under the "PATH" variable of the macOS. Let's see how to achieve the same:
How to setup Selenium GeckoDriver using the System's PATH variable in macOS?
As we mentioned above, one of the easiest ways to make the executable available globally on the macOS is to copy the executable under any the folders which are already in the PATH variable. Let's follow the steps mentioned below to achieve the same:
- Identify the folders which are included in the PATH variable using the command 'echo $PATH' on the terminal. It will give a sample output, as shown below:

-
As we can see, multiple directories are already part of the PATH variable. Suppose we choose "/usr/local/bin" as out directory to hold the GeckoDriver executable.
-
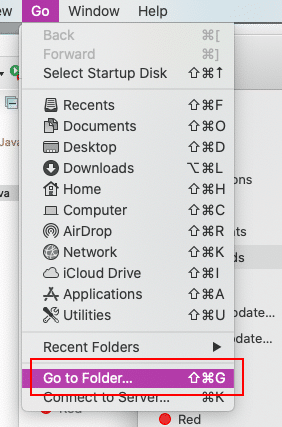
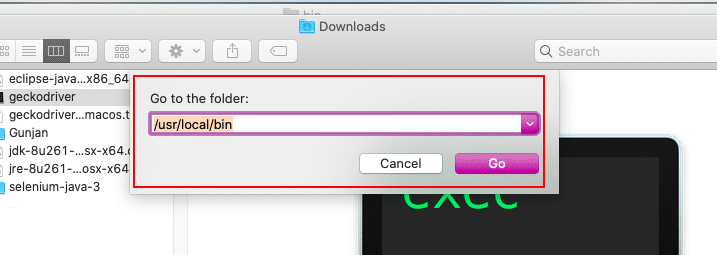
Next, you need to keep the driver at the following location '/usr/local/bin'. Just copy the GeckoDriver executable and navigate to Go > Go to Folder
- Enter the destination directory path and click on Go.
- Paste the Unix executable inside the bin folder.
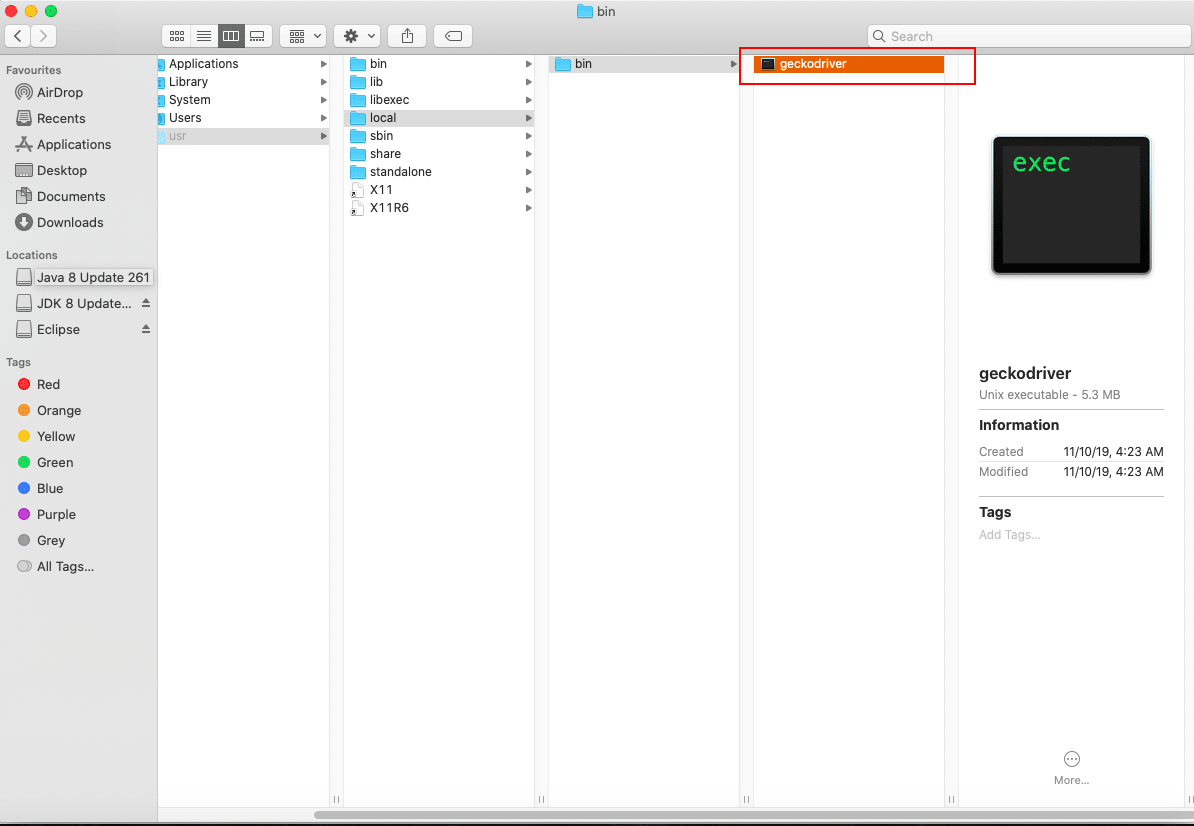
Now your GeckoDriver is ready to be used in your Selenium test scripts. Now we will write a simple program and execute the same in the mac system.
package DemoProject;

import org.openqa.selenium.WebDriver;
import org.openqa.selenium.firefox.FirefoxDriver;

public class GeckoDriver {

	public static void main(String[] args) throws InterruptedException {

		WebDriver driver = new FirefoxDriver();
		System.out.println("GeckoDriver execution on mac!!");
		driver.get("https://demoqa.com");
		Thread.sleep(3000);
		driver.quit();
		System.out.println("Execution completed on mac!!");

	}

}
On executing the same, you can find the results in your console window-
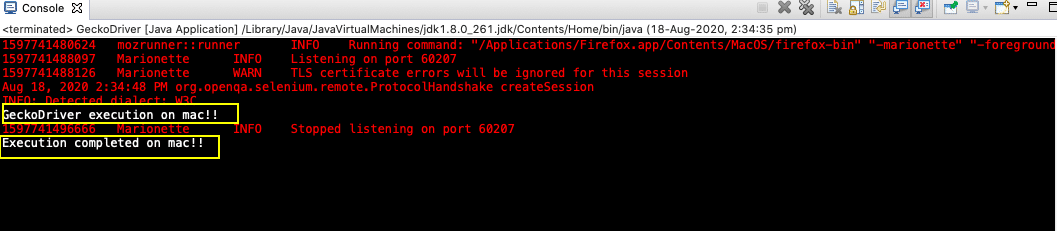
You can see the execution happening successfully without any error. Both the print statements are getting displayed, which indicates that our execution did not face any error. So did you see how easy it was to run GeckoDriver tests in macOS? Unlike the windows system, where you have to remember the path of your driver executable, just placing the driver at a location in mac makes our lives so easy!
How to run tests in Headless mode using GeckoDriver?
You can run your tests in headless mode, i.e., with no UI display and just background execution. The headless mode in GeckoDriver can be used by simply using Firefox Options. All you need to do is use the setHeadless() method, which is a part of the Options class. Below is the Firefox Options code that we would add to our existing tests.
FirefoxOptions options = new FirefoxOptions();
options.setHeadless(true);
WebDriver driver = new FirefoxDriver(options);
And the complete code to run your test in headless mode would look like below:
package gecko;

import org.openqa.selenium.WebDriver;
import org.openqa.selenium.firefox.FirefoxDriver;
import org.openqa.selenium.firefox.FirefoxOptions;

public class GeckoDriver {

	public static void main(String[] args) throws InterruptedException {

		System.out.println("Execution in Headless Mode");
                FirefoxOptions options = new FirefoxOptions();
	        options.setHeadless(true);
		WebDriver driver = new FirefoxDriver(options);
		driver.get("https://demoqa.com");
		Thread.sleep(3000);
		System.out.println("The page title is " +driver.getTitle());
		driver.quit();
		System.out.println("Execution completed");
	}

}
On running this code, you will see that the browser window doesn't come into the display, and in the console, you can see the print statement.
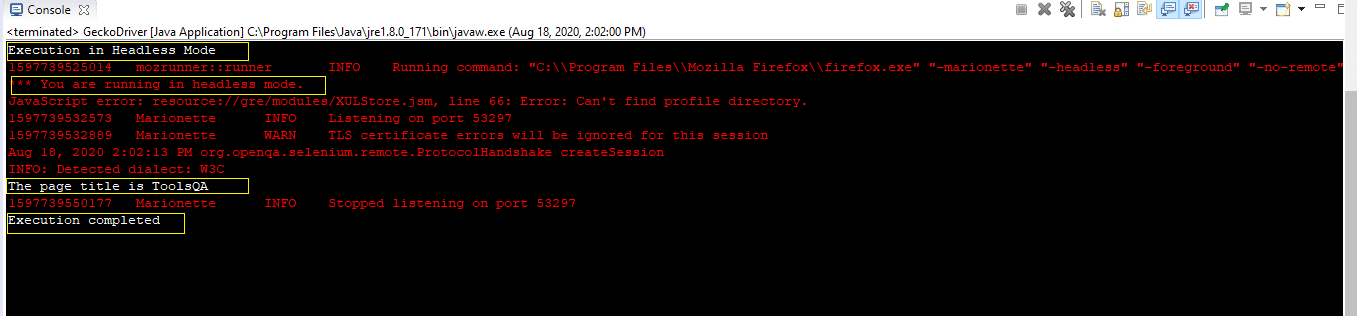
See how easy it was to fasten up your test execution using this headless option! Let us now see the common exceptions that we may come across while working with the GeckoDriver.
What are the Common exceptions raised while using GeckoDriver?
You might come across some issues while working with GeckoDriver. Few of them are listed below with the solutions-
- Not Connected Exception
org.openqa.selenium.firefox.NotConnectedException: Unable to connect to host 127.0.0.1 on port 7055 after 45000 ms.
This exception occurs when you are using the latest Firefox version but an old Selenium version. To resolve, update the selenium jar to the latest version.
- WebDriver Exception
Exception in thread “main” org.openqa.selenium.WebDriverException: Failed to decode response from marionette
This exception occurs when there is a mismatch between the GeckoDriver version or the Selenium version or Firefox Version. To fix, update the latest Gecko Driver version and make sure the Firefox updates to the latest version.
- Connection Refused Exception
org.openqa.selenium.WebDriverException: Connection refused (Connection refused)
Such an exception occurs when WebDriver is unable to establish a connection with Firefox. To resolve, you can clear the browser cache.
- Unreachable Browser Exception
Exception in thread “main” org.openqa.selenium.remote.UnreachableBrowserException: Error communicating with the remote browser. It may have died.
It generally happens when WebDriver is trying to reach some elements, but either the session is closed, or the browser does not launch. Make sure that you quit() or close() method is killing the browser instance in Task Manager.
Key Takeaways:
- With GeckoDriver, you will be able to execute your selenium scripts and be able to launch the Firefox browser using any of the many ways listed above.
- Moreover, you can freely execute your scripts in headless mode and optimize the speed of execution.
- Additionally, you can efficiently build tests knowing the way out when you come across various exceptions!