While working with web elements, we need to perform specific actions like click, type, etc. on the elements. But before we could proceed with these actions, we need to find the exact location of the elements in the HTML DOM of the web page. When we automate any scenario, it means imitating the manual actions on the web element using an automation tool. But before an automation tool could perform any action, it needs to locate the element. It is precisely where the locators or selectors come into the scene. Selenium offers various ways to find web elements using attributes such as id, name, className, etc. But sometimes, while working with a dynamic environment, it is impossible to locate a web element using a simple attribute locator. In such unyielding situations, Selenium comes to rescue with CSS or Cascading style sheets Selectors.
As the design of most web pages happens using CSS, a CSS based locating strategy seems much viable and efficient. Subsequently, we will dive deep into the world of CSS Selectors to understand and implement different scenarios with the following topics.
- What are CSS Selectors in Selenium?
- Why do we need a CSS Selectors in Selenium?
- How to create a CSS Selector?
- What are the different ways to create CSS Selectors?
- How to combine multiple CSS Selectors?
- How to use a CSS Selector for locating dynamic web elements?
What are CSS Selectors in Selenium?
CSS Selectors are one of the locator strategies offered by Selenium to identify the web elements. The CSS Selectors mainly use the character sequence pattern, which identifies the web elements based on their HTML structure. Locating an element using CSS selector may seem a little difficult than using attributes like id, name, link, etc. but it’s one of the most efficient strategies to locate dynamic elements that don’t have consistent HTML attributes. Let's first understand why do we need the CSS Selectors?
Why do we need a CSS Selectors in Selenium?
Locating an element on the web page can be challenging, especially in the current scenarios, where every other web page is dynamically programmed and creates/renders the web elements on a need basis dynamically. It makes finding a unique static attribute for a dynamic element quite tricky. As most of the time, these elements don’t have consistent attribute values. Hence directly using locators like id, name, link, partial link, etc. will not be possible.
But if we see, locating the correct web element is the pre-requisite of creating any UI based automation test script, specifically a Selenium automation script. It is where CSS Selectors comes for rescue, as CSS is powerful enough to identify most of the web element present on the web page. It can also identify elements that don’t have constant attribute values, so it becomes the first choice for all the automation developers. Also, as its more close to the code, it's considered as one of the fastest ways to locate elements on web page. Let's now see how to create a CSS Selector for a web element syntactically.
How to create a CSS Selector?
CSS Selector syntax is quite similar to the XPath syntax. It can be represented syntactically as follows:
node[attribute_name = ‘attribute_value’]
node[attribute_name = ‘attribute_value’]
Where,
- node is the tag name of the HTML element, which needs to locate.
- attribute_name is the name of the attribute which can locate the element.
- attribute_value is the value of the attribute, which can locate the element.
Let's now see what the different ways to create the CSS Selectors in Selenium are.
What are the different ways to create CSS Selectors?
As shown by the following figure, CSS Selectors can be created based on the following strategies:
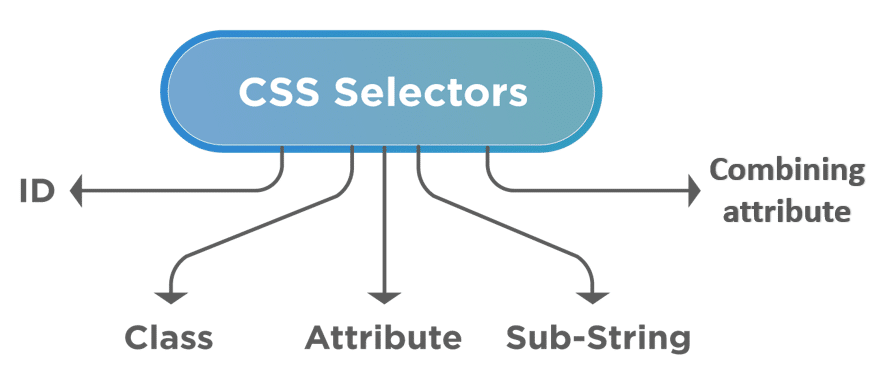
Let's understand how we can create the CSS selectors, using the approaches as mentioned above:
How to create a CSS Selector using ID attribute?
We can use the ID in CSS Selector to identify and locate a web element. Let's try to understand this with an example. On the demo page "https://demoqa.com/automation-practice-form", we will be trying to find the “first name ” textbox. As we can see in the following screenshot, if we inspect the element, we can see that the HTML tag of the element is “input”, and the value of the “id ” attribute is “firstName”.
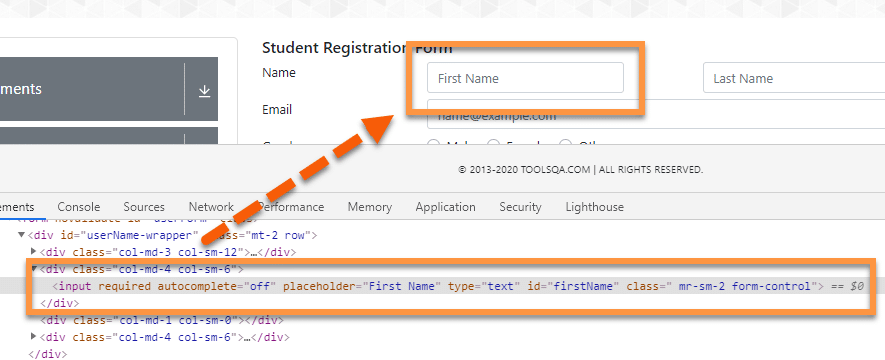
So, if we use the same data to create a CSS Selector based on the syntax that we discussed earlier, we will get our CSS selector expression as follows:
input[id='firstName']
OR, we can also write it using a different syntax again. The ‘# ’ sign symbolizes the ‘ID ’ in CSS Selector. So, we can directly write ‘# ’ followed by the value of the "id " attribute. It will give us a simplified CSS expression. For example, we can also write the above expression as:
input#firstName
It is another way of writing a CSS selector. First, we provide the HTML tag name followed by the ‘#’ sign (in case we are using ID ), followed by the value of the id attribute in the HTML tag.
How to create a CSS Selector using class attribute?
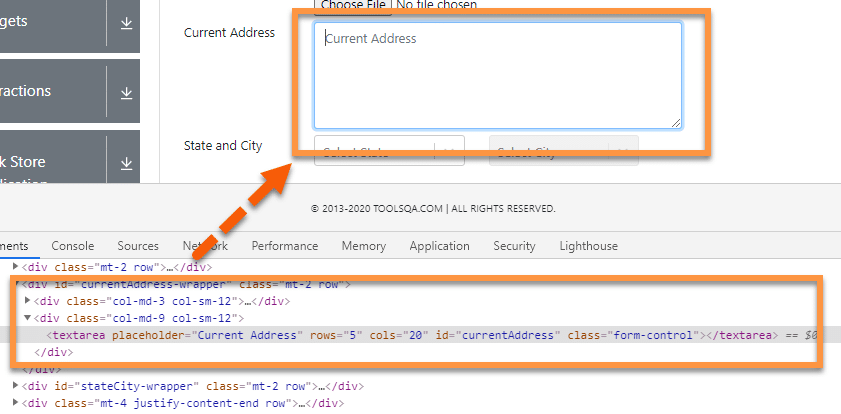
The class attribute of the HTML tags can also identify the elements on a Web Page. Suppose we take an example, where we will look at the “Current Address ” Textarea element on the page https://demoqa.com/automation-practice-form as shown below:

If we look at the HTML tag, we can see that the element has a class attribute, which we can use with a CSS Selector to identify the element. So, the CSS Selector for the above web element will be:
textarea[class='form-control']
Another way of writing the CSS expression for a class attribute is by using the dot (.) symbol to represent the class. It will help in simplifying the CSS Selector, as shown below:
textarea.form-control
The above expression starts with the HTML tag followed by a dot (.) then the class value. Using the class attribute can sometimes yield multiple results as several elements may have the same class name. So, make sure to use it only if the class attribute has a unique value.
How to create a CSS Selector using other attributes?
Apart from the id and class attributes, all other attributes present within the HTML tag of the element can also be used to locate web elements using the CSS Selectors. Let’s take an example in the below screenshot, as we can see that the HTML tag ("textarea") has several different attributes like placeholder, rows, col, id, and class. For this example, we will use the “placeholder ” attribute. (We can use any unique attribute).

So, by following the generic syntax for the CSS Selector, we can quickly come up with the expression for the text area, i.e., “Current Address ” element:
textarea[placeholder='Current Address']
In the above expression, we started with the HTML tag, i.e., textarea, then we used a square bracket[], inside which we provided the attribute (here placeholder ) and its value.
So this way, we can use any of the unique attributes of the HTML elements to locate those elements using CSS Selectors.
How to combine multiple CSS selectors?
As we covered above, CSS Selectors can be used to locate a web element uniquely. But sometimes, using a single attribute may not bring in the desired result; in that case, we combine multiple attributes to precisely locate any element present on the web page.
We can combine the HTML tag with ID, Class, and any other attribute to get the accurate location of the web element. For example, Suppose we have to locate the “Current Address ” textarea element, as shown below:
 Let's see how we can combine multiple attributes of the web element to create a CSS Selector for the element:
How to Combine the ID and other Attributes of the web element to create a CSS Selector?
In the given element, the HTML structure contains a textarea tag, id, and placeholder attribute. We will use these together to create a CSS Selector statement that can easily recognize that element. So, the CSS Selector element for the above elements will be:
textarea#currentAddress[placeholder='Current Address']
- We started with the HTML tag, i.e., textarea
- Then we used the symbol for ID, i.e. “#”
- Then we provided the value of the id attribute.
- In the end, inside the square bracket, we provided the placeholder attribute and its value.
How to Combine the Class and other Attributes of the web element to create a CSS Selector?
Using the same example as above, we have an HTML structure containing textarea tag, class, and placeholder attribute. Subsequently, we can use them together to create a CSS Selector for locating the web element, as shown below:
textarea.form-control[placeholder='Current Address']
- We started with the HTML tag, i.e., textarea
- Then we used the symbol for class, i.e., ‘.’ Or dot
- Then we provided the value of the class attribute.
- In the end, inside the square bracket, we provided the placeholder attribute and its value.
So this way, we can combine various attributes of an HTML element to locate the web element in Selenium uniquely.
How to use a CSS selector for locating dynamic web elements?
With the ever-growing new technologies of web development, multiple times, the web pages are created dynamically. So there will be various scenarios when certain web elements appear on the web page based on specific conditions/action only, and there is no direct locator available for those elements. For locating such dynamic web elements, Selenium provides various strategies, such as:
- Locating the element using Parent/Child hierarchy
- Locating the element using text Strings
Let's see how we can use these strategies to locate dynamic web elements on a web page:
How to locate a web element using Parent/Child hierarchy?
Selenium provides the capability to locate an element in the HTML DOM using its relativity with other HTML elements. It provides two strategies to locate the web elements related to other HTML elements:
- One element is the direct parent/child of another element.
- One element exists in the hierarchy of another element.
Let's understand the implementation of both of these strategies with the following examples:
How to locate a web element when one element is the direct parent/child of another element?
CSS Selectors allow you to select an element by using the locator of the parent element and then moving to the child element. The CSS Selector for locating the child element can be syntactically represented as follows:
Parent_locator > child_locator
Let’s look at an example to comprehend this more clearly.
In the above example, we have a “textarea ” HTML tag enclosed in the bracket, which is the child tag of “div”. Assume a scenario where we are not able to identify the “textarea” by using its attributes, but we can identify its parent HTML tag, then we can use it to access the child tag. Let's create the CSS selector for locating the textarea element:
div>textarea[placeholder='Current Address']
Here we have first used the locator for a parent then “> ” followed by the child locator. Similarly, this can be extended to the sub child also by adding another “> ” followed by another locator.
How to locate a web element when the element exists in the hierarchy?
Similar to the child and sub-child, we can also use a CSS Selector to select the nth-child of an HTML tag. It is quite useful in recognizing list elements or in scenarios where a parent has multiple child elements with non-consistent attributes.
The syntax for locating the nth-child will be:
Parent CSS locator > Child HTML tag : nth-of-type(index)
Selecting nth-child using CSS Selector, for this, we will be using the following site link: https://www.demoqa.com/select-menu.
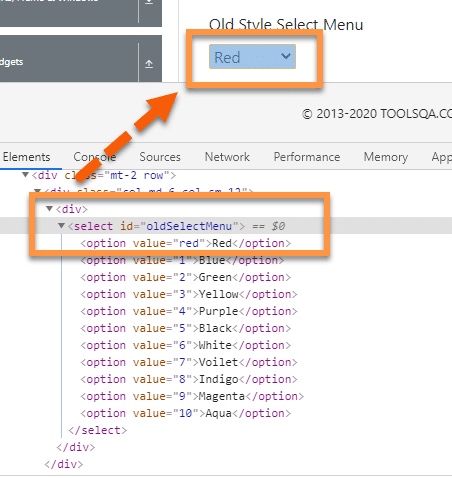
Let’s take the above example; we will try to find the CSS Selector for the child element of “ul ” HTML tag, i.e. “li” Say, we want to find the 2nd child element of the “ul” then the CSS Selector expression for the same will be:
select#oldSelectMenu>option:nth-of-type(2)
Here we started with the parent CSS Selector tag, followed by “>” which is followed by the HTML tag of the child. The child HTML tag is then followed by id symbol -“ : ”, which is followed by “nth-of-type(index)” where bracket accepts the index of the required element.
So this way, we can locate any of the HTML elements in the hierarchy.
How to locate a web element using text strings?
Similar to XPath, CSS Selector also allows users to locate elements by using partial strings. It uses different symbols to represent the start, end, and the contents inside a text. Let’s have a look at some examples to understand more about CSS Sub-Strings in detail.
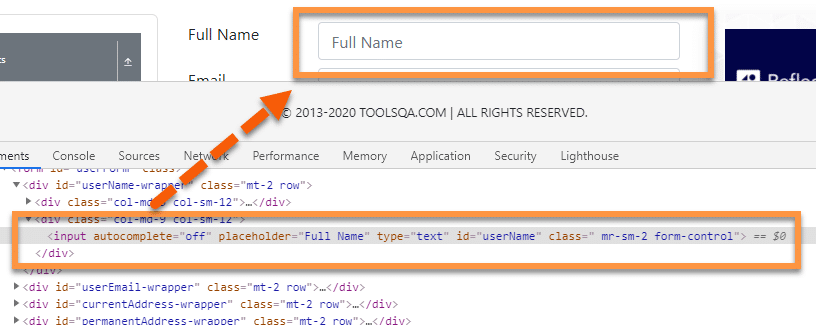
For example, we will use the following element, i.e., “Full Name”, as marked in the below image for locating the text box on the page.
How to locate a web element using the starting text?
We can locate an element by using the starting text of the element. It is quite useful if you know the starting text of the element attribute. We can use the starting character sequence of the attribute value to locate the element using CSS Selectors.
The Symbol for representing the starting text of a string is: ‘^’
Using this symbol in the CSS Selector, the expression for locating the web element will be:
input[id^='userN']
Here, we have used the id attribute. The value of the id attribute in the HTML is “userName”. In this expression, we have used the first five characters of the expression. We can use any number of characters from the beginning.
How to locate a web element using the Ending text?
Similar to the starting text, we can also use ending text to recognize the element. A sequence of the ending character of the attribute value can locate any web element.
The Symbol for representing the ending text of a string is: ‘$’
Using this symbol in the CSS Selector, the expression for locating the web element will be:
input[id$='ame']
Here, again we have used the id attribute whose value is “username ”. Here we have used the last three characters of the attribute value. The attribute and value can change as per the scenario.
How to locate a web element using the contains text?
Other than starting and ending, the CSS Selector in Selenium is also available with contains text(). It can locate the element by using any sequential characters from the attribute value.
The Symbol for representing the contains the text: ‘’*
Using the same symbol in CSS Selector, the expression for the above elements will be:
input[id*='erNa']
Here, we have used the middle characters of the id attribute value, i.e., “username” from the HTML to locate the element.
Note: Always make sure that your CSS expression points to a unique element. Sometimes choosing a generic CSS Selector may point to several different elements. If this happens, Selenium will always recognize the first element pointed by the CSS locator. Hence the automation script will fail if it's not the required element.
Key Takeaways
- CSS selectors are one of the most powerful tools offered by Selenium for recognizing elements in a web page. It uses the Cascading style sheets of the web page for locating and identifying the element.
- CSS selectors are faster, reliable, and require less maintenance.
- It can recognize the element present in a dynamic web environment that doesn’t have uniquely recognizable attribute values.
- It can also combine several different CSS expression, attributes and text to accurately points to the required element.