In this tutorial we will just not look at the code for automating downloads, uploads and handling user authentication through Selenium using AutoIt tool rather we will going to learn how to use AutoIt in detail, so that we can create our own scripts for any windows operation.
Need of third party tools in Selenium
Web applications do not always confine themselves to working entirely on the web. Sometimes they need to interact with the desktop to do things like downloads & uploads. Automating these sorts of workflow is tricky in Selenium. Selenium is confined to automating browsers, so desktop windows are out of scope. If you are looking to automate workflows that go from browser to desktop and back in Selenium, then a little AutoIt is in order.
What is AutoIt
AutoIt v3 is a freeware BASIC-like scripting language designed for automating the Windows GUI and general scripting. It uses a combination of simulated keystrokes, mouse movement and window/control manipulation in order to automate tasks in a way not possible or reliable with other languages (e.g. VBScript and SendKeys). AutoIt is also very small, self-contained and will run on all versions of Windows out-of-the-box with no annoying “runtimes” required!
In layman's term AutoIt is just another automation tool like Selenium but unlike Selenium it is used for Desktop Automation rather Web Automation. It is a powerful tool and it just not automate desktop windows, button & form, it automates mouse movements & keystrokes too. Just like Selenium IDE, it also gives you the recording capability which generates the scripts for you to use the same script in you test.
AutoIt Features
-
Easy to learn: It is just another scripting language and very easy to use. Under help menu of AutoIt it gives you all the functions and methods you can use with detailed explanation and examples.
-
Simulates keystrokes: Where ever it is required to use keystrokes in your test, you can use this for example pressing enter on any dialog box and typing username and password on the popup which you cannot simulate with Selenium.
-
Simulate mouse movements: Like keystrokes there can be situations when you are required to simulate the mouse movements and it is the easiest way out for those situations.
4) Scripts can be compiled into standalone executable: It means that you do not require any IDE to run your scripts, you can easily convert your automation scripts into .exe files which can be run on their own.
-
Windows Management: You can expect to move, hide, show, resize, activate, close and pretty much do what you want with windows. Windows can be referenced by title, text on the window, size, position, class and even internal Win32 API handles.
-
Windows Controls: Directly get information on and interact with edit boxes, check boxes, list boxes, combos, buttons, status bars without the risk of keystrokes getting lost. Even work with controls in windows that aren’t active!
-
Detailed help file and large community-based support forums: You think of any action on windows, you will get it on help file. You face any issue or get stuck anywhere, the large group of users are there to help you.
In short, any windows, mouse & keystrokes simulation which we cannot handle with Selenium that can be handled with AutoIt. All we need to do is to use the script in Selenium which is generated with the help of AutoIt tool.
Steps to Download AutoIt v3
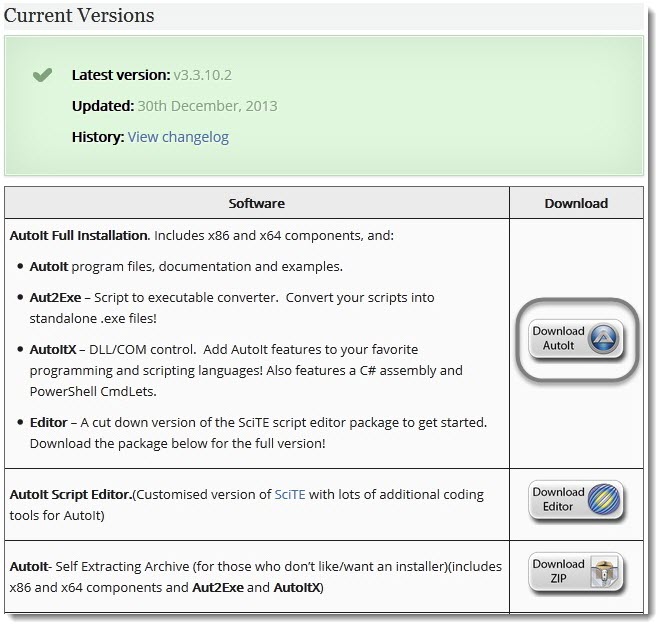
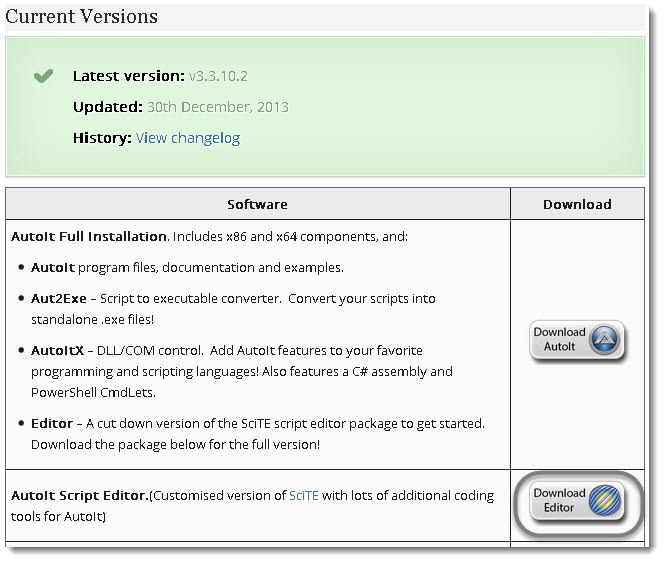
- Go to AutoIt website and navigate to download page. It will display the latest version. The top most download is for AutoIt, click on it.
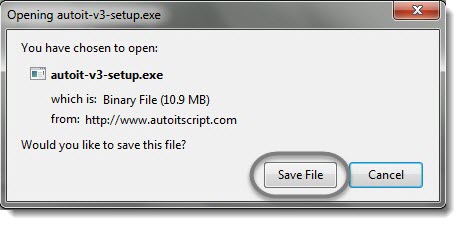
- It will open up a pop up box, click on 'Save File' button.
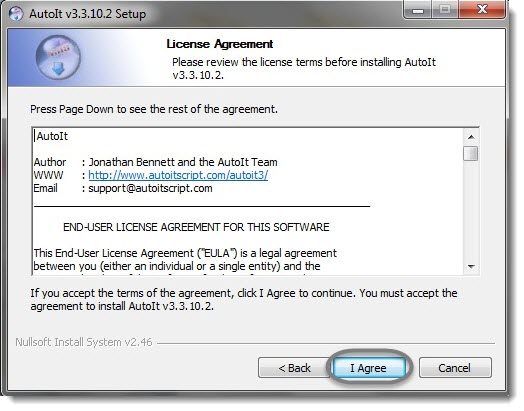
- Once the download is complete, double click on the .exe file and it will ask for your agreement on their terms and condition. Click on 'I Agree' button.
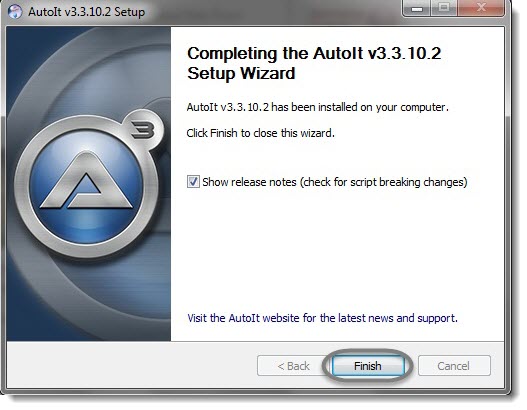
- Complete the process and click on the 'Finish' button at the end of the installation.
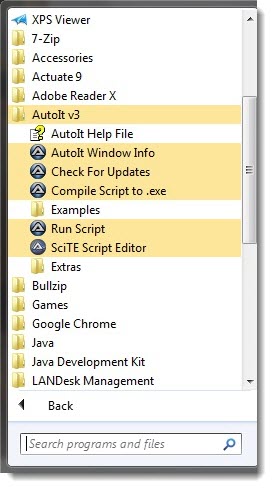
- Go to your program menu and look at the AutoIt folder. If you have 32 bit system, then your folder will look like the image below.
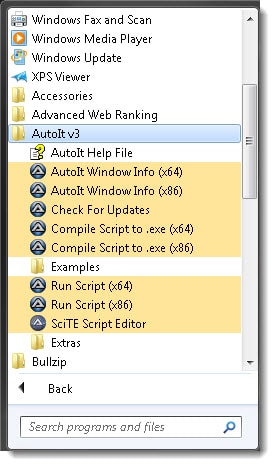
If you have 64 bit system and during installation you have choose default x86 configuration, then your folder will look like the image below.
Recording of AutoIt script
Yes I know that you are surprised to see that AutoIt also have recording feature which helps in generating scripts automatically. But for that we need to use its extension called AutoIt Script Editor. Although script editor is also get installed with AutoIt but it comes with very limited feature.
Steps to Download AutoIt Script Editor
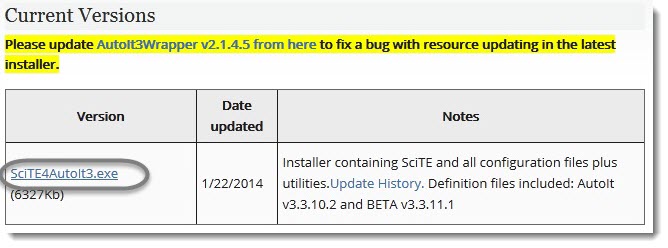
1) Go to AutoIt website and navigate to download page. It will display the latest version. The second download is for AutoIt Script Editor, click on it.
- A new page will open, click on the top most link of 'SciTE4AutoIt3.exe' and follow the process until the installation is finished.
Upload file in Selenium using AutoIt
Uploading of file is a four steps process:
Step 1: Identify the Windows control
Step 2: Build a AutoIt script using identified windows control
Step 3: Compile the .au3 script and convert it in to .exe file
Step 4: Call the .exe file in to the Selenium test case
Step 1: Identify the Windows control
-
Navigate to Practice Form page of ToolsQA.
-
Click on 'Browse' button of Profile Picture column. It will open a Windows box for 'File Upload'.
-
Now go to your Start > All Program > AutoIt v3 and open 'SciTE Script Editor'. It will open an editor window where we write out automation script of AutoIt.
Before writing scripts we should know that what we need to write, as we are new with this tool and we even do not know what language it follows and how the script look like. To get the help for it, open 'Help' from SciTE Script Editor.
As we are interested in firing commands, just type 'Commands' on the search text field of the Help. It will give all the commands you can use in your test.
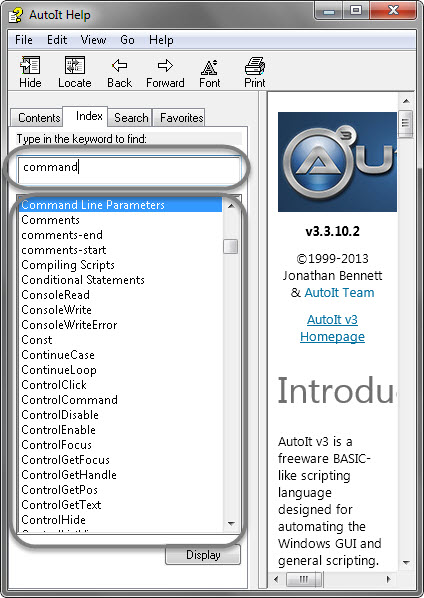
Open few commands and check out the description, it explains the syntax, parameter & detailed description of each method with a descriptive example.
- Now the first task we need to perform is to click on the 'Edit' field of the upload file windows box. To get the command for the focus on the edit field, open 'ControlFocus' from the help.
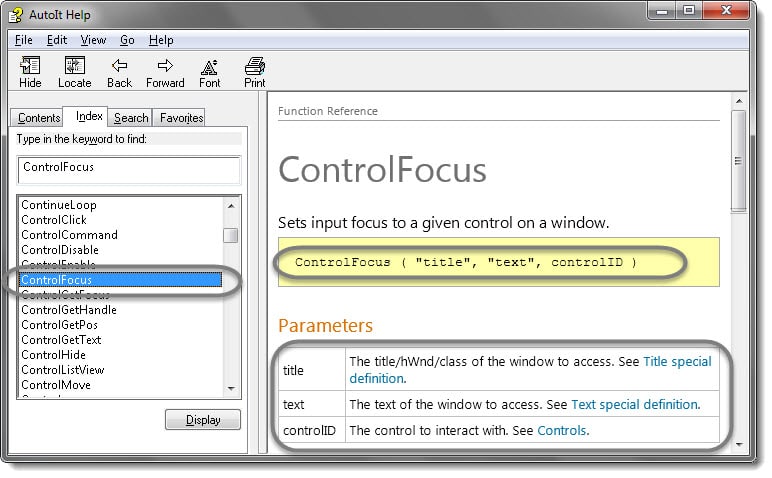
It says that we need ''title", "text" and "ControlID" to use the ControlFocus method. To obtain these we need help to identify windows object. To identify objects, AutoIt has given us Windows Info tool, it is same like Object Spy in QTP and Element Inspector in any Browser. To open it go to Start > All Program > AutoIt v3 > AutoIt Window Info.
- Now drag the 'Finder Tool' box to the object in which you are interested.
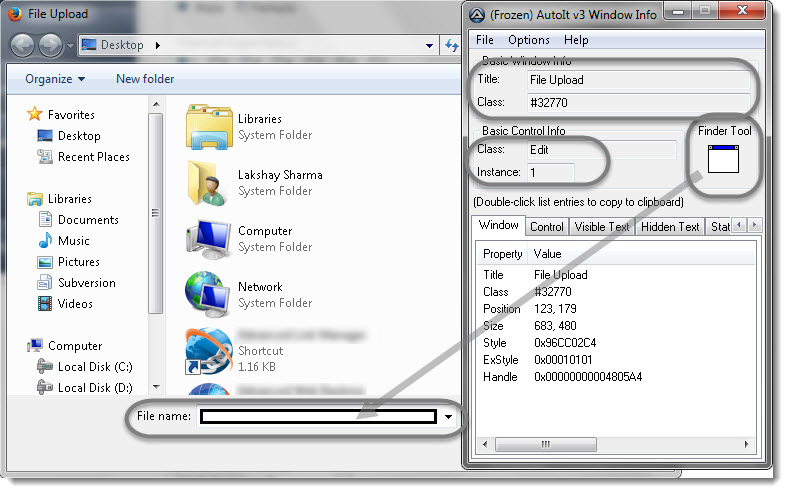
You can see that Windows Info tool has populated all the information which is required to use the method.
Step 2: Build an AutoIt script using identified windows control
Take the information from the "Window Info" tool and fill in the ControlFocus method <ControlFocus ( "***title***", "text", controlID )>. For "title" we can use 'Class', 'hWnd' or 'title', "text" is optional and 'controlId' is "Edit1" (Class name + Class Instance), so our final statement will be like these:
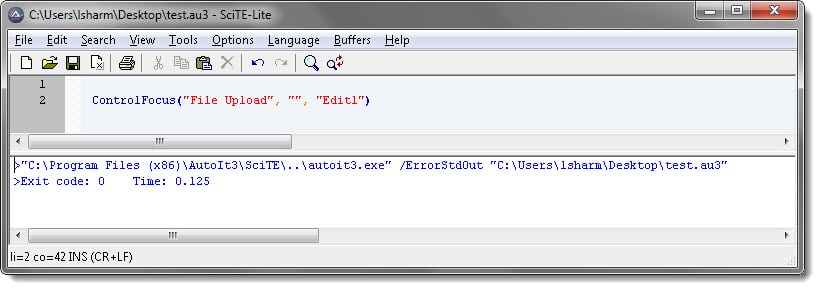
ControlFocus ( "File Upload", "", "Edit1")

Or

ControlFocus("[CLASS:#32770]", "", "Edit1")

Or

Local $hWnd = WinWait("[CLASS:#32770]", "", 10)

ControlFocus(hWnd, "", "Edit1")
To test the above commands you need to Save the test first in '.au3' format. After saving the file try testing all of the above commands. Just press F5 or go to Tools > Go on the SciTE Script Editor. It will execute the statement write at that moment and will display you the result in the same SciTE Script Editor window.
Make sure that upload file window is opened on the back ground and the control is not over the edit field.
Note: If you scroll down the help window for any command, you will get a detailed example which is quite easy to use and understand. That's why in the beginning of this tutorial I said that don't just use the AutoIt script, learn how to build it.
Let's complete the test now and include the steps for choosing a file & pressing Open button.
ControlSetText: This command is used for setting the text on the edit field. ControlClick: This command is used for click action.
Final script will be like this:
; Wait 10 seconds for the Upload window to appear

  Local$hWnd=WinWait("[CLASS:#32770]","",10)

; Set input focus to the edit control of Upload window using the handle returned by WinWait

  ControlFocus($hWnd,"","Edit1")

; Wait for 2 seconds.

  Sleep(2000)

; Set the File name text on the Edit field

ControlSetText($hWnd, "", "Edit1", "SomeFile.txt")

  Sleep(2000)

; Click on the Open button

  ControlClick($hWnd, "","Button1");
Or
; Wait 10 seconds for the Upload window to appear

  WinWait("[CLASS:#32770]","",10)

; Set input focus to the edit control of Upload window using the handle returned by WinWait

  ControlFocus("File Upload","","Edit1")

  Sleep(2000)

; Set the File name text on the Edit field

  ControlSetText("File Upload", "", "Edit1", "SomeFile.txt")

  Sleep(2000)

; Click on the Open button

  ControlClick("File Upload", "","Button1");
Step 3: Compile the .au3 script and convert it in to .exe file
Now save the above script, if in case you have not saved the name earlier, please save it in .au3 format. The next step is to convert it in to .exe format. For that you need to right click on the .au3 file and select "Compile Script".
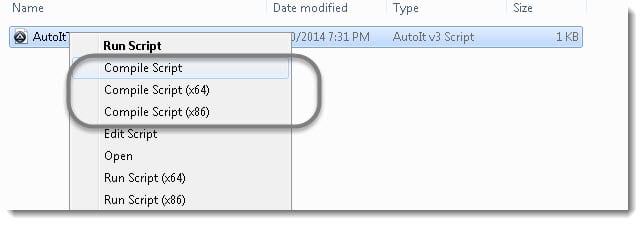
Note: Make sure that you select 'Compile Script' as per your machine configuration. Select normal version if you are on 32 bits, and select x64 or x86 if you are on 64 bits.
Step 4: Call the .exe file in to the Selenium test case
Once you done with the compiling, it will create the '.exe' file with the same name under the same folder and that '.exe' file will be called in the Selenium Test Script by using the following script:
Runtime.getRuntime().exec("D:\AutoIt\AutoItTest.exe");
A complete test will look like this:
package practiceTestCases;

import java.io.IOException;

import java.util.concurrent.TimeUnit;

import org.openqa.selenium.By;

import org.openqa.selenium.WebDriver;

import org.openqa.selenium.firefox.FirefoxDriver;

public class AutoIt {

	private static WebDriver driver = null;

	public static void main(String[] args) throws IOException, InterruptedException {

	    driver = new FirefoxDriver();

	    driver.manage().timeouts().implicitlyWait(10, TimeUnit.SECONDS);

	    driver.get("https://toolsqa.com/automation-practice-form");

	    driver.findElement(By.id("photo")).click();

	    Runtime.getRuntime().exec("D:\AutoIt\AutoItTest.exe");

	    Thread.sleep(5000);

	    driver.close();

	}

}
Upload file in Selenium with AutoIt Recorded Script
Before using this feature, please make sure that you have installed AutoIt Script Editor, otherwise the recorder option will not display on editor window.
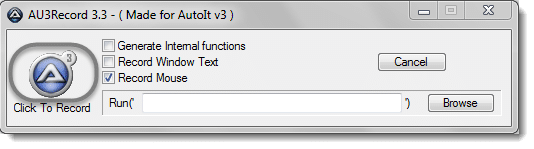
- Open the Script Editor window, save the blank file with '.au3' extension and then go to Tools > AU3Recorder or Alt + F6 on AutoIt Script Editor. A window will open for recording.

- Click on Logo to start recording. You need to make sure that mouse interaction has to be avoided wherever it is possible and encourage keyboard use. After starting the recording, do your things on the already opened window of file upload and stop recording by clicking on the same logo. Your script will somewhat look like this:
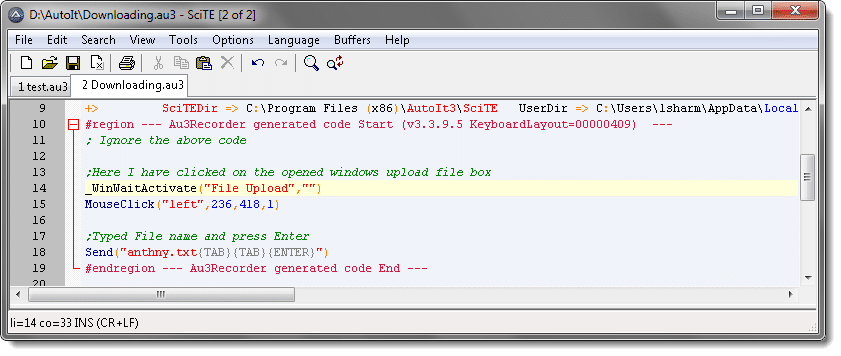
Note: If in case the upload file window was not already opened and you have opened it after starting recording, it will capture those steps too, in that case, you need to make sure that you remove the code generated for those steps only before compiling it.
Note: Mouse interaction may vary in different screen resolution windows, avoid using it and encourage keyboard use.
- Now save the generated script, compile it and use it in your Selenium test script accordingly.
Attention: If you are on 64-bit system and WinWaitActivate gives an error, change it to WinWaitActive then.
Handle Windows-based Authentication Pop Up in Selenium using AutoIt
The main use of AutoIt script in Selenium is to handle Windows-based pop-ups like Username & Password Authentication. Most of the time AutoIt does the trick but sometimes not. I have seen few discussions where users are saying that AutoIt is not working, as Selenium script gets stuck at the pop-up and does not move forward till the time any action is performed on the Authentication window. At the end of this tutorial you will see the workaround for that situation as well.
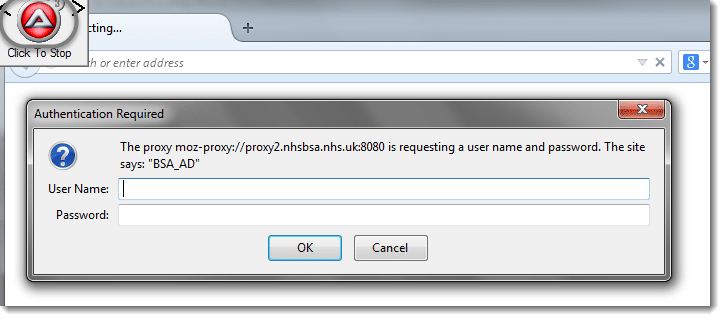
- Open the Url on which the authentication is required and open the AutoIt Window Info tool to get the name of the class and the text of the authentication window.
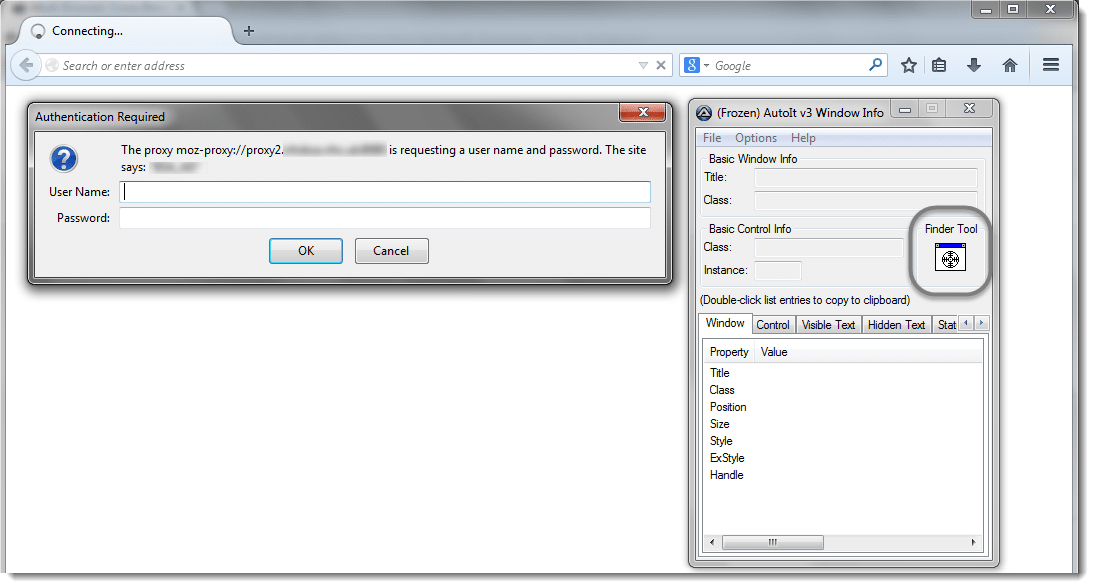
2) Drag the ‘Finder Tool‘ box to the object in which you are interested and it display you the information.
Note: You must have noticed that the Info tool has not picked up any information for the Control. Most probably, in this case, the AutoIt script will not work but we still have a workaround for this..
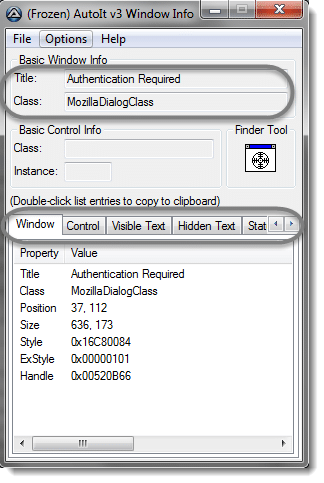
Class information and Instance information is left as blank for 'Basic Control Info'. In this case we will not be able to send the username and password using 'ControlSetText', as we do not have the details for it. But as it has identified the main authentication window, we can simply use the keyboard strokes to send the username and password.
-
Let's record the steps to send the username & password to the authentication window, for that please activate the Recorder by Tools >AU3Recorder or Alt + F6 on AutoIt Script Editor.
-
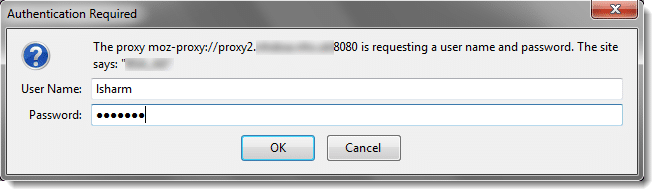
Top left signal says that the recording is on. Now type the username and password and do not use mouse to click on the any field, simply use keyboard's tab button to do the thing.
- Once you done with your recording, your code will look like this.
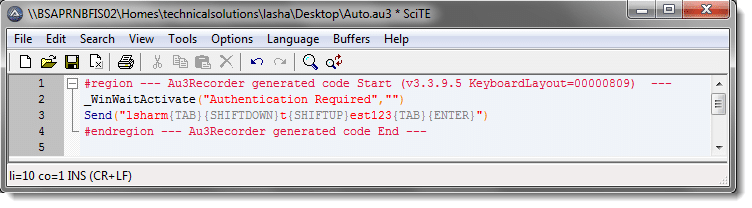
Note: Password I entered is 'Test123', for capital 'T' I had to press Shift button.
- Now save the above script, if in case you have not saved the name earlier, please save it in .au3 format. The next step is to convert it in to .exe format. For that you need to do right click on the .au3 file and select "Compile Script".

Note: Make sure that you select 'Compile Script' as per your machine configuration. Select normal version if you are on 32 bits, and select x64 or x86 if you are on 64 bits.
- Once you done with the compiling, it will create the '.exe' file with the same name under the same folder and that '.exe' file will be called in the Selenium Test Script by using the following script:
Runtime.getRuntime().exec("D:\AutoIt\AutoItTest.exe");
A complete test will look like this:
package practiceTestCases;

import java.io.IOException;

import java.util.concurrent.TimeUnit;

import org.openqa.selenium.By;

import org.openqa.selenium.WebDriver;

import org.openqa.selenium.firefox.FirefoxDriver;

public class AutoIt {

	private static WebDriver driver = null;

	public static void main(String[] args) throws IOException, InterruptedException {

	    driver = new FirefoxDriver();

	    driver.manage().timeouts().implicitlyWait(10, TimeUnit.SECONDS);

	    driver.get("https://www.example.com");

	    Runtime.getRuntime().exec("D:\AutoIt\AutoItTest.exe");

	    Thread.sleep(5000);

	    driver.close();

	}

}
Main Trick
If in case your script did not work, all you need to do is to call the AutoIt script first before opening the Url. AutoIt script takes few seconds to start, in the meantime your Selenium script will open the url and it will display the authentication window.
package practiceTestCases;

import java.io.IOException;

import java.util.concurrent.TimeUnit;

import org.openqa.selenium.By;

import org.openqa.selenium.WebDriver;

import org.openqa.selenium.firefox.FirefoxDriver;

public class AutoIt {

	private static WebDriver driver = null;

	public static void main(String[] args) throws IOException, InterruptedException {

	    driver = new FirefoxDriver();

	    driver.manage().timeouts().implicitlyWait(10, TimeUnit.SECONDS);

		Runtime.getRuntime().exec("D:\AutoIt\AutoItTest.exe");

		driver.get("https://www.example.com");

		Thread.sleep(5000);

		driver.close();

		}

	}
It worked for me, hopefully will work for you as well.
Authentication can be handled with the Browser settings as well, please visit Http Proxy Authentication with Selenium Webdriver