As we continue to leverage the benefits of automating test cases using Selenium, we see that it often becomes difficult to maintain them as our project grows. There would be instances when we use a specific web element at different points in your test script. For example, you might have to search for different test data for a test case, and we have to refer to the id or XPath of the search text field again and again. In such scenarios, you might find that your code is becoming duplicate, i.e., you are using the same piece of code to locate a web element again and again, often termed as redundancy.
Additionally, if there is a change in such a locator, you will have to go through the entire code to make the necessary changes. Consequently, the Page Object Model comes to the rescue to simplify the project and make it easy to maintain and use. Subsequently, in this article, we will understand more about the Page Object Model design pattern. In addition to that, we will also know how to use it in Selenium to optimize test scripts. We will go through the below topics:
- What is the Page Object Model (POM)?
- Why do we need a Page Object Model?
- What are the advantages of the Page Object Model?
- How to implement the Page Object Model in Selenium?
- How to define Page classes?
- Also, how to define Test classes?
- How does POM rescue in case of frequent locator changes?
What is the Page Object Model(POM)?
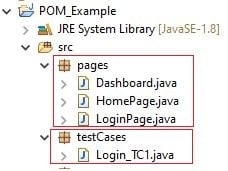
Page Object Model or POM is a design pattern or a framework that we use in Selenium using which one can create an object repository of the different web elements across the application. To simplify, in the Page Object Model framework, we create a class file for each web page. This class file consists of different web elements present on the web page. Moreover, the test scripts then use these elements to perform different actions. Since each page's web elements are in a separate class file, the code becomes easy to maintain and reduces code duplicity. The below diagram shows a simple project structure implementing POM-
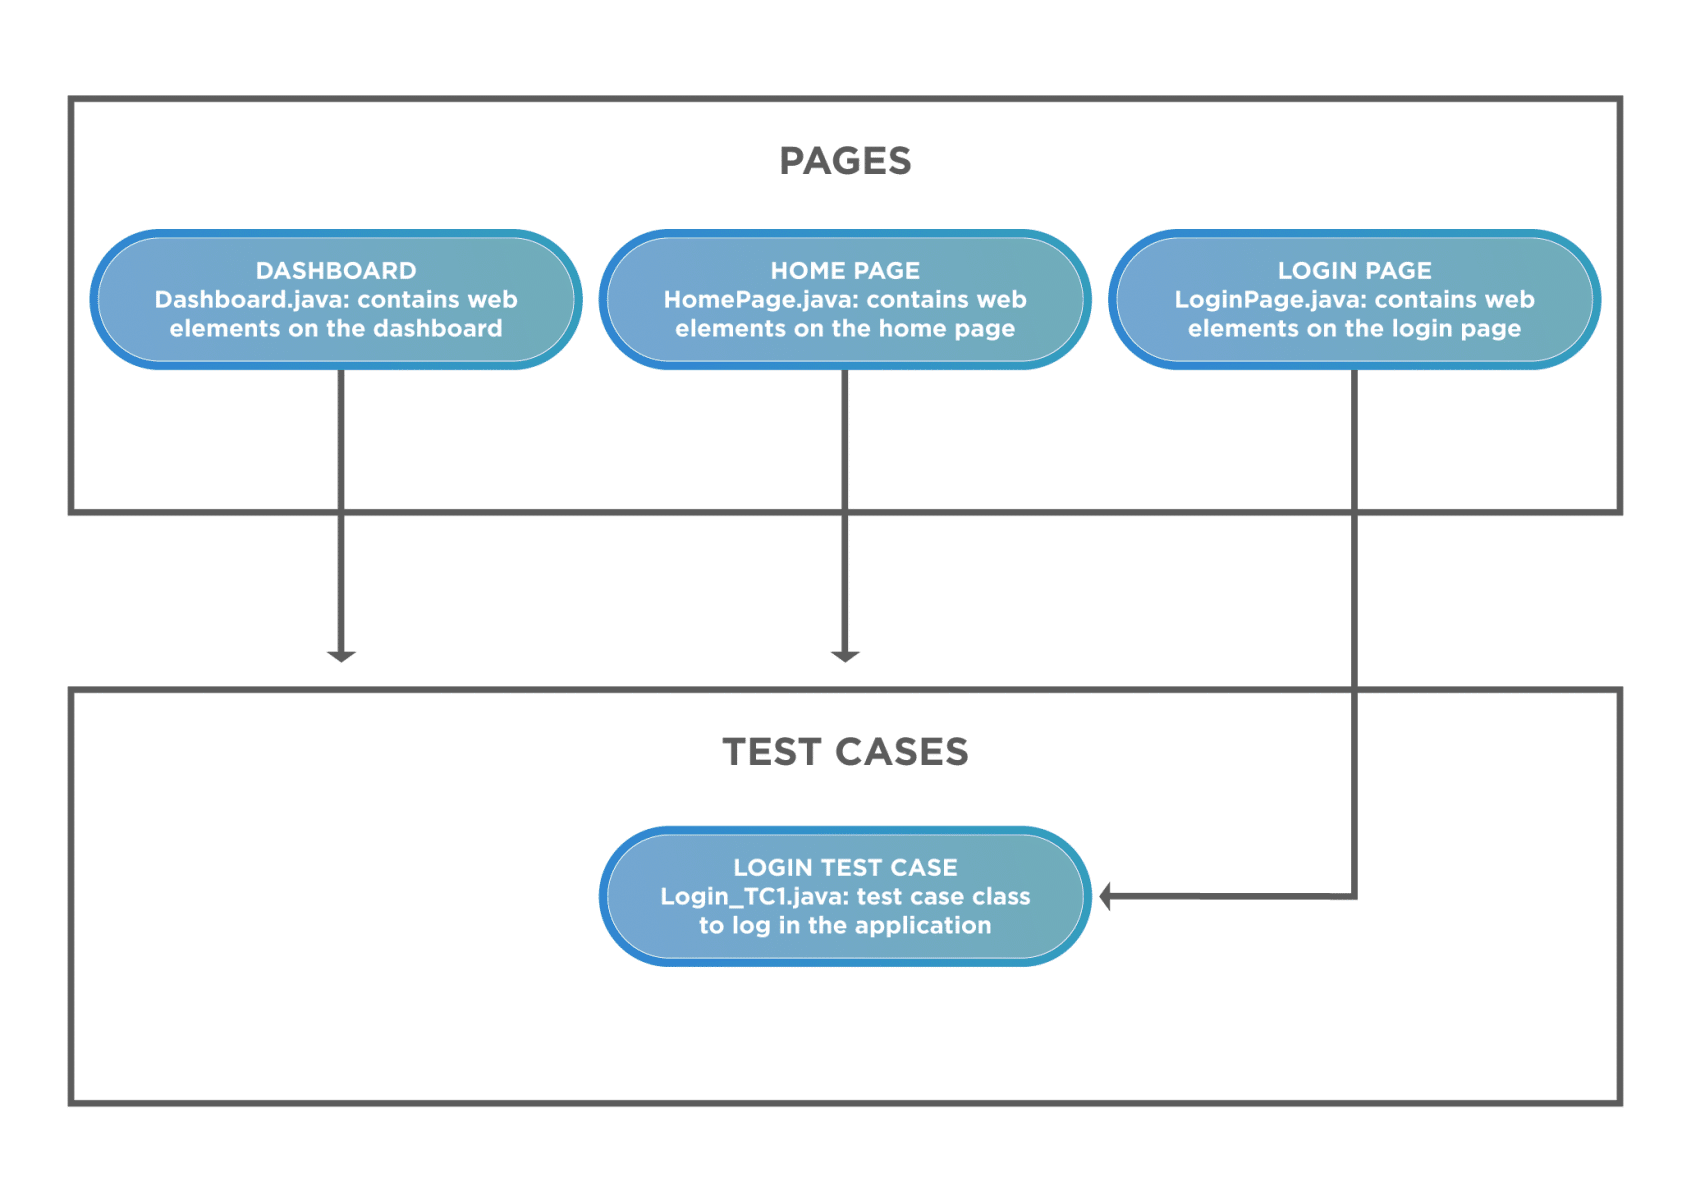
As you can see, we create different classes for the multiple pages and then save the web elements on the pages in them. Correspondingly, we save the test cases under a different package, making clear segregation among the different aspects.
Let's quickly understand why the need for the Page Object Model arose?
Why do we need a Page Object Model?
Selenium automation is not a tedious job. All you need to do is find the elements and perform actions on them. To understand its need, let us consider a simple use case:
- Firstly, navigate to the Demo website.
- Secondly, login into the store.
- Thirdly, capture the dashboard title.
- Finally, logout from the store.
Note: We will be using the demo testing website for the examples in our post.
Additionally, the code for the use case without using POM would look like below:
package simple_Project;

import org.openqa.selenium.By;
import org.openqa.selenium.WebDriver;
import org.openqa.selenium.chrome.ChromeDriver;

public class Test_Without_POM {

	public static void main(String[] args) throws InterruptedException {

		//Instantiating chrome driver
		WebDriver driver = new ChromeDriver();

		//Opening web application
		driver.get("https://www.demoqa.com/books");

		//Locating the Login button and clicking on it
		driver.findElement(By.id("login")).click();

		//Locating the username & password and passing the credentials
		driver.findElement(By.id("userName")).sendKeys("gunjankaushik");
		driver.findElement(By.id("password")).sendKeys("Password@123");

		//Click on the login button
		driver.findElement(By.id("login")).click();

		//Print the web page heading
		System.out.println("The page title is : " +driver.findElement(By.xpath("//*[@id=\"app\"]//div[@class=\"main-header\"]")).getText());

		//Click on Logout button
		driver.findElement(By.id("submit")).click();

		//Close driver instance
		driver.quit();
	}

}
As visible in the script, we locate each web element, like the login button, username, password field, etc. and then perform the corresponding action like click() or sendKeys(). It looks simple, but as the test suite grows, the code becomes complex and challenging to maintain. Subsequently, Learn more about Selenium SendKeys in-depth.
The script maintenance becomes cumbersome as we might use the same web element at several test scripts. A small change in the element will lead to a change in all the scripts that use the web element. It takes a lot of time, and the chances of errors are high.
The resolution to the above problem is by using the Page Object Model Framework or Page Object Model Design Pattern. Using POM, you will create an object repository, which you can refer to at various points in your test script. Now consider a scenario where I have to test login with different users. I will be reusing the same web elements again and again in my test script. If the locator value of the login button changes, I would have to change it at different locations, and I might miss out on changing in one place. Using the Page Object Model approach here would simplify code management and makes it more maintainable and reusable.
What are the advantages of the Page Object Model?
In the section above, we understood why a non-POM project could make our project difficult to maintain, making it a huge advantage of the POM. Below are some advantages of using the Page Object Model that highlights its efficiency:
- Makes code maintainable- Since the test classes are separate from the classes containing the web elements and the operation on them, updating the code is very easy if any web element updates or a new one adds.
- Makes code readable- User can easily read through the project and test scripts due to a fine line between the test classes and the different web pages.
- And, makes code reusable- If multiple test scripts use the same web elements, then we need not write code to handle the web element in every test script. Placing it in a separate page class makes it reusable by making it accessible by any test script.
How to implement the Page Object Model in Selenium?
After understanding the Page Object Model's importance, we will now implement the Page Object Model for the use case that we considered above. Our Page Object Model project structure would look like below:
We will be automating the same use case as used in the section above and understand the implementation incrementally.
How to define Page classes?
We will be working with the different pages first. We will store the web elements present on each page in the corresponding java class.
HomePage.java
The home page of the dummy website looks like below, and the highlighted element is the one that we store in our HomePage.java class.
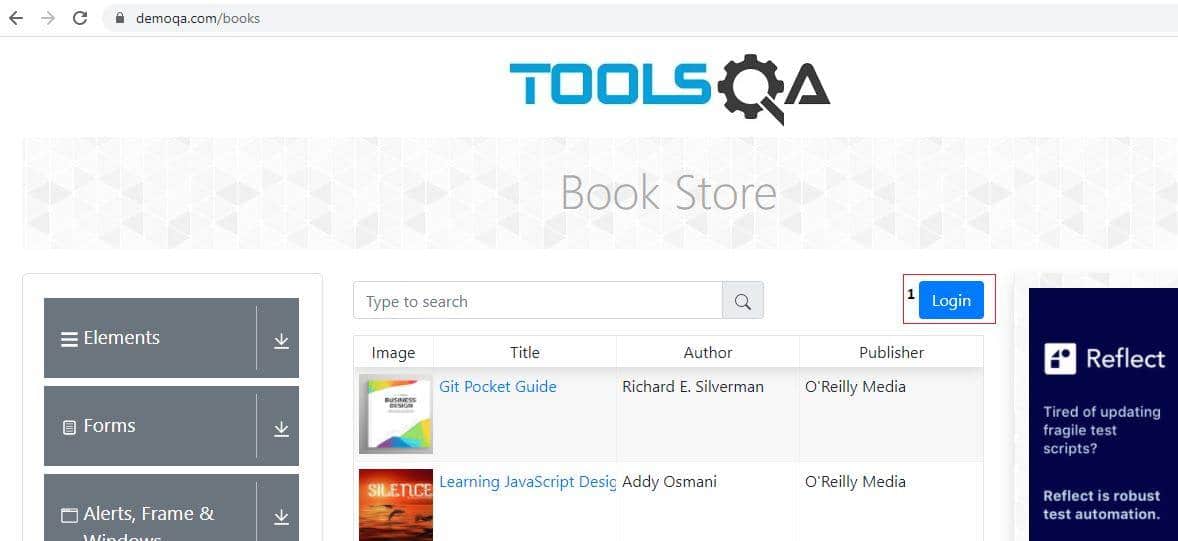
Create a java class for Home Page. This class will contain web elements present on Home Page like the Login button and the operations performed on these elements.
package pages;

import org.openqa.selenium.By;
import org.openqa.selenium.WebDriver;

public class HomePage {

	WebDriver driver;

	//Constructor that will be automatically called as soon as the object of the class is created
	public HomePage(WebDriver driver) {
		this.driver=driver;
	}

	//Locator for login button
	By LoginBtn = By.id("login");

	//Method to click login button
	public void clickLogin() {
		driver.findElement(LoginBtn).click();
	}
}
Let us now understand the code line-by-line to understand how the pages class contains the web elements.
- Import Statement - org.openqa.selenium.By: The import statement the By class, whose methods help locate web elements on a page.
- Next, a constructor public HomePage(WebDriver driver) is created, and WebDriver is passed as an argument. This constructor is called as soon as the object of the HomePage class is created.
- The constructor contains a line of code, i.e., this.driver=driver: This keyword is used to initialize the local driver variable with the actual driver we will use in our test class. The actual driver is the one that we pass as an argument to the constructor. In simple words, when we create a HomePage object in the test class, we pass the driver(which is also initialized in the test class) as an argument to the class. Now the same driver is passed as an argument to the constructor. The locally declared driver in the HomePage class is then initialized with the test class's actual driver. Additionally, you can read more about this keyword and strengthen your understanding.
- By LoginBtn = By.id("login") : An object of the By class is created, and is identified in the document using id. You can use any other locator as per your convenience to locate the web elements using By. You can refer to our article on Selenium Locators for more learning on locators.
- A method is then created containing code to act (s) on the identified locator(s).
- driver.findElement(LoginBtn) .click() : The findElement method is used to locate the Login button and the click() action is performed on the same.
LoginPage.java
The next page to work on is the Login page, which looks like below-
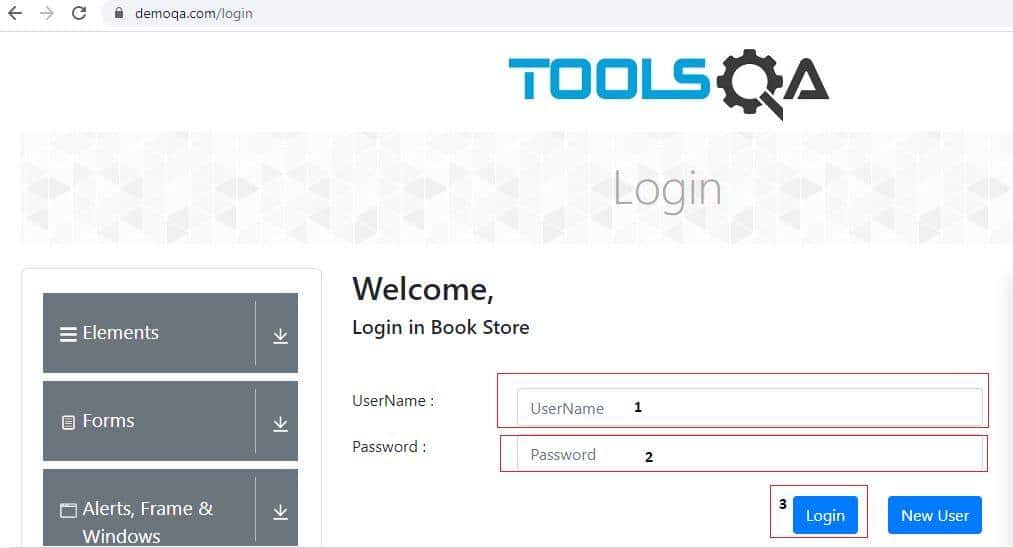
After we click on Login from Home Page, we will be redirected to Login Page, where we will have to enter the username, password and hit the Login button. The LoginPage class will contain the web elements and the corresponding actions shown in the below code.
package pages;

import org.openqa.selenium.By;
import org.openqa.selenium.WebDriver;

public class LoginPage {

	WebDriver driver;

	//Constructor that will be automatically called as soon as the object of the class is created
	public LoginPage(WebDriver driver) {
          this.driver = driver;
	}

	//Locator for username field
	By uName = By.id("userName");

	//Locator for password field
	By pswd = By.id("password");

	//Locator for login button
	By loginBtn = By.id("login");


	//Method to enter username
	public void enterUsername(String user) {
		driver.findElement(uName).sendKeys(user);
	}

	//Method to enter password
	public void enterPassword(String pass) {
		driver.findElement(pswd).sendKeys(pass);
	}

	//Method to click on Login button
	public void clickLogin() {
		driver.findElement(loginBtn).click();
	}
}
The initial part of the code would be the same for all the page classes, i.e., the constructor to initialize the actual driver.
- By uName = By.id("userName") , By pswd = By.id("password") and By loginBtn = By.id("login") : The web element locators for the username field, password field and login button are stored in the uName, pswd and loginBtn respectively using the By class.
- Methods corresponding to each of the web element actions are created that contain code for the web elements' actions.
- Enter username in the username field- public void enterUsername(String user): The method accepts a String value for the username, which is passed to the sendKeys method by code driver.findElement(uName) .sendKeys(user)
- Enter the password in the password field- public void enterPassword(String pass): The method accepts a String value for the username, which is passed to the sendKeys method by code driver.findElement(pswd) .sendKeys(pass)
- Click on the Login button- public void clickLogin() : The method has no argument and the code in it, ie driver.findElement(loginBtn) .click() is used to click on the login button
Dashboard.java
The last page in our example is the Dashboard after logging in. It will look like below-
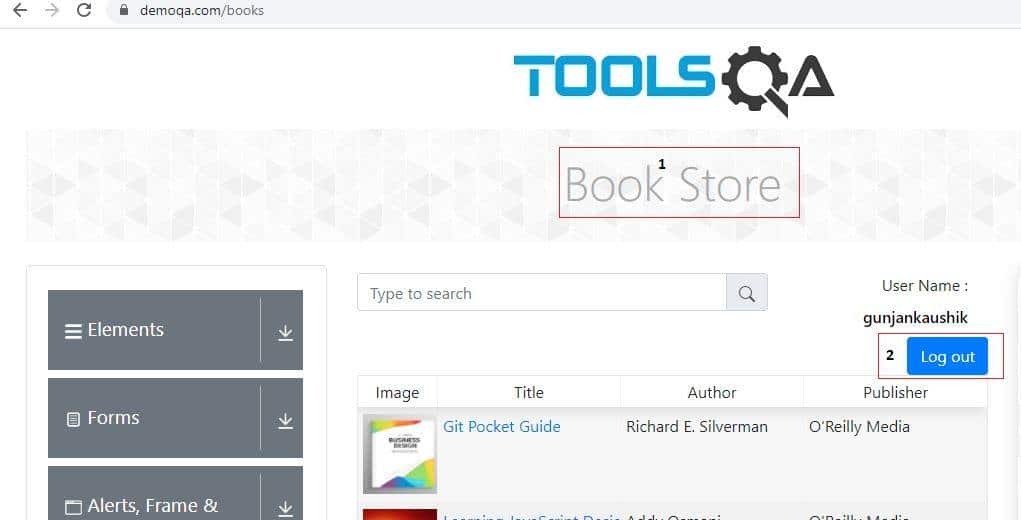
Once we log in, we will capture the page heading and locate the Logout button to log out of the application.
package pages;

import org.openqa.selenium.By;
import org.openqa.selenium.WebDriver;

public class Dashboard {

	WebDriver driver;

	//Constructor that will be automatically called as soon as the object of the class is created
	public Dashboard(WebDriver driver) {
		this.driver=driver;
	}

	//Locators for the page title and the logout button
	By heading = By.xpath("//div[@class=\"main-header\"]");
	By logoutBtn = By.id("submit");

	//Method to capture the page heading
	public String getHeading() {
		String head = driver.findElement(heading).getText();
		return head;
	}

	//Method to click on Logout button
	public void clickLogout() {
		driver.findElement(logoutBtn).click();
	}
}
As we have already understood the use of constructor in the above two page classes, let's see the next lines of code.
- By heading = By.xpath("//div[@class="main-header"]") and By logoutBtn = By.id("submit") : The By class locates the heading we seek on the web page using the xpath and the logout button using the id.
- Next, create a method, public String getHeading() to retrieve the text from the heading web element. We use the return type of the method as String, which returns the heading retrieved using the getText() method.
- We create a method, public void clickLogout() to click on the logout button using the click() method.
How to define Test classes?
After creating the required classes for the different pages, we will now create a test class with execution steps. These steps would reference the object repository created for different page elements. Let us quickly have a look at the code and then understand it step-by-step.
package testCases;

import org.openqa.selenium.WebDriver;
import org.openqa.selenium.chrome.ChromeDriver;
import pages.Dashboard;
import pages.HomePage;
import pages.LoginPage;

public class Login_TC1 {

	public static void main(String[] args) throws InterruptedException {

		System.setProperty("webdriver.chrome.driver", "---Exact path to chromedriver.exe---");
		WebDriver driver = new ChromeDriver();
		driver.get("https://www.demoqa.com/books");

		//Creating object of home page
		HomePage home = new HomePage(driver);

		//Creating object of Login page
		LoginPage login = new LoginPage(driver);

		//Creating object of Dashboard
		Dashboard dashboard = new Dashboard(driver);

		//Click on Login button
		home.clickLogin();

		//Enter username & password
		login.enterUsername("---Your Username---");
		login.enterPassword("---Your Password---");

		//Click on login button
		login.clickLogin();
		Thread.sleep(3000);


		//Capture the page heading and print on console
		System.out.println("The page heading is --- " +dashboard.getHeading());

		//Click on Logout button
		dashboard.clickLogout();

               //Close browser instance
               driver.quit();
	}

}
Let us now understand the test case code line by line.
- System.setProperty("webdriver.chrome.driver", "---Exact path to chromedriver.exe---") : We set up the System properties to locate the chromdriver.exe in our local system.
- WebDriver driver = new ChromeDriver() : Chrome driver instantiates using an object of WebDriver class.
- driver.get("https://www.demoqa.com/books") : Using the webdriver get() method we navigate to the test URL.
- Next we will create objects of all the three page classes that we have created, HomePage home = new HomePage(driver); , LoginPage login = new LoginPage(driver); and Dashboard dashboard = new Dashboard(driver); . As discussed in the first-page class about constructors, the argument passes during each class's object creation. This driver is the actual driver that will initialize the driver in the page class.
- After creating the objects of each class, we can now easily reference any method with the class. We will now execute our test steps.
- home.clickLogin() : By using the object of HomePage class we are referring the clickLogin() method.
- Once we have reached the Login page, we use the object of Login class to use the enterUsername("your username"), enterPassword("your password"), and clickLogin() methods. Note that you can create your own username and password and then pass them as method arguments.
- Next, we will capture the page heading and click on the logout using the Dashboard class object. We will access the getHeading() and clickLogout() methods.
- After performing all the actions, we close the browser instance by using driver.quit().
Now that we have created the multiple page classes required to execute our test case and understood the underlying code, we will now execute the test class and see the results.
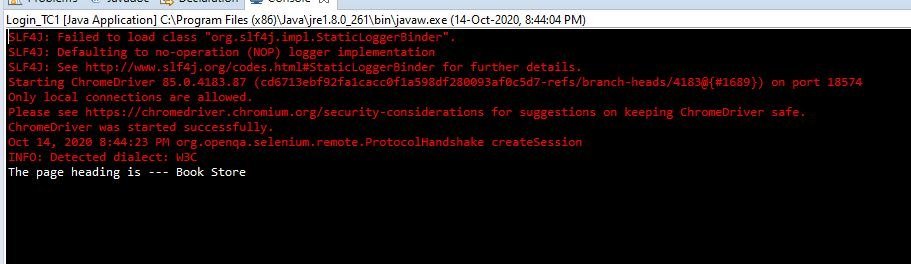
You will see that the web browser opens up with the test website, and subsequent test steps perform on running the test. The console displays the page heading as intended in our test step.
How does POM rescue in case of frequent locator changes?
Now, let me give you an example of how the Page Object Model framework comes to the rescue in making the code maintainable and avoid errors while making updates when there is a change in some locator value. Consider the below use case-
- Navigate to the demo website
- Login with a valid username & password and capture the page heading.
- Logout from the session.
- Now login with an invalid username & password and verify the URL.
As is evident from the use case, we will be using the login text fields and the login button multiple times. First, we will see how our code would look like when we are not using the page object model design technique.
package nonPOM;

import org.openqa.selenium.By;
import org.openqa.selenium.WebDriver;
import org.openqa.selenium.chrome.ChromeDriver;

public class Login {

	public static void main(String[] args) throws InterruptedException {
		System.setProperty("webdriver.chrome.driver", "D:\\Selenium\\drivers\\chromedriver.exe");
		WebDriver driver = new ChromeDriver();
		driver.manage().window().maximize();
		driver.get("https://www.demoqa.com/login");

		//First test case for valid login
		//Finding the web elements and passing the values
		driver.findElement(By.id("userName")).sendKeys("gunjankaushik");
		driver.findElement(By.id("password")).sendKeys("Password@123");
		driver.findElement(By.id("login")).click();

		Thread.sleep(5000);

		//Capture the page heading and print on console
		System.out.println("The page heading is --- " +driver.findElement(By.xpath("//div[@class=\"main-header\"]")).getText());

		//Logout from the session
		driver.findElement(By.id("submit")).click();


		//Second test case for invalid login credentials
		driver.findElement(By.id("userName")).sendKeys("abdc");
		driver.findElement(By.id("password")).sendKeys("Password");
		driver.findElement(By.id("login")).click();

		String expectedURL = "https://www.demoqa.com/login";
		String actualURL = driver.getCurrentUrl();

		if(actualURL.equalsIgnoreCase(expectedURL))
			System.out.println("Test passed !!!!");
		else
			System.out.println("Test failed");

		//Closing browser session
		driver.quit();

	}

}
Now suppose the locator for the login button changes. To make corrections to your test script, you will have to change the Login button locator at two places. That is to say, line number 19 and line number 33. Moreover, if we use the Page Object pattern in this scenario, we would only have to make the changes to the Login button locator in the page class for the login page. We don't have to make the change at every place where we use or refer to the login locator.
Did you see how easy it was to segregate the page web elements using the Page Object Model and using them in our test case? You can now try out a practice problem to strengthen your understanding of the Page Object Model in Selenium.
Practice Exercise
Use Case
- First, log in to the demo website.
- Secondly, on the dashboard page, locate the search text field and enter a search string.
- After that, print the search string on the console.
Try out the above test steps by adding more web elements to the Dashboard page class. Moreover, you can also refer to the below-updated code of the Dashboard page class and the test class.
Dashboard.java
package pages;

import org.openqa.selenium.By;
import org.openqa.selenium.WebDriver;

public class Dashboard {

	WebDriver driver;

	//Constructor that will be automatically called as soon as the object of the class is created
	public Dashboard(WebDriver driver) {
		this.driver=driver;
	}

	//Locators for the page title and the logout button
	By heading = By.xpath("//div[@class=\"main-header\"]");
	By logoutBtn = By.id("submit");

	//Locators for search field and search button
	By searchField = By.id("searchBox");
	By searchBtn = By.xpath("//*[@id=\"basic-addon2\"]");

	//Method to capture the page heading
	public String getHeading() {
		String head = driver.findElement(heading).getText();
		return head;
	}

	//Method to enter search string and display the same on console
	public void enterSearchStr(String str) {
		driver.findElement(searchField).sendKeys(str);
		System.out.println("The search string is : " +str);
		driver.findElement(searchBtn).click();
	}


	//Method to click on Logout button
	public void clickLogout() {
		driver.findElement(logoutBtn).click();
	}
}
Test Case Class
package testCases;

import org.openqa.selenium.WebDriver;
import org.openqa.selenium.chrome.ChromeDriver;
import pages.Dashboard;
import pages.HomePage;
import pages.LoginPage;

public class Login_TC1 {

	public static void main(String[] args) throws InterruptedException {

		System.setProperty("webdriver.chrome.driver", "D:\\Selenium\\drivers\\chromedriver.exe");
		WebDriver driver = new ChromeDriver();
		driver.get("https://www.demoqa.com/books");

		//Creating object of home page
		HomePage home = new HomePage(driver);

		//Creating object of Login page
		LoginPage login = new LoginPage(driver);

		//Creating object of Dashboard
		Dashboard dashboard = new Dashboard(driver);

		//Click on Login button
		home.clickLogin();

		//Enter username & password
		login.enterUsername("gunjankaushik");
		login.enterPassword("Password@123");

		//Click on login button
		login.clickLogin();
		Thread.sleep(3000);


		//Capture the page heading and print on console
		System.out.println("The page heading is --- " +dashboard.getHeading());

		//Perform search and display search string on console
		dashboard.enterSearchStr("java");

		//CLick on Logout button
		dashboard.clickLogout();
	}

}
Key Takeaways
- We understood what the Page Object Model design pattern is and how it enhances our test scripts.
- In addition to that, we saw the various advantages of using a Page Object Model Framework over a regular approach. Especially its benefit of improving code readability and reducing duplicates.
- Moreover, we then saw how we could make our test framework efficient by using multiple page classes for the web application's different web pages. These page classes consist of the elements present on the corresponding pages and their relevant action methods.
- Also, we created a test class that uses the objects created in the page classes. Additionally, it keeps the test script separate from the object repository.