In our last article, witnessed the steps to configure Eclipse in our last article titled Configuring Eclipse with Rest-assured. Continuing on the same path, in this article, we will discuss writing our first API test using Rest Assured. Along with that, we will also discuss the basics of REST API testing briefly in this chapter. This chapter assumes that the reader has good knowledge of the TestNG Framework. Thus we will cover the following topics in this article.
- What is REST API Testing?
- HTTP Methods and status codes for REST API Automation Testing
- REST API test using Rest Assured
- How to Write REST API Test using Rest Assured?
- Understanding Rest Assured code for REST API Testing
What is REST API testing?
Rest stands for Representational State Transfer and is an architectural style for communication with web services. An API or Application Programming Interface is a set of programming instructions used to access a web-based software application. The APIs built using REST is called REST APIs which we have discussed in an earlier article. Let us now begin to understand REST API testing.
So what is REST API testing?
REST API testing is a technique to test RESTful APIs and validate their correctness. We send the request (preferably using automation) and record the response for further assertions. This way we can check if the REST API is working fine or not. REST API testing is mainly done using four REST methods, viz, GET, POST, PUT, DELETE.
There are two approaches to test the REST API:
- Manual testing: Similar to any other manual testing of applications
- Automation testing: Using scripts or programs that can access REST APIs.
However, in this tutorial, we will only concentrate on automated REST API testing.
HTTP Methods and status codes for REST API Automation Testing
We know that REST API uses five HTTP methods to request a command:
| Method | Description |
|---|---|
| GET | Retrieves the information at a particular URL. |
| PUT | Updates the previous resource if it exists or creates new information at a particular URL. |
| POST | Used to send information to the server like uploading data and also to develop a new entity. |
| DELETE | Deletes all current representations at a specific URL. |
| PATCH | This is used for partial updates of resources. |
Once the request is sent using the above methods, the client receives the numeric codes known as "Status codes" or sometimes referred to as "Response codes". Then we can interpret these status codes to know what kind of response the server has sent for a particular request. Status codes are mainly classified into five categories as shown in the table below.
| No | Status Code | Description |
|---|---|---|
| 1 | 1xx (100 – 199) | The response is informational. |
| 2 | 2xx (200 – 299) | Assures successful response. |
| 3 | 3xx (300 – 399) | You are required to take further action to fulfil the request. |
| 4 | 4xx (400 – 499) | There’s a bad syntax and the request cannot be completed. |
| 5 | 5xx (500 – 599) | The server entirely fails to complete the request. |
The above codes help us to interpret the outcome of the HTTP requests. From the above table, we can deduce that if the response status code is 2xx, it means the application is functioning as it should be. The status code 1xx, 2xx, 3xx are not considered errors but are informative messages and these codes will not affect the user experience.
However, if we get status codes like 4xx and 5xx, these are error messages. This means users will encounter error messages when they are navigating through the APIs. Errors at the client or browser level mostly result in 4xx status code error messages. Whereas server-level errors result in 5xx status code error messages. So when performing REST API testing we should evaluate each response by inspecting the error codes.
Consider the following REST API example URL, https://demoqa.com/swagger/#/BookStore. This is a bookstore inventory and it provides us with various REST API methods to access information from the bookstore. Now let us access this URL in the browser and we are presented with the following screen.
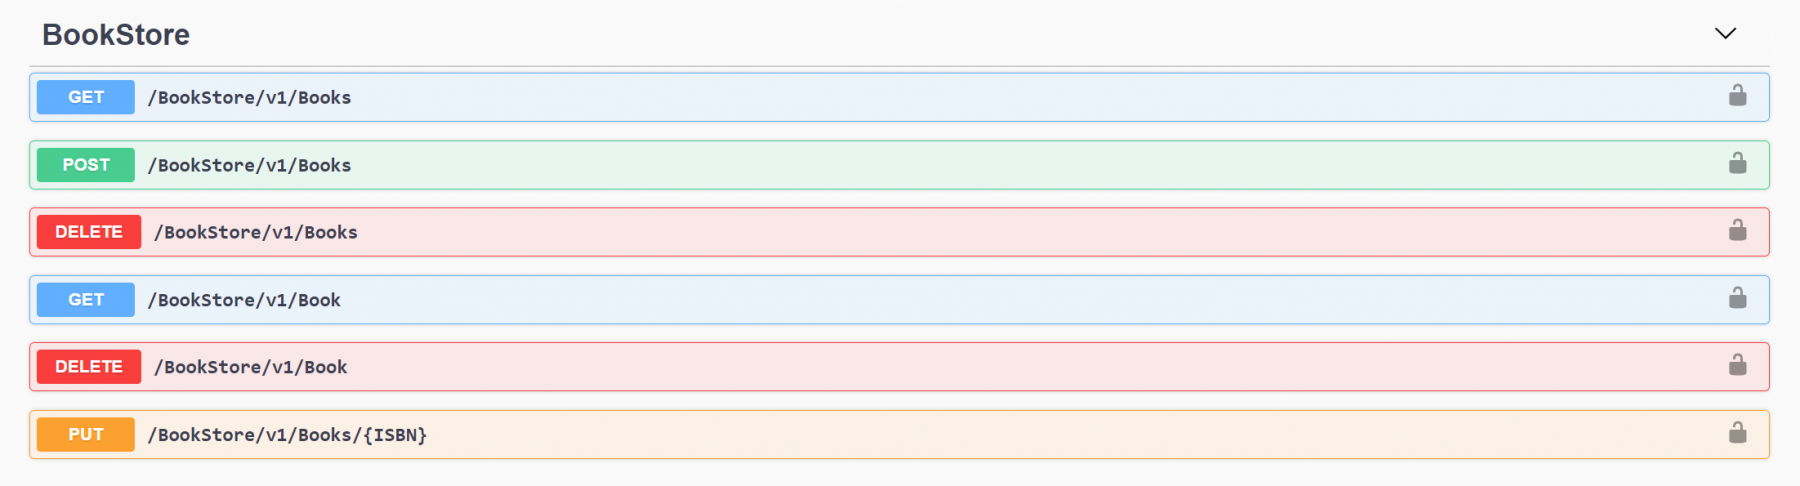
Click on the GET method (the first one) in the above store to access the pet inventory. When we click and execute the GET method, we get the following response.
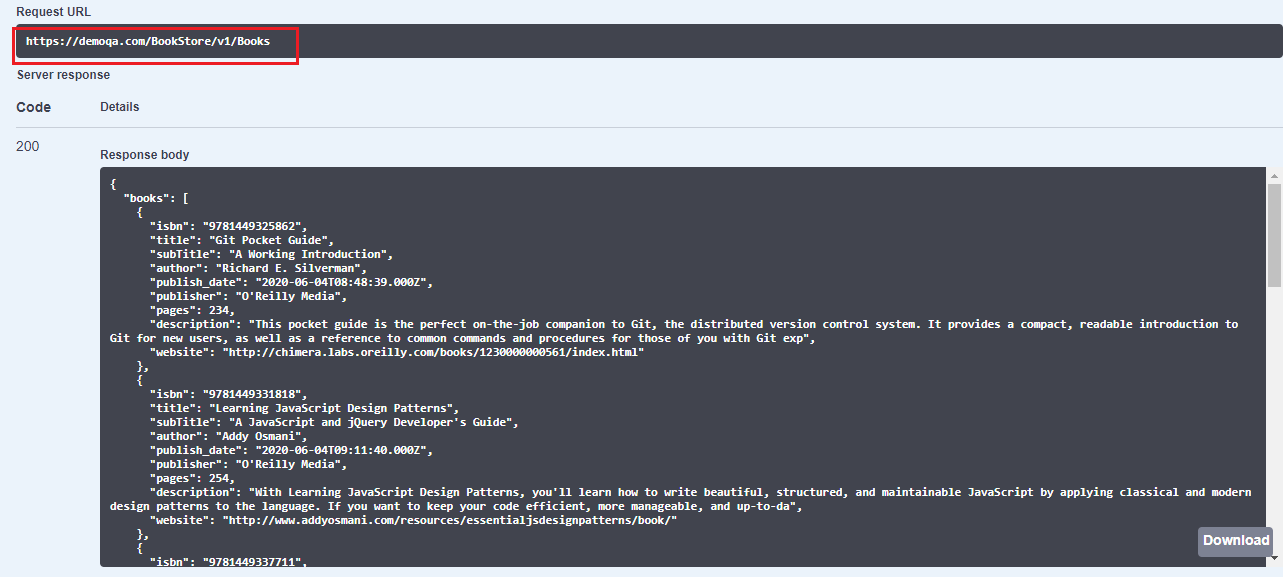
Note the status code on the above screen (left panel). It is 200 which means the request was successfully executed and we got a successful response. This way we receive a status code from the server when we send a request and then we can interpret this status code and check if the request was executed in a normal manner or some error occurred. We will further explore the response obtained from the server in our upcoming articles.
REST API test using Rest Assured
REST Assured is a Java library for testing RESTful APIs. It is widely used to test JSON and XML-based web applications. In addition, it fully supports all REST methods like the GET, PUT, POST, PATCH, and DELETE. Next, we will see a detailed walkthrough of testing one REST API using the Rest Assured library.
How to write REST API test using Rest Assured?
To write a sample REST API test we will make use of the following REST API link.
| Request URL | https://demoqa.com/BookStore/v1/Books |
| HTTP Method | GET |
| Comments | This URL will return the inventory details of a Book store. There are no input parameters for the request. |
| Response | {"books": [{"isbn": "string","title": "string","subTitle": "string","author":"string","publish_date": "2022-01-25T13:44:50.276Z","publisher": "string","pages": 0,"description": "string","website": "string"}]} |
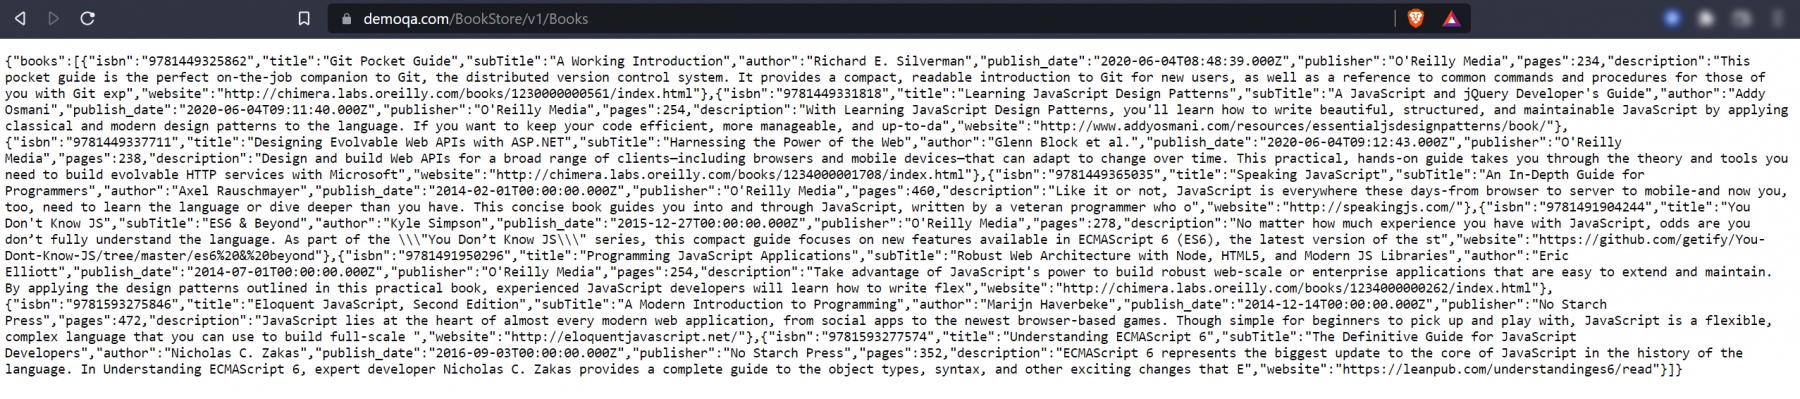
In fact, if we directly open the above URL in the browser, we get this output as shown below:
To get the same output programmatically using the Rest Assured library, we have to follow below steps:
- Use the RestAssured class to generate a RequestSpecification for the URL: https://demoqa.com/BookStore/v1/Books
- Specify the HTTP Method type (GET method).
- Send the Request to the server.
- Get the Response back from the server.
- Print the returned Response’s body.
Below given is the complete code for the above steps:
import io.restassured.RestAssured;
import io.restassured.http.Method;
import io.restassured.response.Response;
import io.restassured.specification.RequestSpecification;

public class RestAssuredAPITest {

 @Test
public void GetBooksDetails() {
	// Specify the base URL to the RESTful web service
	RestAssured.baseURI = "https://demoqa.com/BookStore/v1/Books";
	// Get the RequestSpecification of the request to be sent to the server.
	RequestSpecification httpRequest = RestAssured.given();
	// specify the method type (GET) and the parameters if any.
	//In this case the request does not take any parameters
	Response response = httpRequest.request(Method.GET, "");
	// Print the status and message body of the response received from the server
	System.out.println("Status received => " + response.getStatusLine());
	System.out.println("Response=>" + response.prettyPrint());

}
}
The above code generates the same response as we got in the browser earlier. The following screenshot shows the response.

In this way, we can make any Test API call and get the response from the webserver hosting RestFul services.
Understanding Rest Assured code for REST API Testing
Let us now walk through the code we implemented above.
Code line 1
// Specify the base URL to the RESTful web service
RestAssured.baseURI = "https://demoqa.com/BookStore/v1/Books";
The above line uses RestAssured class to set up a base URI. In this case, the base URI is “https://demoqa.com/BookStore/v1/Books”. The base URI indicates the root address of the resource we are going to request from the server (hence the name base URI). Then we will add parameters, if any, when we actually make the request in subsequent code.
The class io.restassured.RestAssured , is the basis of any kind of HTTP request we make for tests. Some of the key features of this class are:
- It generates HTTP Requests with a base URI.
- Provides support to create Requests for different HTTP method types (GET, POST, PUT, PATCH, DELETE, UPDATE, HEAD, and OPTIONS).
- It communicates with the server using HTTP and sends the Request created in the tests to the server.
- Receives the response from the server.
- Provides support for validating the Response received from the server.
Internally io.restassured.RestAssured class uses an HTTP builder library, which is a Groovy language-based HTTP client.
Code line 2
// Get the RequestSpecification of the request to be sent to the server.
RequestSpecification httpRequest = RestAssured.given();
The next line gets the RequestSpecification of the request to be sent to the server. Rest Assured library provides an interface called RequestSpecification for this purpose. The variable httpRequest stores the request so that we can modify it if required like adding authentication details, adding headers, etc. For this particular test, we are not modifying the variable.
Code line 3
// specify the method type (GET) and the parameters if any.
//In this case the request does not take any parameters
Response response = httpRequest.request(Method.GET, "");
Now we call the server to get the resource using the RequestSpecification object. The above code line uses the request method to send the request for the resource to the server.
The request method takes two arguments, the first is the HTTP method and the second is a string. The string parameter is used to specify the parameters that are to be sent with the base URI. In this case, to get pet store details we do not send any parameters hence the blank string. The return type of the request method is the Response object which means the request method gets the response back from the server.
The Response interface (io.restassured.response.Response) represents a response returned from a server. It contains all the data sent by the server. As we will see in the subsequent articles, we can call different methods on this response object to extract the response like response status, headers, etc.
Code line 4 and 5
// Print the message body of the response received from the server
System.out.println("Status received => " + response.getStatusLine());
System.out.println("Response=>" + response.prettyPrint());
In the above code lines, we just read the response as a string and print it to the console. We use the getBody method of response interface that returns the actual body of the response. This is then printed to the console.
We can also write the above test code using short-hand methods provided by Rest Assured. Following is the code snippet that is shortened a bit.
	@Test
	public void GetWeatherDetailsCondensed()
	{
		// Specify the base URL to the RESTful web service
		RestAssured.baseURI = "https://demoqa.com/BookStore/v1/Books";

		// Get the RequestSpecification of the request that is to be sent
		// to the server.
		RequestSpecification httpRequest = RestAssured.given();

		// Call RequestSpecification.get() method to get the response.
		// Make sure you specify the resource name.
		Response response = httpRequest.get("");

		// Response.asString method will directly return the content of the body
		// as String.
		System.out.println("Response Body is =>  " + response.asString());
	}
So here we use the "get" method on the RequestSpecification object that returns the Response object.
We will refer to the same example in our next articles when we go into details of the io.restassured.response.Response interface.
Note: The postman article on the same topic (API test and GET request) can be found at New Request in Postman and Get Request in Postman.
Visit Get Request in Rest Assured for the video tutorial.
Key TakeAways
In this article we have discussed:
- RestFul web applications use the Rest API testing technique.
- We also learned about various HTTP methods and status codes.
- Then we placed a basic test API call using Rest Assured Library and analyzed its output.
- We also walked through the Test API code to better understand the implementation.
In our next article, we will discuss the response part of the Rest API implementation.