In this tutorial, we will learn to write REST API End to End Test.
We carefully laid the foundations of our API automation framework components. We will be heavily relying on our previous knowledge gained for Rest Assured, Cucumber as well as Maven. Subsequently, these will form the base over which we will build our API Automation Framework. I will be referring to them every once in a while and adding useful links as we need more of them. It's advisable to clear up the basics by going through the tutorials:
In our automation framework, we will automate an End to End business flow of a use case. Additionally, it will help to demonstrate the right examples of framework components and explain their usages. Besides, our understanding of building the Rest Assured API Automation Framework from scratch will improve as we go about this tutorial.
Many-a-times we are involved in getting ready-made frameworks that are built by Senior Test Architects or Software Developers. Understanding the underlying principles and design ideas are crucial to develop our skills as software engineers.
Prerequisites for REST API End to End Test
- Java Setup
- IDE Setup
- Maven Setup
- Create a maven project
- Add Rest Assured Dependencies
- Setup Maven Compiler Plugin
- Create a user for the test
Step 1 - Java Setup
We will use Java as our language, for writing our REST API automation framework based on the Rest Assured library. For this, we will need to install Java on our machines if not previously installed. Likewise, please follow through the tutorial to install Java as our first prerequisite.
Step 2 - IDE Setup
As we will be working with Java, we will need an editor to use for Java. Eclipse, IntelliJ, Net Beans, and several others are popular IDEs you can choose to work. Furthermore, a tutorial on installing Eclipse on Windows and for Mac users exists to ease the process. Please pick an IDE you are comfortable working with and get going.
Step 3 - Maven Setup
Build tools enable us to create executable applications from the source code. They help to automate and script everyday activities like downloading dependencies, compiling, running our tests, and deployments. Moreover, we will use the Maven build tool for our End To End Scenarios. We have created a tutorial explaining the installation of Maven on Windows. Additionally, please install Maven, if not previously installed as we would need it.
Step 4: Create a New Maven Project
Eclipse operates with workspaces, folders, and spaces where you add your projects. Software Teams use different approaches for workspaces and project structures but try to follow and stick with the default structure.
In addition to this, to create a new maven project, please follow our article Steps to create a New Maven Project. Just to make sure that you specify below values to Maven Archetype Parameters:
- Group ID: ToolsQA
- Artifact ID: API TestingFramework

Note: You can have any names as Group ID and Artifact ID. However, for the ease of this tutorial, it is better to keep the same naming conventions across the project. Also, it helps in resolving issues while copying pasting the code.
Step 5 - Add Rest Assured Dependencies
We will add Rest Assured Dependencies to our project through the pom.xml file. To add the required dependencies, go to Rest Assured Maven Repository. Then, select the latest dependency. Copy-paste it in the project pom.xml file.
<dependency>
    <groupId>io.rest-assured</groupId>
    <artifactId>rest-assured</artifactId>
    <version>4.2.0</version>
    <scope>test</scope>
</dependency>
Note: As of Feb'2020, the latest rest-assured version is 4.2.0.
We should add the dependency tag within the dependencies tag, like below.
<dependencies>
   <dependency>Project Dependency</dependency>
</dependencies>
Further, we will be using JUnit Dependency. So please add that dependency in the pom.xml.
  <dependency>
        <groupId>junit</groupId>
        <artifactId>junit</artifactId>
        <version>4.13</version>
        <scope>test</scope>
  </dependency>
Note: As of Feb'2020, the latest JUnit version is 4.13. Always use the latest Junit version.
Step 6: Setup Maven Compiler Plugin
The Compiler Plugin compiles the sources of the project. Regardless of the JDK you run Maven with, the default source setting is 1.5, and the default target setting is 1.5. Additionally, to change the defaults, please set the source and target as described in Setting the –source and –target of the Java Compiler.
Below you can find the maven-compiler-plugin settings:
<build>
   <plugins>
      <plugin>
         <groupId>org.apache.maven.plugins</groupId>
         <artifactId>maven-compiler-plugin</artifactId>
         <version>3.7.0</version>
         <configuration>
            <source>1.8</source>
            <target>1.8</target>
            <encoding>UTF-8</encoding>
         </configuration>
      </plugin>
   </plugins>
</build>
The complete POM would turn out to be likewise:
<?xml version="1.0" encoding="UTF-8"?>
<project xmlns="https://maven.apache.org/POM/4.0.0"
         xmlns:xsi="https://www.w3.org/2001/XMLSchema-instance"
         xsi:schemaLocation="https://maven.apache.org/POM/4.0.0 http://maven.apache.org/xsd/maven-4.0.0.xsd">
    <modelVersion>4.0.0</modelVersion>

    <groupId>ToolsQA</groupId>
    <artifactId>RestAssured_APITests</artifactId>
    <version>1.0-SNAPSHOT</version>

    <dependencies>
    <dependency>
        <groupId>junit</groupId>
        <artifactId>junit</artifactId>
        <version>4.13</version>
        <scope>test</scope>
    </dependency>
    <dependency>
        <groupId>io.rest-assured</groupId>
        <artifactId>rest-assured</artifactId>
        <version>4.2.0</version>
        <scope>test</scope>
    </dependency>
    </dependencies>

    <build>
     <plugins>
       <plugin>
         <groupId>org.apache.maven.plugins</groupId>
         <artifactId>maven-compiler-plugin</artifactId>
         <version>3.7.0</version>
         <configuration>
           <source>1.8</source>
           <target>1.8</target>
            <encoding>UTF-8</encoding>
         </configuration>
       </plugin>
       </plugins>
   </build>

</project>
Step 7: Create an Authorized user for the test
Finally, before we begin automation of our tests, the last piece is remaining. It is of creating an authorized user. We need to create a user that will use our End to End automation tests. We have learned to create a user in our previous tutorial under the POST Request. The POST Request tutorial explains how a POST Request method sends data to the server.
S
    @Test
    public void RegistrationSuccessful() {
        RestAssured.baseURI = "https://bookstore.toolsqa.com";
        RequestSpecification request = RestAssured.given();

        JSONObject requestParams = new JSONObject();
        /*I have put a unique username and password as below,
        you can enter any as per your liking. */
        requestParams.put("UserName", "TOOLSQA-Test");
        requestParams.put("Password", "Test@@123");

        request.body(requestParams.toJSONString());
        Response response = request.post("/Account/v1/User");

        Assert.assertEquals(response.getStatusCode(), 201);
        // We will need the userID in the response body for our tests, please save it in a local variable
        String userID = response.getBody().jsonPath().getString("userID");
    }
Write REST API End to End Test:
Let's consider this scenario:-
Test Scenario: As an existing authorized user, I retrieve a list of books available for me in the library. I will assign a book to myself and later on return it.
We will divide the test scenario into below steps for simplicity:
1. Test will start from generating Token for Authorization - First, we have the username and password of a registered user. Using these credentials, we will generate a token. Additionally, we will send this token into the Requests instead of the username and password. The reason we follow this practice is to have specific resources allocated in a time-bound manner. This step involves making a POST Request call in Rest Assured by passing username and password. Kindly follow this POST Request tutorial to learn about how to send a POST Request.
Note: The below-mentioned User won't work, please create your user for practice.
2. Get List of available books in the library - Secondly, it is a GET Request call. It gets us, the list of available books. Visit the GET Request tutorial to understand the logic of how we make a GET Request call in Rest-Assured.
3. Add a book from the list to the user - The third is a POST Request call. We will send the user and book details in the Request.
4. Delete the added book from the list of books - Fourth is a DELETE Request call. We will delete the added book from the list. The DELETE Request tutorial will help you with it.
5. Confirm if the book removal happens successfully - Last but not least, as a verification step, we will verify if the book has got removed from the user. Therefore, we will send user details in a GET Request call to get details of the user.
Create a Test Package & a Test Class
-
Firstly create a New Package by right click on the src/test/java package and select New >> Package. Moreover, give your package a name apiTests and click Finish.
-
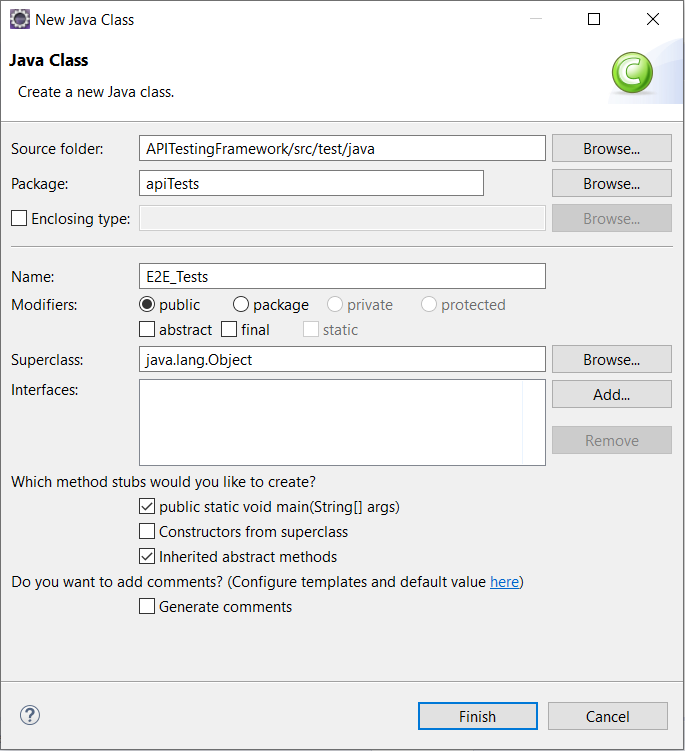
Secondly, create a New Class file by right click on the src/test/java package and select New >> Class. Give your test case the correct name in the resulting dialog and click Finish to create the file. Also, to make sure to check the public static void main, as we will be running the test from the same primary method. I have named the class as E2E_Tests, as you can see in the code snippet below.
Write the complete REST API End to End Test
I have written an end to end test encompassing the steps as mentioned above. The example is relatively simple to follow through. Moreover, it involves the use of GET, POST, and DELETE Requests. It will benefit you if you go through the Rest Assured Tutorial at this point if you are not following.
package apiTests;

import java.util.List;
import java.util.Map;

import org.junit.Assert;

import io.restassured.RestAssured;
import io.restassured.path.json.JsonPath;
import io.restassured.response.Response;
import io.restassured.specification.RequestSpecification;

public class E2E_Tests {

    public static void main(String[] args) {
        String userID = "9b5f49ab-eea9-45f4-9d66-bcf56a531b85";
        String userName = "TOOLSQA-Test";
        String password = "Test@@123";
        String baseUrl = "https://bookstore.toolsqa.com";

        RestAssured.baseURI = baseUrl;
        RequestSpecification request = RestAssured.given();


        //Step - 1
        //Test will start from generating Token for Authorization
        request.header("Content-Type", "application/json");

        Response response = request.body("{ \"userName\":\"" + userName + "\", \"password\":\"" + password + "\"}")
                .post("/Account/v1/GenerateToken");

        Assert.assertEquals(response.getStatusCode(), 200);

        String jsonString = response.asString();
        Assert.assertTrue(jsonString.contains("token"));

        //This token will be used in later requests
        String token = JsonPath.from(jsonString).get("token");


        //Step - 2
        // Get Books - No Auth is required for this.
        response = request.get("/BookStore/v1/Books");

        Assert.assertEquals(response.getStatusCode(), 200);

        jsonString = response.asString();
        List<Map<String, String>> books = JsonPath.from(jsonString).get("books");
        Assert.assertTrue(books.size() > 0);

         //This bookId will be used in later requests, to add the book with respective isbn
        String bookId = books.get(0).get("isbn");


        //Step - 3
        // Add a book - with Auth
        //The token we had saved in the variable before from response in Step 1,
        //we will be passing in the headers for each of the succeeding request
        request.header("Authorization", "Bearer " + token)
                .header("Content-Type", "application/json");

        response = request.body("{ \"userId\": \"" + userID + "\", " +
                "\"collectionOfIsbns\": [ { \"isbn\": \"" + bookId + "\" } ]}")
                .post("/BookStore/v1/Books");

        Assert.assertEquals( 201, response.getStatusCode());


        //Step - 4
        // Delete a book - with Auth
        request.header("Authorization", "Bearer " + token)
                .header("Content-Type", "application/json");

        response = request.body("{ \"isbn\": \"" + bookId + "\", \"userId\": \"" + userID + "\"}")
                .delete("/BookStore/v1/Book");

        Assert.assertEquals(204, response.getStatusCode());

        //Step - 5
        // Get User
        request.header("Authorization", "Bearer " + token)
                .header("Content-Type", "application/json");

        response = request.get("/Account/v1/User/" + userID);
        Assert.assertEquals(200, response.getStatusCode());

        jsonString = response.asString();
        List<Map<String, String>> booksOfUser = JsonPath.from(jsonString).get("books");
        Assert.assertEquals(0, booksOfUser.size());
    }
}
Note: We added an import statement for JSONpath, import io.restassured.path.json.JsonPath; It will help us to traverse through the specific parts of the JSON. You can read more in the JSONPath article.
Run the REST API Test
Next step, we need to execute the test. Right-click in the test body and select Run As >> Java Application. The test will run, and you'll see the results in the Console. Consequently, the program executes successfully without any error. Just in case you happen to configure the same on IntelliJ IDE, the effect observed will be "Process finished with exit code 0". Additionally, it is another sign signifying that there were no errors and our tests executed successfully.
Note: It is not a UI based test. Moreover, there will not be any visual output to observe the test execution.
Conclusively, in the next tutorial, we will Convert our API tests into Cucumber BDD style. It will further our understanding of the way Cucumber Tests are structured.