In our previous tutorial, we wrote a simple End to End Rest API Test. The business flow of a use case was converted into a simple API request and response format of GET, POST, and DELETE Requests. Subsequently, our next step is to convert the REST API Test in Cucumber. While we are at it, we need to develop an understanding of the Cucumber BDD Framework. The Cucumber tutorials are relatively simple to understand and would be a great primer before we deep dive.
And now, we start with our Rest API Test in Cucumber.
REST API Test in Cucumber BDD Style Test
We will use the Cucumber BDD Framework to execute our tests. Additionally, it would require us to Convert our Rest Assured API Tests to the Cucumber BDD Style Test.
The following steps will help us to achieve this:
- Add Cucumber Dependencies to the Project
- Write a test in a Feature File
- Create a Test Runner
- Write test code to Step file
- Run test as JUnit test & Maven Command Line
Step 1: Add Cucumber Dependencies to the Project
Firstly, add the following dependencies to our project to execute our tests in Cucumber:
- cucumber-java
- cucumber-jvm-deps
- cucumber-JUnit
As we are developing the framework in Maven, it would be useful to add the dependencies. Therefore, add the following dependencies into the project POM XML.
cucumber-java: The location of the dependency details is at the [Maven Repository]tps://mvnrepository.com/artifact/io.cucumber/cucumber-junit/5.2.0).
<dependency>
    <groupId>io.cucumber</groupId>
    <artifactId>cucumber-java</artifactId>
    <version>5.2.0</version>
</dependency>
Note: As of Feb’2020, the latest cucumber-java version is 5.2.0.
cucumber-jvm-deps: The location of the dependency details is at the [Maven Repository].(https://mvnrepository.com/artifact/io.cucumber/cucumber-jvm-deps)
<dependency>
    <groupId>io.cucumber</groupId>
    <artifactId>cucumber-jvm-deps</artifactId>
    <version>1.0.6</version>
    <scope>provided</scope>
</dependency>
Note: As of Feb’2020, the latest cucumber-jvm-deps version is 1.0.6
cucumber-junit: The location of the dependency details is at the Maven Repository.
<dependency>
    <groupId>io.cucumber<</groupId>
    <artifactId>cucumber-junit</artifactId>
    <version>5.2.0</version>
    <scope>test</scope>
</dependency>
Note: As of Feb’2020, the latest cucumber-junit version is 5.2.0
Consequently, the complete pom.xml will look like this:
<?xml version="1.0" encoding="UTF-8"?>
<project xmlns="https://maven.apache.org/POM/4.0.0" xmlns:xsi="https://www.w3.org/2001/XMLSchema-instance" xsi:schemaLocation="https://maven.apache.org/POM/4.0.0 http://maven.apache.org/xsd/maven-4.0.0.xsd">
   <modelVersion>4.0.0</modelVersion>
   <groupId>ToolsQA</groupId>
   <artifactId>RestAssured_APITests</artifactId>
   <version>1.0-SNAPSHOT</version>
   <dependencies>
      <dependency>
         <groupId>junit</groupId>
         <artifactId>junit</artifactId>
         <version>4.13</version>
         <scope>test</scope>
      </dependency>
      <dependency>
         <groupId>io.rest-assured</groupId>
         <artifactId>rest-assured</artifactId>
         <version>4.2.0</version>
         <scope>test</scope>
      </dependency>
      <dependency>
         <groupId>io.cucumber</groupId>
         <artifactId>cucumber-java</artifactId>
         <version>5.2.0</version>
      </dependency>
      <dependency>
         <groupId>io.cucumber</groupId>
         <artifactId>cucumber-jvm-deps</artifactId>
         <version>1.0.6</version>
         <scope>provided</scope>
      </dependency>
      <dependency>
         <groupId>io.cucumber</groupId>
         <artifactId>cucumber-junit</artifactId>
         <version>5.2.0</version>
         <scope>test</scope>
      </dependency>
   </dependencies>
   <build>
      <plugins>
         <plugin>
            <groupId>org.apache.maven.plugins</groupId>
            <artifactId>maven-compiler-plugin</artifactId>
            <version>3.7.0</version>
            <configuration>
               <source>1.8</source>
               <target>1.8</target>
               <encoding>UTF-8</encoding>
            </configuration>
         </plugin>
      </plugins>
   </build>
</project>
Note: Update the POM by right click on the project root and select Maven >> Update Project. This action will nullify the dependencies based issues.
Additional note: If you feel comfortable adding the jars in the project library instead of using Maven dependencies, that's alright as well.
Step 2: Write a test in a Feature File
Secondly, we will highly recommend acquainting yourself with the tutorial on the Feature file. It will help in understanding the basics of the Cucumber feature file. Consequently, we will begin to convert our test scenario into the Cucumber Feature file.
In the previous chapter, we broke down the scenario into parts for us to easily convert the scenario into steps. Let's visit the scenario yet again,
- The test will start by generating a Token for Authorization
- Get List of available books in the library
- Add a book from the list to the user
- Delete the added book from the list of books
- Confirm if the book removal is successful
Conversion of above scenario to Cucumber BDD Style Test:
-
Background: User generates token for Authorisation
Given I am an authorized user
-
Scenario: the Authorized user can Add and Remove a book.
Given A list of books are available
When I add a book to my reading list
Then the book is added
When I remove a book from my reading list
Then the book is removed
Create Feature File
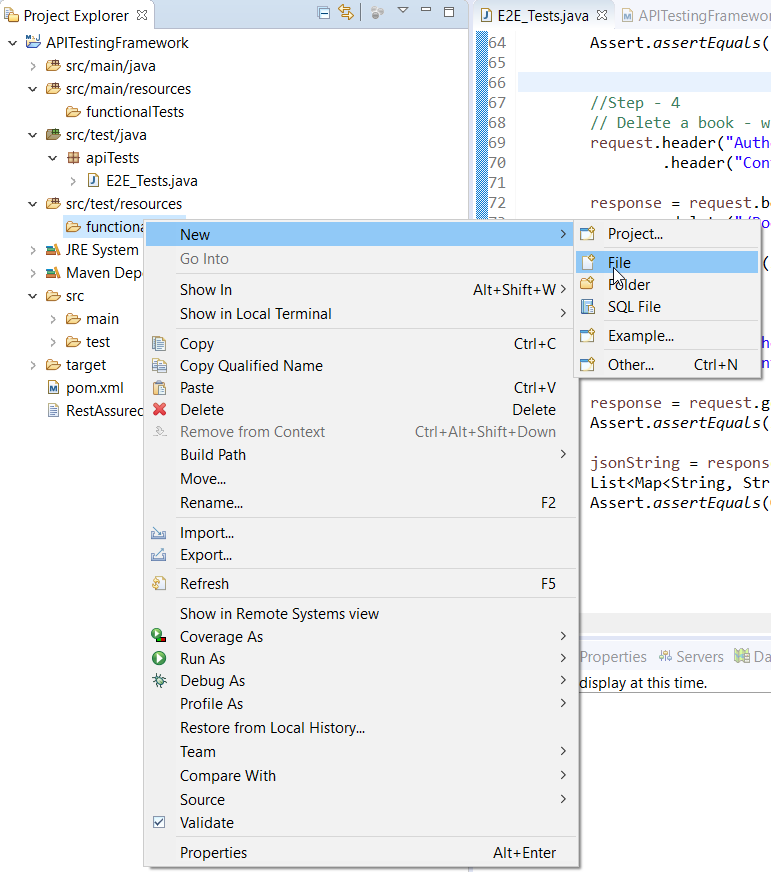
- First, create a New Package and name it as functionalTests. You can do it by right-clicking on the src/test/resources and select New >> Package.
Note: It's always recommendable to put all the feature files in the resources folder.
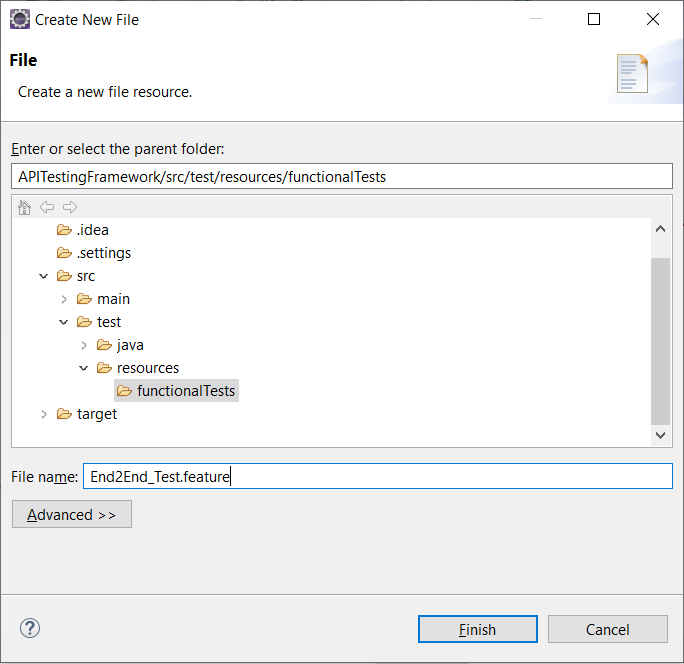
- Secondly, create a Feature file and name it as End2End_Test.feature by right click on the above created package and select New >> File.
Add .feature extension to the file.
- Lastly, add the test steps to the feature file.
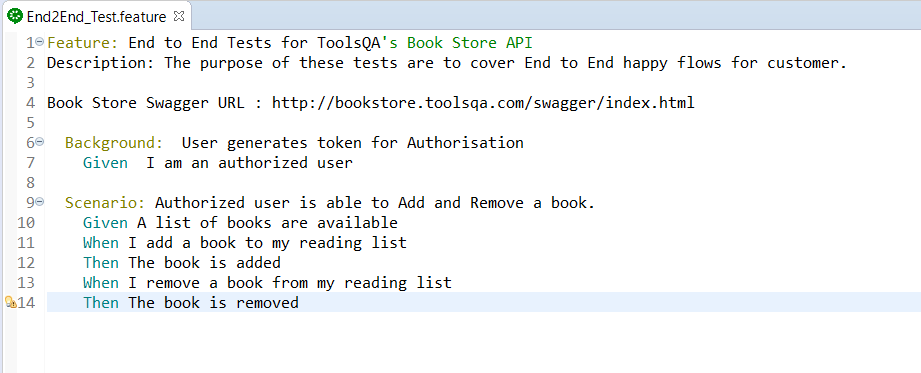
Note: As you are aware, the keywords used in the test steps are in different colors. Those are the Gherkin keywords. Eclipse does not understand these. However, if we install the cucumber Eclipse plugin-in, this will be recognized. Please follow our tutorial to Install Cucumber Eclipse Plugin.
Step 3: Create a JUnit test runner
Thirdly, we will create a Cucumber Test Runner to execute our tests. Moreover, we will need a Cucumber Test Runner based on the JUnit Test Runner for our tests. To understand more about Cucumber Test Runner, please refer JUnit Test Runner for the tutorial.
-
Firstly, Right-click on the src/test/java and select a New Package by using New >> Package. Name it as runners.
-
After that, Create a New Java Class file and name it as TestRunner by right click on the above-created package and select New >> Class.
package runners;


@RunWith(Cucumber.class)
@CucumberOptions(
        features = "src/test/resources/functionalTests",
)
public class TestRunner {
}
Note: Do not select the public static void main while creating the runner class.
Step 4: Write test code to Step file
Fourthly, as we move ahead in our next step to convert the test code to Step file, we need to revise our knowledge on Cucumber Step Definitions.
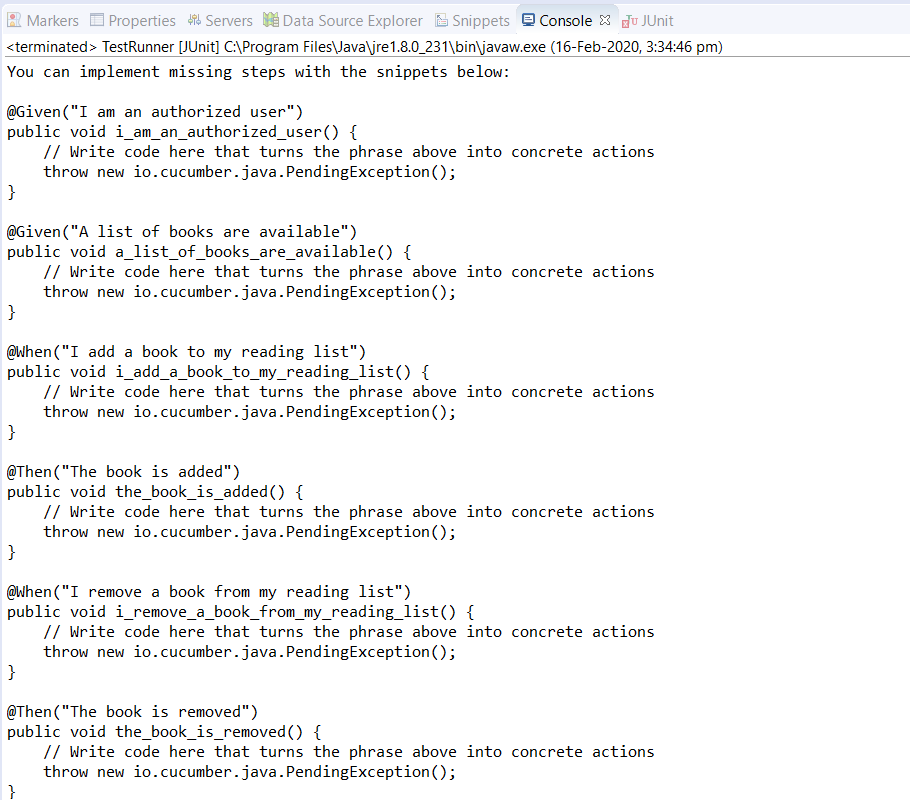
- To reduce our efforts in step creation, we will automatically generate the much required Cucumber Steps for implementation. Consequently, we will execute the TestRunner class for this. Right-click on the TestRunner file and select Run As >> JUnit Test. Therefore, you would get the below result in the Eclipse Console.
-
Create a New Package and title it as stepDefinitions by right click on the src/test/java and select New >> Package.
-
After that, create a New Java Class and name it is as Steps by right click on the above created package and select New >> Class.
-
Finally, copy all the steps created by Eclipse to this Steps file and start filling up these steps with Selenium Code. Select all the code from our Selenium Test file created in the End2End_Test. The Steps test file will look like this:
package stepDefinitions;

import java.util.List;
import java.util.Map;

import org.junit.Assert;

import io.cucumber.java.en.Given;
import io.cucumber.java.en.Then;
import io.cucumber.java.en.When;
import io.restassured.RestAssured;
import io.restassured.path.json.JsonPath;
import io.restassured.response.Response;
import io.restassured.specification.RequestSpecification;

public class Steps {
	private static final String USER_ID = "9b5f49ab-eea9-45f4-9d66-bcf56a531b85";
	private static final String USERNAME = "TOOLSQA-Test";
	private static final String PASSWORD = "Test@@123";
	private static final String BASE_URL = "https://bookstore.toolsqa.com";

	private static String token;
	private static Response response;
	private static String jsonString;
	private static String bookId;


	@Given("I am an authorized user")
	public void iAmAnAuthorizedUser() {

		RestAssured.baseURI = BASE_URL;
		RequestSpecification request = RestAssured.given();

		request.header("Content-Type", "application/json");
		response = request.body("{ \"userName\":\"" + USERNAME + "\", \"password\":\"" + PASSWORD + "\"}")
				.post("/Account/v1/GenerateToken");

		String jsonString = response.asString();
		token = JsonPath.from(jsonString).get("token");

	}

	@Given("A list of books are available")
	public void listOfBooksAreAvailable() {
		RestAssured.baseURI = BASE_URL;
		RequestSpecification request = RestAssured.given();
		response = request.get("/BookStore/v1/Books");

		jsonString = response.asString();
		List<Map<String, String>> books = JsonPath.from(jsonString).get("books");
		Assert.assertTrue(books.size() > 0);

		bookId = books.get(0).get("isbn");
	}

	@When("I add a book to my reading list")
	public void addBookInList() {
		RestAssured.baseURI = BASE_URL;
		RequestSpecification request = RestAssured.given();
		request.header("Authorization", "Bearer " + token)
		.header("Content-Type", "application/json");

		response = request.body("{ \"userId\": \"" + USER_ID + "\", " +
				"\"collectionOfIsbns\": [ { \"isbn\": \"" + bookId + "\" } ]}")
				.post("/BookStore/v1/Books");
	}

	@Then("The book is added")
	public void bookIsAdded() {
		Assert.assertEquals(201, response.getStatusCode());
	}

	@When("I remove a book from my reading list")
	public void removeBookFromList() {
		RestAssured.baseURI = BASE_URL;
		RequestSpecification request = RestAssured.given();

		request.header("Authorization", "Bearer " + token)
		.header("Content-Type", "application/json");

		response = request.body("{ \"isbn\": \"" + bookId + "\", \"userId\": \"" + USER_ID + "\"}")
				.delete("/BookStore/v1/Book");


	}

	@Then("The book is removed")
	public void bookIsRemoved() {
		Assert.assertEquals(204, response.getStatusCode());

		RestAssured.baseURI = BASE_URL;
		RequestSpecification request = RestAssured.given();

		request.header("Authorization", "Bearer " + token)
		.header("Content-Type", "application/json");

		response = request.get("/Account/v1/User/" + USER_ID);
		Assert.assertEquals(200, response.getStatusCode());

		jsonString = response.asString();
		List<Map<String, String>> booksOfUser = JsonPath.from(jsonString).get("books");
		Assert.assertEquals(0, booksOfUser.size());
	}
}
Note: As compared to our E2E tests created, we have made the following changes:
- Declared the variables as private static final to not allow changes outside the class.
- We have updated method names and not kept the same as auto-generated ones.
- The TestRunner file must be able to find the steps files. To achieve that, we need to mention the path of the package. This path has all of our step definitions in CucumberOptions. Additionally, to know more about the parameters we can add in the @CucumberOptions, please visit our tutorial Cucumber Options.
package runners;
import io.cucumber.junit.Cucumber;
import io.cucumber.junit.CucumberOptions;
import org.junit.runner.RunWith;

@RunWith(Cucumber.class)
@CucumberOptions(
        features = "src/test/resources/functionalTests",
        glue = {"stepDefinitions"},
        monochrome = true,
        strict = true
)

public class TestRunner {

}
Note: By default, the Junit/Cucumber finds the test code in the src/test/java folder. Hence, this is why we just need to specify the package name for the cucumber glue.
Step 5: Run the Cucumber Test
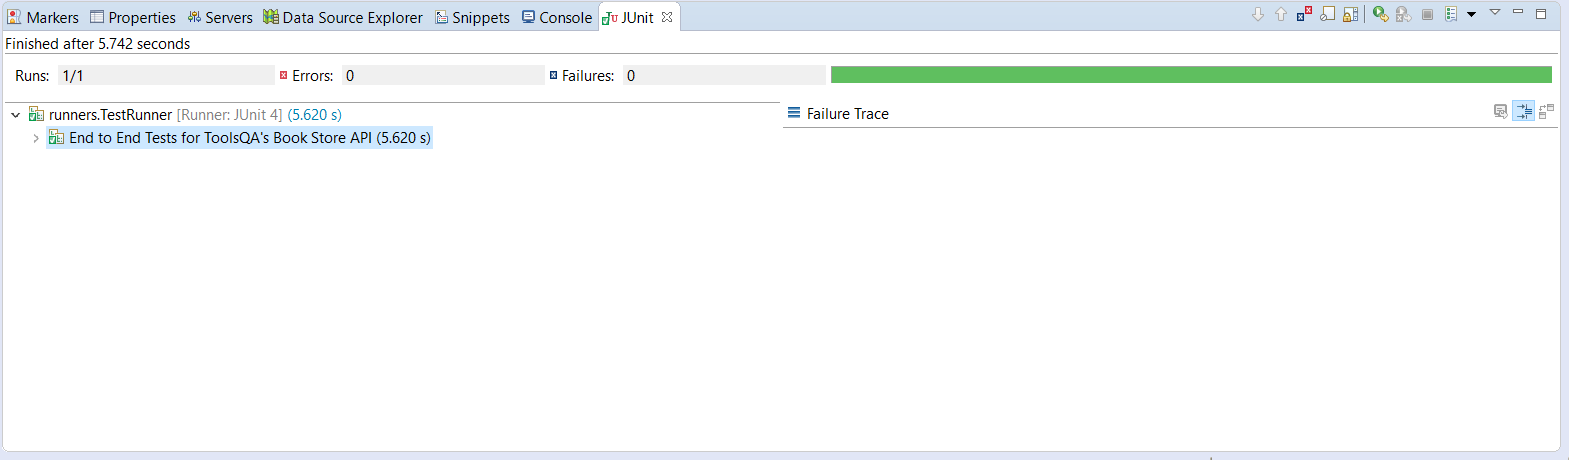
Run as JUnit
Finally, we are all set to run the first Cucumber test. Right -Click on TestRunner class and Click Run As >> JUnit Test. Cucumber will execute the script the same way it runs in Selenium WebDriver. Consequently, the result will appear in the left-hand side project explorer window in the JUnit tab.
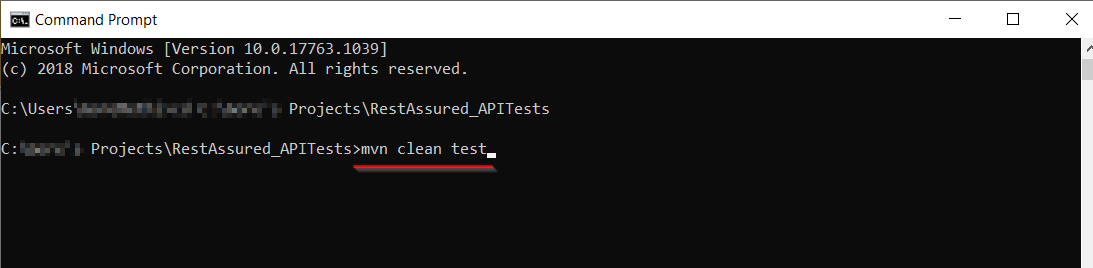
Run the Tests from Command Prompt
We have a Maven Type project, and thus, we can run our tests from the command prompt as well. A simple command to run tests is an mvn clean test. Moreover, to use this command, we have to change our directory to the location of our Cucumber project. In the below screenshot first, I went to my project location, and then I used the Maven as mentioned above command to run the test.
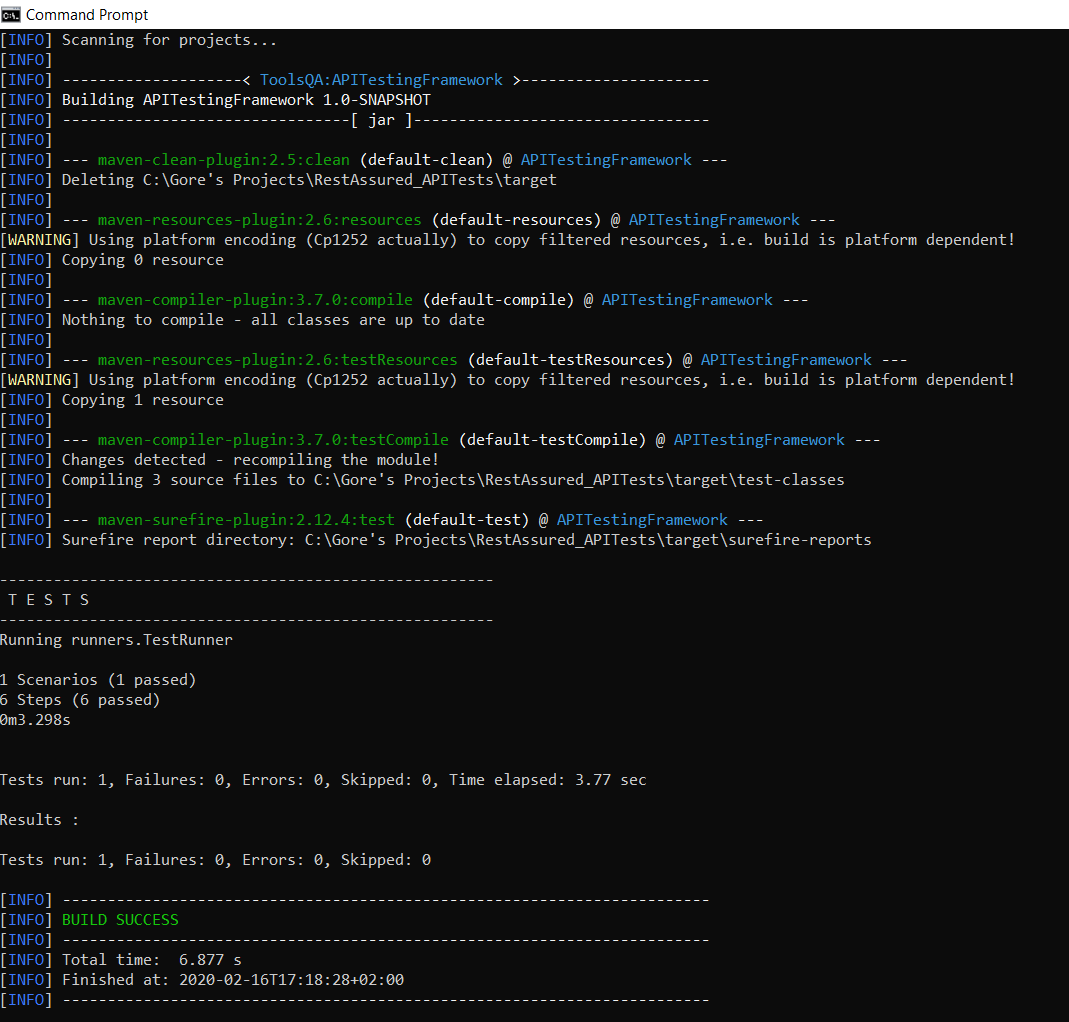
Consequently, we can see the output of the tests below in the command prompt.
To conclude, by now, we have converted our Rest Assured API tests into Cucumber based tests. Subsequently, we will see how to implement the Java serialization concept in our Framework and enhance it. Moreover, it would be useful at this stage to go through the Convert JSON to JAVA Object tutorial as a refresher before advancing on the next framework tutorial.