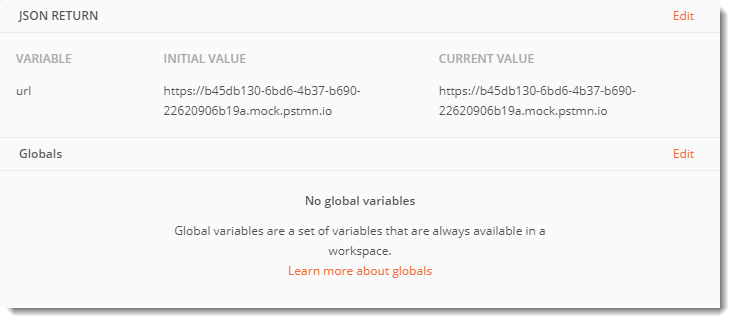
Sessions in Postman is a newly introduced feature (after version 6.2) which was much needed before this was introduced. It has solved a problem of sharing sensitive information you used in the project with other members of the team which may or may not be located with you. It has given an additional layer to hold collection, environments and variables. The following image shows the Postman sessions holding two values of Variables called Initial Value & Current Value.
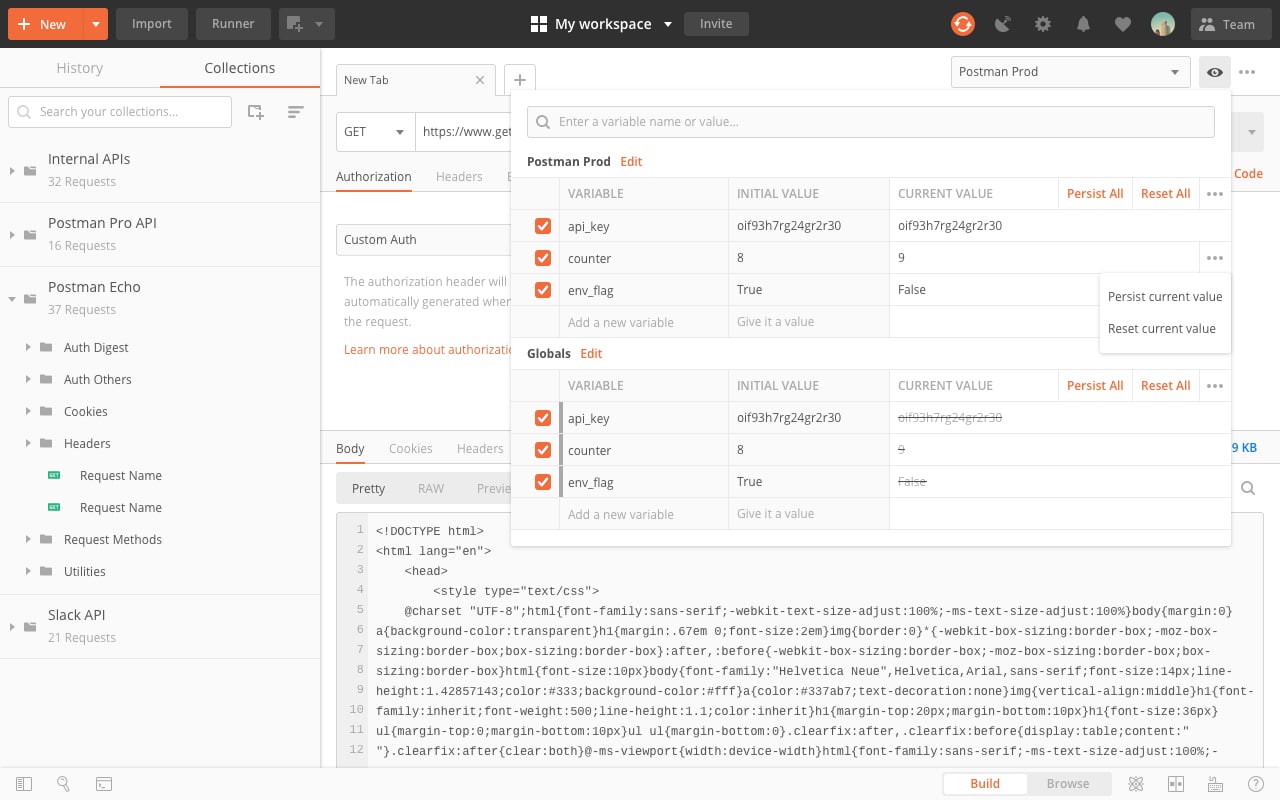
Do not worry about the different terminologies here. Notice just that two types of values are used here for each variable. This was not available before this version in Postman. Everything about Postman sessions is confined to these two values. We will come to this in the later sections in detail. Although this is a newly introduced feature, it needs few prerequisites to work with
Pre-Requisites
- Knowledge of Environment and Variables (Refer Environment and Variables)
- Knowledge of Collection in Postman (Refer Collections In Postman)
- Knowledge of Workspaces in Postman (Refer Workspace in Postman)
Sessions in Postman is described as a transient layer that holds your variable values related to your current working instance by allowing you to work with certain variables that remain local to your individual scope (referred from official postman website). This is quite technical and I am pretty sure it is hard to decode the real value of this feature by now. So we will take all this in the upcoming sections of this tutorial. In this tutorial we will learn about
- What are session in postman
- Advantages of sessions
- How to use sessions in postman
What are Sessions in Postman?
As described above, sessions holds your variable values to make them available locally to you. A session in postman means that you can change the value of some variables according to you and work on your system accordingly. These values need not be shared when you share your work with your team. Let say you work with a bunch of developers in a team. You all are working on a server where access token is required which is get using client id, secret as explained in the Oauth 2.0 tutorial. As mentioned there, these values are confidential to you and should not be shared, even among your team members. Keeping this in mind, sessions has been introduced in Postman. With sessions you can use your own values in the variables locally and these values will not be synced to the postman server. These values will also not be shared when you share the collection. Simply put, your session variables will remain local and personal to you in every aspect. We will use the same example described here in the explanation of using the session variables in the upcoming section to make it more clear.
Advantages of Session Variables
- Change of Values: You can change the values in sessions in Postman according to you including the sensitive data while working in the team as Postman does not sync these values. So these values will remain local to you.
- Sessions in Postman allows you to change the initial values and current values separately.
- Sessions allows you to work with many people in your workspace and still use your own IDs, Token, Passwords etc.
Sessions in Postman
Before continuing on to use the session variables in Postman, we must see the different between the variable panel interface earlier and after the 6.2 version here.
Previously the interface looked something like this
![]()
After the update and inclusion of sessions, this interface is changed to something like this
Now, you can see two new columns in this interface
- Initial Value: Initial value is the value that other people will see when you share your collection. This should not contain sensitive information like token, id etc which can lead to access to your account.
- Current Value: This value is personal and local to you. It will not be seen by the other people once you share the collection with them.
The below image shows the same.
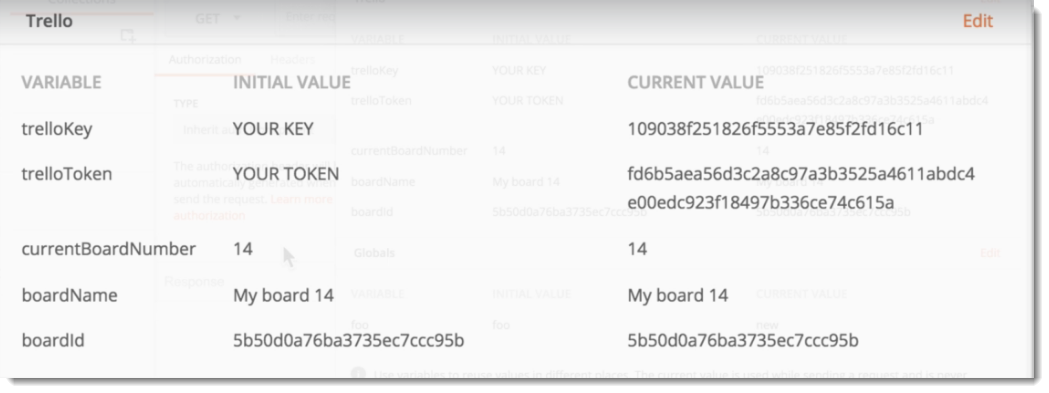
Here the initial value has been given the name Your Key so that when we share it with other people, they will know that they have to insert their own key in the current value. This way our sensitive information will remain local to our system. This value is not synced with the Postman cloud so there is no need to worry.
Now, we can proceed further to understand more about sessions.
How to use Sessions in Postman?
We will be continuing with the same process as we did while generating the OAuth 2.0 token in Postman. In that tutorial, we generated an access token to be used with the API to access our account information.
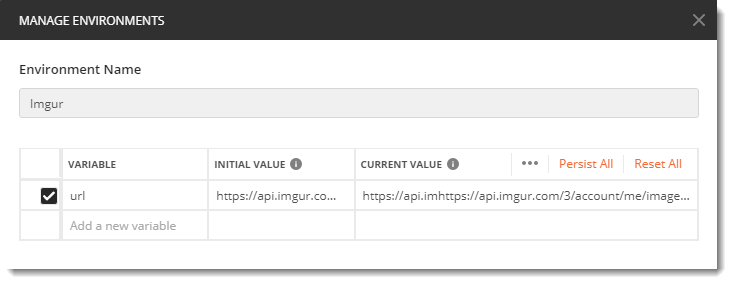
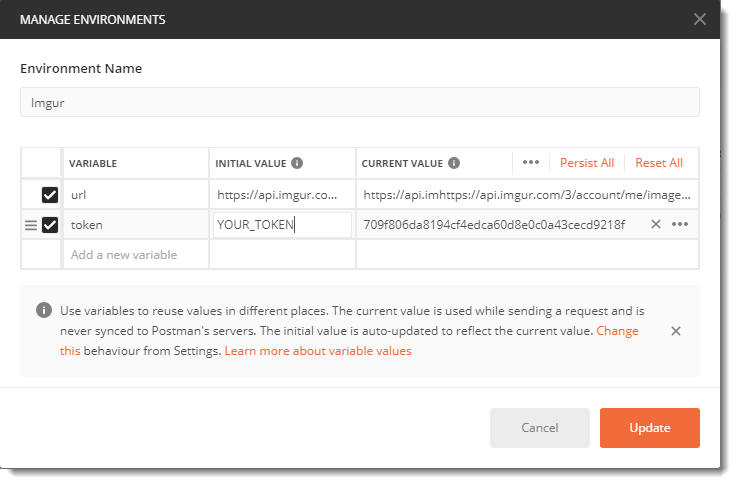
- Create a new environment Imgur with a variable URL (containing the endpoint URL) as shown in the image
Please refer environments and variables to know about the creation of an environment and variables in Postman.
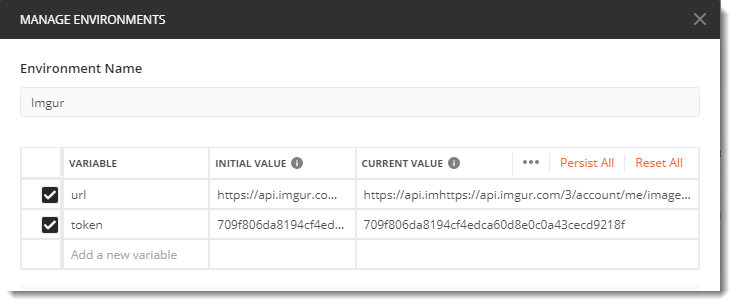
- Add another variable to this environment called token which will contain the token value that you fetched.
Note: The above example is in the continuation of OAuth 2.0 Authorization with Postman, please refer the same tutorial to get the actual value of Authorization token.
Just enter the initial value and you can see that your current value will be automatically updated.
- Go back to Postman and see under Header section that the authorization is hard coded because we added it automatically.
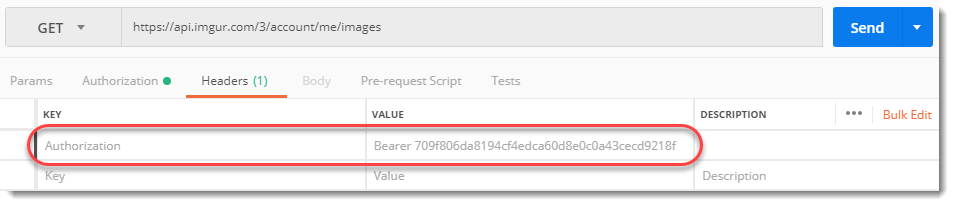
Note: The above example is in the continuation of OAuth 2.0 Authorization with Postman, please refer the same tutorial to get the actual value of Authorization token.
- Now if we try to add another Header of Authorization, we get a prompt by Postman.
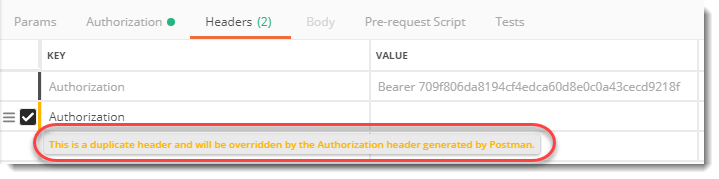
This prompt basically means you cannot use the same header Authorization twice as it will be overridden.
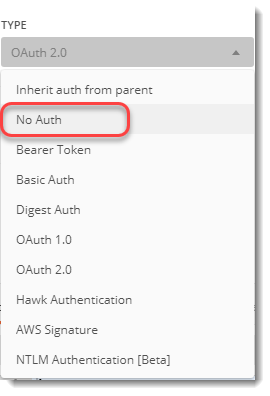
- Go to Authorization tab and select No Auth in the Authorization Type Tab.
- Go back to Header tab and now enter the Authorization key with value as Bearer {{token}}.

- Hover your mouse over {{token}} and see the values mentioned
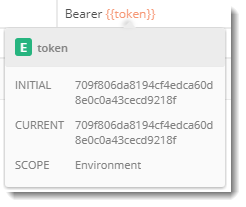
- These are both Current and Initial value. But token value is sensitive. Anyone can access your account with the token value. So as discussed above, we must change the Initial Value so that it is not shared among others. For this, you need to press the edit button from the environment panel and the panel given in step 2 will open up. Change the initial value as given.
This will remind every other member to enter their own value in the field.
Now you can press send to the API and see that the result is same as you got in the OAuth 2.0 tutorial. So basically to end this, session variable is used to use our own variables' value personally. It helps us to keep our sensitive information private to our system. Whether you share the collection with in team or even after signing in to postman cloud. I hope you got the concept. On this note, we end this tutorial here.