With the wide adoption of Agile practices in software development processes, there was always a need for a common language for all the stakeholders. So that both technical and non-technical stakeholders are on the same page, and there is no confusion around the expected and delivered requirements. BDD has solved this problem to a large extent by providing a common platform to all the stakeholders (such as Product Owner, Scrum Master and Scrum Team(Business Analyst, Developer, and Quality Analyst) to use the same specification file (written in Gherkin language) as the source of truth. Various tools provide the capability to write the requirements and tests in the Gherkin format, but Cucumber is undoubtedly the leader in this space. Following the latest trends in the market, Cypress also provides the capability to integrate its tests with Cucumber and to develop a BDD Automation Framework in Cypress.
Let's understand in this article the intricacies of BDD and Cucumber and their integration with Cypress for development of a Gherkin based test automation framework in Cypress, by covering the details under following headings:
- What is Behavior Driven Development?
- What is Cucumber?
- How to integrate Cucumber with Cypress?
- How to set up Cucumber with Cypress?
- Also, how to configure Cucumber with Cypress?
- How to write Cucumber BDD tests in the Cypress framework?
What is Behavior Driven Development?
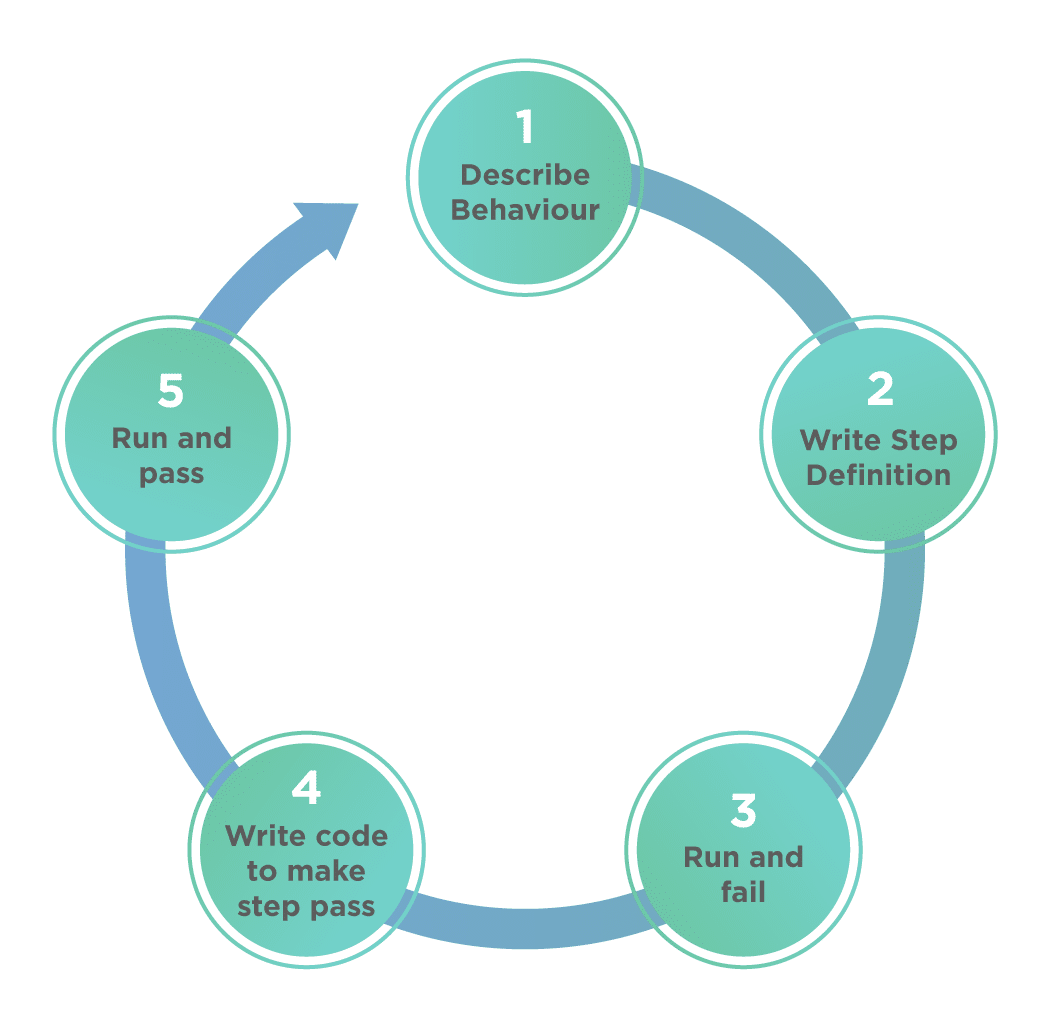
Behavioural Driven Development (BDD) is an Agile Software Development process that has evolved from TDD (Test Driven Development). It differs by being written in a shared language, which improves communication between the tech and non-tech teams and stakeholders and also encourages the collaboration between different roles within the same team. In both development approaches, though, tests are written ahead of the code. But in BDD, the only difference is that tests are more end user-focused. That includes user journeys based on the system's behavior and uses the English level syntax to documenting the test cases. The below figure gives a basic overview of the steps involved in the BDD process:
One of the essential advantages of using BDD is that we use a common language(known as "Gherkin") to write the test cases. It explains how the application behaves so that all the stakeholders involved can easily understand it. It follows the "Given-When-Then" structure, as shown below:
Given a particular scenario or precondition
When an action takes place
Then this should be the outcome.
Note: For more details onBDD, you can refer to the article: "Behavior Driven Development."
Now, as discussed above, to implement BDD, there are various tools available in the market. Below is a sample list of a few of them.
- Specification by Example
- Behat (PHP framework)
- Cynefin framework
- Concordion (Java framework)
- Cucumber (initially a Ruby framework, also available for Java, JavaScript and other languages)
- Gauge (software)
- Jasmine (JavaScript testing framework)
- Squish GUI Tester (BDD GUI Testing Tool for JavaScript, Python, Perl, Ruby, and Tcl)
As we have to understand the usage and integration of Cucumber with Cypress, let's first understand what exactly is Cucumber and work on developing a Cucumber BDD automation framework in Cypress?
What is Cucumber?
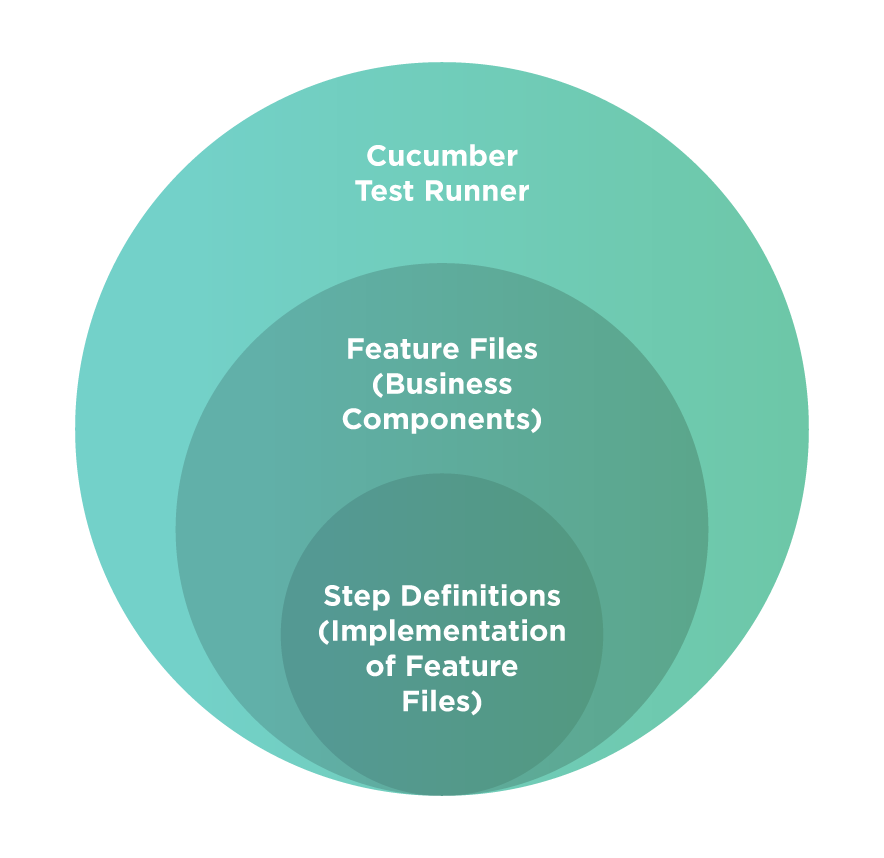
As discussed, Cucumber is one of Gherkin based tool which supports and helps in Behavior Driven Development (BDD). This tool offers the capability to write our tests in a syntax similar to English. The below figure shows the essential components of a Cucumber based automation framework:
Where,
- Feature File is the entry point to the Cucumber tests of your framework. It is a file where you will write your tests or acceptance criteria in Descriptive Gherkin language (Like English). It is an essential component of Cucumber, as it serves as an automation test script as well as live documentation containing the acceptance criteria. A feature file can include one or many scenarios that are in the form of Given-When-Then format.
- Step Definition is a small piece of code with a design pattern attached to it. An annotation followed by the pattern that we have mentioned in the feature file links the Step Definition to all the matching Steps. Cucumber will execute the code when it sees a Gherkin Step mentioned in the feature file. Cucumber finds the corresponding Step Definition file with the help of the Glue code that we mention in Cucumber Options.
The above concepts of Cucumber remain consistent across all the programming languages that it supports. As we are going to integrate Cucumber with Cypress, which is a JavaScript framework, so, we will be using the Cucumber-js for this integration. Let's see how we can integrate Cucumber with Cypress for the development of a Cucumber BDD framework in Cypress.
How to integrate Cucumber with Cypress?
Till now, we have written all the Cypress test scripts directly in the JavaScript files, but with the integration of Cucumber, the test structure will change, and now the entry points will be the Cucumber feature files. Let's understand step by step, how we can integrate Cucumber in a Cypress for development of a BDD automation framework in Cypress:
How to set up Cucumber with Cypress?
The first step in the integration of Cucumber with Cypress is installing the dependency of Cucumber preprocessor in the framework. For installing the Cucumber-preprocessor node module for Cypress, we can use the following command:
npm install --save-dev cypress-cucumber-preprocessor
When we execute this command, it will produce the sample output, as shown below:

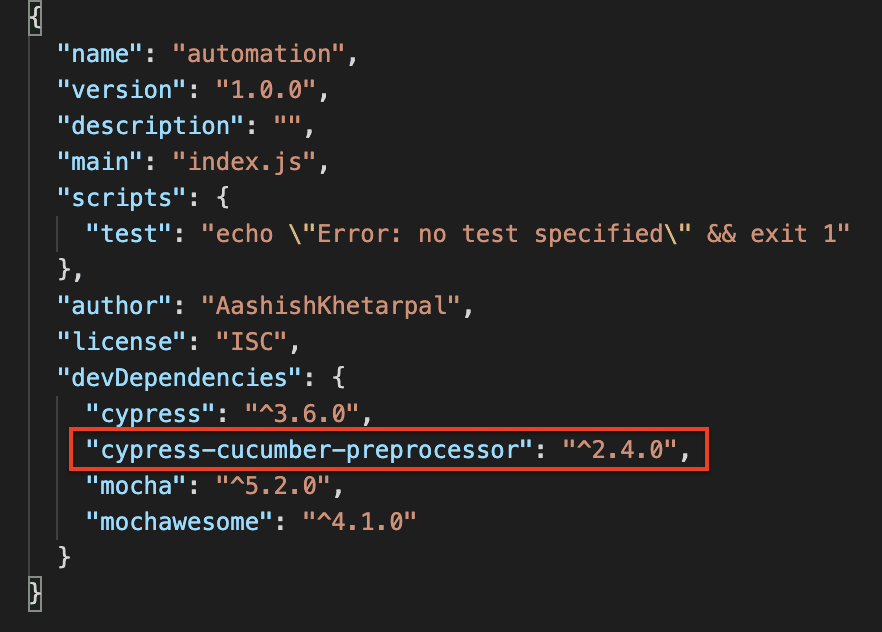
Where marker 1 shows the command, we need to run to install Cypress plugin, and marker 2 shows the packages installed. It will add a new dependency in the "package.json" file, as shown below:
Now, once the Cucumber-preprocessor installation is successful, the next step is to make some configuration changes, so as Cypress can start using the Cucumber and enables users to write BDD tests.
How to configure Cucumber with Cypress?
To enable usage of Cucumber in the Cypress automation framework, we need to make some configurations in 3 files as shown in the below screenshot:

- The first file (shown by marker 1) is the "index.js" file under the plugins folder. We need to make the following changes in the "index.js"file, which exports Cucumber as a module and make it accessible in other Cypress files.
module.exports = (on, config) => {
  // `on` is used to hook into various events Cypress emits
  // `config` is the resolved Cypress config
}

const cucumber = require('cypress-cucumber-preprocessor').default

module.exports = (on, config) => {
  on('file:preprocessor', cucumber())
}
- The next set of configuration changes are in the "cypress.json" file*(shown by marker 2). The changes here specify that Cypress should only consider those as test files, which end with extension as ".feature or .features*", which are the extensions for the Cucumber feature files. Specify the below configuration in the "cypress.json" file:
{
  "testFiles": "**/*.{feature,features}"
}
- The last file which needs to be updated is the "package.json" file*(shown by marker 3)*. Here we need to specify the configuration that non-global step definitions are allowed, which means that step definitions can exist in sub-folders as well. Add the following code at the end of the package.json file just after the devDependencies section:
"cypress-cucumber-preprocessor": {
    "nonGlobalStepDefinitions": true
}
Conclusively, with all the configuration changes for integration of the Cucumber with Cypress framework. We have set up the initial milestone for the development of the BDD automation framework in Cypress. Let's now understand how we can write the Cypress tests cases with Cucumber:
How to write Cucumber BDD tests in the Cypress framework?
So by now, we have understood the necessary details of BDD. Additionally, we have done all the configurations needed to integrate Cucumber with Cypress. Now, let's see how we can write our test scenarios with Cucumber and Cypress with the help of following test scenario:
- Open the URL, which is My Account page of E-commerce demo website http://shop.demoqa.com/my-account/.
- Then do the registration using a valid username, email, and password.
- Verify if the registration was successful or not.
- Search for Shirt and select 2 products as per the data provided in parameters.
- Browse the Checkout page and verify the addition of the correct product in the cart.
- Enter the Billing Data along with the Login details.
- Place the order button and verify that the order has been placed successfully or not.
Let's see step by step how we can implement the above test scenario:
Define a Cucumber Feature File:
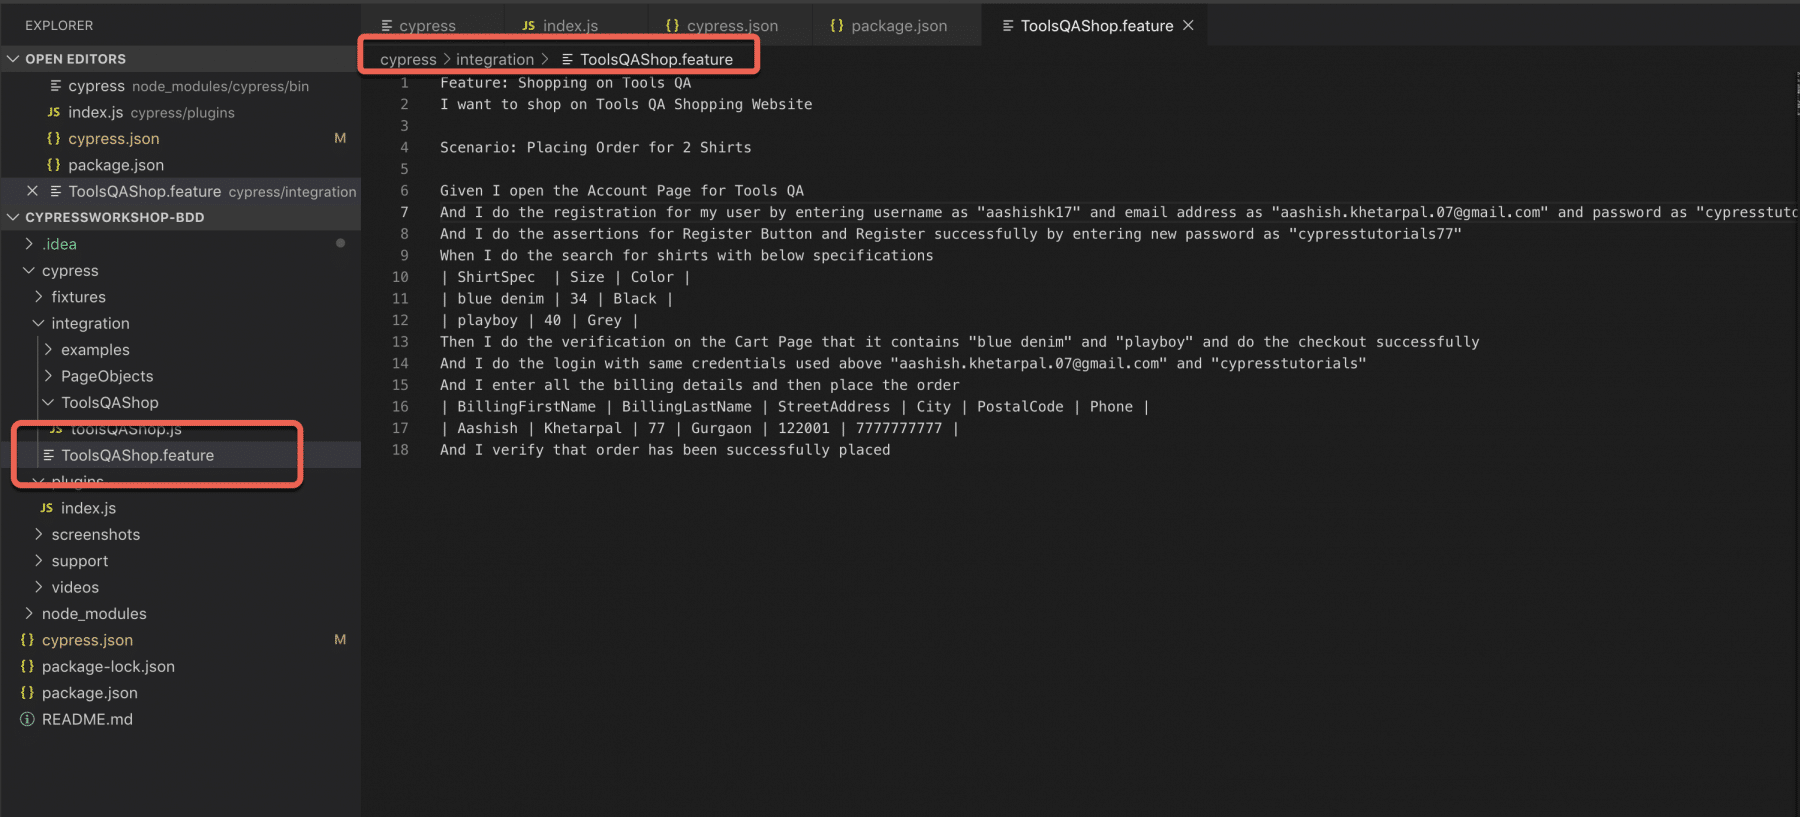
So for the test steps in our scenario, let's write down a feature file using Gherkin(Given-When-Then) language by creating a file ToolsQAShop.feature under the Integration folder. The feature file will contain the following contents:
Feature: Shopping on Tools QA
I want to shop on Tools QA Shopping Website

Scenario: Placing Order for 2 Shirts

Given I open the Account Page for Tools QA
And I do the registration for my user by entering username as "aashishk17" and email address as
"[email protected]" and password as "cypresstutorials"
And I do the assertions for Register Button and Register successfully by entering new password
as "cypresstutorials77"
When I do the search for shirts with below specifications
| ShirtSpec  | Size | Color |
| blue denim | 34 | Black |
| playboy | 40 | Grey |
Then I do the verification on the Cart Page that it contains "blue denim" and "playboy"
and do the checkout successfully
And I do the login with same credentials used above "[email protected]" and "cypresstutorials"
And I enter all the billing details and then place the order
| BillingFirstName | BillingLastName | StreetAddress | City | PostalCode | Phone |
| Aashish | Khetarpal | 77 | Gurgaon | 122001 | 7777777777 |
And I verify that order has been successfully placed
So we have written a feature "Shopping on Tools QA", and it's one scenario "Placing Order for 2 Shirts".
Now in this Cucumber feature file, we will see we have kept all our test data here in two forms of parameters :
-
In inverted commas: This is one parameter we want to pass to the step definition file that we will write later.
2.* In Table Form: As we can see in the When statement, where the requirement was to add two shirts by specifying its spec, size, and color, instead of writing this step twice, we have stored our data in table form.*
So now, we have our feature file setup done. Now let's move to step definition and write down the implementation of all these steps we have defined in features file as highlighted in below screenshot :
Define a Step Definition File:
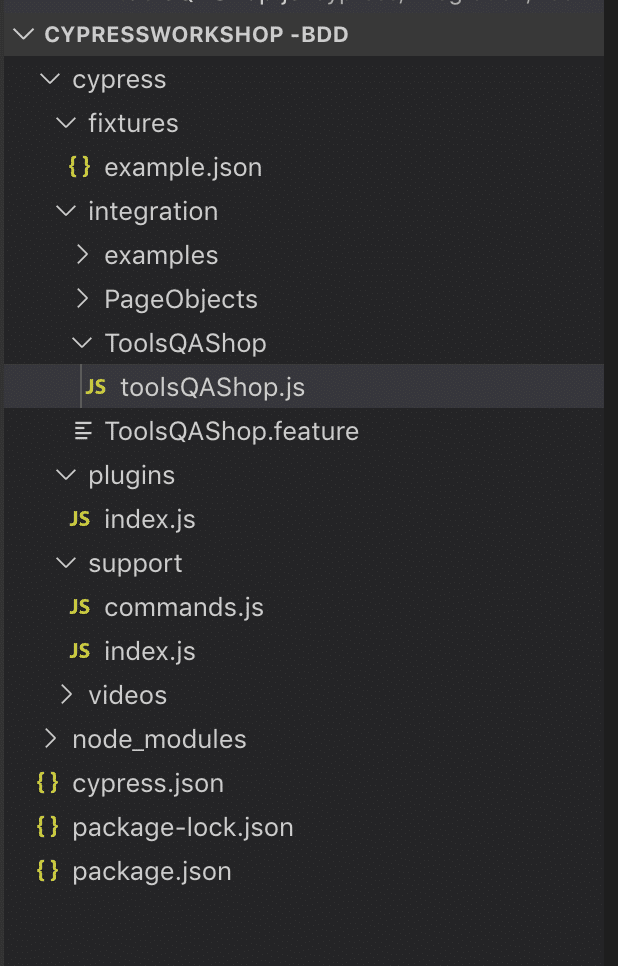
So to implement the step definition file, we can create a folder ToolsQAShop and under that create a file toolsQAShop.js, which will be our step definition file. Keep the name of the folder the same as the feature file so that our framework understands where it has to look for step definitions. The sample hierarchy of the step definition file will look as follows:
Now we have our js file ready where we have to write the implementation of these steps. Also, one more point to add, we still will be using the Page Classes that we created while learning the Page Object pattern. Using Page classes is always helpful because it is straightforward to understand and maintain the page locators if we are splitting them. We will just refactor the main test.js by writing the feature implementation. So, the sample implementation of the step definition file will look as follows:
import { Given , And , Then , When} from "cypress-cucumber-preprocessor/steps";
import HomePage from '../PageObjects/HomePage';
import CheckoutPage from '../PageObjects/CheckoutPage';
import BillingPage from '../PageObjects/BillingPage';

//Object Creation for PageObject Page Class and assigning it to a constant variable

const homePage=new HomePage();
const checkoutPage= new CheckoutPage();
const billingPage=new BillingPage();

//test steps
Given('I open the Account Page for Tools QA', () => {
cy.visit(Cypress.env('url'));

And('I do the registration for my user by entering username as {string} and email address as {string}
and password as {string}', (Username , Email , Password) => {
homePage.getUserName().type(Username);
homePage.getEmail().type(Email);
homePage.getPassword().type(Password);
})

And ('I do the assertions for Register Button and Register successfully by entering new password
as {string}', (NewPassword) => {
//homePage.getRegisterButton().should('have.attr','disabled','disabled');
//homePage.getRegisterButton().should('be.disabled');
//homePage.getPassword().type(NewPassword);
homePage.getRegisterButton().click();
})

When ('I do the search for shirts with below specifications', datatable => {
    datatable.hashes().forEach(row => {
    cy.selectProduct(row.ShirtSpec,row.Size,row.Color);
    })
})

Then ('I do the verification on the Cart Page that it contains {string} and {string} and do the checkout
successfully' , (ProductText1 , ProductText2) => {
    //End to End Test Completion including Checkout and Placing Order
    checkoutPage.getCartButton().click();
    //Validate if the items we added are successfully there in the cart using should and expect together.
    checkoutPage.getProducts().should(($p) => {
    expect($p).to.have.length(2); // There should be 2 items in cart.
    expect($p.first()).to.contain(ProductText1); // First Element should have blue denim
    expect($p).to.contain(ProductText2); // Verifying that playboy shirt should also be there
    });
    checkoutPage.getCheckoutButton().click();
})

And ('I do the login with same credentials used above {string} and {string}',(Email , Password) => {
    billingPage.getShowLogin().click();
    billingPage.getLoginUserName().type(Email);
    billingPage.getLoginPassword().type(Password);
    billingPage.getLoginButton().click();
})

And ('I enter all the billing details and then place the order', datatable => {
    datatable.hashes().forEach(row => {
    billingPage.getBillingFirstName().clear().type(row.BillingFirstName);
    billingPage.getBillingLastName().clear().type(row.BillingLastName);
    billingPage.getBillingAddress().clear().type(row.StreetAddress);
    billingPage.getStateDropdown().click().then(function(){
        billingPage.getStateSearchBox().clear().type('Haryana').type('{enter');
    });
    billingPage.getBillingCity().clear().type(row.City);
    billingPage.getBillingPostCode().clear().type(row.PostalCode);
    billingPage.getBillingPhone().clear().type(row.Phone);

    //Placing the Order button click by selecting the checkbox

    billingPage.getTermsCheckbox().click();
    billingPage.getPlaceOrderButton().click();
})
})

And ('I verify that order has been successfully placed',() => {
    billingPage.getOrderPlacedText().then(function(element){
    expect(element.text().includes("Thank you")).to.be.true;
})
})
})
Some of the key points to understand this code snippet:
-
Import statement: We have imported Given - When - Then annotations from Cypress-preprocessor. The reason for this is these annotations provide the mapping between steps in feature files and the methods in the step definition files.
-
While writing the step definition for the statements in the Cucumber feature file, the English text in the feature file and the step definition file should be the same. It assists the Regex in identifying which step matches to which method implementation.
-
For data that was in inverted commas in the feature file, we are saving it as a {string}. Then, later, we will pass it as a parameter like we have used Username, Email, etc.
-
For data that was in the table in the feature file, we have used a data-table object. Along with that, have used a hashes function for each loop to traverse through all rows mentioned in the data-table.
So we are done with the necessary implementation, now let's see how to run this feature file and how it shows in the Test Runner.
Run the Cucumber feature file
If you open Cypress now, you will find the feature file (as shown below) there, and all you have to do is double click and see how the test runs:

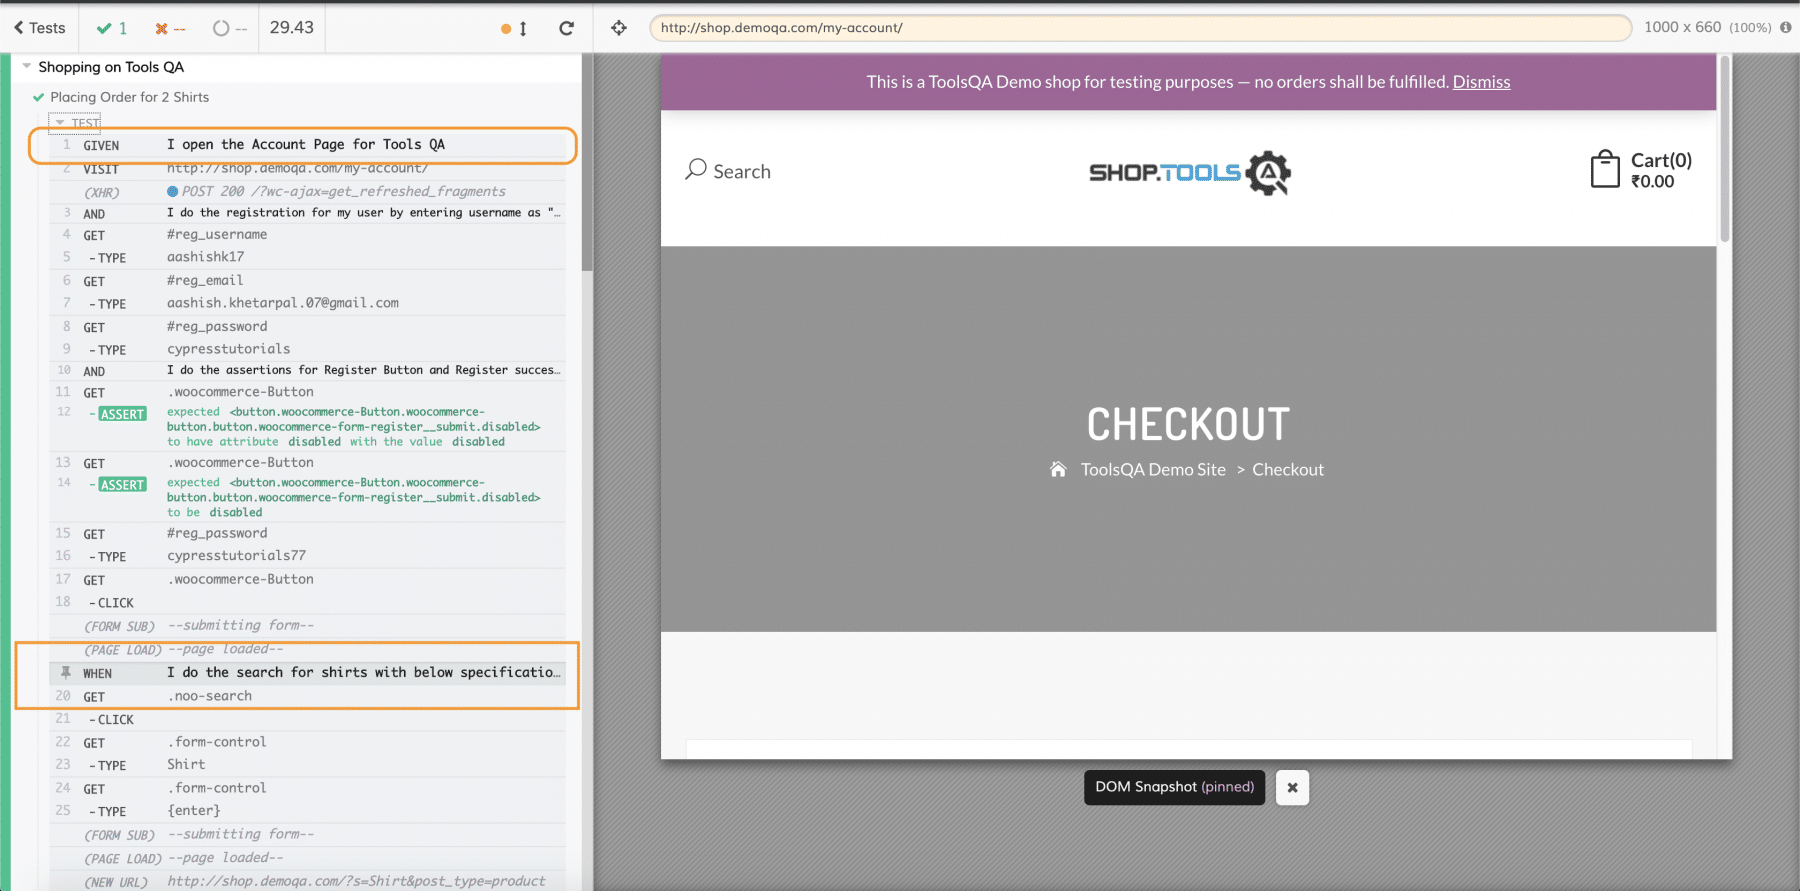
Now on the left side panel of the test runner, you will see your steps divided into Given-When-Then statements. They are the same as written in your Feature file and after that in step definitions, as highlighted below. So it becomes easier to track which particular step got passed and which failed. A sample test run of the Cucumber feature file will show the results as below:
And this is all. We have now discussed the integration and implementation of the Cucumber based BDD automation framework in Cypress.
Key Takeaways
- Cypress provides integration with Cucumber for writing the test scenarios in BDD format.
- Cypress uses all the capabilities of Cucumber by using the Cucumber-preprocessor node module.
- Similar to other Cucumber implementations, with Cypress also, it uses the RegEx mapping. It assists in mapping the steps in feature files with the methods in the step definitions files.
- Cypress Test Runner can recognize and execute Cucumber feature files, the same way it runs the Cypress spec files.
If you want to learn more you can look at this video series: ++Cypress video series++