Every test automation framework that we create in today's world is run either from the command-line or using CI/CD tools such as Jenkins, without any human interference. Also, whenever your test fails due to any reason, then your automation tool should be smart enough to straight forward tell you the reason for failure or give you pieces of evidence that can help you in debugging the cause of failure. Capturing Screenshots and Videos during the test runs make it very easy to debug any of the issues during the test run, and the maximum of the UI automation frameworks provides at least one of these qualities. Cypress also follows the same market trends and provides the capabilities to capture both screenshots and videos during the test run. Let's understand in the following topics, how an engineer can use these features to make the test runs in Cypress more robust, stable, and easy to debug.
- What are screenshots in Cypress terminology?
- How to capture screenshots explicitly during a test run in Cypress?
- What are the different naming conventions used for screenshots in Cypress?
- How do we get automatic screenshots of test failures in Cypress?
- What are the videos in Cypress terminology?
- How can we capture videos of the entire test runs in Cypress?
- How to capture and verify screenshots and videos on Cypress Dashboard?
What are screenshots in Cypress terminology?
Screenshots, as we all know, is an image which shows the contents of the screen at a particular moment. The same way during the automated test runs, whatever appears on the browser's screen, can be captured as a screenshot. Cypress as a tool comes with the in-build capability to take screenshots irrespective of whether you are running in interactive mode using cypress open or cypress run and even in headless mode on the command line or CI as part of your pipeline. The Cypress framework is smart enough to take screenshots on the failure of a test case on its own; we don't have to write any code for this. But if we want to take some explicit screenshots during the test runs, Cypress provides following methods for the same:
cy.screenshot()
cy.screenshot(fileName)
cy.screenshot(options)
cy.screenshot(fileName, options)
Where,
- fileName (string) is the name for the image file that we want to save, and this will be relative to the screenshots folder and the path to the spec file.
- options is an object to change the default behavior of .screenshot( ) method. For example, - we can set options such as log, timeouts, and blackouts, etc.
The screenshot gets stored in the cypress/screenshots folder by default. We can change the directory where screenshots are saved in by changing the values in Cypress global configurations.
Let's understand, with the help of an example, how to capture screenshots during a test run explicitly:
How to capture screenshots explicitly during a test run in Cypress?
As mentioned above, Cypress offers the "screenshot()" method to capture the screenshots at run time. Consider a scenario that we want to capture a screenshot, after successful login on the Demo site "http://shop.demoqa.com/." We can explicitly call the screenshot method after the successful login as shown in the below code snippet:
// type definitions for Cypress object "cy"
// <reference types="cypress" />

import HomePage from '../../support/PageObjects/HomePage';
import CheckoutPage from '../../support/PageObjects/CheckoutPage';
import BillingPage from '../../support/PageObjects/BillingPage'

describe('Automation Test Suite ', function() {

    //Mostly used for Setup Part
    before(function(){
    cy.fixture('example').then(function(data)
    {
        this.data=data ;
    })
    })

    it('My First Test Case', function() {
    //Object Creation for PageObject Page Class and assigning it to a constant variable

    const homePage=new HomePage();
    const checkoutPage= new CheckoutPage();
    const billingPage=new BillingPage();

    //Calling
    cy.visit(Cypress.env('url'));
    homePage.getUserName().type(this.data.Username);
    homePage.getEmail().type(this.data.Email);
    homePage.getPassword().type(this.data.Password)

    homePage.getPassword().type(this.data.NewPassword);
    homePage.getRegisterButton().click();

    //Checking whether the Registration is successful and whether UserName is populated under login section
    homePage.getLoginUserName().should('have.value',this.data.Username);


    cy.screenshot('Capturing the screenshot after successful login');
}
As we can see in the above code snippet, we explicitly put the last line to capture the screenshot and save it with a name "Capturing the screenshot after successful login".
Note: for the complete Page Objects and other dependent classes, you can refer to the project on GitHub at "https://github.com/toolsqa/CypressWorkshop-PageObject.git."
Now let's run the code and see whether we took the screenshot successfully:
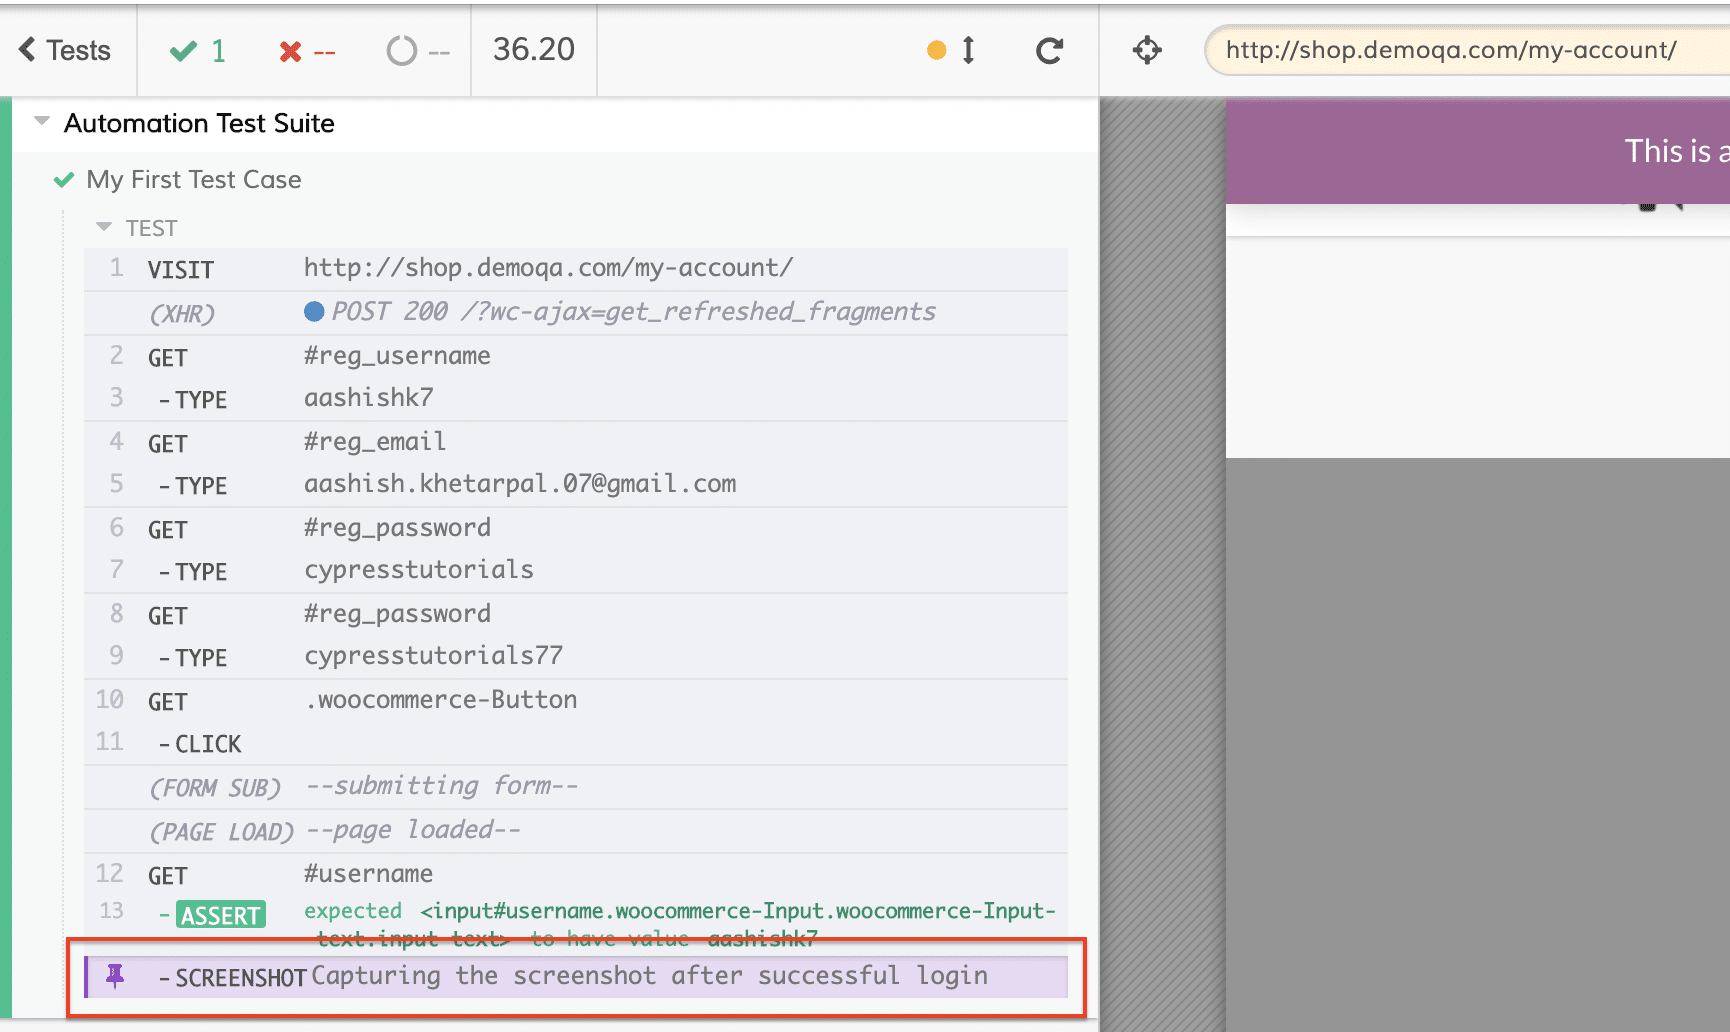
As we can see that in the above highlighted part, that we got the screenshot successfully, and the same name is getting displayed that we passed along with cy.screenshot( ) command. We can validate the screenshot under the screenshots folder as shown below:
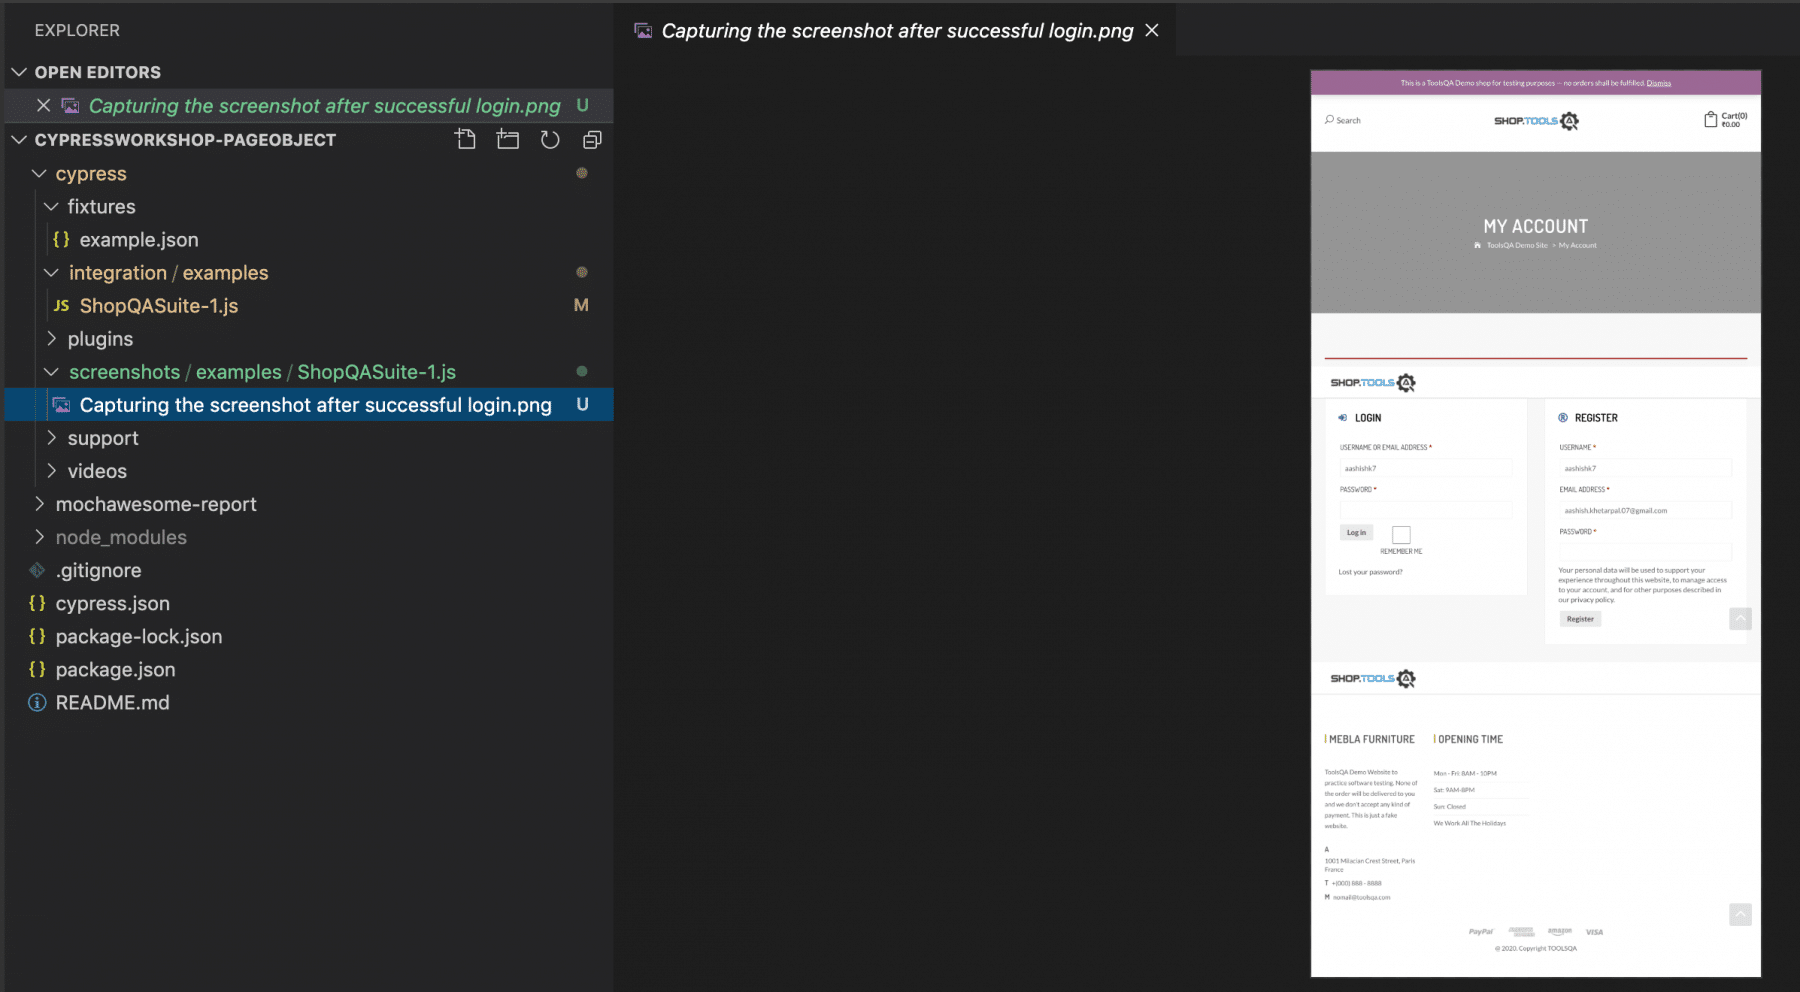
As we can see that in the above screenshot, highlight shows that the file creation happened with the same name that we mentioned, and by default, it went to screenshots directory. One can update the default screenshot directory by changing the needed values in the Global configurations.
What are the different naming conventions used for screenshots in Cypress?
Cypress follows certain default naming conventions while creating the screenshots. Few of them are:
- By default, a screenshot gets saved to a file with a path relative to the screenshots folder, appended by a path relating to where the spec file exists, with a name included with current test suites and test names. So, it will look like:
{screenshotsFolder}/{specPath}/{testName}.png
-
For a named screenshot, if you have mentioned any, the name passed as parameter is used instead of the test suite and test name. So, in the case of a named screenshot, it will look like:{screenshotsFolder}/{specPath}/{name}.png
-
For any duplicate screenshots (named or not), one can append with a number depending upon how many times the screenshot we take. So, if it is the first duplicate, it will look like:
{screenshotsFolder}/{specPath}/{testName} (1).png
- For a failure screenshot, we use the default naming scheme, and the name appends with (failed). So in case of a failed test, the screenshot will look like:{screenshotsFolder}/{specPath}/{testName} (failed).png
How do we get automatic screenshots of test failures in Cypress?
When running the test cases either on CLI through cypress run or in Continuous Integration, Cypress automatically takes a screenshot when a test fails and saves it in the cypress/screenshots folder. We can turn these automatic screenshots off by setting screenshotOnRunFailure to false for Cypress.Screenshot.defaults( ) in Global configurations as shown below.
Cypress.Screenshot.defaults({
  screenshotOnRunFailure: false
})
Let's consider an example that we run the test suite "https://github.com/toolsqa/CypressWorkshop-PageObject," by providing a wrong URL from the CLI as follows:
./node_modules/cypress/bin/cypress run --env url="https://demoqa.com/"
Here, we have changed the URL of the application from "http://shop.demoqa.com/" to "http://demoqa.com/". So, when we run the test case using the command as mentioned above, it will fail and will save the screenshot in the screenshots directory as shown below:
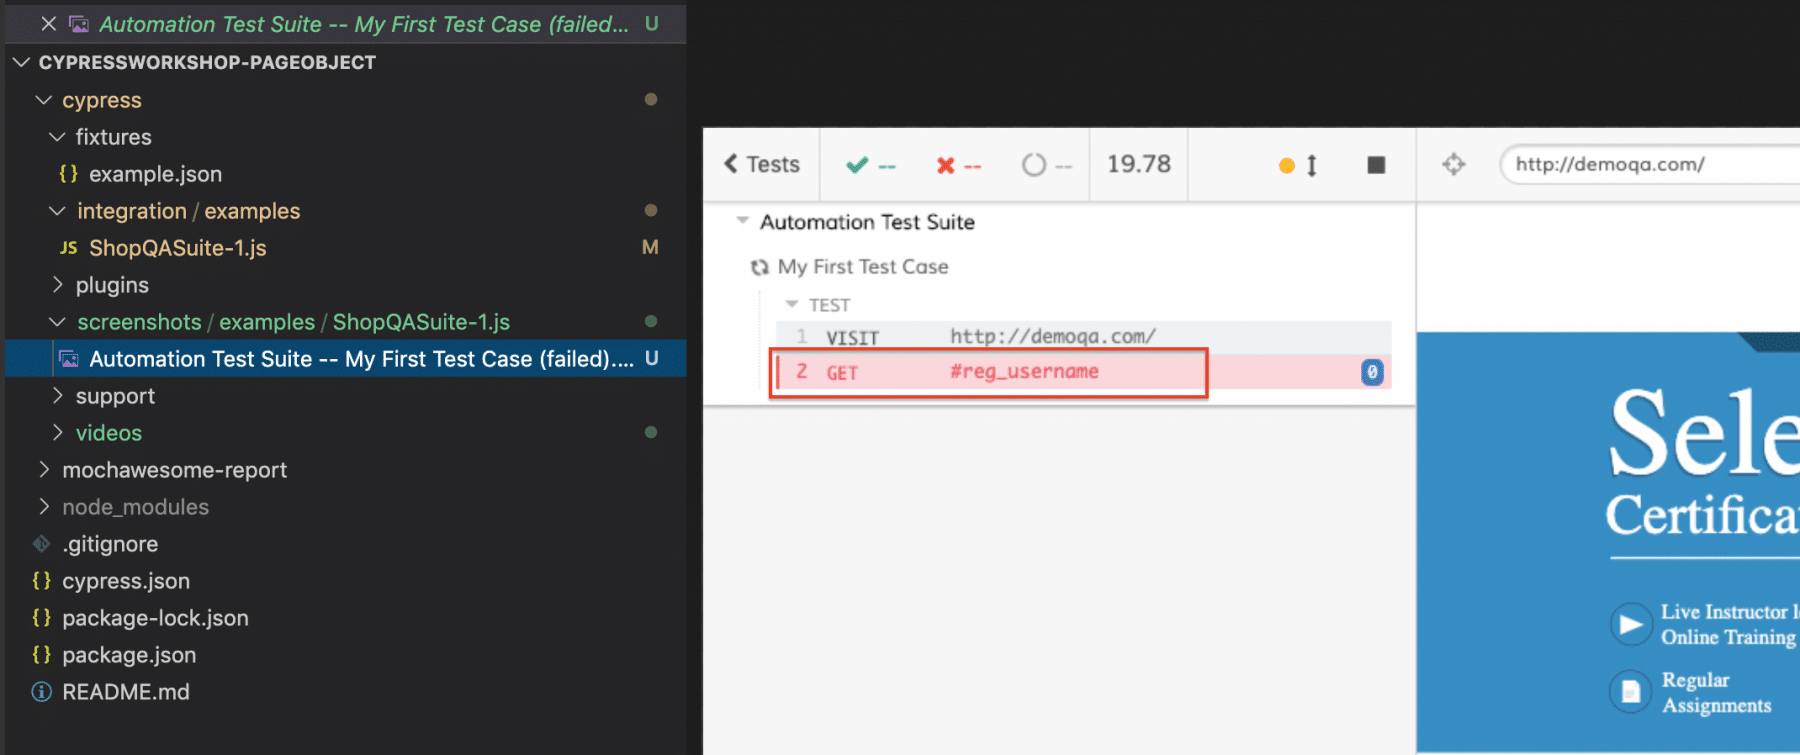
As we can see in the above screenshot, as the test case failed due to the non-availability of a web element, Cypress automatically saved a screenshot under the screenshots directory, even though we didn't use the cy.screenshot() method anywhere.
What are the videos in Cypress terminology?
Screenshots were the still images which capture the screen at a particular time. But, what if the automation tool provides a capability that it can record a video of your complete test run, no doubt, it will be an icing on the cake. Cypress provides the capability to record videos for any of the test runs.
By default, video recording in Cypress is enabled for all the test runs on CLI using cypress run. Still, it can be turned on or off by setting a video configuration to true/false in the configuration file. You can specify the configuration as below to turn off the video recordings for test runs:
{
   video: false
}
We store videos in the cypress/videos folder by default, but one can override by specifying the values in the config files.
How can we capture videos of the entire test runs in Cypress?
If the videoconfiguration sets to true, then Cypress automatically records videos for the test executions on the CLI. So, we need no extra settings or configurations to capture the video of the test runs. If you just run the test scripts using the "cypress run" commands, videos for all the test runs will automatically save in the cypress/videos folder.
Let's try to understand and visualize it with the help of an example. Run the following commands in your project directory:
./node_modules/cypress/bin/cypress run
It will run all the test scripts in your project and will a sample output, as shown below:
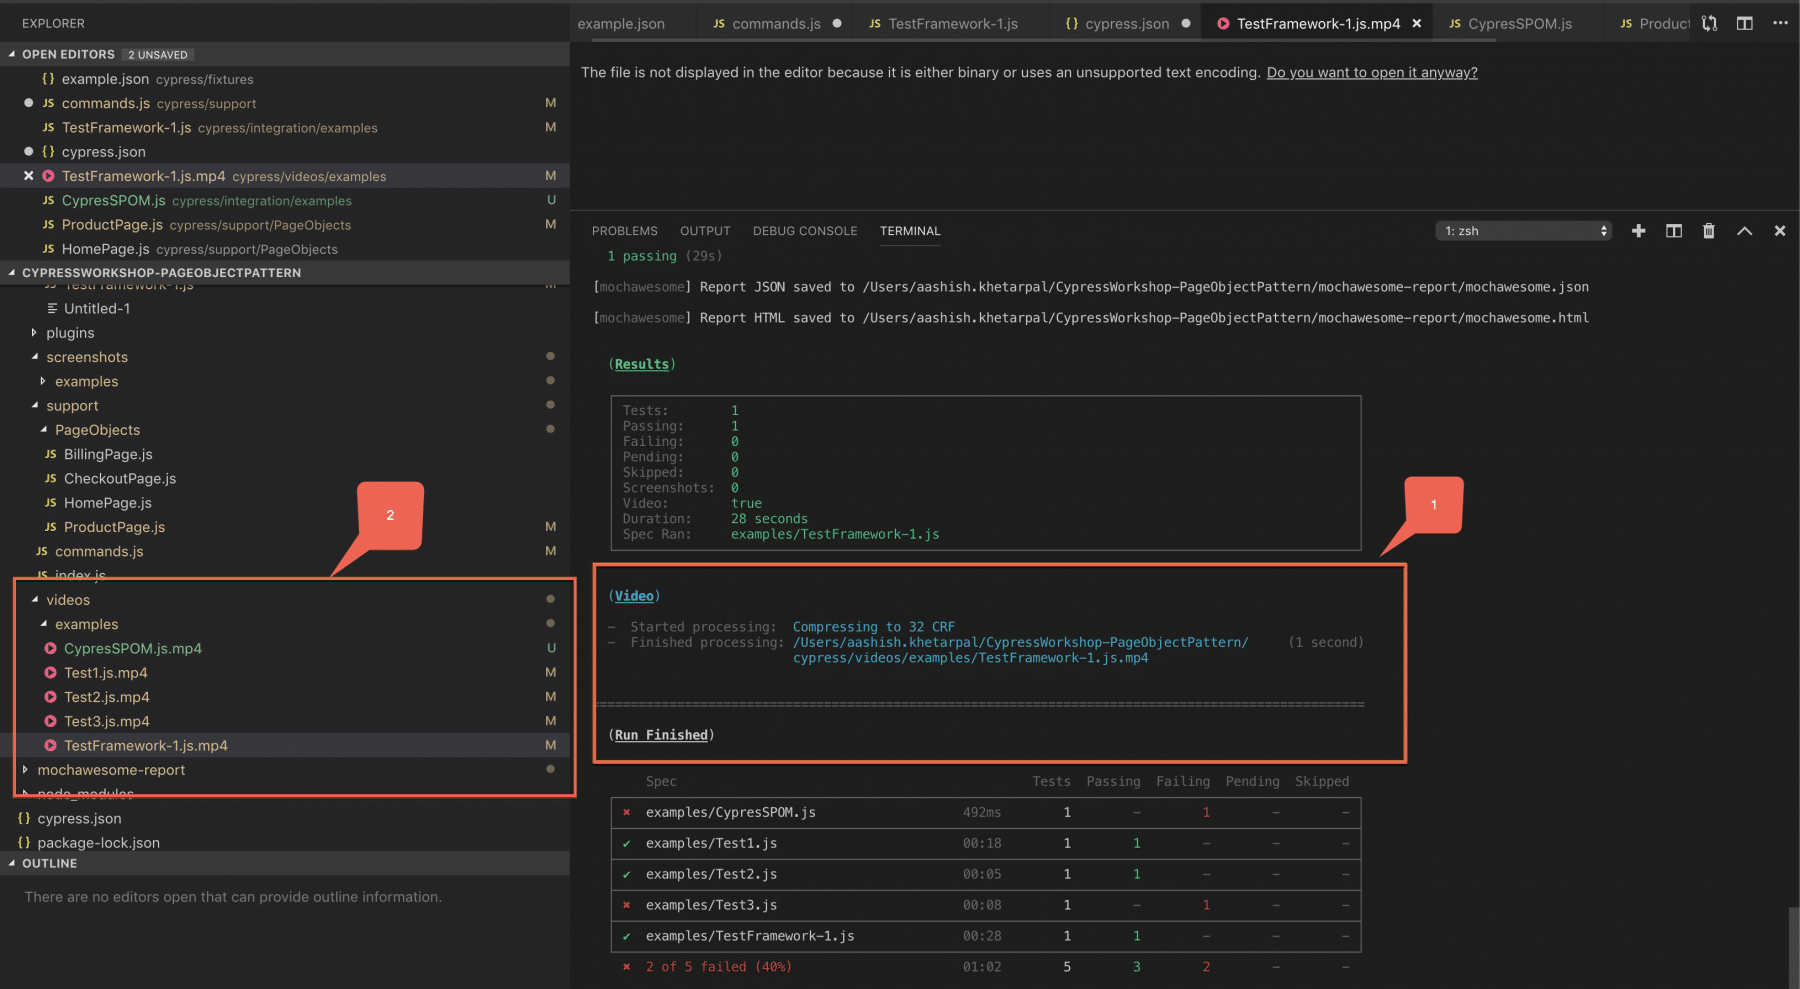
As we can see in the above screenshot, marker 1 shows the video generation, and it's compression to 32CRF. Later, we save it at a given desired path, which got picked from the configurations. On the left-hand side, under the videos folder highlighted with marker 2, we can see that ".mp4" files were generated successfully for all the test scripts. Now you can play the particular video file in a supported application to see the video of the Test run and visualize what all steps perform during the test run.
How to capture and verify screenshots and videos on Cypress Dashboard?
As we discussed in the article "Cypress Dashboard Service", all the test results can be uploaded and viewed on the cloud-hosted Cypress Dashboard. Once we have set up the Dashboard project, we can use the "--record" flag with the key of the project, and it will automatically upload all the screenshots and videos to the Project Dashboard. So, you can just run the following command to upload the screenshots and videos to the Cypress Dashboard:
./node_modules/cypress/bin/cypress run --record --key f8e389d9-2a6a-41ad-a96c-5e14f7ed4bda
So, what will this upload to the Dashboard? It will upload following, apart from the test runs:
- screenshots (only for failed specs) and nothing for passed one's until and unless you are using cy.screenshot() command.
- Processed Videos compress in the size of your entire test run. Which, in turn, can help in debugging the point of test failure.
This information will be available on the Cypress Dashboard after every spec file runs. Irrespective, whether the test run was successful or not.
The last two columns in front of every test run (as highlighted below) represents the Screenshots and Video, respectively, on Dashboard.
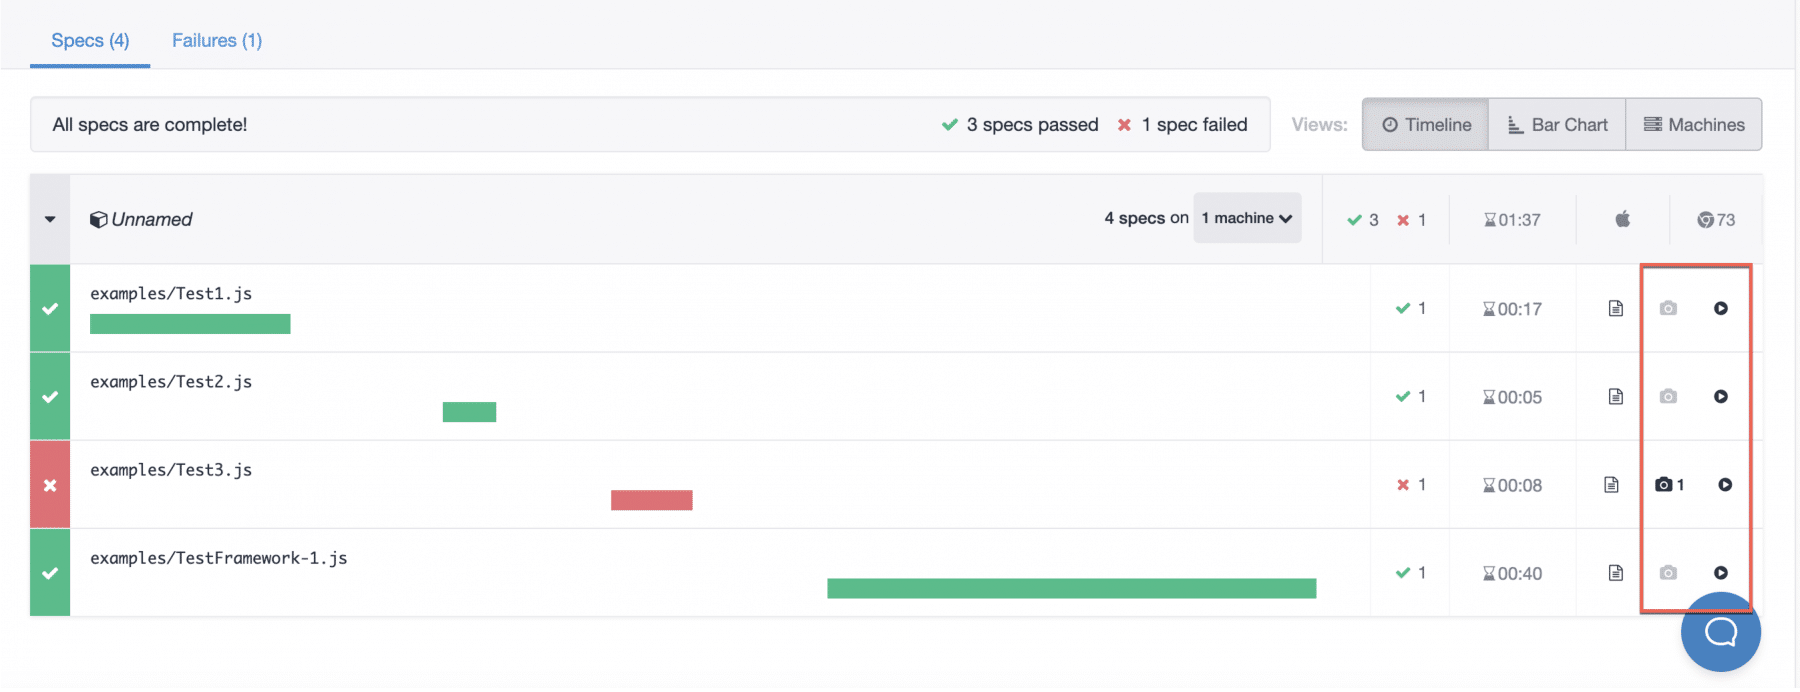
As we can see in the above screenshot, the screenshots are available only for the failed tests. Similarly, the videos are available for all the test runs. So, this way, we can capture and view various screenshots and videos of the test runs. Additionally, we can take help from then while debugging any of the test runs.
Key Takeaways
- Cypress provides in-built functionality for capturing screenshots and videos of various test runs.
- By default, we capture screenshots only for failed test cases. And, we capture videos for all the test runs.
- You can also upload and view the screenshots and videos on the Cypress Dashboard. You can upload them by specifying --record option while running the tests.
Let's move to the next article. We will enhance our test scripts by integrating BDD with the Cypress test scripts in that article.
If you want to learn more you can look at this video series: ++Cypress video series++