For each test automation framework, test runners are one of the essential parts. The reason being, they provide the entry point for kicking off the execution of the test cases. Cypress has a unique test runner that allows us to see commands as they execute. Additionally, it also shows the real-time run of the application under test. In the last article, “Writing First Cypress Test Case”, we completed the development of our first automated test case using Cypress. In this article, we will be executing that test case with the help of the Cypress Test Runner. We will cover below topics in this tutorial:
- How to execute the Cypress test?
- Execute Cypress tests from Command Line?
- Procedure to run all the test cases using Cypress CLI?
- How to run a specific test case using Cypress CLI?
- Procedure to run the tests in another browser using Cypress CLI?
How to execute Cypress Tests with Cypress Test Runner?
As briefed in the previous tutorial, we can open Cypress with different methods we have. So let's open Cypress by typing below command on the terminal:
node_modules/.bin/cypress open
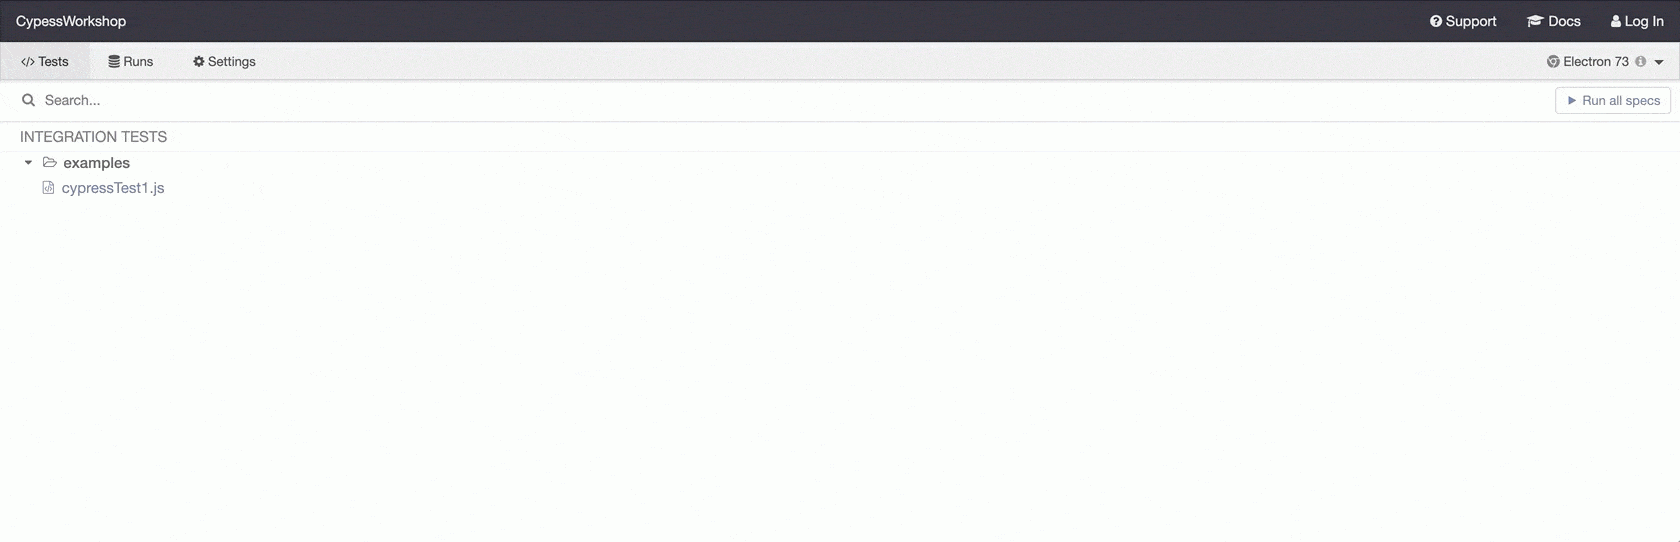
After you open the Cypress, the Test Runner window will open, which will show the test case “cypressTest1.js”, as shown below. Since in our current project, we have only one spec.js file, but when we have multiple test files, all of them will be visible under the examples folder, and we can click on one particular spec file(cypressTest1.js) to see how it runs.

Now let's see what other things we can do from the Cypress Test Runner, You can update Browser for our test case from the right-hand side from Test Runner as highlighted below in the screenshot.
The Cypress Test Runner tries to find all compatible browsers on the user’s machine. The drop-down to chose a different browser is in the top right corner of the Test Runner.

Now, to run the test case that we created in our previous tutorial which was cypressTest1.js, just click on the test case on the runner window as highlighted in the above screenshot, it will open the browser and will run all the steps in the test case. You will see a screen similar to below showing the execution of the test case:
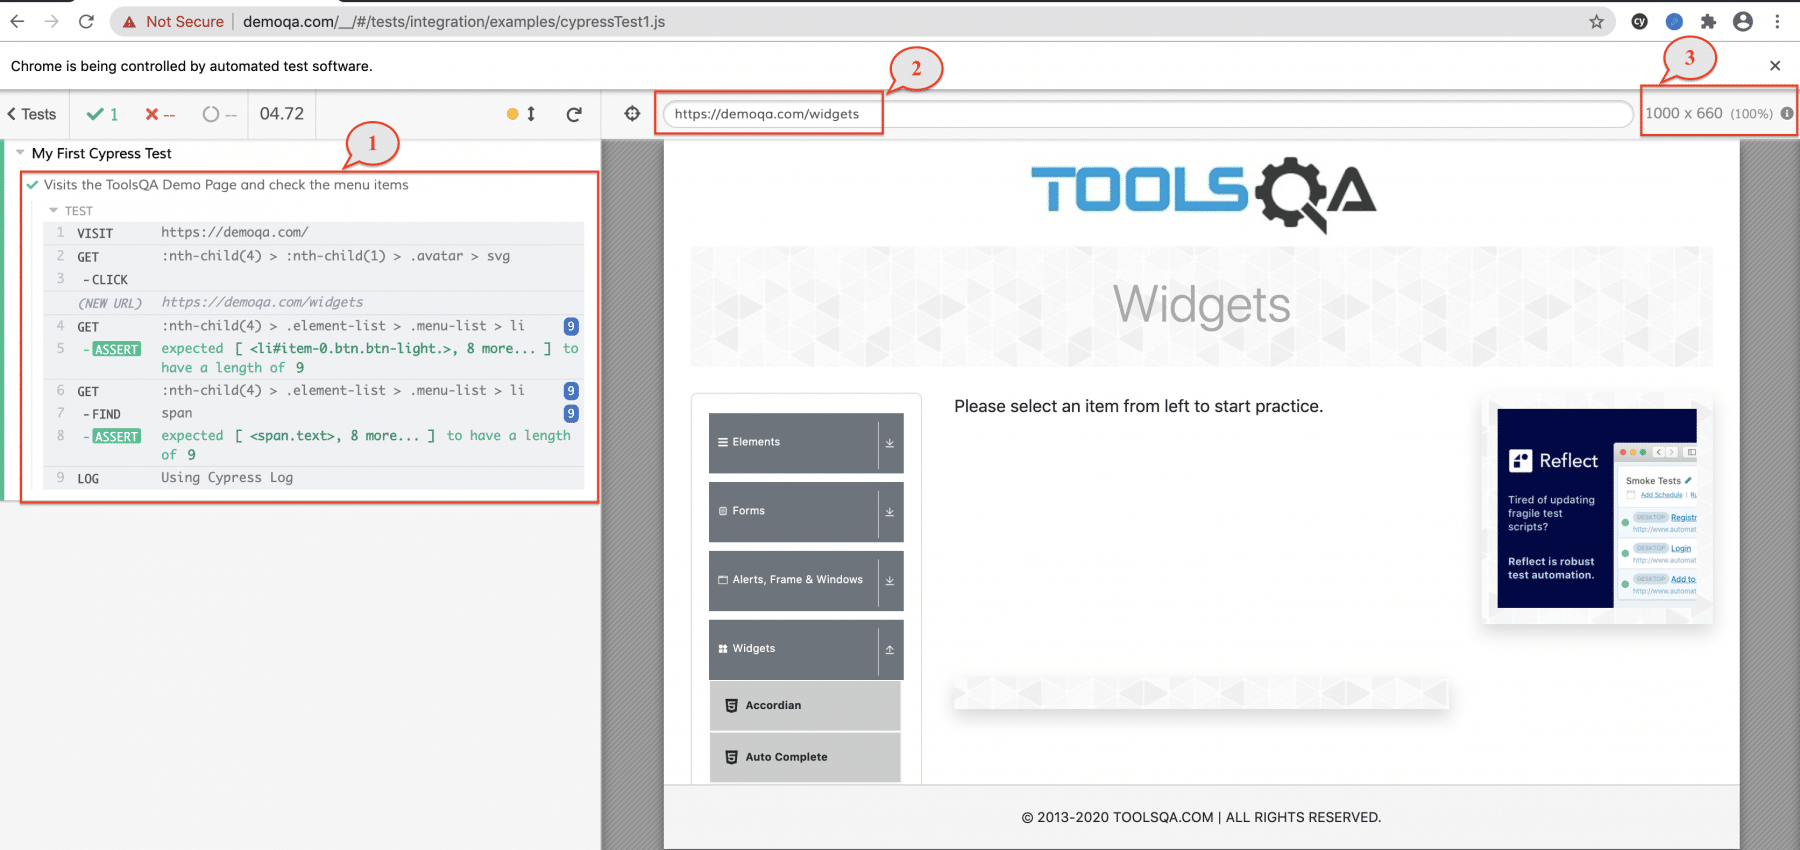
The Cypress test runner shows all the details of the test in the left side panel and the execution details on the right-hand side panel. A few of the essential call outs are:
- Test Suite and Test Case: Point 1 in the above screenshot represents the Test Suite and the Test cases in that Test Suite. "My First Cypress Test" is the name of the Test Suite and is defined by the "describe" block. "Visit the ToolsQA Demo Page and check the menu items" is the test case and is defined by the "it()" block. As there is only one Test Suite and one Test Case in our spec file, the Cypress Test Runner is showing only those in the screenshot. Test Suite is the name of the Test Suite. Under this, we will have a list of various tests. In our case, the test suite name is "My First Cypress Test".
- Steps of Test: Also, on the Left panel, it shows details of all the steps executed, as defined in the Test Case. It is marked with one indicator in the above screenshot.
- Current URL: URL of the web page in the right-side panel. It's marked with indicator 2 in the above screenshot.
- Browser Size: Size of the browser(Indicator 3) when the test case was running displays in the top right corner. It is set as default in Cypress configuration and can override as per test needs.
So, wasn’t it simple, just open the Cypress UI, Click on the test suite which you want to run and see all the action live within the same screen. The below gif shows the running instance of the test case:
Also, in some cases, we have to change our code while writing our tests or include more steps or assertions. So the Cypress Test Runner is smart enough that it detects any saved change in your test file and starts executing your test from the start whenever you save any code changes on your local.
Execute Cypress tests from Terminal/CLI?
Running the test cases in UI mode is more suitable when the development of test cases is in progress. But once the development completes, the user would want to run the test cases in headless mode. Because it is easy to hookup with CI(Continuous Integration, e.g., Jenkins) and run it quickly, as running test cases in UI are always slower than running in headless mode. Cypress fulfils all these needs and provides ways to execute the test cases from CLI.
Now to cover this, we have just created another test file with the name "cypressTest2.js," which is doing the same thing as of cypressTest1.js but instead of clicking on Widgets menu item, it is clicking on the Interaction menu item. Below is the code snippet for the same.
  // type definitions for Cypress object "cy"
  /// <reference types="cypress" />

  describe('My Second Cypress Test', function() {
    it('Visits the ToolsQA Demo Page and check the Interactions menu items', function() {
    //Visit the Demo QA Website
    cy.visit("https://demoqa.com/");

  // Clicking on Interactions Menu Item
  cy.get(':nth-child(5) > :nth-child(1) > .avatar > svg').click();

    //Verify number of items present under the Widget Tab
    cy.get(':nth-child(5) > .element-list > .menu-list > li').should('have.length',5);

  })
  })
Now we have 2 Test files ready for execution. Cypress provides various options to test cases from CLI. Let's understand them in the below sections:
How to run all Cypress Tests using Cypress CLI?
To run all the test cases from your Workspace on the Command-Line or terminal, instead of "cypress open", we just have to mention "cypress run" We can use the below command to run all the spec files present under the Integration folder. In our case, as we have got 2 test files so both we will pick both for execution:
./node_modules/.bin/cypress run
Now let's see how the execution looks like from the CLI when we run the above command. We will also learn the different points that we have highlighted in the screenshot below:
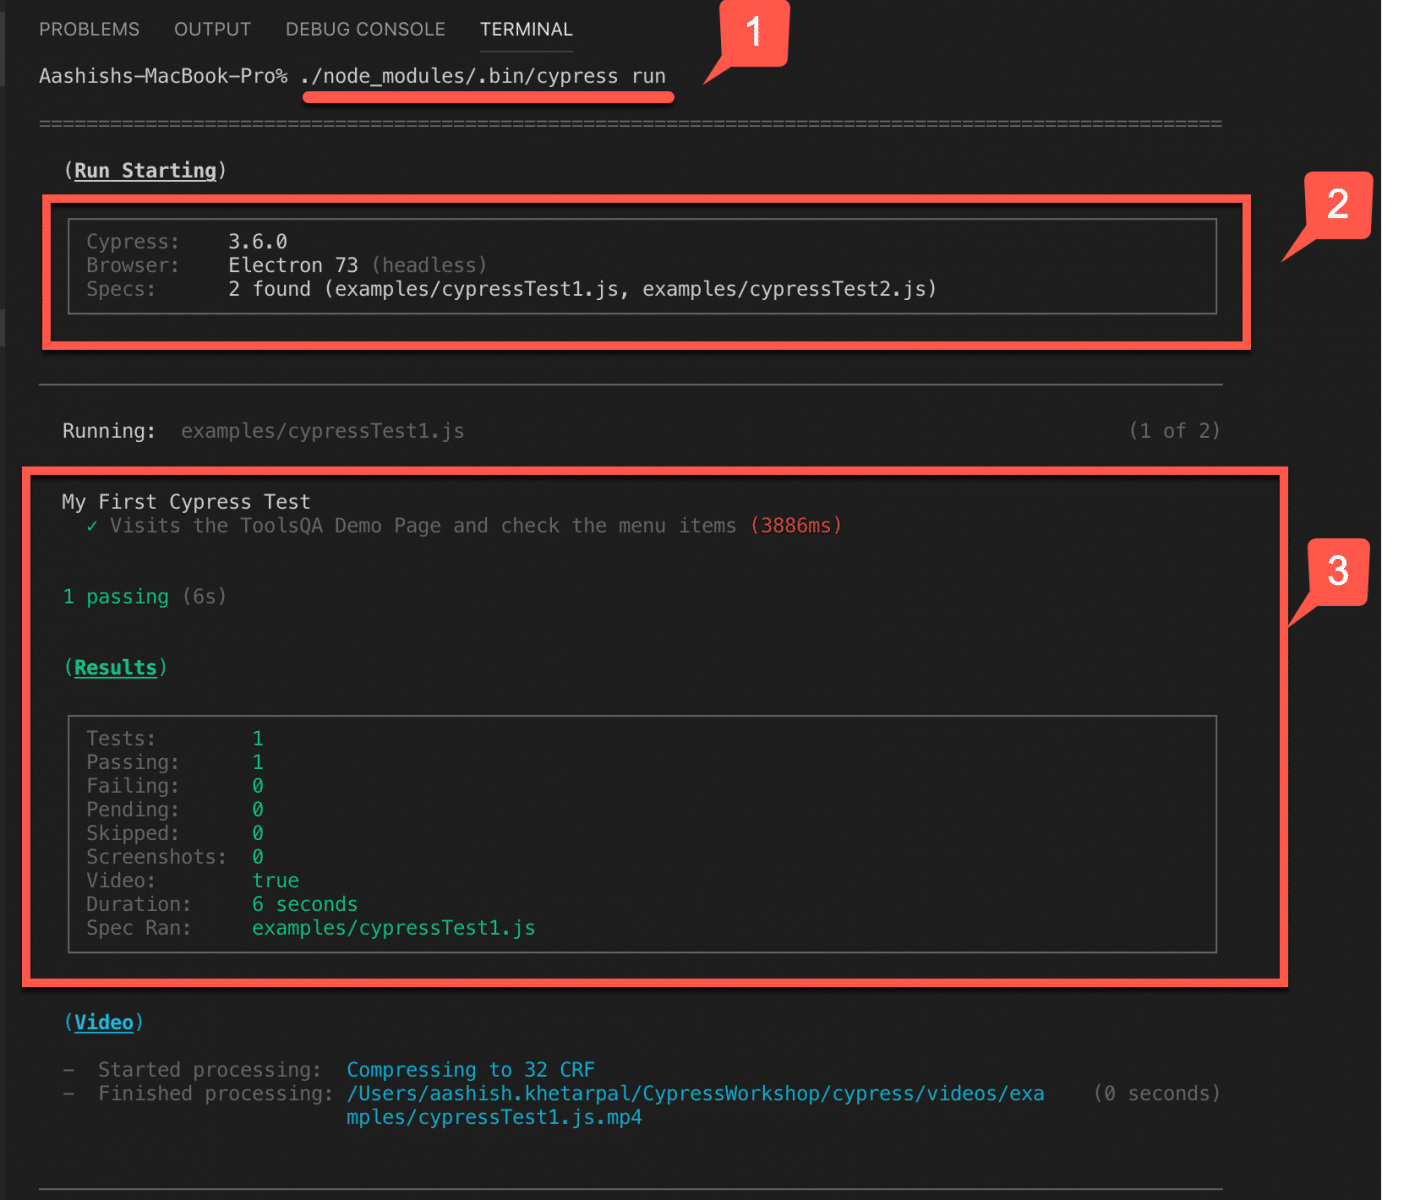
So our cypress run command worked fine, and our tests got executed. Now, let's understand some important aspects of this execution marked by the numbered tickers:
-
The command we used to run all the test files present under the "integration" folder.
-
Test run starting sections gives you a summary showing what Cypress will be taking the options to perform this run.
-
First, it shows the Cypress version, whose installation has already happened as part of this project. You can find the same in your package.json.
-
Then it shows the browser, and in which mode, it will execute the runs. By default, it uses the Electron browser in headless mode to execute the runs, but it can be changed bypassing these as a parameter in the Cypress run command.
-
Spec count, which shows how many test files were present in the "integration" folder and their respective names.
-
-
Execution of a test file that shows the name that we have put in describe() and it() block and then it's status and a little summary about the test run.
-
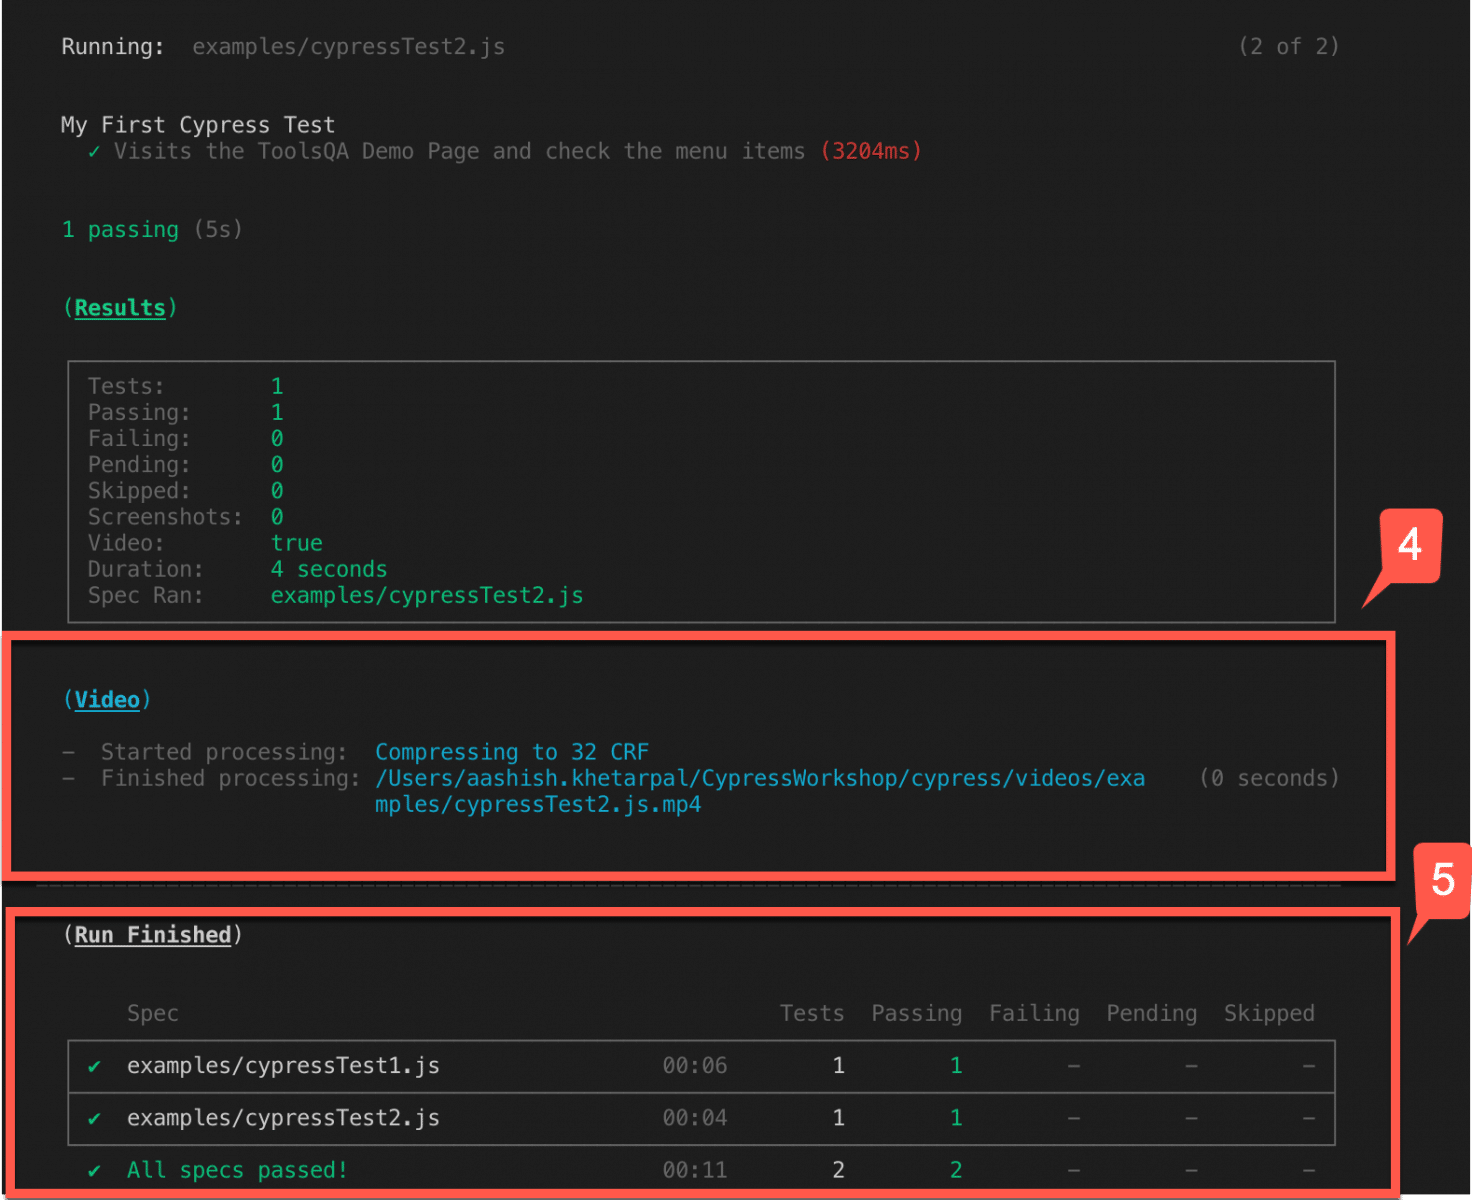
The Video directory saves the recording of the test run, and you can see the mp4 files present on your local machine, which has a recording of your test run.
-
The "Run Finished" section gives you a summary of what all test files executed and what their status is, and it also gives you a final status.
How to run a specific Cypress Test using Cypress CLI?
In our above example, we just used the command "cypress run". And, it picked & run all the test files present under the "integration" folder with the default browser. But there can be a different requirement in the automation world where we have a good number of tests. But we have to run only some specific tests to sanitize our environment. In other words, let's say we have to run our test in another browser, say Chrome browser and in headed mode instead of the default cypress options. These two situations can be tackled even while running the tests with CLI.
To run some specific test case or spec file from the list of test cases under example folder, we can mention the path using "--spec" along with "cypress run" command. For example, if we want to run only cypressTest1.js file, run the below command on terminal:
./node_modules/.bin/cypress run --spec cypress/integration/examples/cypressTest1.js
where "cypress/integration/examples/cypressTest1.js" is the path of the spec file which we want to run.
The below screenshot shows a snippet of the test, as mentioned above run:
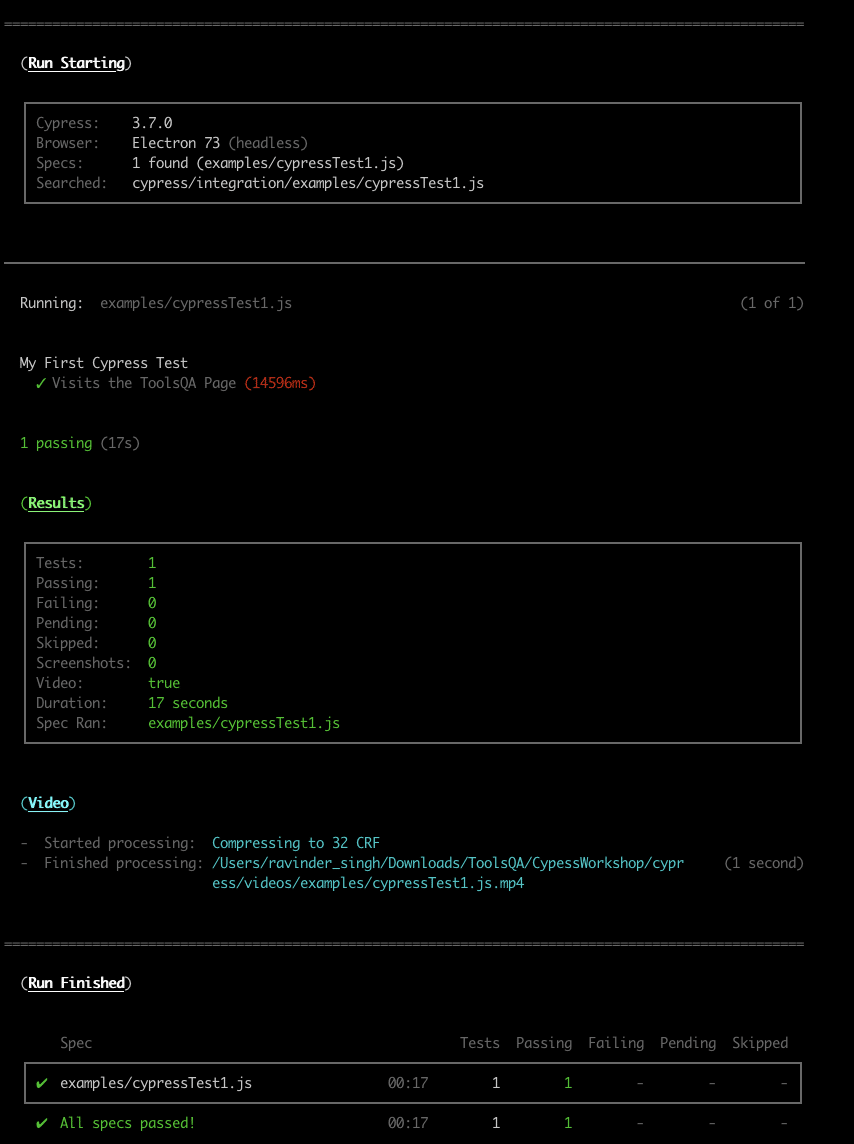
As we can see in the above screenshot, only one spec file ran. It indicates that the name of the test is "cypressTest1.js," and even the "Run Finished" section confirms that only one test ran. So, we can quickly run a specific test suite by specifying the spec file name with the "--spec" option.
How to run a test in another browser from CLI?
As we discussed above, sometimes we have to run our tests in headed mode or maybe in some other browser. So let's see how we can do this from CLI.
For running in headed mode, we have to pass --headed at the end of "cypress run" command and for changing browser we have to pass --browser <browser-name>
E.g., to run all the test in Chrome, do run following command:
./node_modules/.bin/cypress run --browser chrome
or, to run a specific test in Chrome, do run following command:
./node_modules/.bin/cypress run --spec cypress/integration/examples/cypressTest1.js --browser chrome
Specifying the --browser flag will almost be the same as running the test cases using Cypress Test Runner.
Below is a snippet of how the run from Command Line looks like, which also shows you the browser like Chrome, which had a mention in Cypress run command.

As in the above snippet, we can see under the Run Starting section that Chrome 80 browser ran the tests instead of Electron. Which, in turn, is the default browser for Cypress. So this way, we can mention various browsers in the command-line, which the Cypress supports.
So these were the different ways how we could initiate our runs from CLI by passing different parameters along with it as per our requirement.
Key Takeaways
- Cypress provides two ways to test cases. Either using the Cypress UI Test Runner or from the CLI using the "cypress run" command.
- A specific test case can be executed on the CLI using the "--spec" option.
- We can change the browser for a specific test run on CLI using the "--browser" option.
So, we accomplished the tasks of having a good overview of the Cypress Test Runner. Additionally, we also ran our test case both from Cypress UI or CLI. Let's proceed to the next tutorial, where we will learn the various "Locator Strategies" supported by Cypress.
If you want to learn more you can look at this video series: ++Cypress video series++