Each UI automation tool provides some APIs or methods to interact with the web elements, so the designated operation can be performed on the UI element. In addition to this, these methods also assist in the needed user journey simulation. Continuing the same practice, Cypress also provides Cypress Commands - UI Interaction Commands which can simulate the user's interaction with the application.
Subsequently, in this article, we will be covering details of all those commands. Additionally, we will also know how cypress processes these commands on each element, in the following sections:
- What are the UI interaction commands provided by Cypress?
- Click Command
- Double Command
- Right Click Command
- Type Command
- Clear Command
- Check/UnCheck Command
- Select Command
- Trigger Command
- What Cypress performs checks/Actions for each UI action?
Cypress Commands - UI Interaction Commands?
There are multiple commands which Cypress provides, which fires the events a browser would fire. Moreover, they simulate the user's behavior of interacting with the application under test. Some of these commands are:
Cypress - Click Command
.click() command: The click() command clicks any DOM element. Moreover, one can invoke it using the following syntaxes:
.click() // Syntax 1

.click(options) // Syntax 2

.click(position) //Syntax 3

.click(position, options) //Syntax 4

.click(xCoordinate, yCoordinate) // Syntax 5

.click(xCoordinate, yCoordinate, options) // Syntax 6
Where,
Options: The possible values for the "Option" parameter are:
| Option | Default | Description |
|---|---|---|
| log | true | It prints the command in the command log. |
| force | false | It forces the action. |
| multiple | false | Serially click multiple elements |
| timeout | defaultCommandTimeout | Time to wait for .click() to resolve before timing out. |
Positions: The possible values for the "Position" parameter are:
- center (Default value)
- topLeft
- top
- topRight
- left
- right
- bottomLeft
- bottom
- bottomRight
Let's understand the details and usage of click method with the help of the following examples:
For Example:
cy.get('button1').click() // Example 1

cy.get('button').click({ force: true }) // Example 2

cy.get('button').click('topRight') // Example 3

cy.get('button').click(5, 60, { force: true }) // Example 4

cy.get('button').click(15, 40) // Example 5

cy.get('button').click(5, 60, { force: true }) // Example 6
Cypress - Double Click Command
.dblclick() command: The dblclick() command double clicks on a DOM element. Additionally, one can invoke it using the following syntaxes:
.dblclick()   // Syntax 1

.dblclick(options) // Syntax 2

.dblclick(position) // Syntax 3

.dblclick(position, options) // Syntax 4

.dblclick(x, y) // Syntax 5

.dblclick(x, y, options) // Syntax 6
Where,
Options: It accepts the same options, as mentioned in the ".click()" command above.
Positions: It accepts the same options, as mentioned in the ".click()" command above.
Let's understand the details and usage of "dblclick" method with the help of the following examples:
For Example:
cy.get('button').dblclick() // Example 1

cy.get('button').dblclick({ force: true }) //Example 2

cy.get('button').dblclick('bottom') // Example 3

cy.get('button').dblclick('bottom', { force: true }) //Example 4

cy.get('button').dblclick(15, 20, { force: true }) //Example 5

cy.get('button').dblclick(15, 20, { multiple: false }) //Example 6
Cypress - Right Click Command
.rightclick() command: The rightclick() command right-clicks a DOM element. Moreover, one can invoke it using the following syntaxes:
.rightclick() // Syntax 1

.rightclick(options) // Syntax 2

.rightclick(position) // Syntax 3

.rightclick(position, options) // Syntax 4

.rightclick(x, y) // Syntax 5

.rightclick(x, y, options) // Syntax 6
Where,
Options: It accepts the same options, as mentioned in the ".click()" command above.
Positions: It accepts the same options, as mentioned in the ".click()" command above.
Let's understand the details and usage of "rightclick()" method with the help of the following examples:
For Example:
cy.get('button').rightclick() // Example 1

cy.get('button').rightclick({ force: true }) //Example 2

cy.get('button').rightclick('bottom') // Example 3

cy.get('button').rightclick('bottom', { force: true }) //Example 4

cy.get('button').rightclick(15, 20, { force: true }) //Example 5

cy.get('button').rightclick(15, 20, { multiple: false }) //Example 6
Cypress - Type Command
.type() command: The type() command types into a DOM element. Additionally, one can invoke it using the following syntaxes:
.type(text) // Syntax 1

.type(text, options) // Syntax 2
Where,
Options: The possible values for the "Options" parameter are:
| Option | Default | Description |
|---|---|---|
| log | true | Displays the command in the Command log. |
| delay | 10 | Delay in secs after each keypress |
| force | false | Forces the action. Additionally, it disables waiting for actionability. |
| parseSpecialCharSequences | true | Parse special characters for strings surrounded by {}, such as {esc}. Set to false to type the literal characters instead. |
| release | true | Keep a modifier activated between commands. |
| timeout | defaultCommandTimeout | Time to wait for .type() to resolve before timing out. |
Let's understand the details and usage of "type()" method with the help of the following examples:
For Example:
cy.get('input').type('Hello, World') // Example 1

cy.get('input').type('Hello, World', { force: true }) // Example 2
Cypress - Clear Command
.clear() command: This command clears the values of input or text-area. Additionally, the invoking of clear() command happens using the following syntaxes:
.clear() // Syntax 1

.clear(options) // Syntax 2
Where,
Options: The possible values for the "Options" parameter are:
| Option | Default | Description |
|---|---|---|
| log | true | Displays the command in the Command log |
| force | false | Forces the action, disables waiting for actionability |
| timeout | defaultCommandTimeout | Time to wait for .clear() to resolve before timing out |
Let's understand the details and usage of "clear()" method with the help of the following examples:
For Example:
cy.get('textarea').clear() // Example 1

cy.get('input').clear({ force: true }) // Example 2
Cypress - Check/UnCheck Command
.check()/.uncheck command: These methods are used to check/uncheck checkboxes and radio buttons. Moreover, following syntaxes invoke these commands:
// check() command syntax:
.check() // Syntax 1

.check(value) // Syntax 2: Value of checkbox or radio that should be checked.

.check(values) // Syntax 3: Values of checkboxes or radios that should be checked.

.check(options) // Syntax 4

.check(value, options) // Syntax 5

.check(values, options) // Syntax 6


// uncheck() command syntax
.uncheck() // Syntax 1

.uncheck(value) // Syntax 2: Value of checkbox or radio that should be unchecked.

.uncheck(values) // Syntax 3: Values of checkboxes or radios that should be unchecked.

.uncheck(options) // Syntax 4

.uncheck(value, options) // Syntax 5

.uncheck(values, options) // Syntax 6
Where,
Options: The possible values for the "Options" parameter are:
| Option | Default | Description |
|---|---|---|
| log | true | Displays the command in the Command log |
| force | false | Forces the action, disables waiting for actionability |
| timeout | defaultCommandTimeout | Time to wait for .check() to resolve before timing out |
Let's understand the details and usage of "check() and uncheck()" methods with the help of the following examples:
For Example:
// check() commands examples
cy.get('[type="checkbox"]').check() // Example 1
cy.get('[type="radio"]').check()

cy.get('[type="radio"]').check('US') // Example 2

cy.get('[type="checkbox"]').check(['ga', 'ca']) // Example 3

cy.get('.action-checkboxes').should('not.be.visible')
      .check({ force: true }).should('be.checked') // Example 4


// uncheck() commands examples
cy.get('[type="checkbox"]').uncheck() // Example 1
cy.get('[type="radio"]').uncheck()

cy.get('[type="radio"]').uncheck('US') // Example 2

cy.get('[type="checkbox"]').uncheck(['ga', 'ca']) // Example 3

cy.get('.action-checkboxes').should('not.be.visible')
       .uncheck({ force: true }).should('be.unchecked') // Example 4
Cypress - Select Command
.select command: The select() command selects an option within <select> tags. Additionally, one can invoke it using the following syntaxes:
.select(value) // Syntax 1

.select(values) // Syntax 2

.select(value, options) // Syntax 3

.select(values, options) // Syntax 4
Where,
Options: It accepts the same options, as mentioned in the ".click()" command above.
Let's understand the details and usage of "select()" method with the help of the following examples:
For Example:
cy.get('select').select('apples') // Example 1

cy.get('select').select(['apples', 'bananas']) // Example 2

cy.get('select').select('apples', { force: true }) // Example 3
Cypress - Trigger Command
.trigger command: The trigger() command triggers an event on a DOM element. Additionally, one can invoke it using the following syntaxes:
.trigger(eventName) // Syntax 1

.trigger(eventName, position) // Syntax 2

.trigger(eventName, options) // Syntax 3

.trigger(eventName, x, y) // Syntax 4

.trigger(eventName, position, options)  // Syntax 5

.trigger(eventName, x, y, options) // Syntax 6
Where,
Options: The possible values for the "Options" parameter are:
| Option | Default | Description |
|---|---|---|
| log | true | It displays the command in the Command log. |
| force | false | Forces the action. Additionally, it disables waiting for actionability. |
| bubbles | true | Whether the event bubbles |
| cancelable | true | Whether the event is cancelable |
| timeout | defaultCommandTimeout | Time to wait for .trigger() to resolve before timing out |
Let's comprehend the details and usage of "trigger()" method with the help of the following examples:
For Example:
cy.get('a').trigger('mousedown')  // Example 1

cy.get('button').trigger('mousedown', 'topRight') // Example 2

cy.get('button').trigger('mouseover', { bubbles: false }) // Example 3

cy.get('button').trigger('mouseup', 15, 40) // Example 4

cy.get('button').trigger('mouseup', topRight, { bubbles: false }) // Example 5

cy.get('button').trigger('mouseup', 15, 40, { bubbles: false }) // Example 6
What Cypress performs Checks/Actions for each UI action?
Cypress performs some pre-checks and actions before it issues any of the commands, as mentioned above. Additionally, these pre-checks and actions ensure that the element is ready for receiving the planned action. Few of these checks and actions are:
- Firstly, it ensures that no element is hidden.
- Secondly, it ensures that the element is not disabled.
- Thirdly, it ascertains that the element is not detached.
- Fourthly, it ensures that the element is not read-only.
- In addition to the above, it ensures that the element is not animating.
- Sixthly, it makes sure that the element is not covered.
- Moreover, it scrolls the element in port-view.
- Finally, it scrolls the element to fix the position if covered by another element.
So, these are few of the validations and actions that Cypress tries in-built to ensure that the element is actionable. Still, if Cypress is not able to interact with the element, it will raise an error mentioning the exact reason why the element was not actionable.
Let's understand the usage of all these UI interaction commands with the help of following code snippet :
For Example,
/// <reference types="Cypress" />

describe('Actions', () => {

  // https://on.cypress.io/interacting-with-elements

  it('.type() - type into a DOM element', () => {
    cy.visit('https://example.cypress.io/commands/actions')

    cy.get('.action-email')
      .type('[email protected]').should('have.value', '[email protected]')

      // .type() with special character sequences
      .type('{leftarrow}{rightarrow}{uparrow}{downarrow}')
      .type('{del}{selectall}{backspace}')

      // .type() with key modifiers
      .type('{alt}{option}') //these are equivalent
      .type('{ctrl}{control}') //these are equivalent
      .type('{meta}{command}{cmd}') //these are equivalent
      .type('{shift}')

      // Delay each keypress by 0.1 sec
      .type('[email protected]', { delay: 100 })
      .should('have.value', '[email protected]')

      cy.get('.action-disabled')
      // Ignore error checking prior to type
      // like whether the input is visible or disabled
      .type('disabled error checking', { force: true })
      .should('have.value', 'disabled error checking')
  })

  it('.focus() - focus on a DOM element', () => {
    // https://on.cypress.io/focus
    cy.get('.action-focus').focus()
      .should('have.class', 'focus')
      .prev().should('have.attr', 'style', 'color: orange;')
  })

  it('.blur() - blur off a DOM element', () => {
    // https://on.cypress.io/blur
    cy.get('.action-blur').type('About to blur').blur()
      .should('have.class', 'error')
      .prev().should('have.attr', 'style', 'color: red;')
  })

  it('.clear() - clears an input or textarea element', () => {
    // https://on.cypress.io/clear
    cy.get('.action-clear').type('Clear this text')
      .should('have.value', 'Clear this text')
      .clear()
      .should('have.value', '')
  })

  it('.submit() - submit a form', () => {
    // https://on.cypress.io/submit
    cy.get('.action-form')
      .find('[type="text"]').type('HALFOFF')
    cy.get('.action-form').submit()
      .next().should('contain', 'Your form has been submitted!')
  })

  it('.click() - click on a DOM element', () => {
    cy.get('.action-btn').click()

    // You can click on 9 specific positions of an element:
    //  -----------------------------------
    // | topLeft        top       topRight |
    // |                                   |
    // |                                   |
    // |                                   |
    // | left          center        right |
    // |                                   |
    // |                                   |
    // |                                   |
    // | bottomLeft   bottom   bottomRight |
    //  -----------------------------------

    // clicking in the center of the element is the default
    cy.get('#action-canvas').click()

    cy.get('#action-canvas').click('topLeft')
    cy.get('#action-canvas').click('top')
    cy.get('#action-canvas').click('topRight')
    cy.get('#action-canvas').click('left')
    cy.get('#action-canvas').click('right')
    cy.get('#action-canvas').click('bottomLeft')
    cy.get('#action-canvas').click('bottom')
    cy.get('#action-canvas').click('bottomRight')

    // .click() accepts an x and y coordinate
    // that controls where the click occurs :)
    cy.get('#action-canvas')
      .click(80, 75) // click 80px on x coord and 75px on y coord
      .click(170, 75)
      .click(80, 165)
      .click(100, 185)
      .click(125, 190)
      .click(150, 185)
      .click(170, 165)

    // click multiple elements by passing multiple: true
    cy.get('.action-labels>.label').click({ multiple: true })

    // Ignore error checking prior to clicking
    cy.get('.action-opacity>.btn').click({ force: true })
  })

  it('.dblclick() - double click on a DOM element', () => {

    cy.get('.action-div').dblclick().should('not.be.visible')
    cy.get('.action-input-hidden').should('be.visible')
  })

  it('.check() - check a checkbox or radio element', () => {

    // By default, .check() will check all
    // matching checkbox or radio elements in succession, one after another
    cy.get('.action-checkboxes [type="checkbox"]').not('[disabled]')
      .check().should('be.checked')

    cy.get('.action-radios [type="radio"]').not('[disabled]')
      .check().should('be.checked')

    // .check() accepts a value argument
    cy.get('.action-radios [type="radio"]')
      .check('radio1').should('be.checked')

    // .check() accepts an array of values
    cy.get('.action-multiple-checkboxes [type="checkbox"]')
      .check(['checkbox1', 'checkbox2']).should('be.checked')

    // Ignore error checking prior to checking
    cy.get('.action-checkboxes [disabled]')
      .check({ force: true }).should('be.checked')

    cy.get('.action-radios [type="radio"]')
      .check('radio3', { force: true }).should('be.checked')
  })

  it('.uncheck() - uncheck a checkbox element', () => {

    // By default, .uncheck() will uncheck all matching
    // checkbox elements in succession, one after another
    cy.get('.action-check [type="checkbox"]')
      .not('[disabled]')
      .uncheck().should('not.be.checked')

    // .uncheck() accepts a value argument
    cy.get('.action-check [type="checkbox"]')
      .check('checkbox1')
      .uncheck('checkbox1').should('not.be.checked')

    // .uncheck() accepts an array of values
    cy.get('.action-check [type="checkbox"]')
      .check(['checkbox1', 'checkbox3'])
      .uncheck(['checkbox1', 'checkbox3']).should('not.be.checked')

    // Ignore error checking prior to unchecking
    cy.get('.action-check [disabled]')
      .uncheck({ force: true }).should('not.be.checked')
  })

  it('.select() - select an option in a <select> element', () => {

    // Select option(s) with matching text content
    cy.get('.action-select').select('apples')

    cy.get('.action-select-multiple')
    .select(['apples', 'oranges', 'bananas'])

    // Select option(s) with matching value
    cy.get('.action-select').select('fr-bananas')

    cy.get('.action-select-multiple')
      .select(['fr-apples', 'fr-oranges', 'fr-bananas'])
  })

  it('.scrollIntoView() - scroll an element into view', () => {

    // normally all of these buttons are hidden,
    // because they're not within
    // the viewable area of their parent
    // (we need to scroll to see them)
    cy.get('#scroll-horizontal button')
      .should('not.be.visible')

    // scroll the button into view, as if the user had scrolled
    cy.get('#scroll-horizontal button').scrollIntoView()
      .should('be.visible')

    cy.get('#scroll-vertical button')
      .should('not.be.visible')

    // Cypress handles the scroll direction needed
    cy.get('#scroll-vertical button').scrollIntoView()
      .should('be.visible')

    cy.get('#scroll-both button')
      .should('not.be.visible')

    // Cypress knows to scroll to the right and down
    cy.get('#scroll-both button').scrollIntoView()
      .should('be.visible')
  })

  it('.trigger() - trigger an event on a DOM element', () => {

    // To interact with a range input (slider)
    // we need to set its value & trigger the
    // event to signal it changed

    // Here, we invoke jQuery's val() method to set
    // the value and trigger the 'change' event
    cy.get('.trigger-input-range')
      .invoke('val', 25)
      .trigger('change')
      .get('input[type=range]').siblings('p')
      .should('have.text', '25')
  })

  it('cy.scrollTo() - scroll the window or element to a position', () => {

    // You can scroll to 9 specific positions of an element:
    //  -----------------------------------
    // | topLeft        top       topRight |
    // |                                   |
    // |                                   |
    // |                                   |
    // | left          center        right |
    // |                                   |
    // |                                   |
    // |                                   |
    // | bottomLeft   bottom   bottomRight |
    //  -----------------------------------

    // if you chain .scrollTo() off of cy, we will
    // scroll the entire window
    cy.scrollTo('bottom')

    cy.get('#scrollable-horizontal').scrollTo('right')

    // or you can scroll to a specific coordinate:
    // (x axis, y axis) in pixels
    cy.get('#scrollable-vertical').scrollTo(250, 250)

    // or you can scroll to a specific percentage
    // of the (width, height) of the element
    cy.get('#scrollable-both').scrollTo('75%', '25%')

    // control the easing of the scroll (default is 'swing')
    cy.get('#scrollable-vertical').scrollTo('center', { easing: 'linear' })

    // control the duration of the scroll (in ms)
    cy.get('#scrollable-both').scrollTo('center', { duration: 2000 })
  })
})
In the above code, we covered the below cases :
- In the first case, we are opening the website and typing an email address in one text box. Additionally, we are doing an assertion of the same as well. Moreover, there have been multiple options practiced with type command for typing particular character sequences or special keys. After that, there are assertions to check the disabled of any input.
- The second case is about focussing on a web element. Additionally, it verifies the assertion for the same and also its properties.
- Thirdly, the case is about blur-off a DOM element and verifying the assertion for the same. Moreover, it also verifies its properties.
- Fourthly, we are learning a clear command of how we can clear the input or text area element. Moreover, we verify that it should have an empty value.
- The fifth case is "it" block, where we are checking how we can submit a form. Additionally, we also verify the contain assertion along with it. 6.* Sixthly, we are checking how we can use click command for a DOM element along with different options of clicking it on different positions.*
- In the seventh case, we are verifying the double click command for an element. Additionally, we also carry out the assertions.
- Eighthly, the case involves checking how to check a checkbox or radio element. Additionally, it verifies that the desired action has taken place and ensures the accomplishment of the work.
- In the ninth case, we are verifying how to uncheck a checkbox or radio element. Moreover, we ensure the necessary verifications.
- The tenth case explains how to work with a dropdown where we have to select an option from
<select>tag. - In the 11th case of "it" block, the scrollIntoView( ) command is explained. Additionally, it also includes different usages of what options we can use for scrolling.
- After that, the "it" block explains how we can trigger an event on a DOM element.
- Lastly, we have the scrollTo( ) command and its different usages that how we can scroll on a specific DOM element.
Finally, let's run the complete test case. Subsequently, it will show the result as follows:
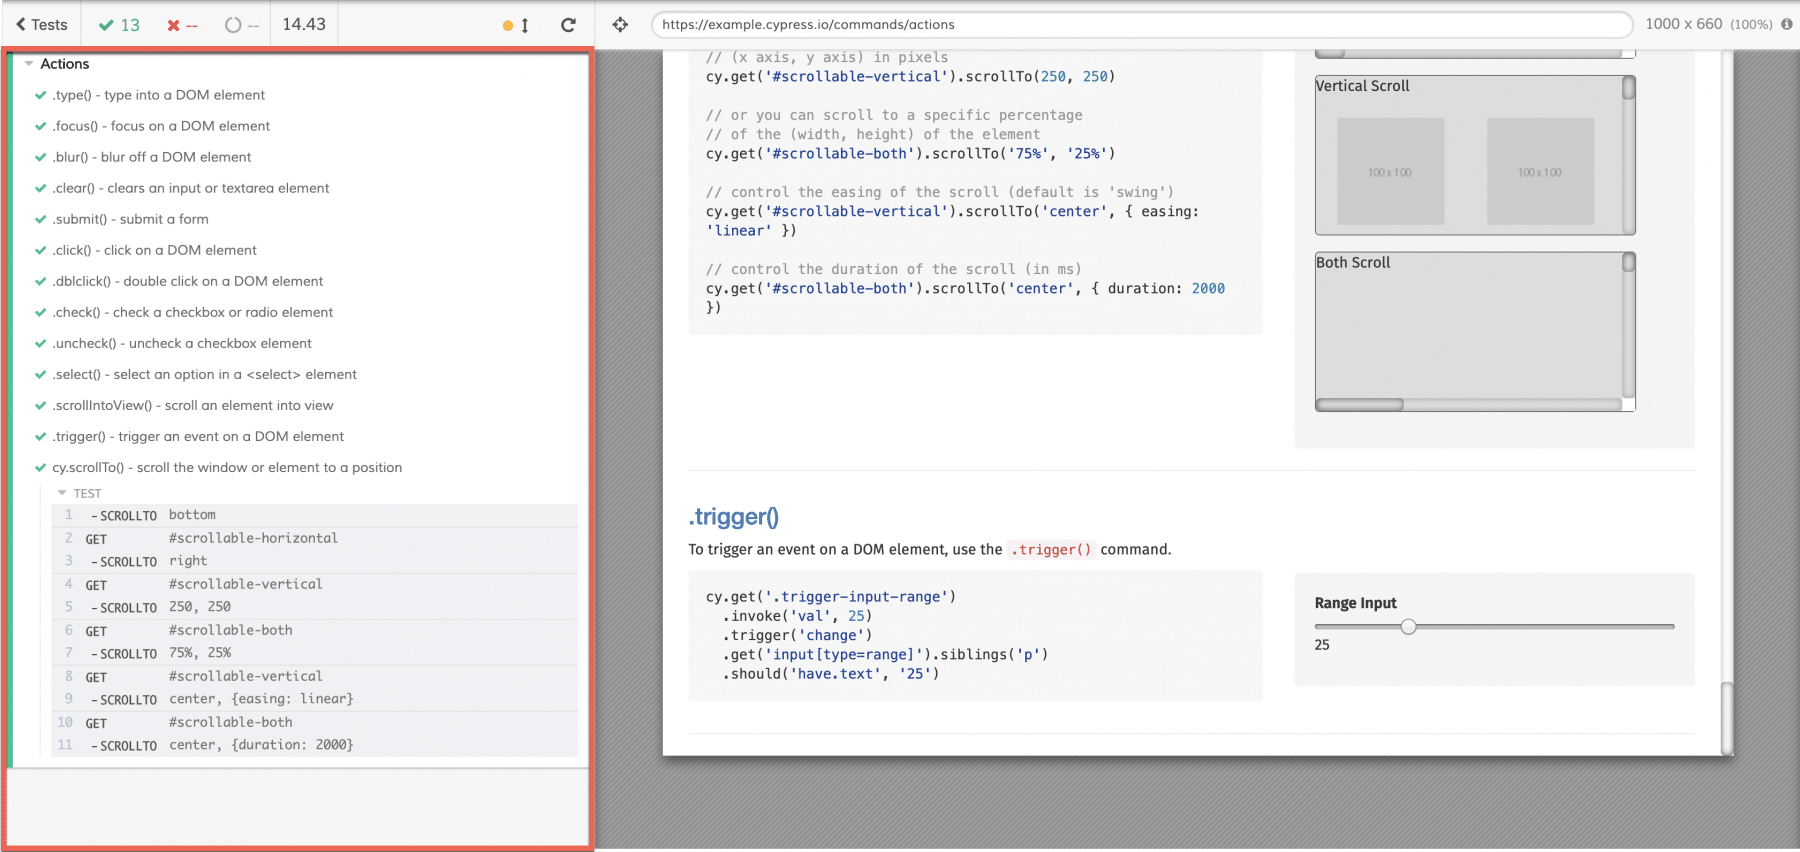
Consequently, as highlighted in the above screenshot, we can see that all test cases we run to cover the UI interaction and its actions have passed. Additionally, I would suggest, please take out some time here to expand through every test and see on the test runner how every command performed on the designated website. The reason being, you will find different situations in your automation journey.
Key Takeaways
- Cypress provides various commands like click(), dblclick(), rightclick(), type() etc. Additionally, these commands simulate user actions on the UI elements.
- Moreover, Cypress internally performs various pre-checks to ensure that the UI element is in the interactable state, before firing the command for the element.
Conclusively, let's move to the next article. We will understand various Cypress and JQuery commands, which, in turn, will be handy during the automation using Cypress.
If you want to learn more you can look at this video series: ++Cypress video series++