The basis of the Cypress Test is Mocha and Chai (one of the famous assertion libraries in JavaScript), and it adheres to the same style of writing test cases as will be used by any other JavaScript-based framework. We will use the default folder structure provided by Cypress to manage and write our test cases. In this article, we will be covering the following topics regarding writing the first Cypress Test:
- How to open Cypress?
- What are the basic constructs of Cypress?
- How to write a Cypress Test?
- What are the common errors while launching Cypress?
How to open Cypress to run Cypress Test?
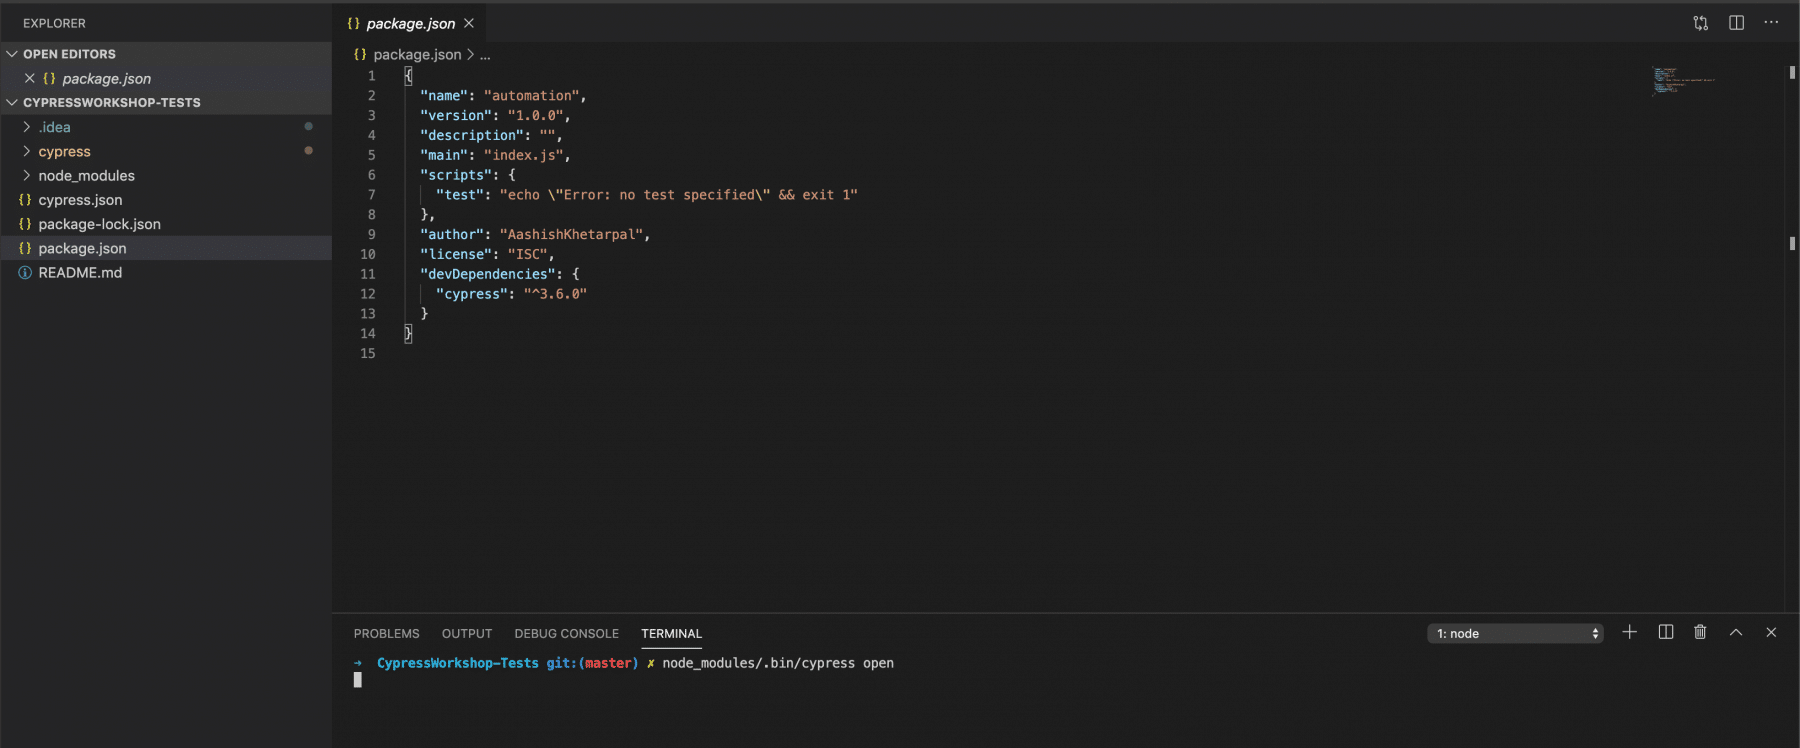
In the previous tutorial of “Cypress Installation,” we noticed that Cypress installed as a node module, and the binary file for the same resides under the folder “node_modules”. We did all this work when we created a new project, 'CypressWorkshop', as part of the npm init command. Now to open Cypress under the same project which we created, below commands can be executed on the terminal:
By providing the full path of node modules:
node_modules/.bin/cypress open
By using the alias for node modules:
$(npm bin)/cypress open
Cypress can be opened by using the "npx" commands as well
npx cypress open
Note : npx is available with npm > 5.2 version only.
It is how the commands can run inside Visual Studio Code Editor for opening Cypress :
When we run any of the commands as mentioned above for the first time, it will open a pop-up as shown below:
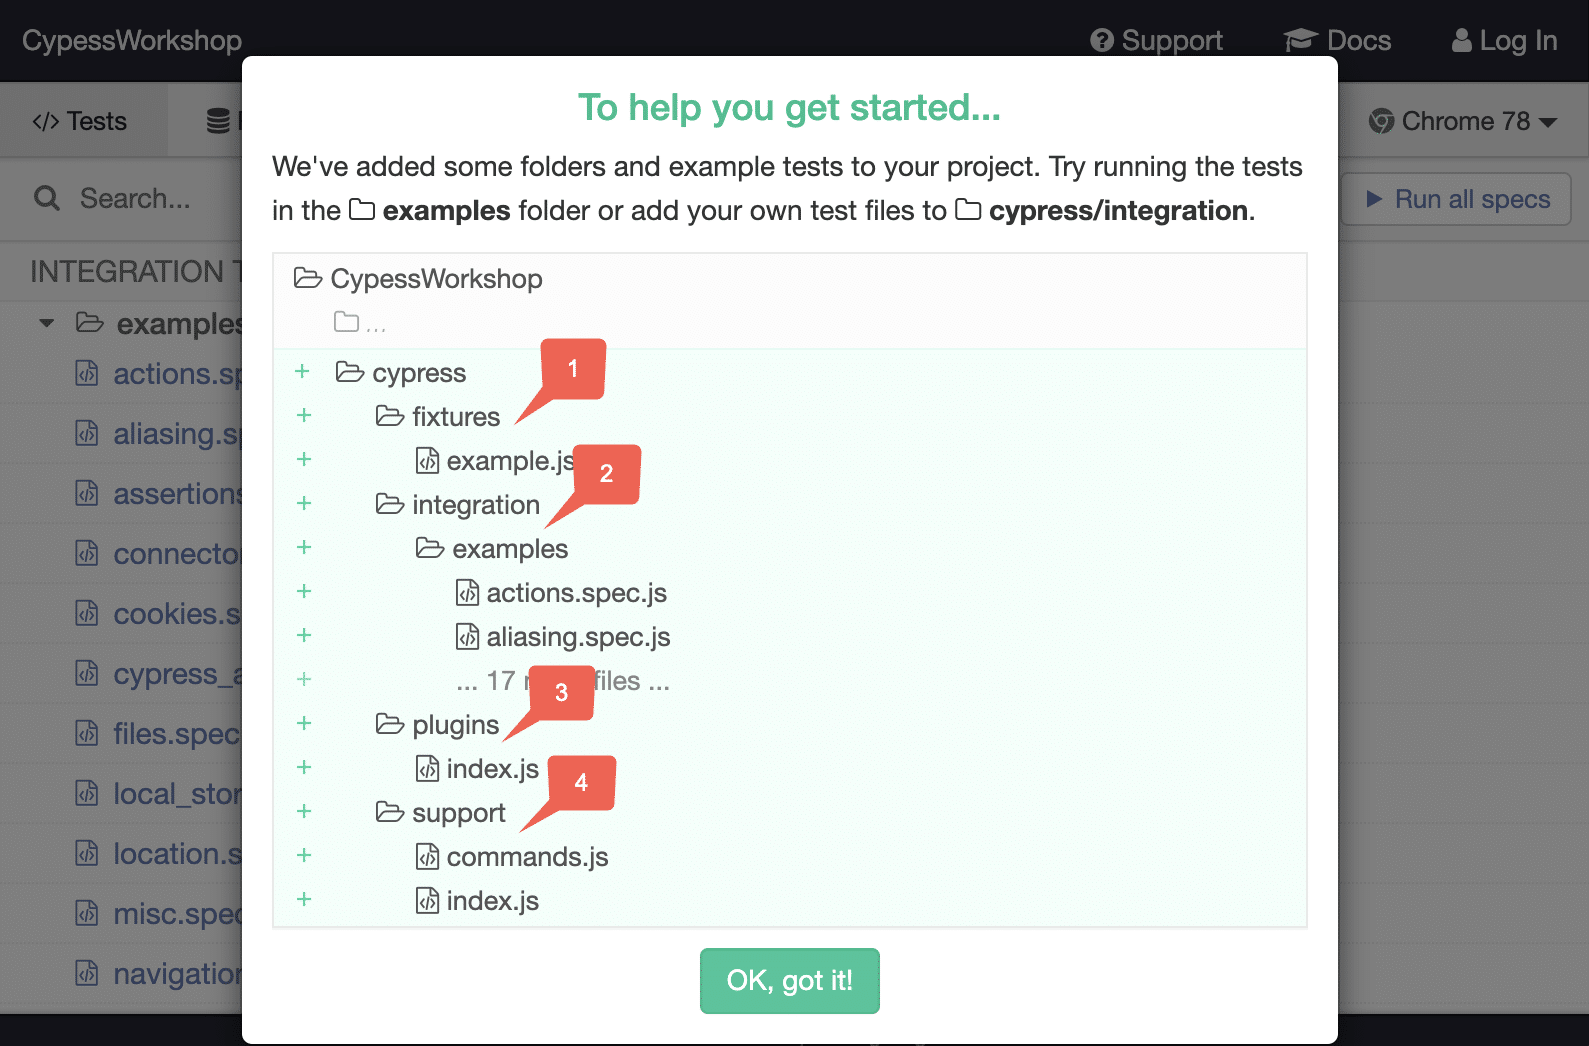
It shows a message that Cypress has created a default folder hierarchy and some sample test cases under the "examples" folder.
Now on this dialogue box, When the user clicks the “OK got it” button cypress creates a default project structure under the parent folder “CypressWorkshop” as shown below:
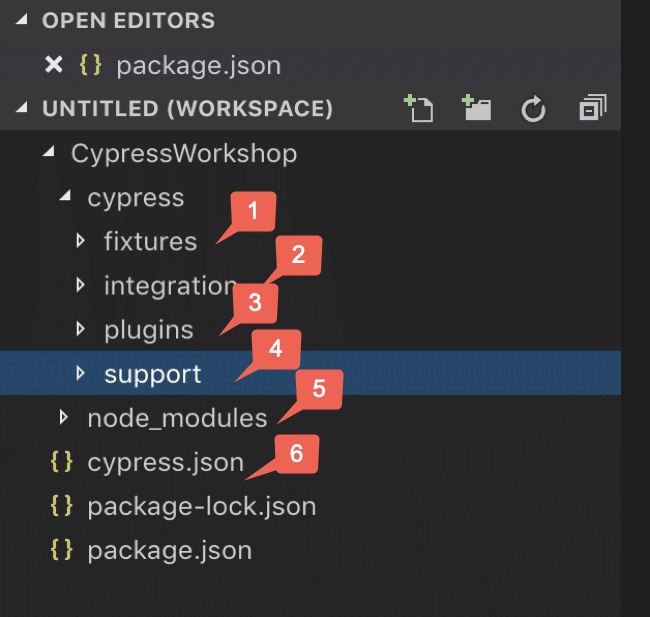
We can see from the above two screenshots that Cypress has created a default folder hierarchy when it opens the first time. Below are the details for each of these folders/files created by Cypress:
- Fixtures are external pieces of static data that can be used by your tests. We should not hard code data in the test case. It should drive from an external source like CSV, HTML, or JSON. They will be majorly used with the cy.fixture() command when you need to stub the network calls.
- The integration folder provides a place that writes out test cases. It also provides an "examples" directory, which contains the default test cases provided by Cypress and can be used to add new test cases also. We can also create our folder under the integration directory and add out test cases under that.
- Plugins contain the plugins or listeners. By default, Cypress will automatically include the plugins file "cypress/plugins/index.js" before every test it runs. You can programmatically alter the resolved configuration and environment variables using plugins, Eg. If we have to inject customized options to browsers like accepting the certificate, or do any activity on test case pass or fail or to handle any other events like handling screenshots. They enable you to extend or modify the existing behavior of Cypress.
- Support writes customized commands or reusable methods that are available for usage in all of your spec/test files. This file runs before every single spec file. That's why you don’t have to import this file in every single one of your spec files. The "support" file is a great place to put reusable behavior such as Custom Commands or global overrides that you want to be applied and available to all of your spec files.
- Node_Modules in the default project structure is the heart of the cypress project. All the node packages will be installed in the node_modules directory and will be available in all the test files. So, in a nutshell, this is the folder where NPM installs all the project dependencies.
- Cypress.json is used to store different configurations. E.g., timeout, base URL, test files, or any other configuration that we want to override for tweaking the behavior of Cypress. We can also manage the customized folder structure because it is part of by default Cypress Configurations.
What are the basic Constructs of Cypress:
Cypress has adopted Mocha’s syntax for the development of test cases, and it uses all the fundamental harness that Mocha provides. Below are a few of the main constructs which we majorly use in Cypress test development:
- describe(): It is is simply a way to group our tests. It takes two arguments, the first is the name of the test group, and the second is a callback function.
- context(): It is is just an alias for describe().
- it(): We use it for an individual test case. It takes two arguments, a string explaining what the test should do, and a callback function which contains our actual test.
- before(): It runs once before all tests in the block.
- after(): It runs once after all tests in the block.
- beforeEach(): It runs before each test in the block.
- afterEach(): It runs after each test in the block.
- .only(): To run a specified suite or test, append ".only" to the function.
- .skip(): To skip a specified suite or test, append ".skip()" to the function.
Note: We will cover all these test constructs in more detail in future articles.
Now, let's move to the next section, where we will be writing out first Cypress test case:
How to write a Cypress Test Case?
As we know, each test generally consists of three steps:
- Prerequisite: You have a given state of the application.
- Action: You perform some action on the elements of the application.
- Expectations: Then, you assert/validate the changed state of the application.
On the same lines, let's consider we have the following scenario that we need to automate using Cypress:
- We visit the home page of “https://demoqa.com/”.
- Click on the widget menu item.
- Validate the search results.
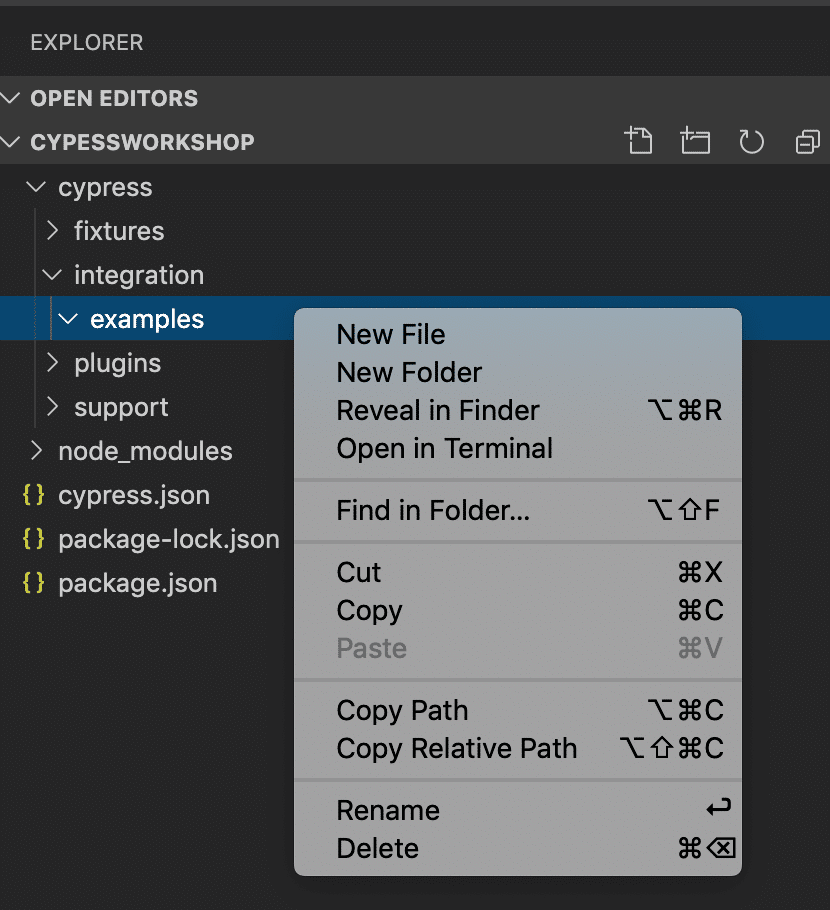
First of all, add a new file named “cypressTest1.js” under “examples” folder, by right-clicking on the folder and selecting option “New File”:
Step 1: Visit the site:
As discussed, we need to visit the page “https://demoqa.com/”. Cypress provides a visit() method which accepts a URL of the page which needs to open in the browser. Add the following code to the file “cypressTest1.js”
// type definitions for Cypress object "cy"
/// <reference types="cypress" />

describe('My First Cypress Test', function() {
    it('Visits the ToolsQA Demo Page and check the menu items', function() {
    //Visit the Demo QA Website
    cy.visit("https://demoqa.com/");
})
})
Step 2: Click on the Widget Menu Items.
After the home page(DemoQA) is open, click on the "Widget" item at the top main menu. To perform all these actions, add below lines of code after the cy.visit():
// Clicking on Widget Menu Item
cy.get(':nth-child(4) > :nth-child(1) > .avatar > svg').click();
The values in get() methods are the CSS selectors of the HTML elements on which actions need to perform.
Note: We will cover details of all the supported locators' types in future articles.
Step 3: Validate the count of links:
Verify that the number of links displayed has a length of the items being returned. To validate this, add the below code inside it() method:
//Verify number of items present under the Widget Tab
  cy.get(':nth-child(4) > .element-list > .menu-list > li').should('have.length',9);
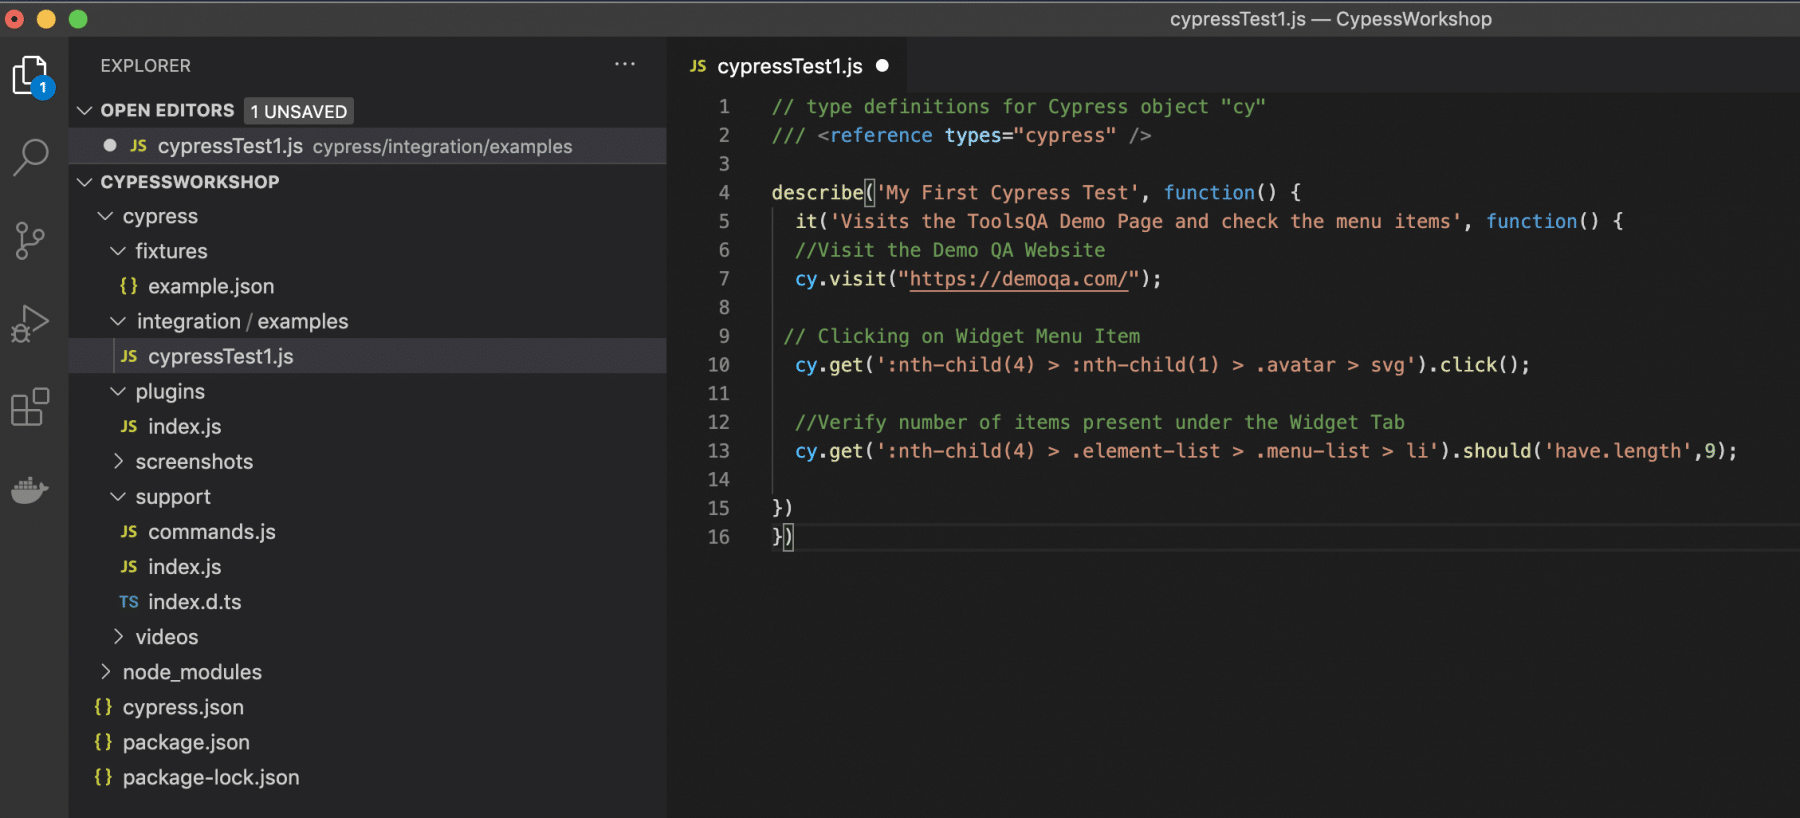
And this completes your first test case using Cypress. After all these steps, the complete code in file “cypressTest1.js” should be:
// type definitions for Cypress object "cy"
/// <reference types="cypress" />

describe('My First Cypress Test', function() {
  it('Visits the ToolsQA Demo Page and check the menu items', function() {
  //Visit the Demo QA Website
  cy.visit("https://demoqa.com/");

 // Clicking on Widget Menu Item
  cy.get(':nth-child(4) > :nth-child(1) > .avatar > svg').click();

  //Verify number of items present under the Widget Tab
  cy.get(':nth-child(4) > .element-list > .menu-list > li').should('have.length',9);

})
})
It is how it will look like on your Code Editor when you have created a new test file.
So, wasn't it quick and straightforward, no need to do any pre-setup or initialize any driver as in case of selenium. Just directly invoke the Cypress methods provided by the "cy" object, and your first test is ready within a few minutes.
What are the common errors while launching Cypress?
Users generally face specific issues while launching Cypress. Few of them are:
Error 1: CypressCypress.ps1 cannot be loaded because running scripts is disabled on this system.
As a Windows user, when you try to run this command on Powershell, You sometimes notice the above error. You can fix this error by typing following command in the PowerShell:
Set-ExecutionPolicy Unrestricted
The Unrestricted mode will allow running the unsigned scripts.
Error 2: One can not recognize the term 'cypress' as the name of a cmdlet, function, script file, or operable program.
Sometimes, users explicitly do a path change to the ".bin" directory of the "node_modules" folder and then try to open Cypress using following commands:
cd node_modules/.bin

cypress open
It will give an error as follow:
cypress : The term 'cypress' is not recognized as the name of a cmdlet, function, script file, or operable program. Check the spelling of the name, or if a path was included, verify that the path is
correct and try again.
It is an expected error, as this will execute the "cypress" command only if the "cypress" file is executable and located in some directory in the $PATH variable. As each project will have its own "node_modules" folder having its own "cypress" module, so it's not recommendable to add the path of Cypress to the $PATH variable.
To fix this error, you can execute the following commands:
cd node_modules/.bin

./cypress open
It will run "cypress" only if the file is executable and located in the current directory. The leading dot and slash (./) denote the current directory. It is necessary because the current directory is usually not (and often should not be) in $PATH.
Key Takeaways
- Cypress can launch using the "open" command with various package managers provided by Node.
- Cypress provides its default folder hierarchy, which makes the test development quick and easy.
- Moreover, Cypress uses Mocha's BDD constructs for the development of test cases.
- We can invoke Cypress methods using the "cy" object.
- Cypress provides a "visit" method to browse any webpage.
- Additionally, Cypress provides a "get" method to find a web element and perform any actions on that.
So, we accomplished the tasks of launching Cypress and writing a test case to automate the test scenario. Let's proceed to the next tutorial, where we will learn "[How to execute/run these test cases in Cypress with the help of Cypress Test Runner].(https://www.toolsqa.com/cypress/cypress-test-runners/)"
If you want to learn more you can look at this video series: ++Cypress video series++