People who have worked on Selenium will be well versed in the concepts of locators. Locators are the backbone for all automation frameworks for Web-based applications. Additionally, a locator is an identifier that tells any automation tool that GUI elements ( say Text Box, Buttons, Check Boxes, etc.); it needs to operate. Following the same concepts, Cypress also uses the locators to identify the UI element for the application under test. Subsequently, we will cover the following topics in this article to understand the concept of locators in the world of Cypress:
- What Locators are supported by Cypress?
- How to write locators with CSS Selectors?
- How to use Cypress selector playground to grab locators?
What Locators are supported by Cypress?
Unlike Selenium, Cypress only supports CSS selectors( very similar to JQuery Selectors). Therefore, we will be using CSS selectors in all our Cypress automation code.
Note: Cypress does support Xpath selectors as well. However, that does not come by default. In other words, we need 'Cypress-Xpath' external plugins to assist this selector.
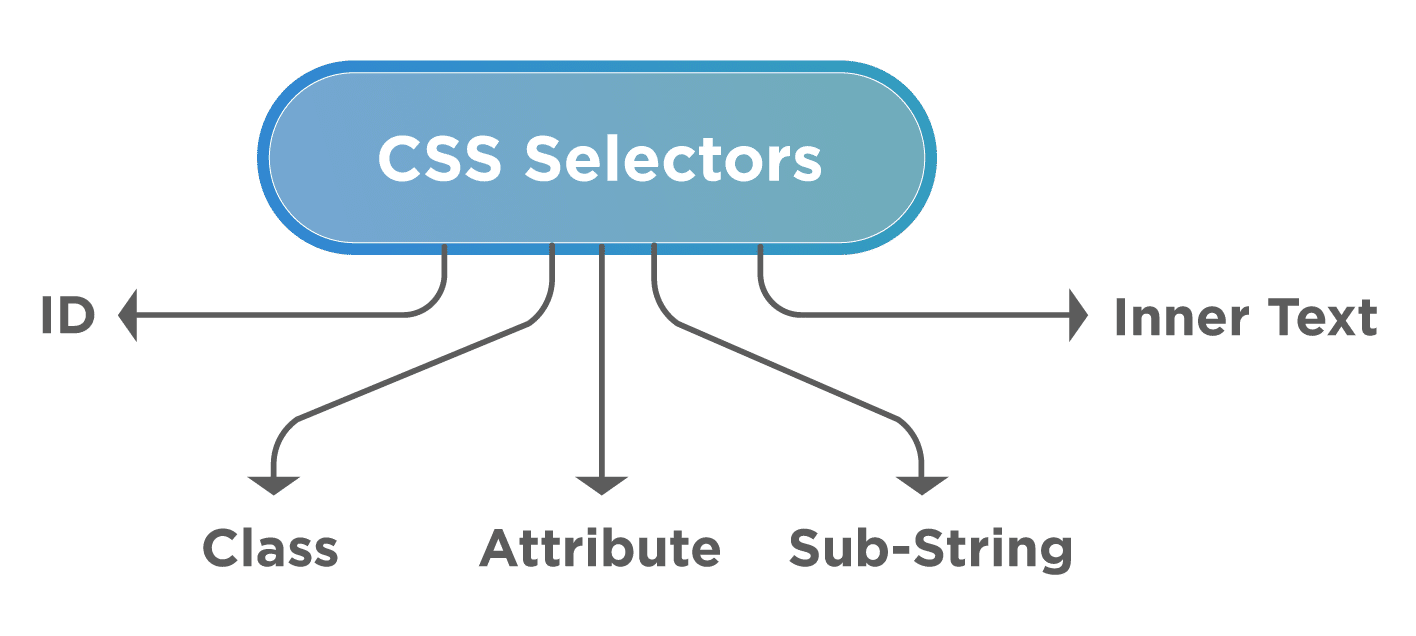
We can write CSS selectors in multiple ways. For example, using the id, class, or any other attribute of a web element that can help us in writing customized CSS selectors. Moreover, we can categorize the CSS selectors into the following categories:
How to write Cypress Locators with CSS Selector?
Suppose we do have the following HTML page as a test application:
<html>
    <head>
        <title>Demo Site</title>
    </head>
    <body>
        <h1>Demo Site</h1>
        </br>
        <div>
            <label>UserName:</label>
            <input id="userid" class="login" name="username" type='text'>
        </div>
    </body>
</html>
It is a simple HTML page, which has a label as "UserName". Additionally, it also has a text field that has various attributes such as "id" as 'userid', "class", as 'login' and "name" as 'username'.*
Now suppose, we have to identify the web elements on this HTML page by using the various types of CSS selectors. Let's see in the below sub-sections, how can we achieve the same.
CSS Selector: ID
Syntax:
<HTML tag><#><Value of ID attribute>
- HTML tag – It is the tag that denotes the web element which we want to access.
- # – The hash sign symbolizes the ID attribute. Additionally, it is mandatory to use the hash sign if we are using the ID attribute to create a CSS Selector.
- Value of ID attribute – It is the value of an ID attribute that we access.
For Example, input#userid where "userid" is the id of the tag input.
CSS Selector: Class
Syntax:
<HTML tag><.><Value of Class attribute>
** . – The dot sign is used to symbolize the Class attribute.*
Example: input.login where login is the class name of the tag input.
CSS Selector: Attribute
Syntax:
<HTML tag><[attribute=Value of attribute]>
- Attribute – It is the attribute we want to use to create a CSS Selector. Moreover, it can be value, type, name, class, id, etc.
For Example, input[name=username] where "username" is the value of attribute "name".
or
input[class=login], where, "login" is the value of the attribute "class"
CSS Selector: Sub-string
There are three ways in which CSS Selectors can be created based on matching the substring:
Match a prefix:
<HTML tag><[attribute^=prefix of the string]>
- ^ – It is a symbolic representation of matching a string using the prefix.
- Prefix – It is the string based on which we perform the match operation.
For Example, input#userid[name^=user].
Where input denotes an HTML tag-name. Which, in turn, has an "id" value as 'userid' and from the attribute, and the 'name' attribute should have a value which starts with 'user'.
Match a suffix
<HTML tag><[attribute$=suffix of the string]>
- $ – It is a symbolic representation of matching a string using the suffix.
- The suffix – It is the string based on which we perform the match operation.
Example: input#userid[name$=name].
Where input denotes an HTML tag-name that has an id value as 'userid' and the attribute' name' should have a value which ends with 'user'.
Match a substring
<HTML tag><[attribute*=sub string]>
- ** – It is a symbolic representation of matching a string using substring.*
- Sub string – It is the string based on which we perform the match operation.
Example: input#userid[name=erna].*
Where input denotes an HTML tag-name that has an id value as 'userid' and the attribute 'name' should have a value which contains a substring 'erna'.
Note: Chrome provides a plugin named "ChroPath", which provides an easy way to capture and inspect Xpath and CSS selectors. Moreover, you can use the same to capture CSS selectors that we will use in Cypress tests going further.
How to use Cypress Selector Playground to grab locators?
Now imagine, if the automation tool itself provides the functionality to identify and validate the selectors/locators within the tool. Wouldn't it be an icing on the cake? Cypress provides an Open Selector Playground functionality in Test Runner. Additionally, it helps us in identifying the CSS Selectors for different Web Pages. Let's learn it with below snapshots and steps :
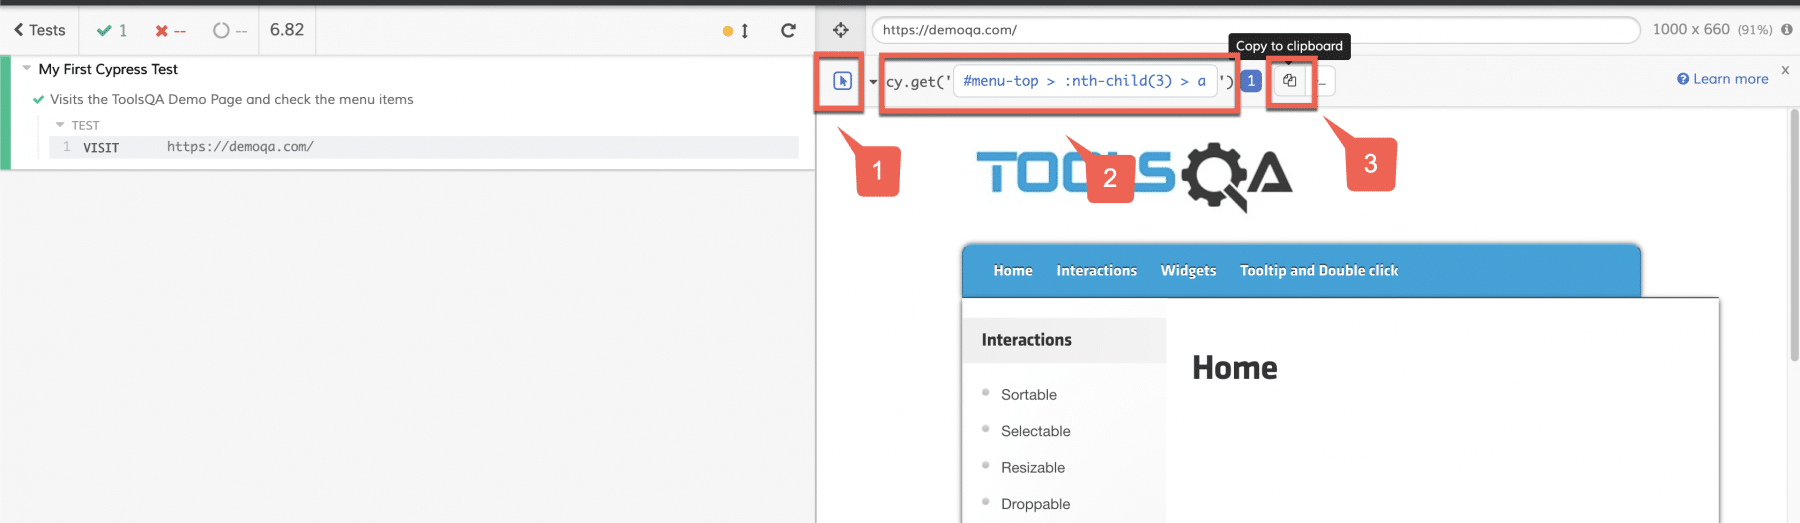
Firstly, open the Cypress Test runner and run any of the tests. Secondly, after that click on the toggle (as highlighted in the below screenshot) to enable the "Selector Playground":
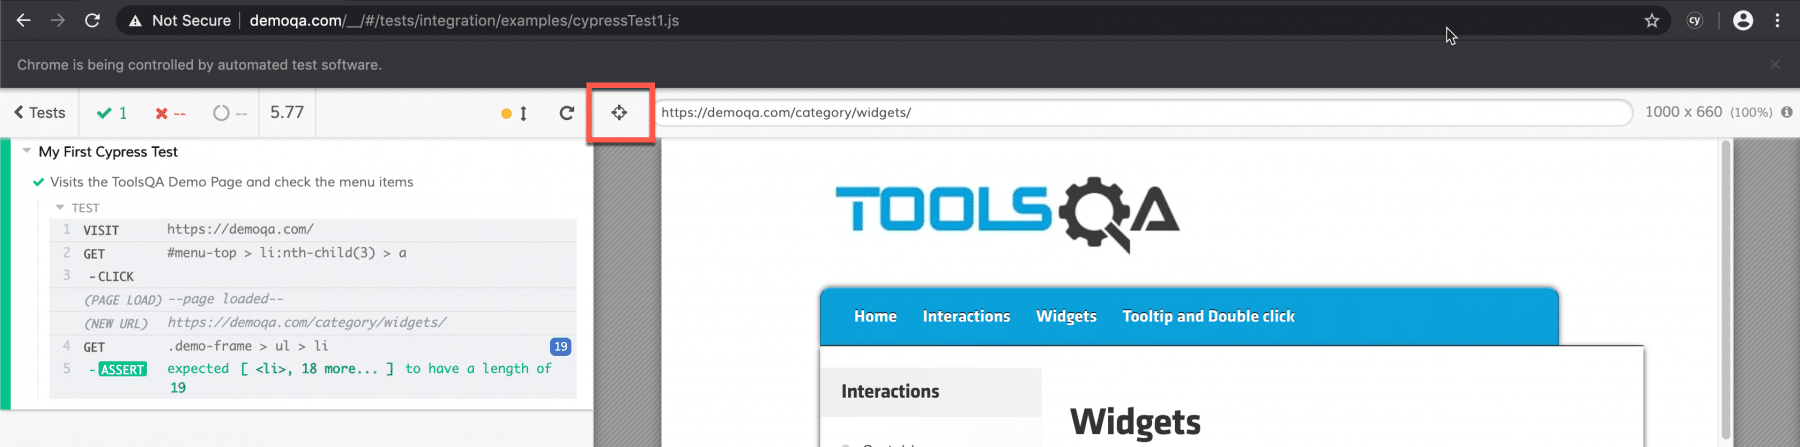
After that, once you click on the toggle button, it shows the selector tools as highlighted below:
Where,
- The 1st marker shows the "selector". You can click on this and then click on any of the web elements, of which you want to grab the CSS selector.
- The 2nd marker is showing the CSS selector of the selected element. Additionally, it will auto-populate the CSS locator of the web element, which you have selected using the selector marked with "Marker 1".
- The 3rd marker is showing the option of Copying the CSS selector to Clipboard. By using this, you can directly paste the CSS selector of the web element in your tests.
Let's take the example of the test script, which we developed in the previous article for clicking the "Widgets menu item" on the demoqa.com website. Moreover, the activities that we need to do is to capture the CSS selector for the "widgets menu item". Additionally, use the same in our code to perform any activity on that web element. Let's follow the below steps to achieve the same :
- First, open the Selector playground by clicking on the "Toggle" button.
- Second, click on the "Selector" icon, as shown by marker 1 in the above screenshot.
- Third, click on the "Widgets" menu to grab its CSS selector. Just after clicking the "Widgets" menu, it will show the CSS selector inside the "cy.get()" section, which was demonstrated by marker 2 in the above screenshot.
- Fourthly, click on the copy icon to copy the CSS selector. Additionally, it will show the message as "copied" once the successful copying of the CSS selector happens on the clipboard.
- Finally, you can use this CSS selector anywhere in your test.
Let's see all these steps in real action in the following gif:

Now, as we got the CSS selector from the above steps, we can use the same selector we copied in our code and subsequently, perform the click operation as shown below:
// type definitions for Cypress object "cy"
/// <reference types="cypress" />

describe('My First Cypress Test', function() {
    it('Visits the ToolsQA Demo Page and check the menu items', function() {
    //Visit the Demo QA Website
    cy.visit("https://demoqa.com/");

   // Clicking on Widget Menu Item
   // Fetched the CSS selector from Open Selector Playground
   cy.get('#menu-top > li:nth-child(3) > a').click();

})
})
Continuing the same way, we can grab the CSS selectors for all the actionable UI elements and develop the complete test case. Doesn't it make it a very effective and efficient way to grab the selectors of web elements and use them directly in our test cases?
Key Takeaways
- Cypress only supports CSS selectors for identifying any of the web elements.
- Additionally, we can create the CSS selectors either using ID, class, name or using a substring or innerText of a web element.
- Moreover, Cypress Open Selector Playground provides an easy way to grab a CSS selector for any web element.
To conclude, I hope we now understand various ways in which a CSS selector creation and usage happens in Cypress. Subsequently, let's now move to the next article, where we will comprehend the "Get and Find Commands" that Cypress provides to search various web elements on a web page.
If you want to learn more you can look at this video series: ++Cypress video series++