As we now know, TestProject Agents facilitate test execution and recording on the local machine. There is an intuitive wizard that helps users install the agent specific to their platform (Windows, Mac, or Linux). Beyond running the tests on a local machine, TestProject also provides the capability to run the tests within a docker container. Additionally, the TestProject Agent in Docker Container uses the capabilities of virtualization, where multiple docker containers can run on a single machine, and all of them can serve as independent TestProject Agents. TestProject's Dockerized Agents are one of the unique capabilities of TestProject, making it stand in the frontline of all the automation tools. Moreover, these virtual agents help ensure better utilization of system resources, in turn, saving cost for the end-user.
Now, in our previous article covering TestProject: Installation & Setup, we have already explored the following topics:
- How to install Agents for Windows & Mac?
- How to Manage Agents in TestProject?
These agents run on the local machine as an application/process and share the resources of the machine on which they install. Additionally, many customers would prefer to install their agents in other ways, namely where an agent can run as a Docker Container. Subsequently, in this article, TestProject Agent in Docker Container, we are going to learn about the TestProject's Dockerized Agents in detail via the following sub-topics:
- How to Setup a TestProject Agent in Docker Container?
- How to Setup TestProject Agent as a Permanent Docker Container?
- Similarly, how to Setup a TestProject Agent as Ephemeral Instances?
- How to Run a Test in TestProject using Docker Agents?
How to Setup a TestProject Agent for Docker Container?
TestProject provides two ways to Setup a TestProject Agent for Docker. Before we proceed with the setup, the following are the pre-requisites for the setup for Docker Container as Test Agent:
- TestProject Account: You should have a TestProject Account. If you don't have one already, please refer to TestProject: Installation & Setup
- Docker Daemon Installed and running on your local machine.
Once you have docker installed and running on your machine, you can run the following command in your terminal to validate that docker has been installed and is running successfully on your machine:
docker stats --no-stream
docker stats displays the details of containers currently running, as a stream of information, using the --no-stream option, will display the information once, rather than continuously updating and displaying the information as a stream of data.

The above screenshot signifies that we have a docker daemon installed and running. Consequently, we are now ready to move on to the next steps in the agent setup process.
As mentioned above, TestProject provides two distinct ways to run Dockerized Agents:
- Starting a Permanent Instance
- Starting an Ephemeral Instance
Let's see each of them in the section below.
How to Setup a TestProject Agent as a Permanent Docker Container?
When we run the TestProject agent as a permanent container, the agent is registered once but can re-use to execute tests & jobs as long as it remains running. This setup is similar to the way a regular agent would run on our local machine. Let's look at the steps to this setup.
- Getting our API Key: Firstly, to start the setup, we would first need to get our API Key. The API Key will provide the necessary connection between the docker agent on your machine and your TestProject account in the cloud. Moreover, og into your TestProject account and click on the "API" link located under the "Integrations" menu, as displayed in the snapshot below.
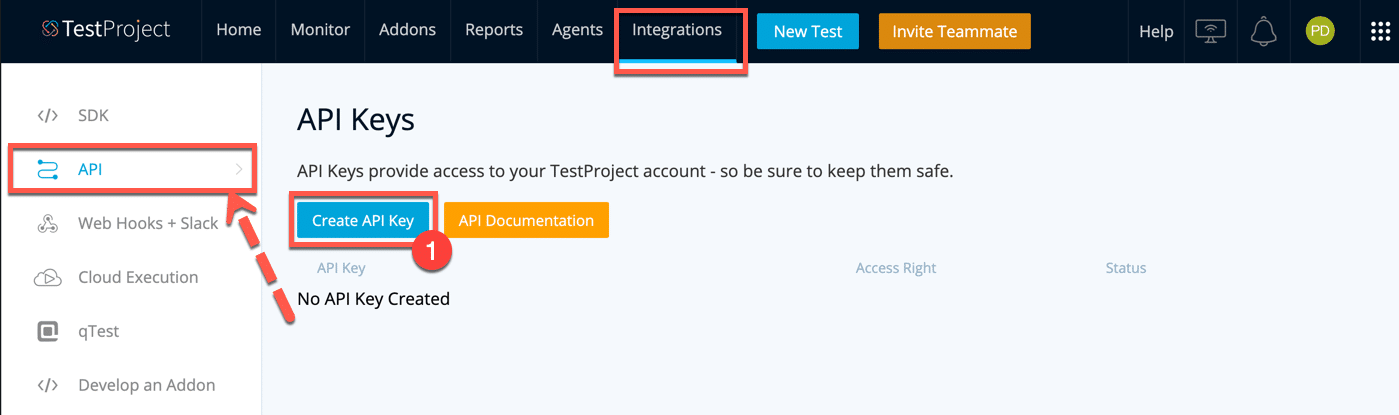
As you can see, there is no key added so far. Click on the "Create API Key", as highlighted by marker 1, to add a new API Key.
- Secondly, TestProject will then open the "Create API Key" wizard, as displayed below:
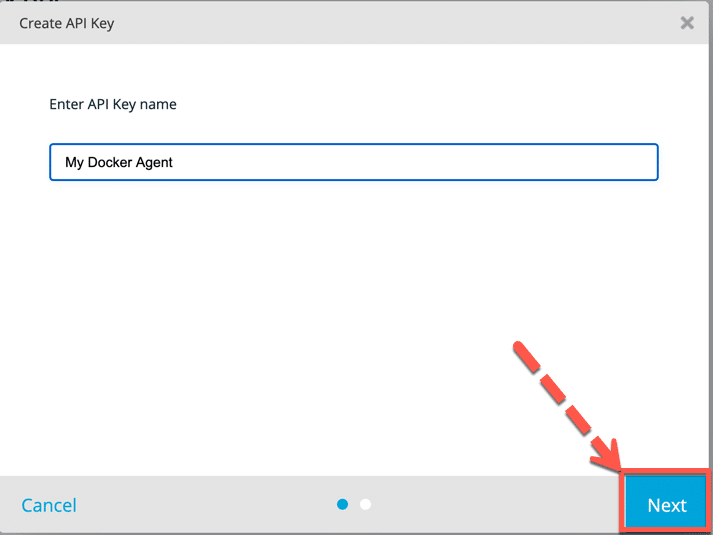
Provide a name for the API key and click on the "Next" button.
- Thirdly, clicking on the "Next" button will enable you to manage access for this key, as can be seen in the snapshot below:
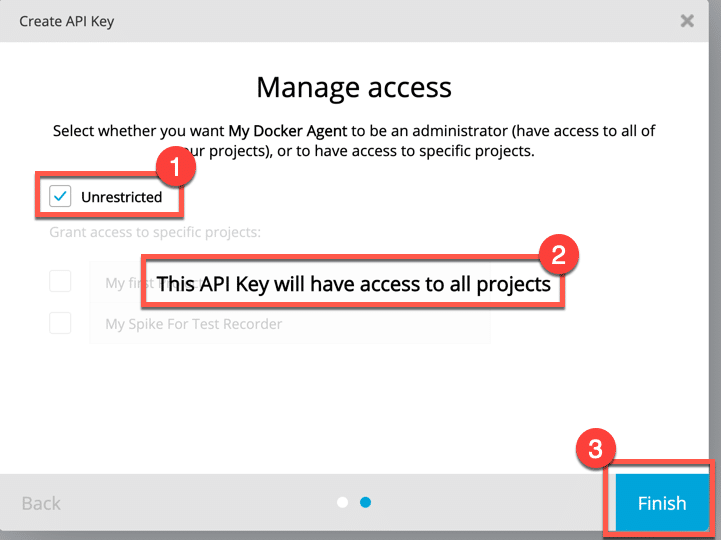
This screen allows you to specify the access for this API Key on a project level. Moreover, you may choose to use this API key for a specific project or choose "Unrestricted" to allow it to access all projects in your TestProject account. We are configuring the key for unrestricted access as highlighted by marker one, and hence you can see a message indicating access to all projects as highlighted by marker 2. Additionally, to complete the API Key creation, please click on the "Finish" highlighted by marker 3.
- Fourthly, once you click on the "Finish", you will see that a new API key has been added to your account, as can be seen in the screenshot below.
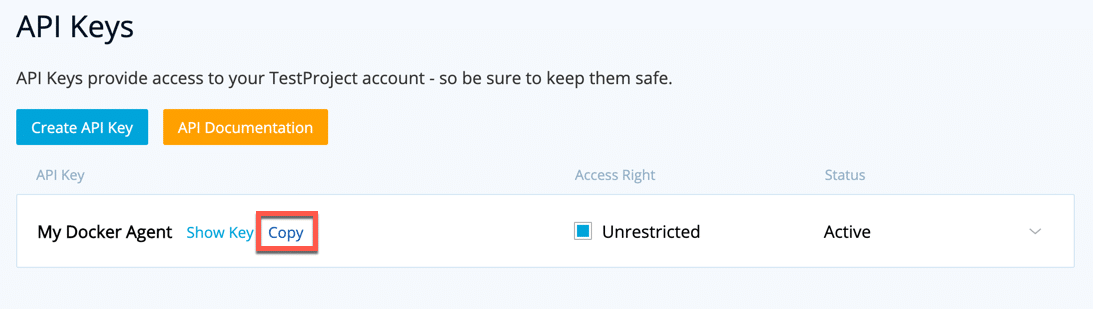
You can copy the key to your clipboard by simply clicking on the "Copy" link.
- Fifthly, bringing the Docker Image to your machine: Now that we have an API key added, which will enable communication between the agent TestProject's account and the docker container, Let's go ahead and set up the agent on our machine. To begin, we need to pull the image of the agent into our machine. After that, open the terminal on your machine and type the below command.
docker pull testproject/agent
The above command will pull the latest image of the TestProject-agent from the "testproject/agent "repository of the docker hub. This command needs to use when setting up the TestProject Agent for the first time when running the agent; subsequently, we don't need to run this command.
- Once you execute this command, you will see that component pulled, as displayed in the snapshot below
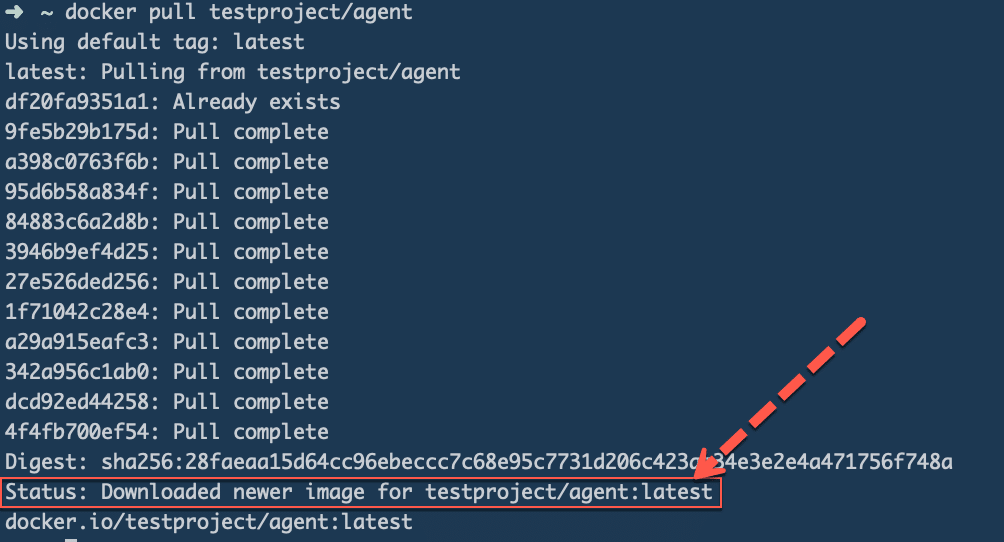
As highlighted, we can see that the latest image of the successful download of the TestProject's agent.
- Now we need to start a container that will run this image. We use the following command to start a container.
docker run --name testproject-agent \
    -e TP_API_KEY="REPLACE_WITH_YOUR_KEY" \
    -e TP_AGENT_ALIAS="My Docker Agent" \
    -v </path/to/host/folder>:/var/testproject/agent \
    testproject/agent:latest
- The above command will run a docker container having the name "testproject-agent" with the specified image "testproject-agent:latest".
-e TP_API_KEY="REPLACE_WITH_YOUR_KEY" \
Don't forget to update the placeholder with your API keys created above before executing this command.
-v </path/to/host/folder>:/var/testproject/agent \
This argument ensures that all necessary configuration around this container stores locally, so it can be re-used next time,
- Subsequently, now, you should be able to see a new agent running in your TestProject account with the name specified as part of the above command, as can be seen in the screenshot below:
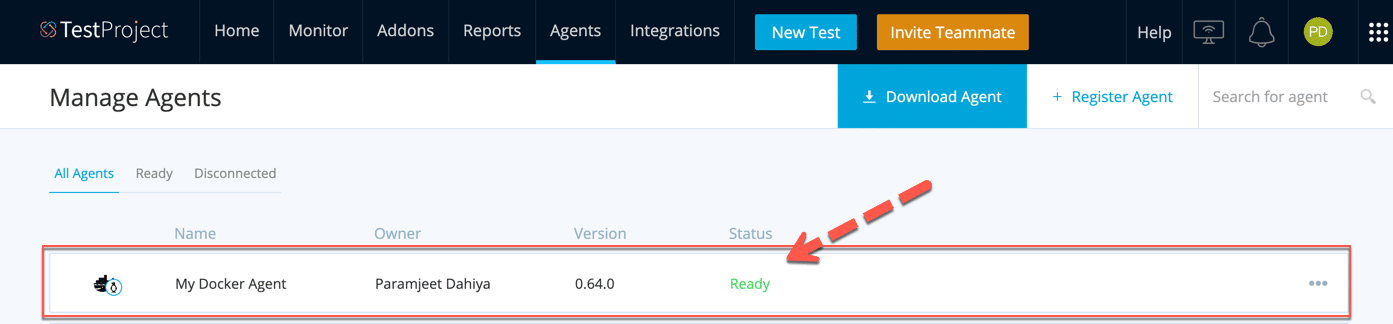
Now, our docker-agent is in "Ready" status, and we can use it for running test cases.
So, this completes the setup of the docker container as Test Agent in TestProject. This container will continue to run on the local machine and will be available for executing any compatible test cases or jobs.
How to Setup a TestProject Agent as an Ephemeral Instances?
Sometimes, we may not want to keep an agent permanently running. Instead, we want to have an agent that performs a task and then ceases to exist. For example, if we are running tests via a Jenkins agent or any other Continuous Integration System, where we may want the docker container to stop automatically after performing its needed job so that we can save the system resources. For such use cases, TestProject provides the concept of Ephemeral Instances.
- To run the docker container as an Ephemeral instance, add the "--rm" command while running the container, as shown below:
docker run --rm \
    -e TP_API_KEY="REPLACE_WITH_YOUR_KEY" \
    -e TP_JOB_ID="REPLACE_WITH_YOUR_JOB_ID" \
    testproject/agent:latest
- Here the --rm argument to docker run will ensure that after performing the job, this instance will automatically terminate.
-e TP_JOB_ID="REPLACE_WITH_YOUR_JOB_ID"
It is the JOB ID from the TestProject project that you wish to execute. This JOB ID can be found from the jobs sections of your project, as displayed in the snapshot below.
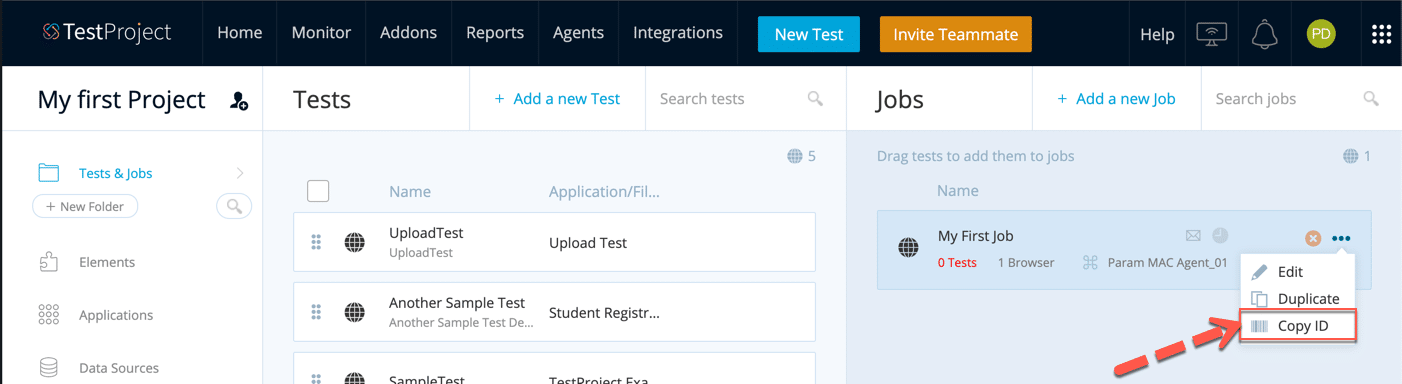
Notice the "Copy ID" link highlighted in the above screenshot.
Note: For more details around how to create a job, please check out our previous article, TestProject - Getting Job ID
Note that this container will kill itself automatically upon job completion. If we decide to run another job or test case later, we will need to run a container once again.
How to Run a Test in TestProject using Docker Agents?
In the previous section, we have seen how we can run a TestProject Agent as a Docker Container. Now, we need to connect some headless browsers to these TestProject Agent instances.
For this, we are going to use a docker-compose file. As we know, Compose is a tool for defining and running multi-container Docker applications. With Compose, you use a YAML file to configure your application's services. Then, with a single command, you create and begin all the services from your configuration. To learn more about all the features of Compose, please read the official documentation here.
Let's learn the steps to run multiple containers. We are going to run Chrome & Firefox browser as a dependent container.
- Firstly, create a directory/folder in your machine to place the compose file. Under this directory, create a file with the below contents.
version: "3.1"
services:
  testproject-agent:
    image: testproject/agent:latest
    container_name: testproject-agent
    depends_on:
      - chrome
      - firefox
    volumes:
      - <Path on you machine goes here>:/var/testproject/agent
    environment:
      TP_API_KEY: "<Your API Keys Goes Here>"
      TP_AGENT_ALIAS: "My Docker Agent"
      TP_JOB_PARAMS: '"jobParameters" : { "browsers": [ "chrome", "firefox" ] }'
      CHROME: "chrome:4444"
      FIREFOX: "firefox:4444"
  chrome:
    image: selenium/standalone-chrome
    volumes:
      - /dev/shm:/dev/shm
  firefox:
    image: selenium/standalone-firefox
    volumes:
      - /dev/shm:/dev/shm
- This configuration file specifies Chrome & Firefox as a dependency for testproject-agent.
- The configuration file provides the name of the docker image of Chrome & Firefox.
- It takes API Keys & Volume as other configurations, something that we have already discussed above.
- Secondly, save this file with a logical name having extension .yml, e.g., dockerAgent.yml. And run the following command
docker-compose -f <file_name> up -d
Note: if you get an error indicating that a docker container with <container_id> is already running using this image, you can use the following commands to stop and remove the containers.
docker stop <container_id>
docker rm <container_id>
- Thirdly, when running for the first time, docker will pull the images from docker-hub and will be showing the below output
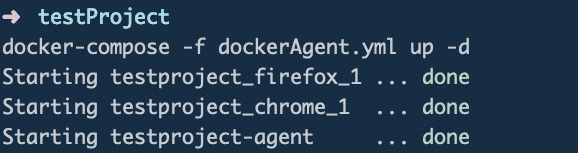
The above output states that the docker daemon has started all three containers successfully.
Now, we have an agent running along with headless browsers. Let's use this agent to run an already present test in a project of TestProject.
Navigate to Tests in the Project of which you want to execute a test. For details on how to create Project & Add tests, feel free to refer our article TestProject: Recording your first TestCase.
Let's take a quick look at the steps to run a test using TestProject Docker Agent*.
- First, click on the "Run" button to execute the test steps of the test.

Clicking on the highlighted "Run" button will open the run test wizard.
- Secondly, you will be able to see your docker agent "My Docker Agent", which we had started using the compose file, as you can see in the screenshot below.
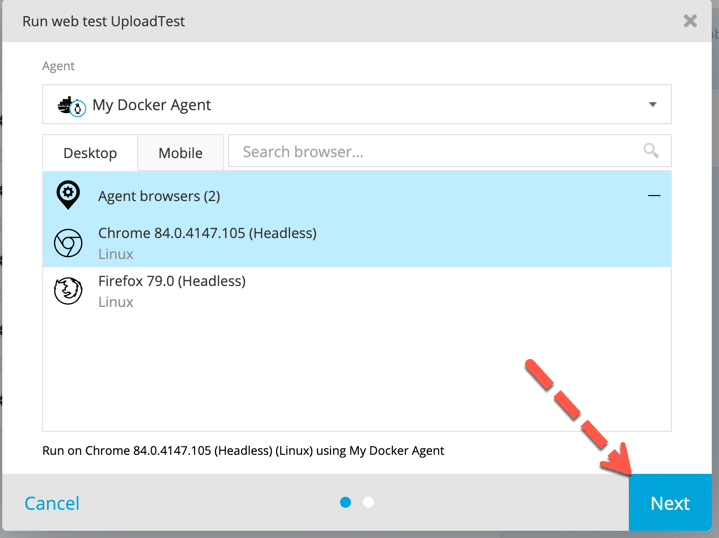
Also, it displays Chrome & Firefox as two Agent browsers available. Select your preferred browser and click on the "Next" button. Text execution will start after clicking on the "Run" button on the next screen.
- Thirdly, you can access the report of this execution from the Reports section.
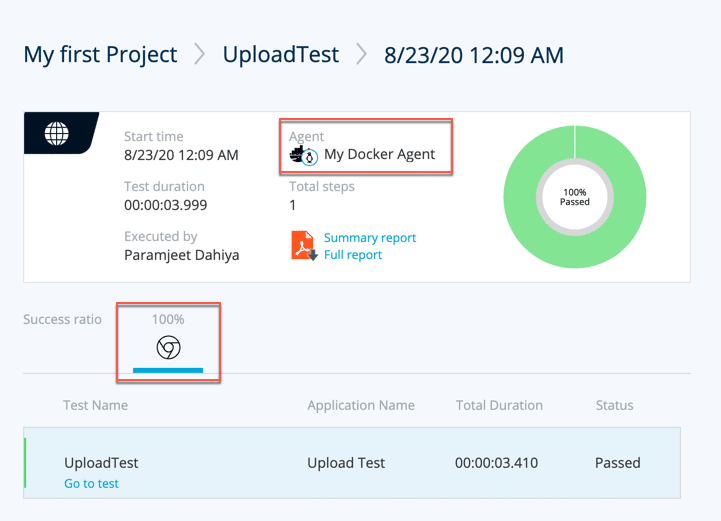
You can see that we used our agent "My Docker Agent", which is running as a docker container. Feel free to refer our article TestProject: Understanding the Test Reports for a deeper understanding of rich features related to the "test reports" provided by TestProject's reports.
Conclusively, it completes our journey of learning how we can quickly spin-up a TestProject Agent for Docker Container and run the tests in docker.
Key Takeaways:
- TestProject's containerized agent lands immense flexibility to our testing by eliminating the need to install the agent as a standalone application.
- Additionally, TestProject's agents can be installed on an "as needed" basis as well as via a permanent container.
- Moreover, TestProject works seamlessly with docker agents running on a local machine using one's API key to connect with their TestProject cloud account.
- Also, we can use the powerful docker-compose tool to run browsers with the agent by using multiple containers.