Best practices often suggest that we should not use hard code the data values into our test scripts. The better choice is usually to use a dynamic variable in our tests. Specific to TestProject, this is where the test parameters come in handy. Hence, we will study "How to Parameterize Tests in TestProject" in this article.
Parameters are a particular type of variable that refers to data provided by the user as an input for the test step. Additionally, these variables take data and pass it to the test step, allowing users to pass several different data values to the same test without having to change the test logic.
Parameters offer more power and flexibility to the test by allowing them to replicate quickly. Moreover, they also help in increasing the maintainability of the test when test data inevitably changes. Additionally, with the TestProject parameters, users can easily share parameters across the project for easy collaboration, using Project level parameters. TestProject also allows for a test level parameter, which will be restricted to use within a specific test. Subsequently, we will be discussing the following topics under this tutorial to understand how to create Parameterized tests in TestProject?
- What are the input parameters in TestProject?
- How to define Test Level Parameters in TestProject?
- How to define Project Level Parameters in TestProject?
- What are the output parameters in TestProject?
- How to share parameters between different test steps?
What are the input parameters in TestProject?
Input parameters provide various values to the test step. They retrieve values and send them to the correct test step during run time, so the test can use them to perform specific actions. TestProject allows usage of two different types of input parameters: first, being a preset value and the second being a value from a data source.
- Preset value means the value that is set up directly into the element, and will stay constant unless edited in the TestProject dashboard.
- Data source values mean values picked up from an external data source like an excel file, where the value will change depending on what data is within the file.
Input parameters can have various access levels, which can be classified as follows:
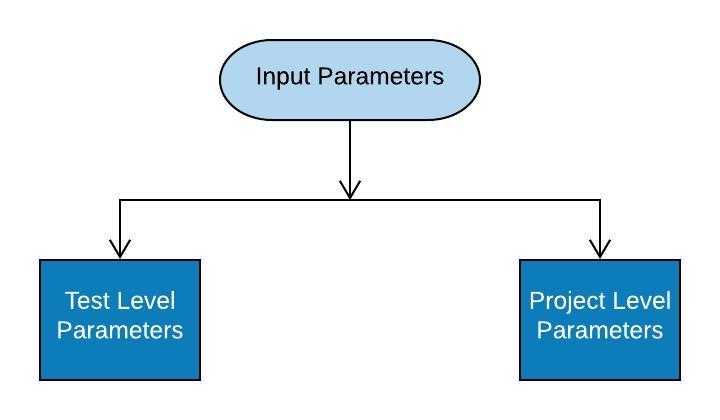
- Test Level / Type Parameters: The first one is the test type parameter; we can access these parameters only in the test case in which we define them.
- Project Level / Type Parameters: The second one is the project type parameter; these parameters are accessible from any test across the entire project. Project type parameters are quite useful in defining constant project parameters used in many different test cases, as an application URL.
Make sure to use the appropriate access level for the parameters you create, depending on the scope where you will use them in your Parameterized tests in TestProject. Subsequently, let's understand how to define these various types of parameters to carry Parameterized tests in TestProject :
How to define Test Level Parameters in TestProject?
Input test parameters can be managed easily within an existing test. First, we can navigate to the TestProject Home page and click on our project. It will take us to the list of tests inside the project. Select any test that needs to have parameters defined and then navigate to the test step.
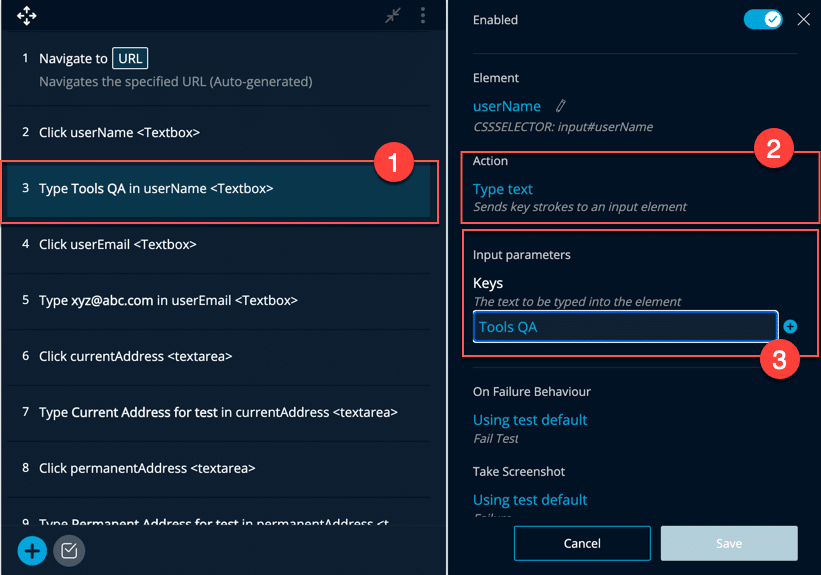
As you can see in the image below, clicking on the test step opens up a new panel with several different options. After scrolling down, you will find an Input Parameters (Shown by Marker 3) section that helps in carrying out Parameterized tests in TestProject.
-
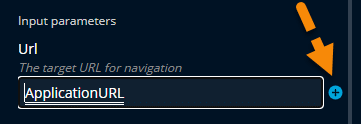
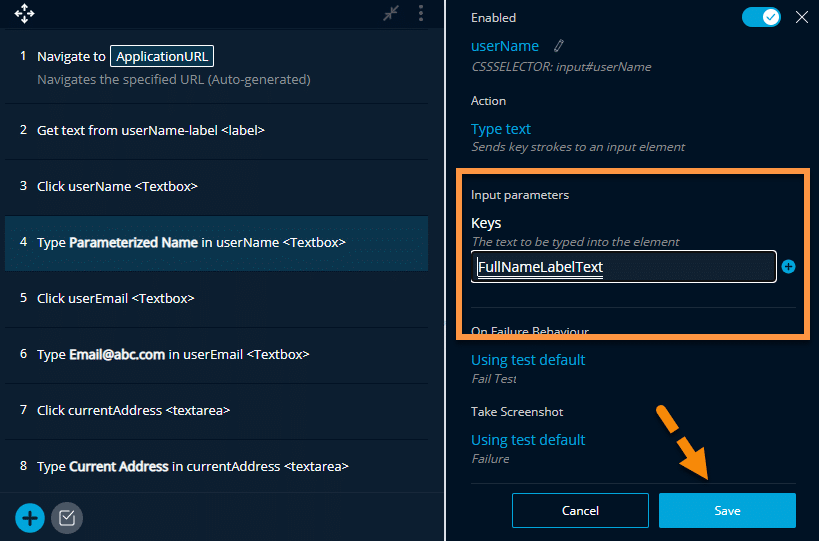
Firstly, click on a step that indicates that we take some input, e.g., in the step highlighted by the markers; we are sending keys "ToolsQA" in UserName.
-
Secondly, it is noteworthy that the Input parameter section is available only in steps where the user is performing a specific action on the web element like click, type text, etc., as highlighted by marker 2 in the image above.
-
Thirdly, the section highlighted by marker 3 can provide input parameters to the test. There are two ways to update the parameter value:
- Firstly, you can directly change the parameter value here by replacing the text from the keys text box
- Secondly, for more options, click on the "+" button just in the right of the text box (Just next to marker 3)
-
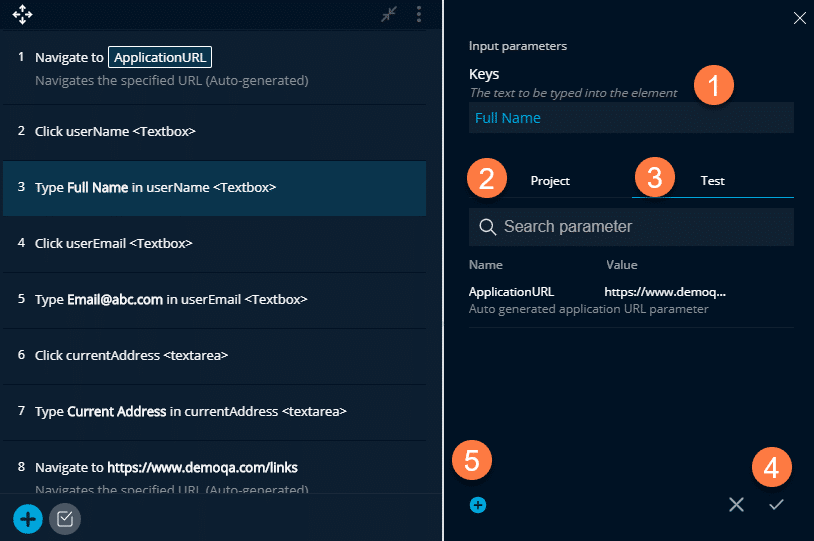
After that, clicking on the "+" button will open an "Input parameter" wizard, as displayed in the image below. Here, we can change the parameter value, and we can mark it as a project parameter (Shown by Marker 2) or test parameter (Shown by Marker 3). After that, to save the parameter, we can click on the (✓) button shown by marker 4.
-
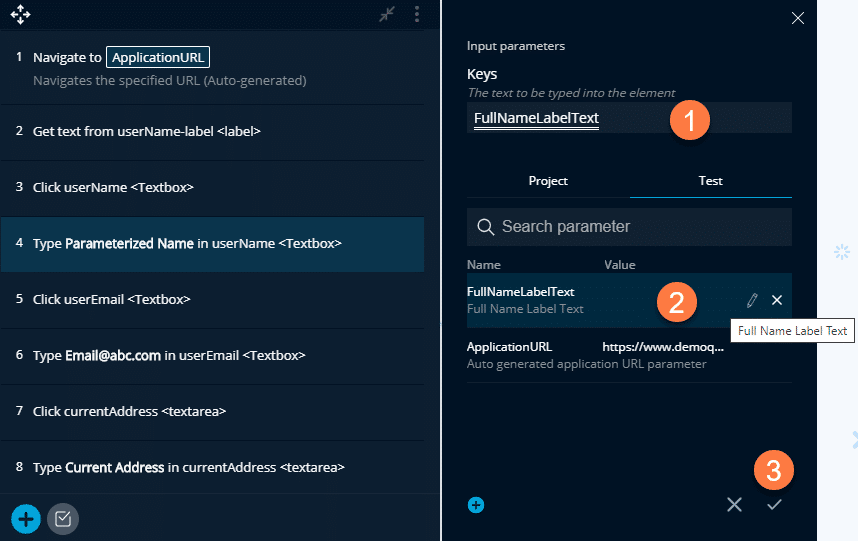
If you want to create more parameters, click on the "+" button as denoted by marker 5 in the above screenshot. A new panel will open, which will allow you to enter new parameters as displayed in the below snippet.
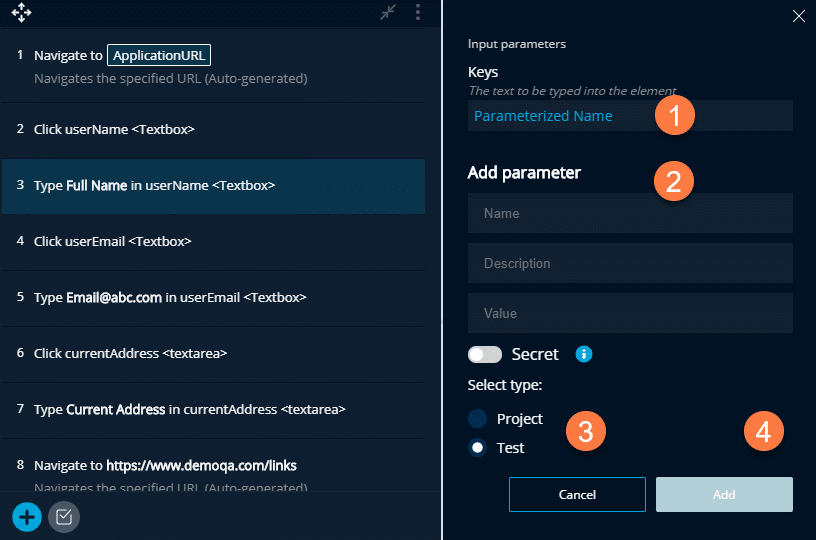
- The marker 1 here denotes the preset parameter. If you want to make any changes to the previous parameter, you can make changes here. For example, we have changed the preset parameter value from "Full Name" to "Parameterized Name".
- The marker 2 denotes the creation of new parameters. You can create different parameters here and can assign them to your test steps later. In step 2, you will need to add the Name, Description, and value of the parameter.
- The 3rd step requires you to select if the new parameter is Project type or Test type. It denotes if the parameter will be available across the project or just in this test.
- The 4th step is to save the changes. We can do it by clicking on the "Add" button to save.
- Another important aspect is the "Secret" toggle button. Moreover, it allows the user to enter secret parameters. The secret parameter is a special parameter type which can store sensitive values or information, like passwords. Unlike other parameters, this parameter encrypts the value before storing it so that it's not visible by any user in the platform. Once the value sets, it cannot be viewed or edited, and can only replace with the new value. Secret parameters are always hidden from reports and cannot store in a text file.
The parameter is now ready for use in the test. As we have selected parameter type as a test in the above example, this parameter will be available only within this test. So, this way, we were able to create a test step that shows how to create Parameterized tests in TestProject.
How to define Project Level Parameters in TestProject?
Similar to the Test Parameter, we can also define Project Parameters. Project parameters, instead of only being available in the scope of a single test, can instead be used across any test in that project.
Let's take an example here, where the application URL is the most common parameter used across the project. So, we will create a project-level parameter, which holds the application URL and is accessible across all the tests.
-
Firstly, in any of our recorded test cases, click on the "Navigate to URL" test step. It will open up the step panel at the right. We can then scroll down to find the "Input parameter" section. After that, then click on the "+" button, as shown below:
-
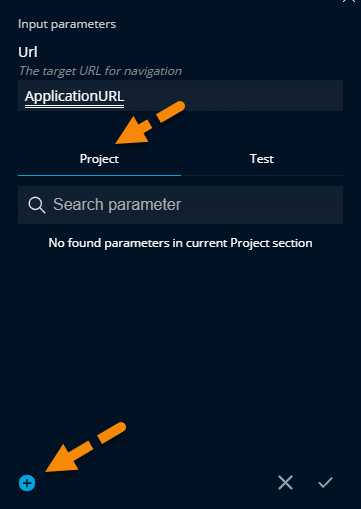
Secondly, after clicking on the "+" button, you will go to the Input Parameters panel. Here, click on the project tab as marked by the arrow in the below screenshot. Any available project-level parameter will be listed below the tab for you to search and select. If you don't have any available or want to create a new one, click on the "+" button as marked by an arrow at bottom of the screenshot.
-
Thirdly, clicking the "+" button will open up the Input Parameter panel as shown below:
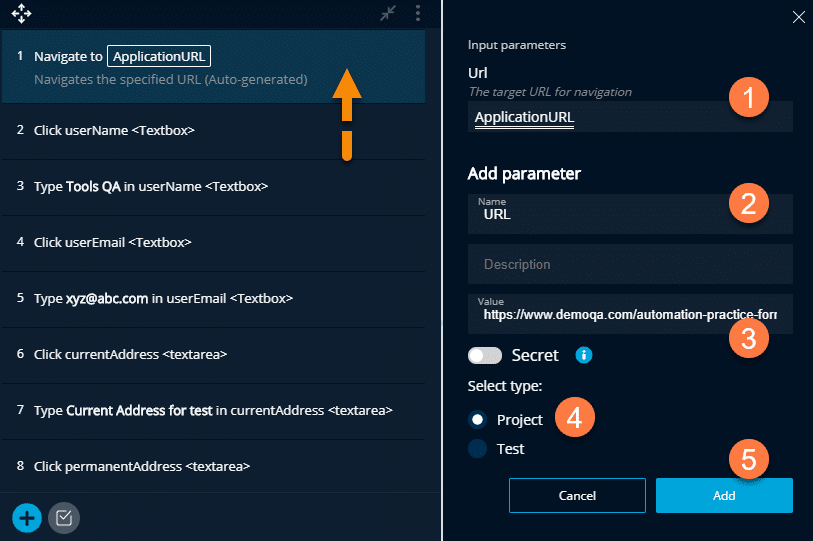
- Marker 1 shows the current parameter and its type.
- Marker 2 shows where we will need to provide a name to the parameter. Here we have used "URL" for denoting the application URL.
- Market 3 shows where we need to provide value to the parameter. We can directly enter our application URL here.
- Marker 4 shows where we need to select the type "Project", as we are trying to define the project-level parameter.
- Click on the add button (Marker 5) to complete adding a project-level parameter.
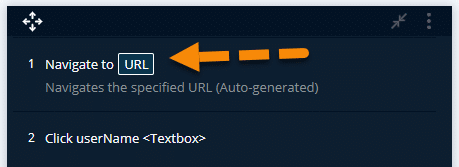
- Fourthly, once you save the parameter, it will start reflecting in the test step, as shown in the image below.
Now that we finish the creation of a Project-Level parameter, let's see how we can use the same parameter in other test cases:
-
Let's navigate to another test. Click on the "Navigate to URL" test step to open the edit element panel. We will then navigate to the Input parameter section. In the input parameter section, let's open the Project tab, in the same way as outlined in the previous sections. In the project tab, we will find our project parameter present and ready for use, as shown in the below image.

-
As you can see, we have our project-level parameter "URL" present in a different test case. So, this shows that the "Project-level" parameters will be accessible all the test-cases under the same project.
So, this way, we were able to create a test step that uses Project Level parameters and helps in creating Parameterized tests in TestProject.
What are the output parameters in TestProject?
Output parameters hold information that is generated by any of the test steps in the TestProject. In some ways, you can think of it as the opposite of the input parameter. In the input parameter, values are provided by the parameter to the test. Whereas with the output parameter, values are provided by the test to the parameter. Since the test itself assigns the value of the output parameter, so it's necessary not to assign any value to the output parameter while defining it.
Output parameters can be quite useful in several scenarios. They can be used to pass data between tests or validate fields contain the correct values. For example, let's say we have a scenario where we pick data from one field and enter that data into another field. In those cases, the output parameter can make our lives much more manageable.
Let's have a look at a real-world example. To understand the output parameter, we will take an example of the test step with the "get the text" action.
- Navigate to the test and click on the test step with get text action. A panel will open, scrolling down a little will show Output Parameter section as displayed in the image below.
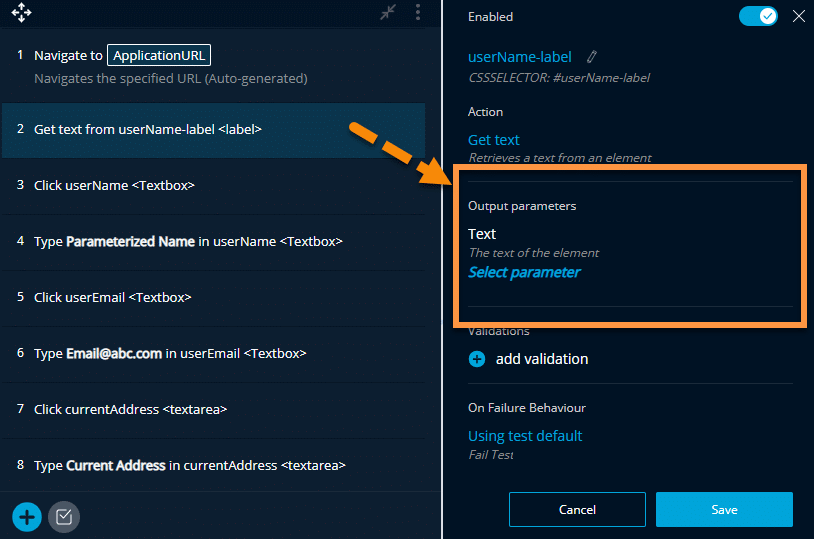
Note*: The output parameter section is only available for specific actions performed on an element, such as 'Get Text'.
-
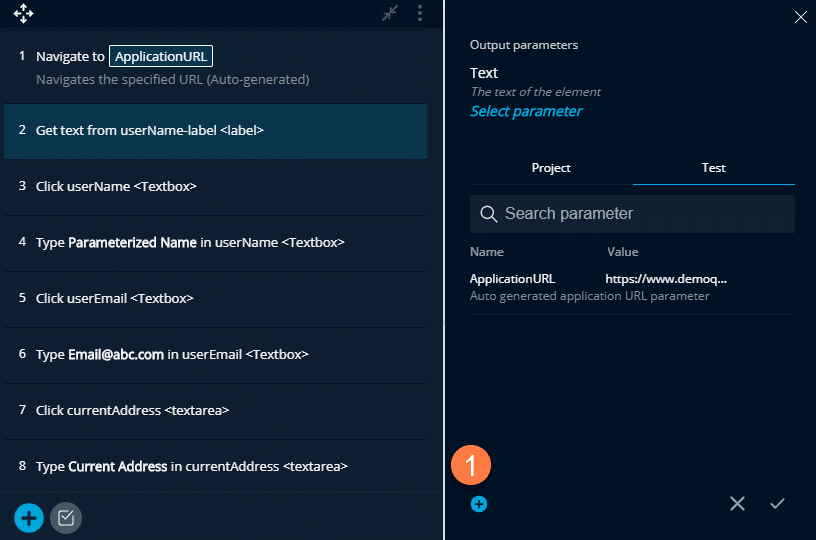
In this section, click on the "Select Parameter" link as marked in the image above. The output parameter panel will open up, as shown below:
-
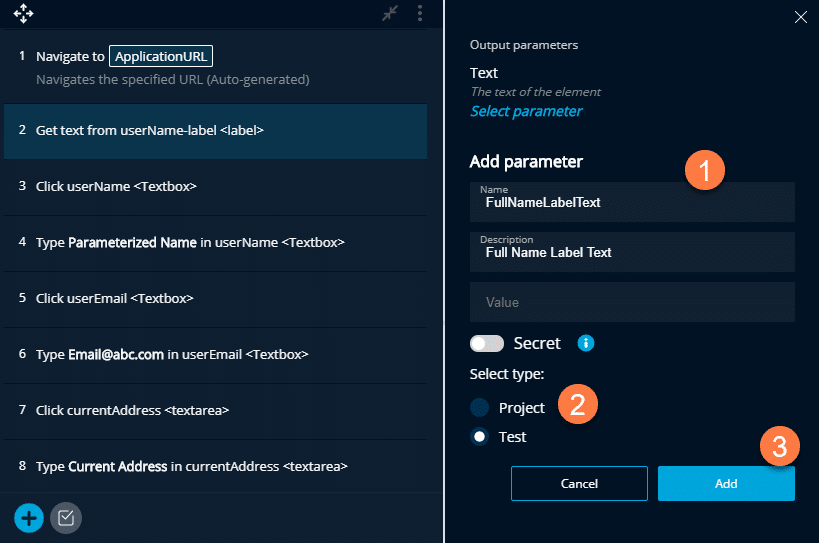
Here you can add a new parameter by clicking on the "+" button marked by step 1. It will open up the output parameter panel. To add a parameter, provide Name and Description. Suppose, we are giving the name of the parameter as "FullNameLabelText"
-
As discussed earlier, the value field will be blank for the output parameter. Then the second step will be to select the parameter type as a project or test.
-
Once done, click on the "Add" button to save the output parameter.
We have captured the output parameter successfully and learned how we could create Parameterized tests in TestProject using output Parameters. Now let's understand how we can use the output parameter from one step as an input parameter to another step within the test.
How to share Parameters in TestProject between different test steps?
When creating the Parameterized tests in TestProject, there will often be a scenario when we need to pass the value of one parameter or output of a command to another parameter. We can achieve this scenario in TestProject simply, with the help of output Parameters.
In the previous section, we used a get text test step to generate the output parameter. Now, let's use this parameter as an input parameter for the next step. Let's see how we can achieve the same in TestProject:
-
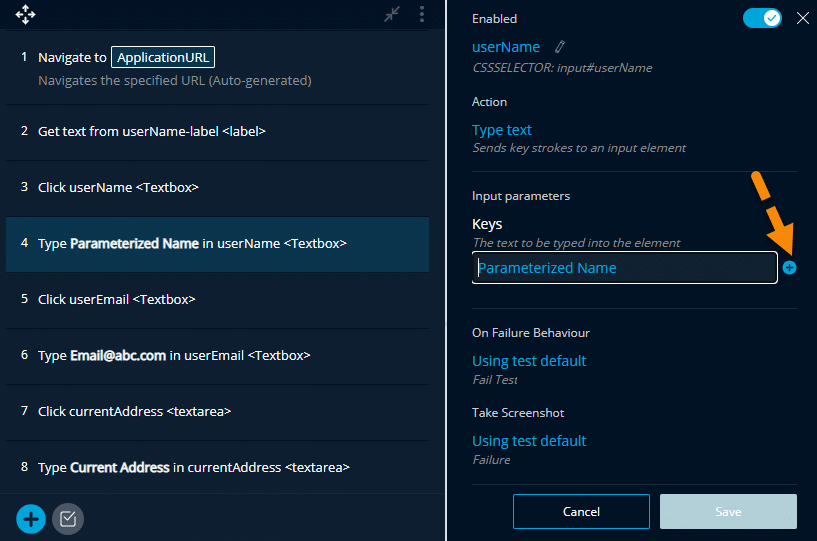
Let's navigate to the Input parameter section in the panel. If you remember, we provided a fixed value for this parameter in the last section, which we can see here "Parameterized Name".
-
Now, click on the "+" button as marked by the arrow. An input parameter panel will open. Here we will need to provide input parameters to the test step.
-
As we are looking for a test based output parameter, so we will select the test tab and then click to select the required parameter, i.e., "FullNameLabelText", as shown in step 2. Doing this will populate it in the "Keys" field. Now, the value of the "FullNameLabelText" parameter will act as an input value for the input to "TextBox".
-
The final step is to save the parameters. Click on the tick mark as denoted by step 3. And click on the "Save" button, highlighted in the shot below.
-
Once saved, you will navigate back to the element edit panel, where you can verify that the parameter sets to the input parameter section. Click on the save button to save the parameter to the test step.
-
Now, we need to verify that the value of the output parameter will be passed successfully as the input parameter to the next step. So, let's execute the test until the test step where we shared parameter.

- As we can see in the above image, to execute the test until a given step, you will need to click on the three-dots as shown by the arrow and then select "Run Until Here" after starting your smart test recorder. After this, the test will get executed until the given step, stopping at that point.
- In the second test step, we are picking the text value of the label and storing it in the output parameter. In the fourth field, we will use the parameter defined in the second step as the input parameter. If you look at the test steps, we can see that all the test steps passed. (marked by the green stripe at the left side of the test step).
- We can also look at the web app; then, we can see that the label ("Full Name") picks up, and then the same has been entered in the textbox.
- So, this confirms a successful transmission of the value of an output parameter to a later test step as an input parameter. The only pre-condition which is needed here is that the value of the output parameter should always be populated before we can use it at any of the later steps as an input parameter.
Similar to the Test-Based Output parameters, we can define and capture values in the Project-based output parameters also. The same pre-condition will apply there too, that any of the test steps should assign the output parameter value before we can use it as the input parameter by any of the later test steps.
It completes our journey of learning various capabilities of TestProject, which allows for the creation of Parameterized tests in TestProject.
Key Takeaways
- Parameters are variables that can store the information needed to execute a test. Additionally, we can manipulate a parameter value during the test execution to automate more complex scenarios.
- Secondly, Test parameters in TestProject can be of two types, depending upon whether it's accepting or providing values. These are input parameters and output parameters.
- Thirdly, input parameters hold values that we can use in the test steps to perform specific actions during test execution.
- Finally, output parameters store values produced by the execution of the test case. Moreover, users don't have to enter any value in the output parameter. In other words, it passes data between different test steps. Often, we will use it as an input parameter to another test.
Conclusively, our tutorial on creating Parameterized tests in TestProject completes. In the next tutorial, we will dive deep into other interesting topics, helping us build our knowledge on TestProject.