Every UI automation test requires us to perform actions against web elements, such as text boxes, buttons, links, etc. Before the test can interact with any element, the automation test will need to identify and locate the element inside the web page. To accomplish this often time-draining and challenging task, we rely on element locators. Elements locators are the most vital component of the UI test automation. Element locators quickly recognize the elements present on the different parts of the web page. In other words, they help in locating Web Elements in TestProject.
While writing an automation test, an engineer often needs to locate several different elements. In order to achieve this goal, there are several different locators available within TestProject, each having its own set of pros and cons. Moreover, to create a valid, reliable, and robust automation test, a QA Engineer will have to understand when to use the right locator, depending upon the type of element they need to handle. Additionally, effective utilization of the locators will create more reliable, maintainable, and performant tests.
Here is the list of topics that we intend to learn from this article, related to locating Web Elements with TestProject:
- What are the different ways of working with the elements in TestProject?
- How to add the elements using the Elements section?
- How to locate the elements using the TestProject recorder?
- What are the different types of locators available in TestProject?
- How to locate an element using CSS Selector in TestProject?
- How to locate an element using XPath in TestProject?
- Similarly, how to locate an element using Tag Name in TestProject?
- How to locate an element using Link Text in TestProject?
- How to locate an element using Partial Link Text in TestProject?
What are the different ways of working with the Elements in TestProject?
TestProject provides two different ways to add elements to a project. Moreover, regardless of the method you choose, all elements are re-usable across the project. The following are the ways to create a new element in TestProject.
- Using the "Elements" link on the left panel on the project dashboard.
- During adding a test step while using the TestProject recorder.
Let's understand the details of both of these ways:
How to add elements using the Elements section?
One can access the "Elements" link from the left panel on the project page. You can navigate here after clicking on your project as displayed in below snippet.
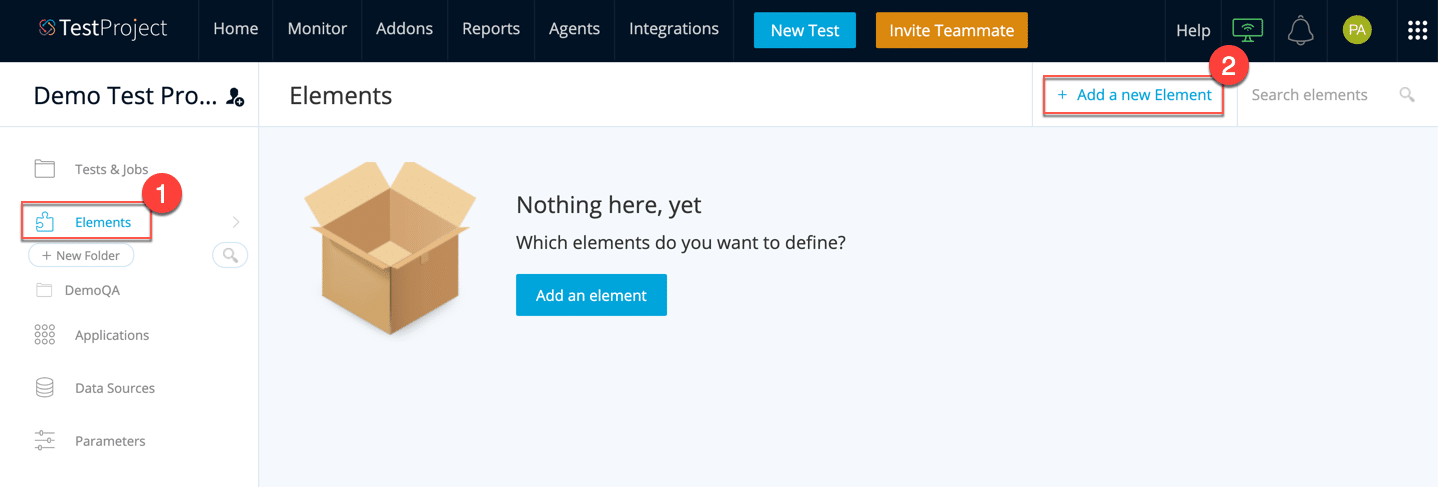
Click on the "Elements" link, highlighted by step 1. Further, click on the "Add a new Element" link as highlighted by step 2. You will be displayed the below screen:
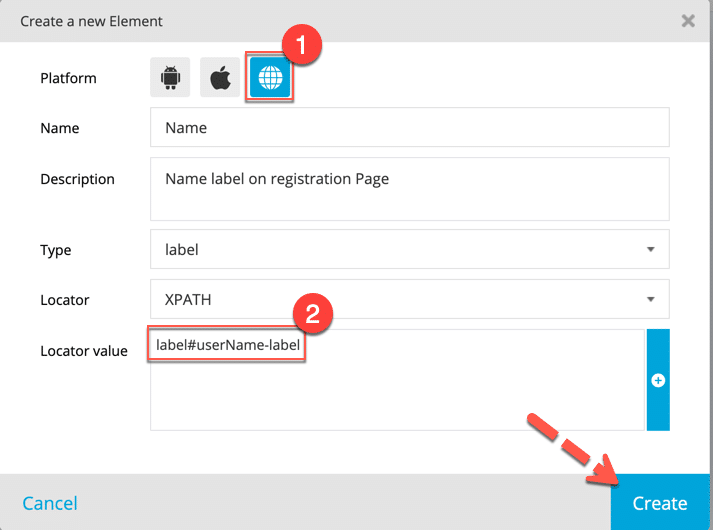
This wizard facilitates users of adding elements for all three platforms supported by TestProject, i.e., android, iOS & web. As highlighted by marker 1, we are going to create a new element for the web.
Further, we need to provide necessary details like Name and Description of the element. Type field captures the type of the element; you can type and select the type from the dropdown.
And then, we need to provide the Locator and Locator value that we wish to use to identify this element. TestProject offers the following types of locators that help in Locating Web Elements in TestProject.
- CSS Selector – CSS is used for designing web pages, and is typically one of the most reliable ways to locate an element.
- XPath – XPath is used to query the XML document. XPath query can be easily used to locate any element on the web page, but can sometimes be less reliable.
- Tag Name – Use an element's tag to locate it.
- Link Text – Hyperlinks present within the web page can be easily identified by querying the hyperlink texts.
- Partial Link Text – Similar to link text, you can query the hyperlink text for only part of the text string. Be careful; this method can often result in more frequent misidentification of elements, as part of the link text may be common to several hyperlinks.
We are going to learn about each of these options in-depth in the latter part of this article. Let's first explore how we can create elements using the Smart Test Recorder.
How to Locate Elements using the TestProject recorder?
As you may have noticed already, TestProject's Smart Recorder automatically selects the best available option for locating Web Elements in TestProject when creating the test. However, in some cases, you may want to override this selection with a better element locator.
For example, if your web application is dynamic, i.e., the element's attributes are populated dynamically with page load, you might find the default selection to be brittle. It means the elements recognized by test recording for the current test run may deprecate in the next execution cycle. When this happens frequently, you may end up stuck with a lot of test maintenance and rework.
To explore our options further, let's first start the test recorder. To know more about the Smart Test Recorder, visit our previous tutorial about the TestProject's recorder.
We will be using the DemoQA link for our recording purpose: https://www.demoqa.com/text-box.
-
Firstly, we will need to navigate to the test that we created in our previous tutorial. On the home page, click on the project to navigate to the project page.
-
Secondly, on the project page, click on the test to navigate to the test page.
-
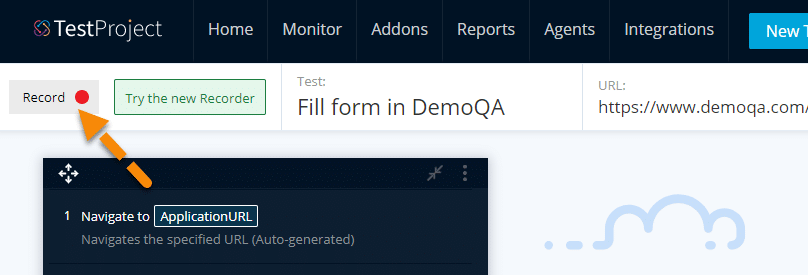
Thirdly, click on the record button on the test page. As shown in the below image.
-
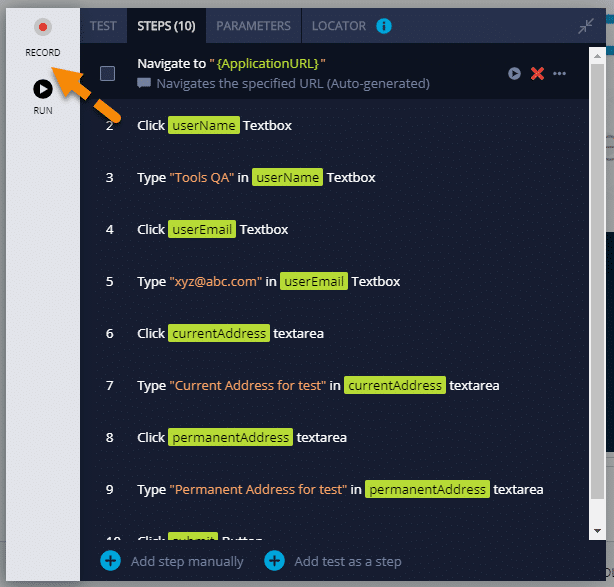
Fourthly, the record button will open a new browser window with Smart Test Recorder.
-
After that, the "RECORD" button in the smart test recorder can activate the automatic recording feature. The arrow in the below image marks this button.
-
Once, in the recorder, we can use the element inspector offered by the smart recorder. Whenever you hover your mouse over a web element, the element selector will highlight that element. We can move and hover our mouse cursor to any element that we want to inspect.
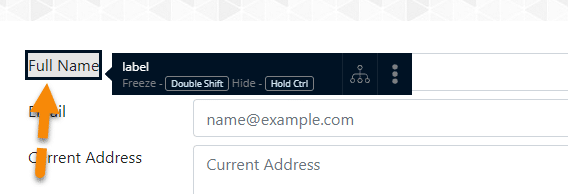
-
Now, we will be able to highlight the element. In the above image, we have inspected the "Full Name" label. So, a menu item with a Label tag will open up on the right side. After that, click on the "three dots" in the Label tag to expand for more options, and it will display the following screen.
-
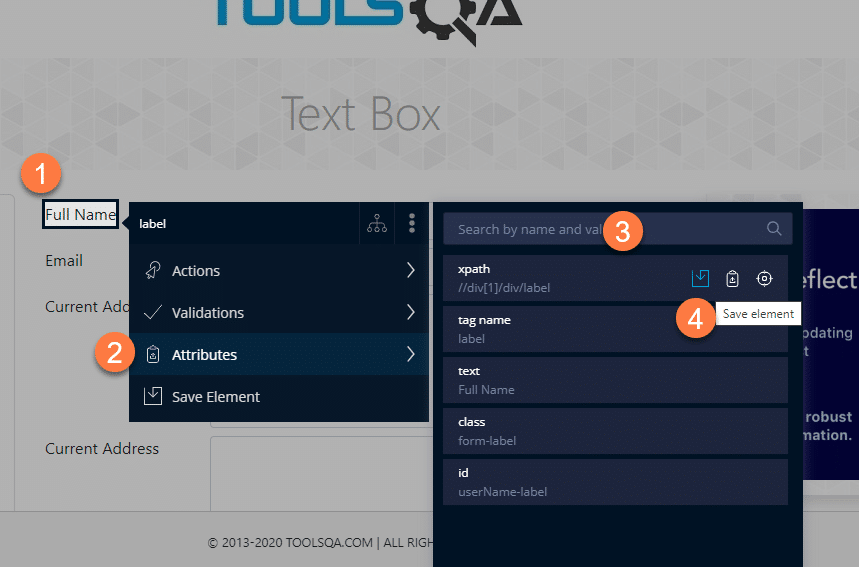
In the expanded menu, you can see the various options such as Actions, Validations, Attributes, and Save element.
-
The second step marked in the above image is to click on "Attributes" to open more options. It will open up another menu list with a list of different locators that we can use with the particular element. You are free to select from any of the available options, depending on your requirement.
-
It's also possible to change the locator attributes and values. For example, if we are dealing with a dynamic element, then we may want to provide an efficient Xpath to handle the same. To do that, click on the "Save Element" button as marked by step 4. It will take the user to "Create a new Step Wizard".
-
We can also use this wizard by clicking directly on any of the test steps, as marked in the below image by marker 1. Once you click on marker 1, a panel will open up at the right showing this wizard. Scroll down a little till the "Element" section, as marked by marker 2. Now, click on the pencil icon as marked by the arrow shown below.
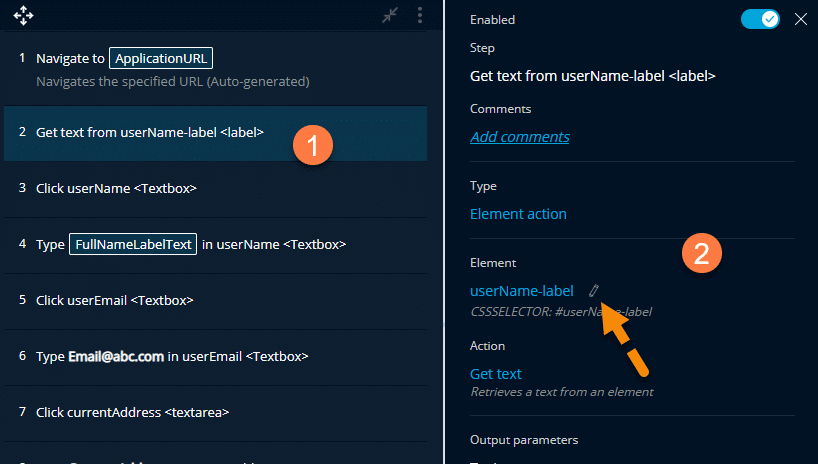
It will open up the "Create a new Element" wizard. We will discuss this in detail in the following sections.
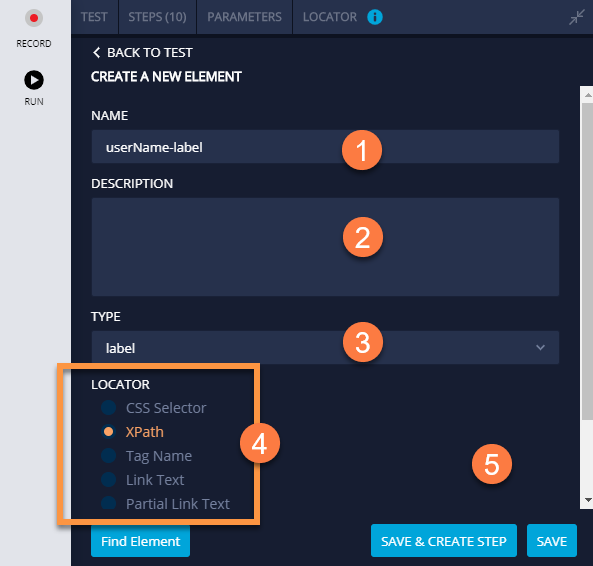
- The Create a New Element page allows users to create an element for use in their tests.
- The first step is to give a meaningful and recognizable name to the element. Correctly naming an element improves test maintainability and re-usability of the element.
- The 2nd step is to describe the element; this step is optional but can add more information about the element, to help other users understand when they can use it.
- The third step is to select element type, for example, whether the element is a label, textbox, dropdown, etc.
- The fourth and most crucial step is to select a locator for Locating Web Elements in TestProject. Scroll down a little to explore locator values.
-
Now, select the most appropriate locator from the Locator section. In the Value field, enter the value of the locators, as highlighted in marker 2 of the above snippet.
-
Click on the Find Element button to validate your locator attribute. Clicking on this will highlight the corresponding element on the web page. Once done, you choose either to save the element using the "Save" button or "Save & Create Step" button to create a step with this element.
The locator section provides the list of all the locators, as mentioned in the section above. Now let's understand how we can use different locators for Locating Web Elements in TestProject.
What are the different types of Element Locators in TestProject?
TestProject supports eight types of locators that can help in locating Web Elements in TestProject. Three of these locators are rarely recommended: ID, NAME & CLASSNAME, as W3C standards do not support them. Therefore, we are going to focus on how we can use the other five recommended locators.
Please note that, when you create a new element via elements link, you will have only five recommended locators available, while in Smart Test Recorder, we have all the eight locators available.
How to Locate Elements in TestProject using CSS Selector?
We use CSS or Cascading style sheets popularly for styling web pages. As they are responsible for web page design and element's position, CSS locators can be effectively used to identify and locate any element present on the web page. When available, they are some of the most reliable and efficient locators available to recognize an element.
Furthermore, since the construction of most of today's web pages dynamic, it gets quite challenging to identify a unique attribute to locate elements. In these scenarios, the CSS selector can be a great option.
The basic CSS syntax is:
'CSS=HTML Tag[Attribute=Value]
Let's try to understand this syntax using details from the following real-world example:
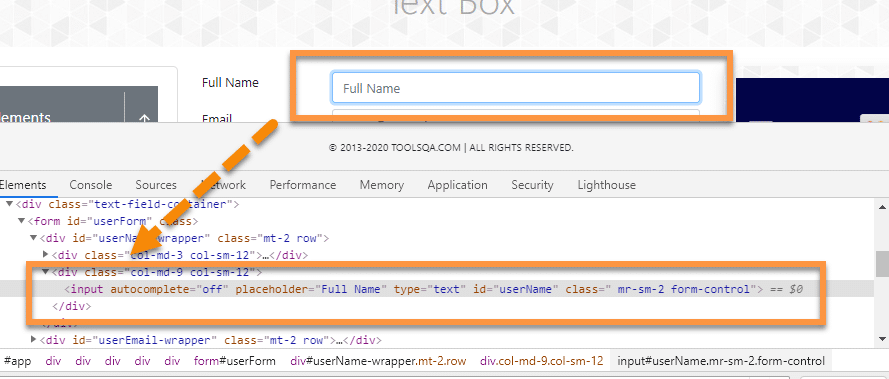
Suppose we have to locate the "Full Name" text box element on the page "https://demoqa.com/text-box" Let's first understand how we can achieve the same in a browser's DOM using a CSS locator.
-
We can open the DOM in a Chrome browser by Right-clicking on the element and selecting inspect from the context menu. Then, we can search for the element using the CSS locator "input#userName" as shown in the below image:
-
Here, the input is the tag name of the text box, and "#" represents its id. As the id of the element is "userName", combining them will give us the CSS selector value, i.e., "input#userName"
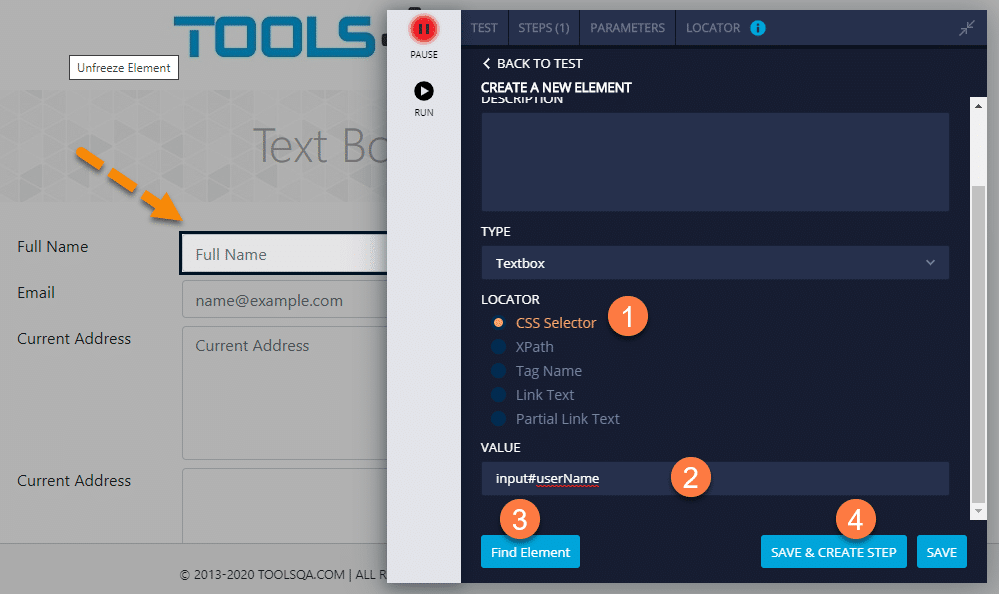
Now, let's see how we identify the same web element using the CSS locator in TestProject. As mentioned in the above section, lets first navigate to the "Create a new Element page". Then, follow the steps as shown below to locate the "Full Name" text box on the page.
-
Once on the Create a New Element page, we will need to select the locator so that we will choose the "CSS Selector"
-
The next step on this page is to provide value for the locator. The locator chosen will use the given value to identify the element, so we won't need to make any changes now.
-
Once we have our locator and locating value ready, we will want to check if we can identify the correct element on the page, so we are not creating a test that fails. To validate, click on the "Find Element" button, as shown in step 3.
-
Now, click on the "Save and Create Step" button to save the element.
So, this way, we were successfully able to identify the element using the CSS locator and store the locator in the test step.
How to Locate Elements in TestProject using XPath in TestProject?
XPath uses an XML expression to query an element on the webpage. Just like the CSS Selector, XPath is also quite useful in locating dynamic web elements, which are not easily identified by other attributes. XPath offers a way to identify them based on their position and location inside DOM.
The basic syntax of the XPath is:
//tag_name[@attribute_value]
Now let's try to create an element in the TestProject by using XPath. We will use the next text box, i.e., "Email" in this example. Let's have a look at the element and the DOM, using the same process in Chrome as before.
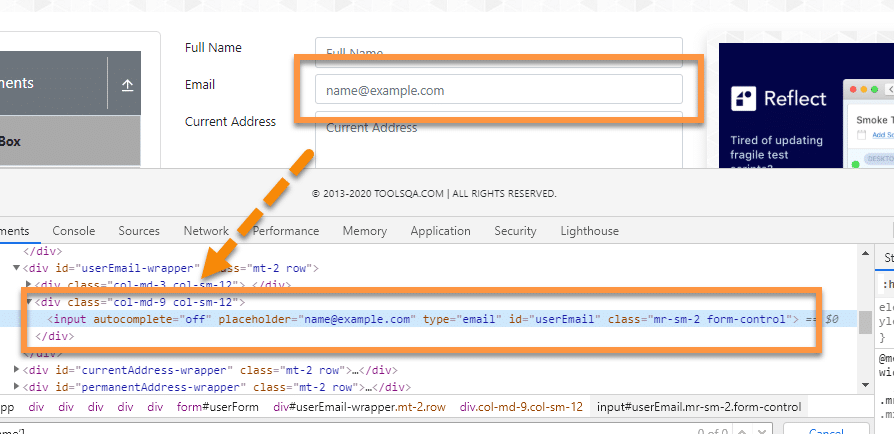
So, based on the DOM, as seen in the above image. We can easily understand the XPath using the common XPath syntax. As the tag of the element is "input", and it contains attribute "id" with value as "userEmail". We can generate the XPath of the same as "//input[@id='userEmail']".
Now in TestProject, let's open the recorder and try to record this element and update the value.
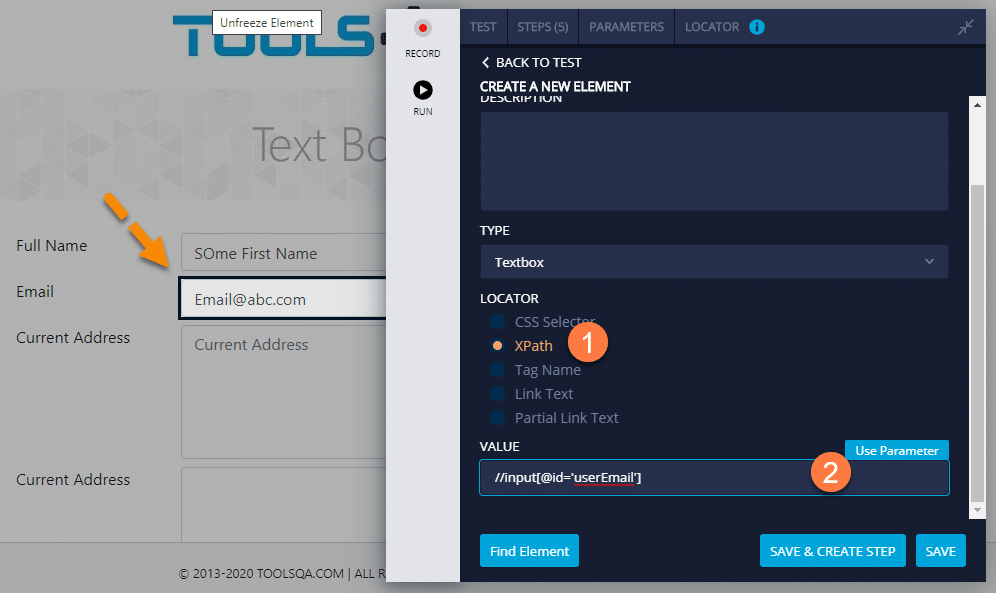
- In the above image, we are trying to save the "Email" element using XPath. To do this, we go to the Create a New Element page and select XPath as the locator type. In the value field, we have entered the same XPath value we found earlier.
- Now, we will validate it using the "Find Element" button. It will highlight the element, assuming it is visible, and our syntax is correct.
- Once validated, click on the Save and create a step button to save elements in a step.
We were successfully able to identify the element using the Xpath locator and store the locator in the test step.
How to Locate Elements in TestProject using TageName in TestProject?
The tag locator option uses HTML nodes to identify elements present on a web page. The node is the part of the HTML DOM where each web element type gets represented by nodes or tags like input, div, button, etc. Moreover, each of these nodes contains several different attributes that can define the properties of these elements. The tag name locator can identify all the elements from the page that includes a specified tag.
Let's have a look at the element in the DOM, which we want to identify using Tag Name.
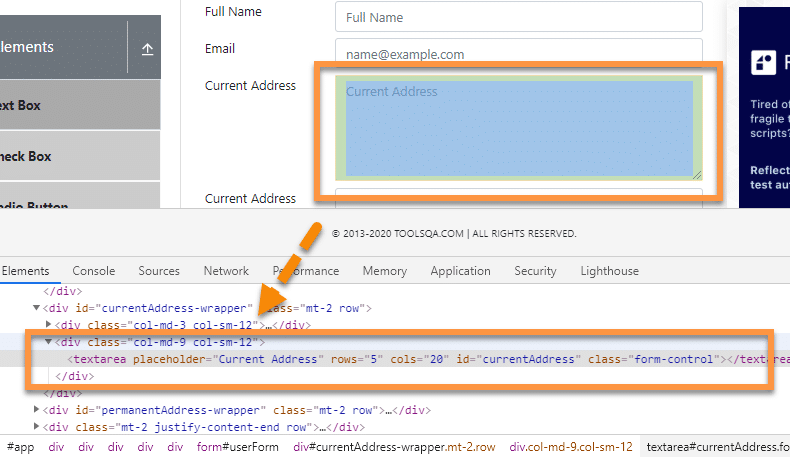
In the above image, we can see that the Current address has tag "textarea" in the DOM. Let's try to create an element of the same using TestProject as per the steps shown below:
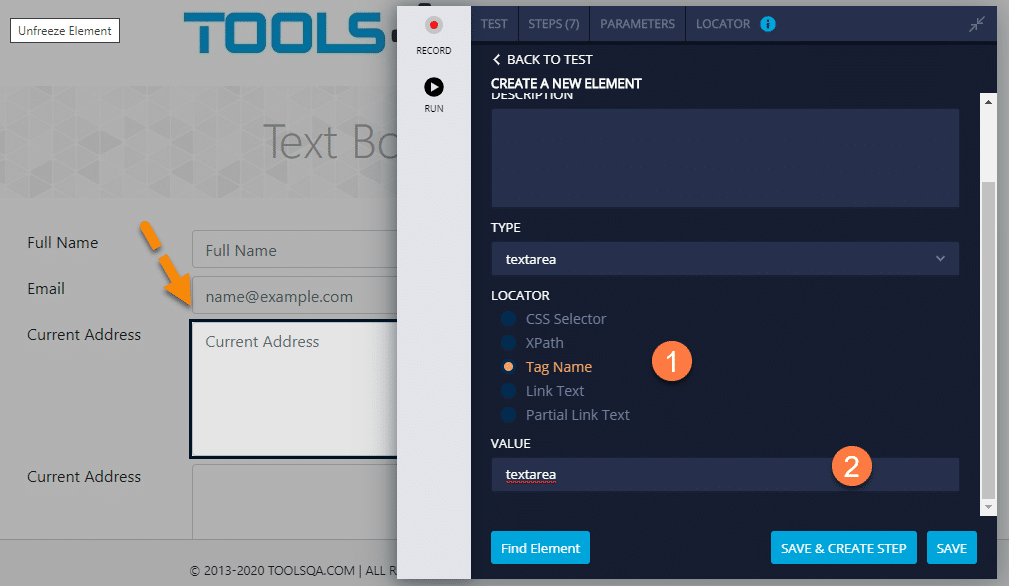
- Once we have recognized the tag name, in the Create a New Element page, we will select the locator as "Tag Name" and then will enter the value in the Value field.
- To validate, if the locator value combination is able to recognize the element or not, we will click on the "Find Element" button.
- Once validated, we can save the element by clicking on the "Save & Create Step" button.
We were successfully able to identify the element using the Tag Name locator and store the locator in the test step.
How to Locate an Element using Link Text in TestProject?
Link Text uses the hyperlink text present in the UI of the web application to recognize an element. Link Text is one of the unique locators that use UI text for identifying elements, instead of using DOM attributes. Any hyperlink present on the web page can be used to identify that particular link.
Let's have a look at an example to understand how this locator process works. For this example, we will be using the Link page of DemoQA. You can access the same link here: https://demoqa.com/links.
Let's try to identify the "Home" hyperlink present on the page as it can be clearly seen that the hyperlink is represented by the text "Home". So, in this case, we can directly use the given text with the "Link Text" locator to identify this element.
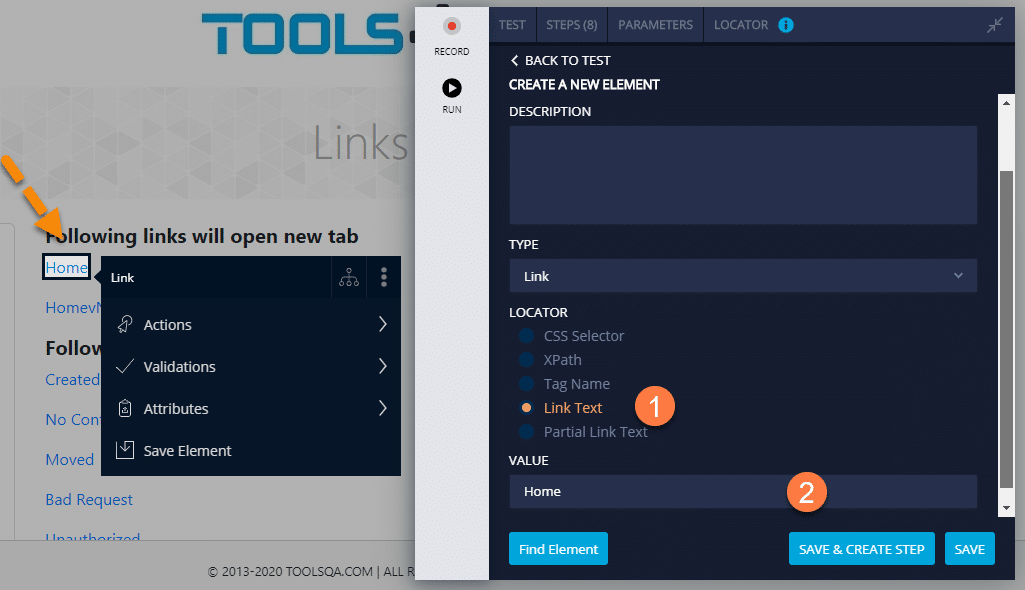
- Once we have identified the element we can try to save it. On the Create a New Element page, we will select "Link Text" and then will provide the value of the hyperlink text.
- Now, once we have validated the element using the "Find element" button, we can save the element.
We were successfully able to identify the element using the Link Text locator and store the locator in the test step.
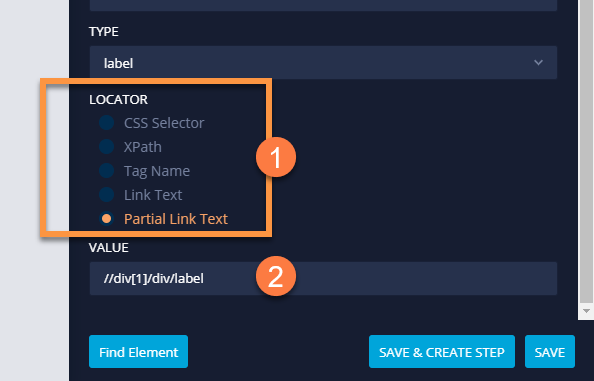
How to Locate an Element using Partial Link Text in TestProject?
Partial link Text is similar to Link Text difference being. It can recognize partial characters in a hyperlink text. Partial Link Text can leverage any sequential characters from a given hyperlink text. It's quite useful in scenarios where some part of hyperlink is generated dynamically with few fixed characters. However, it can be tricky in that it can often identify hyperlinks other than the target element, especially when the partial link text used is short and common to other hyperlinks on the webpage.
Let's have a look at an example in DemoQA's link page. Here we have a link "HomevNukD" let's assume we want to click on this link. So, to do that, we can use a continuous character from the start of the text, i.e., "Homev". You can use any part of the text you want.
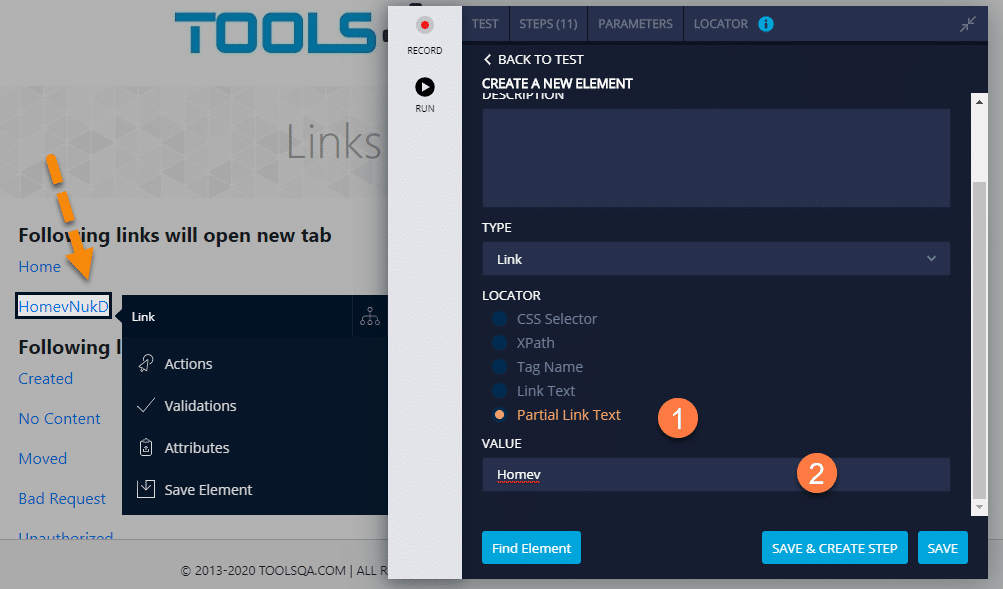
- Once we have highlighted and tried to save the element, Create a New Element page will open. As shown in step 1, select the Partial Link Text locator type.
- After selecting the locator type, we will need to provide the value. Here we have entered "Homev",the first five characters from the hyperlink. You can use any sequential characters you want, and they don't need to be the first characters in the hyperlink.
- After successfully validating the element using the "Find Element" button, we can save the element.
So, this way, we were successfully able to identify the element using the Partial Link Text locator and store the locator in the test step.
Now, we have covered all the locators in the same test in our project. To validate they are working properly, we can execute the test and inspect the result. If we have done our work properly, we should receive the following result:
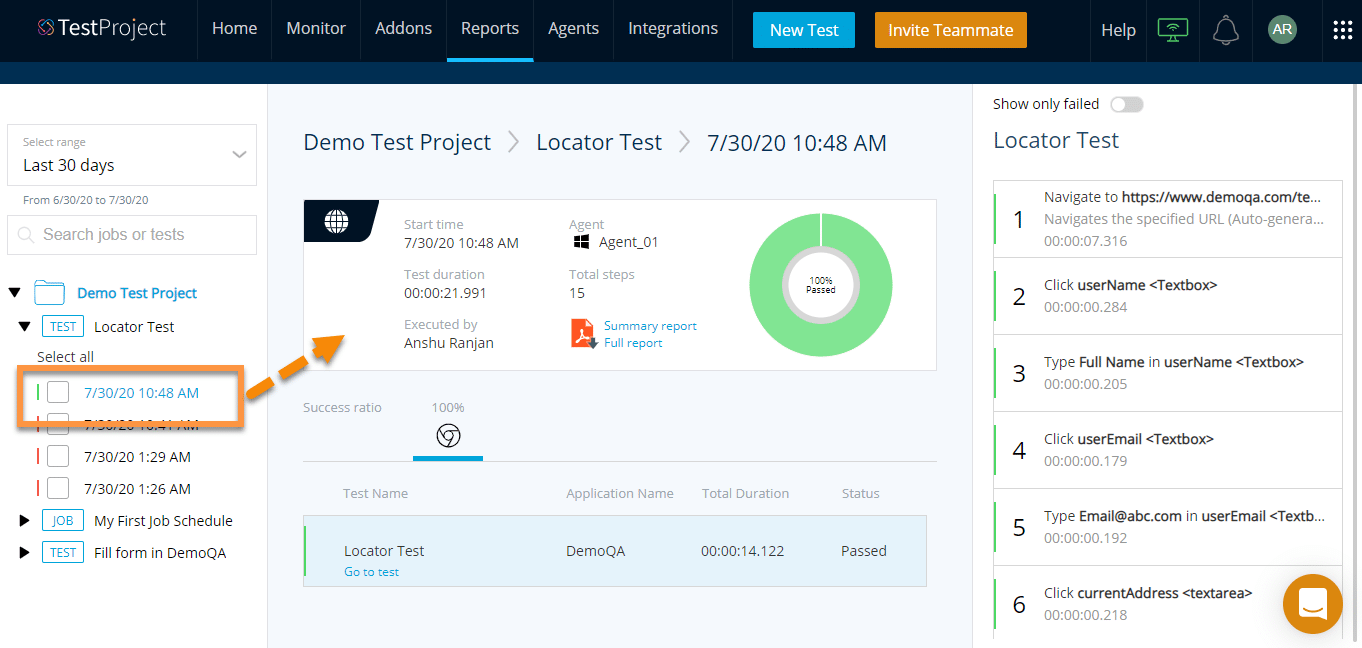
As you can see in the above image, the marked test execution is complete. The result shows pass for all test steps executed. It means all the locators and value combinations that we used were able to identify and were successful in locating Web Elements in TestProject. It means we should also be able to perform all actions on the element like entering text or performing a click on links.
Depending on the application under test, we can use any combination of the supported locators to identify and search the elements and perform needed actions on the same.
Key Takeaways
- Using a correct locator strategy allows users to write reliable, maintainable, and performant tests. Additionally, it helps in Locating Web Elements in TestProject.
- TestProject recommends five different types of locators, including Tag Name, Link Text, Partial Link Text, CSS selector, and XPath.
- CSS selector and XPath can identify dynamic elements on a web page. Relative XPath can be used to identify elements that don't have unique attribute values.
- TestProject allows adding of the element by smart recorder either during test step recording or after recording by clicking on the test step and editing the recorded element.
Conclusively, this finishes our article on Locating Web Elements in TestProject. In the next chapter, we will discuss more other features and functionalities of the smart test recorder and how we can leverage them to write powerful and efficient tests.