In the Software Testing world, QA Engineers generally develop their test cases with one goal in mind: validating the functionality of the application under test. Each test case will consist of specific test steps, which perform certain "Actions" on the application. Additionally, test cases will also typically contain "Validations", which ensure that the application has reached a specific state after performing the test case's action. Therefore, almost every test automation tool will provide the capabilities to perform actions on the application under test and then to perform validations for the state of the application. Moreover, it is no surprise then that TestProject also provides the capabilities to perform actions and validations on the application.
Subsequently, in this article, we will discuss the various Actions and Validations provided by TestProject, which can help us in ensuring the quality of the application under test. We will be covering the following details related to the capabilities of Actions and Validations in TestProject:
- What is an Action in TestProject?
- Also, what are the different types of Actions available in TestProject?
- What is Validation in TestProject?
- What are the different types of Validation available in TestProject?
- How to use Actions and Validations in TestProject to automate an application?
What is an Action in TestProject?
An action, by definition, is the process of doing something, which in software testing translates to interacting with the application under test. Additionally, whenever we execute any test step, we perform some applicable action(s) on a specific element or part of the application. Subsequently, these actions can be anything like clicking on a button, writing inside a textbox, mouse movement over an element, navigating to a URL. So, when we execute any test steps, actions over the elements are triggered automatically and perform a specific action, the application's elements.
Following the same trend, TestProject also provides various actions; few of these actions can be directly applied on the web elements, whereas few of them are not directly applicable to the web elements, but helps in performing specific other actions on the application under test. Subsequently, let's see what the various kinds of actions available to us in TestProject are:
What are the different types of Actions available in TestProject?
As we discussed, based on the kind of operation, we can perform different actions. The Actions in TestType split into the following two types:
- Element Actions: These can directly apply to web elements.
- Non-Element Actions: This can not directly apply to web elements.
Consequently, the following is a list of a few of the Actions provided by TestProject, which are categorized by Action Type:
| Action Type | Action Name | Description |
|---|---|---|
| Element | Click | Clicks an element |
| Element | Click if visible | Click an element if visible. |
| Element | Double Click | Performs Double click on the element |
| Element | Clear contents | Clears the content of elements |
| Element | Get text | Extracts text from an element |
| Element | Contains text? (if visible) | Check if the element has any text |
| Element | Is clickable? (if visible) | Check if any element is clickable |
| Element | Is Disabled? (if visible) | Check if any element is disabled on the web page |
| Element | Is Enabled? (if visible) | Check if any element is enabled on the web page |
| Element | Is selected? (if visible) | Check if any element is selected |
| Element | Long press gesture | Performs a long press gesture |
| Element | Move the mouse to element | Moves the mouse to the middle of the element, and the element is scrolled into view. |
| Element | Type text | Types text inside any text box |
| NonElement | Get current URL | Extract the current URL of the web page |
| NonElement | Navigate to URL | Navigates to the specified URL |
| NonElement | Get title | Extracts the title of current web Page |
| NonElement | Launch app | Launches the app which was provided in the capabilities at session creation |
| NonElement | Close app | Closes the app or application under test |
| NonElement | Navigate forward | Navigates one page forward in the browser history |
| NonElement | Navigate back | Navigates one page back in the browser history |
| NonElement | Pause | Pauses the execution in the specified time |
| NonElement | Refresh | Refresh the current web page |
| NonElement | Send Keys | Performs the send keys operations like keyboard operations |
| NonElement | Start Activity | Launches an android activity |
| NonElement | Scroll window | Scroll the page with the specified no of pixels |
The list is not exhaustive but outlines some of the most popular Element and Non-Element Actions provided by TestProject. In addition to that, after performing these actions to manipulate the application, we need to perform specific validations on the application. Therefore, we can ensure that the application is performing as expected. Subsequently, let's see what exactly is validation in TestProject, and what are various types of validations provided by TestProject?
What is Validation in TestProject?
As we discussed, when we write certain test cases, we also often need some validation steps to check the correctness of the application behavior that occurs in response to our action. To assist with this, TestProject provides several validations, which can validate the quality and behavior of the application under test. Consequently, we can say that validation is a checkpoint, where we try to certify the comparison between actual and expected results. Therefore, based on the validation results, we can certify that things are working as they should be.
In TestProject, if we want to certify any Action, we add a Validation after that action. If that validation step passes, then we can say that action is working as expected. Moreover, to validate the state of the application or application's elements after performing specific actions, TestProject provides various types of validations. Subsequently, let's explore the different types of validations that are available for automating any application using TestProject.
What are the different types of Validation available in TestProject?
The following are a few of the most used Validations provided by TestProject, which can verify the state or behavior of the web elements or the application under test:
| Validation Name | Validation Description |
|---|---|
| Contains text? | Check if an element contains a given text. |
| Is clickable? | Check if an element is clickable. |
| Is invisible? | Check if an element is not visible on a web page or does not exist in the DOM structure. |
| Is it present? | Check if an element is present on a web page or DOM structure. |
| Is selected? | Check if an element is selected. |
| Is it visible? | Check if an element is visible on the web page. |
| Is selected now? | Check if an element is selected (waiting time is not allowed) |
The above list is not the exhaustive list of all validations provided by TestProject, but covers many of the most popular and most frequently used Validations in TestProject.
Now that we know various Actions and Validations provided by TestProject, let's see how we can use them while automating any application using TestProject:
How to use Actions and Validations in TestProject for automating an application?
Building on our learning about Actions and Validations, we will see the practical demonstration of how we can use these functions while automating an application via TestProject.
Let's suppose we need to automate the following scenario using TestProject:
Note: For the Symbolic purposes, we have included Actions inside "Round Bracket ( )" and Validations inside "Square Brackets [ ]".
- Firstly, navigate to the ToolsQA Demo QA Site.
- Secondly, (Get the title) of the launched site.
- Thirdly, validate that the title [equals to ToolQA].
- Fourthly, (Move the mouse to the element) on the "Elements" link.
- Fifthly, validate that the element [Is Present].
- Sixthly, validate that the element [Is clickable].
- (Click) on the element Link.
- Also, validate that the TextBox link [Is visible].
- Ninthly, (Click) on the TextBox Link.
- (Type text) as "ToolsQA" in the Full Name Text Box.
- Then, validate that the Text box [Contains Text] as Tools.
- (Get Text) Action on the Full Name Text Box.
- After that, (Clear contents) for the Full Name Text Box.
- Finally, validate that the Automation text [Is invisible].
Consequently, let's implement all these steps of the scenario using TestProject:
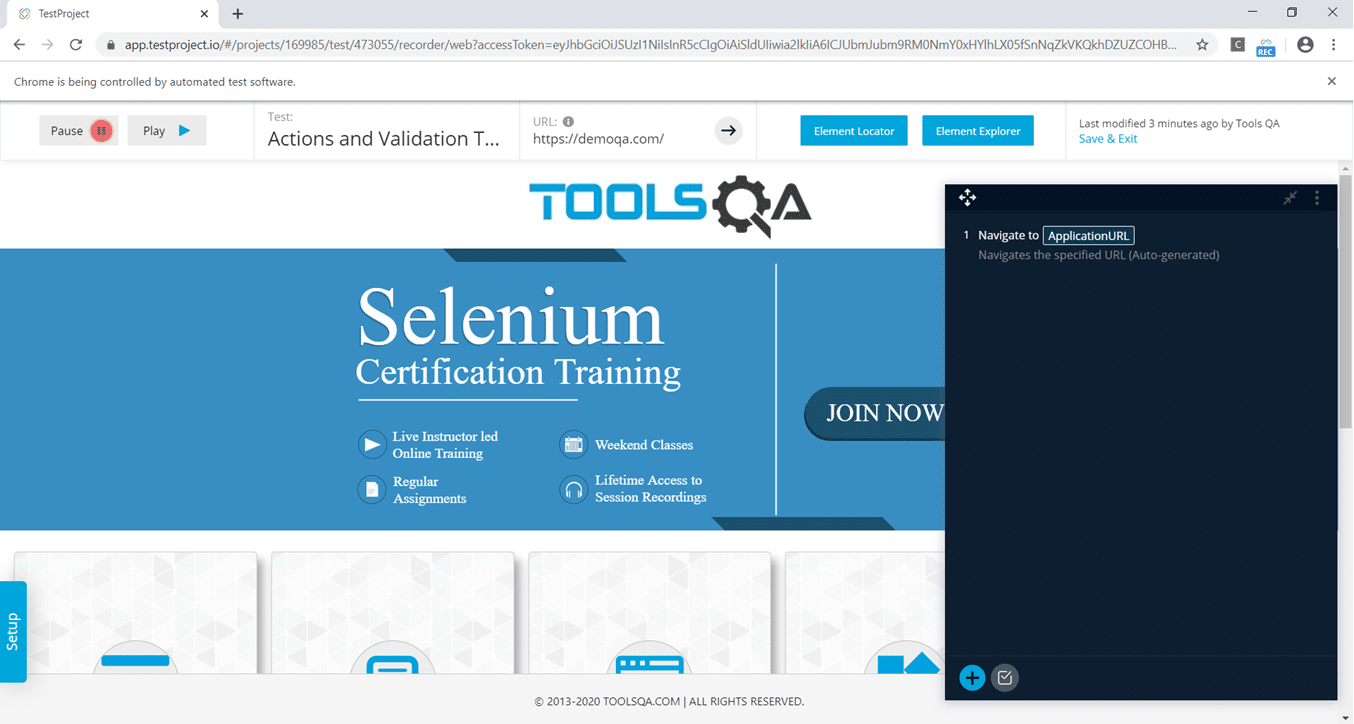
Step 1: Firstly, create a new Project and a new test in the new project as per steps mentioned in the article "Recording your first TestCase". Firstly as a basic Test Step, Navigate to the Demo QA Site.
Step 2: Secondly, Get title of the launched site. For implementing this step, follow the steps as below:
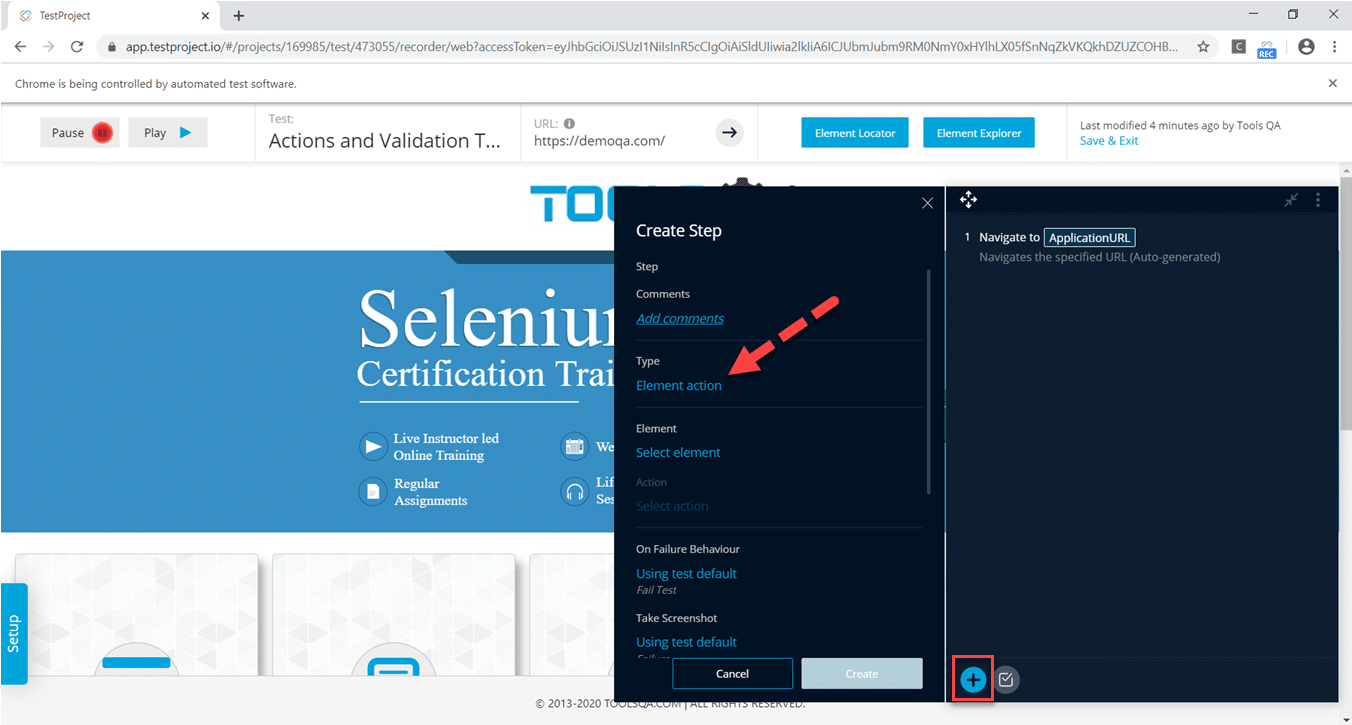
-
Firstly, click on the + sign and then Click on "Element Action", as highlighted by the arrow in the following screenshot. Moreover, it is for selecting the Type of Test Step:
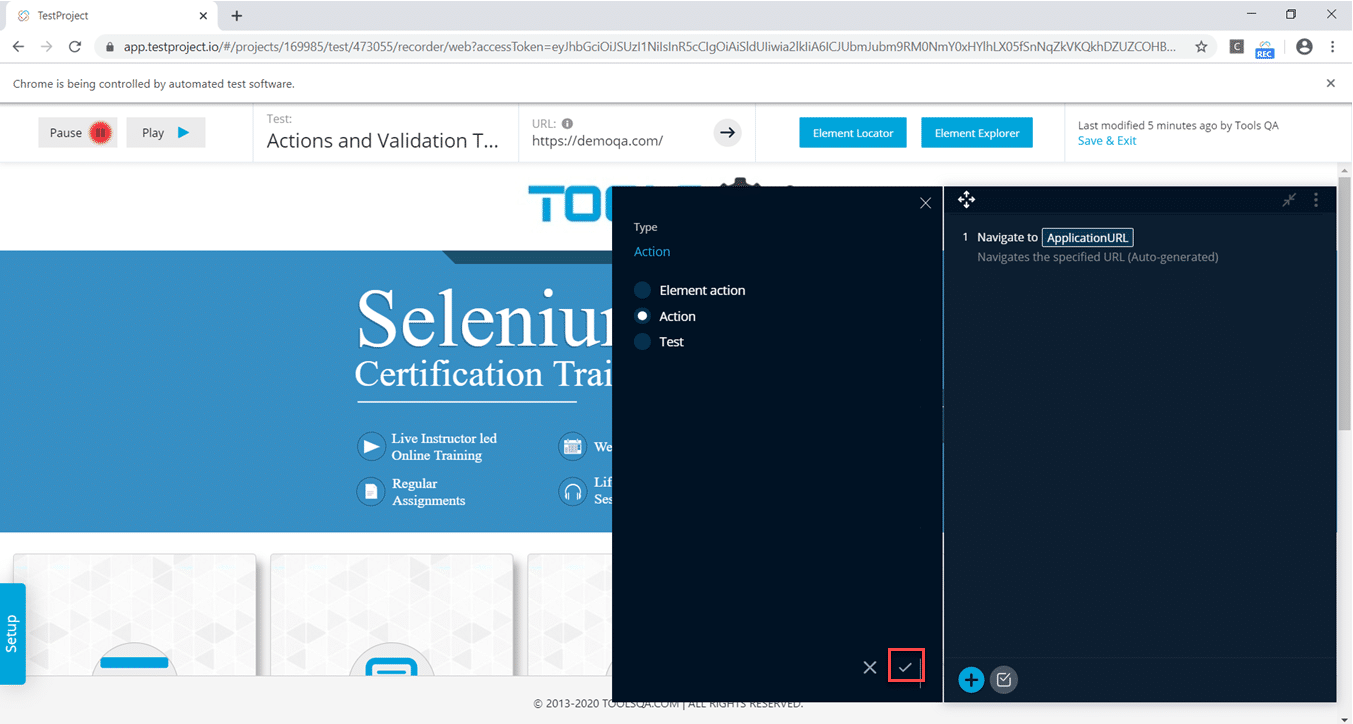
-
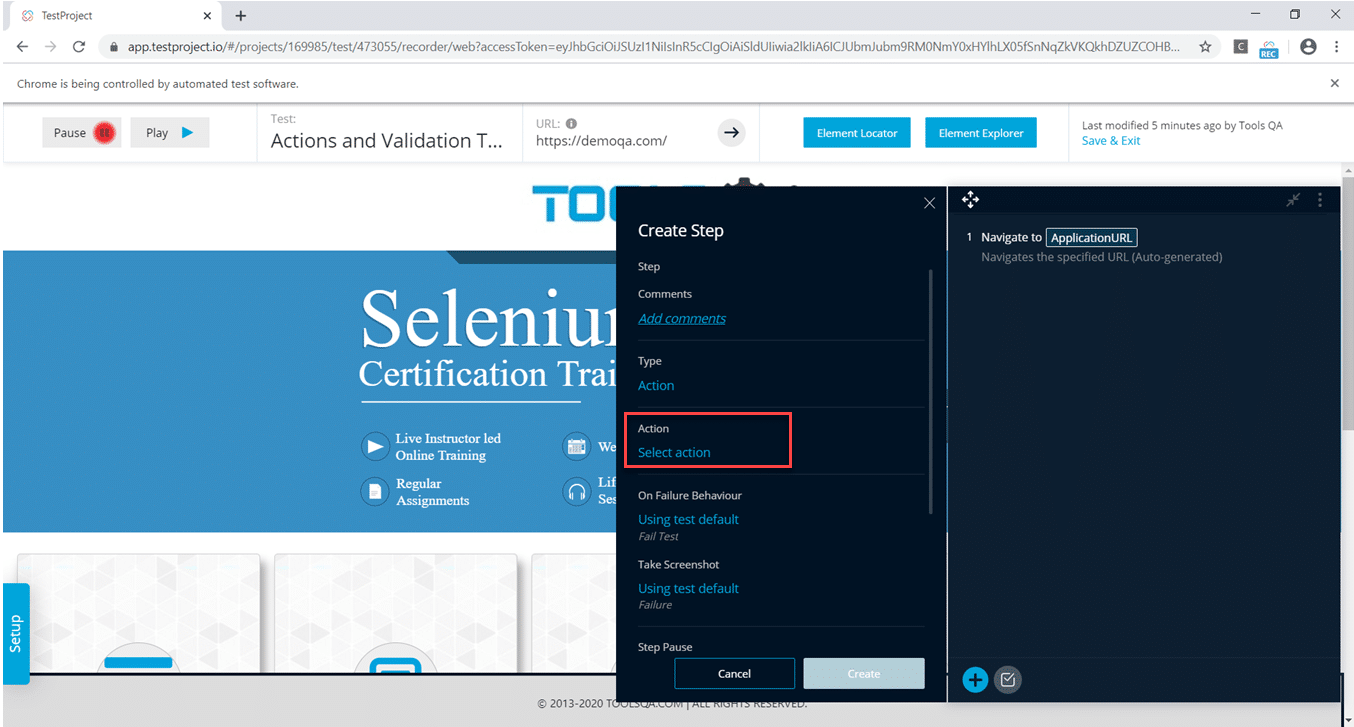
Secondly, now select the Action option and click on the check sign as highlighted in the following screenshot. As we can see here, we have to select the Action option explicitly as Get Title is Non-Element Action.
-
After that, click on "Select Action" as highlighted in the below screenshot:
-
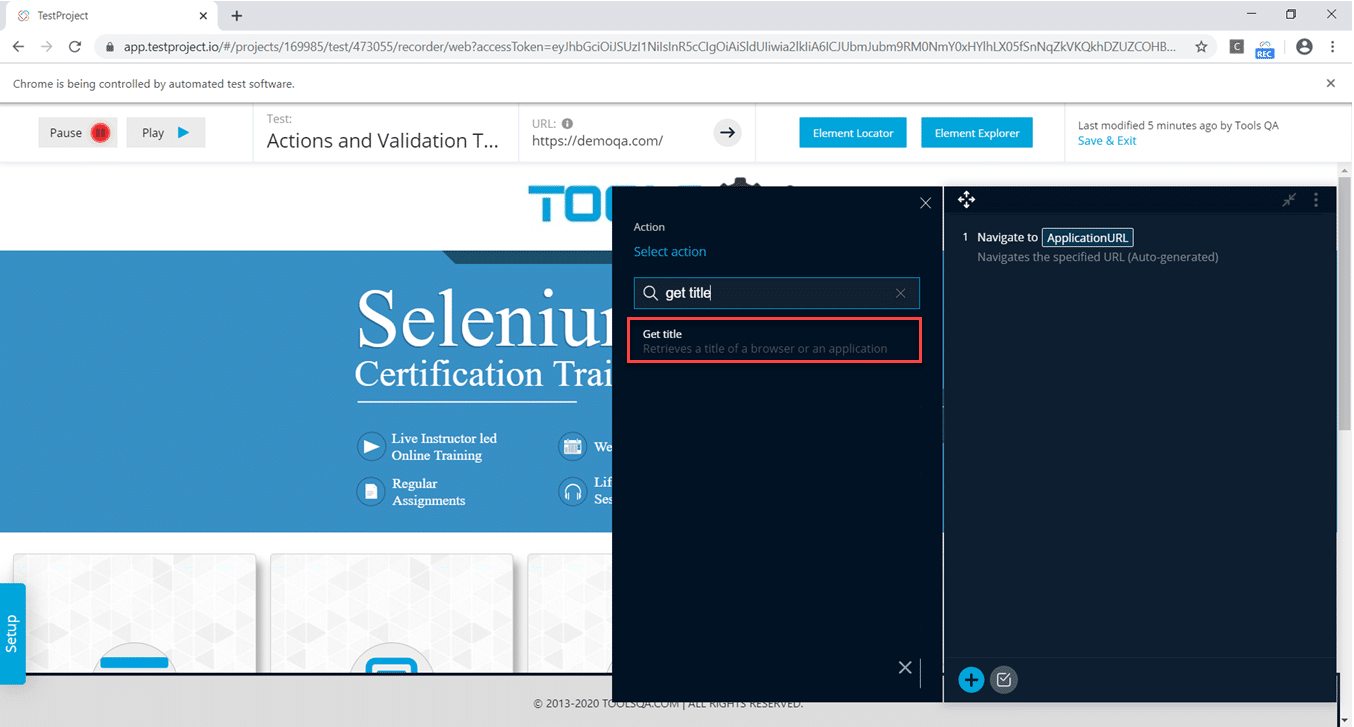
Now, search "Get Title" in the search box and click on get title option highlighted in the red rectangle. Moreover, once you have selected this option and click on the create button, the action will automatically add as a test step.
-
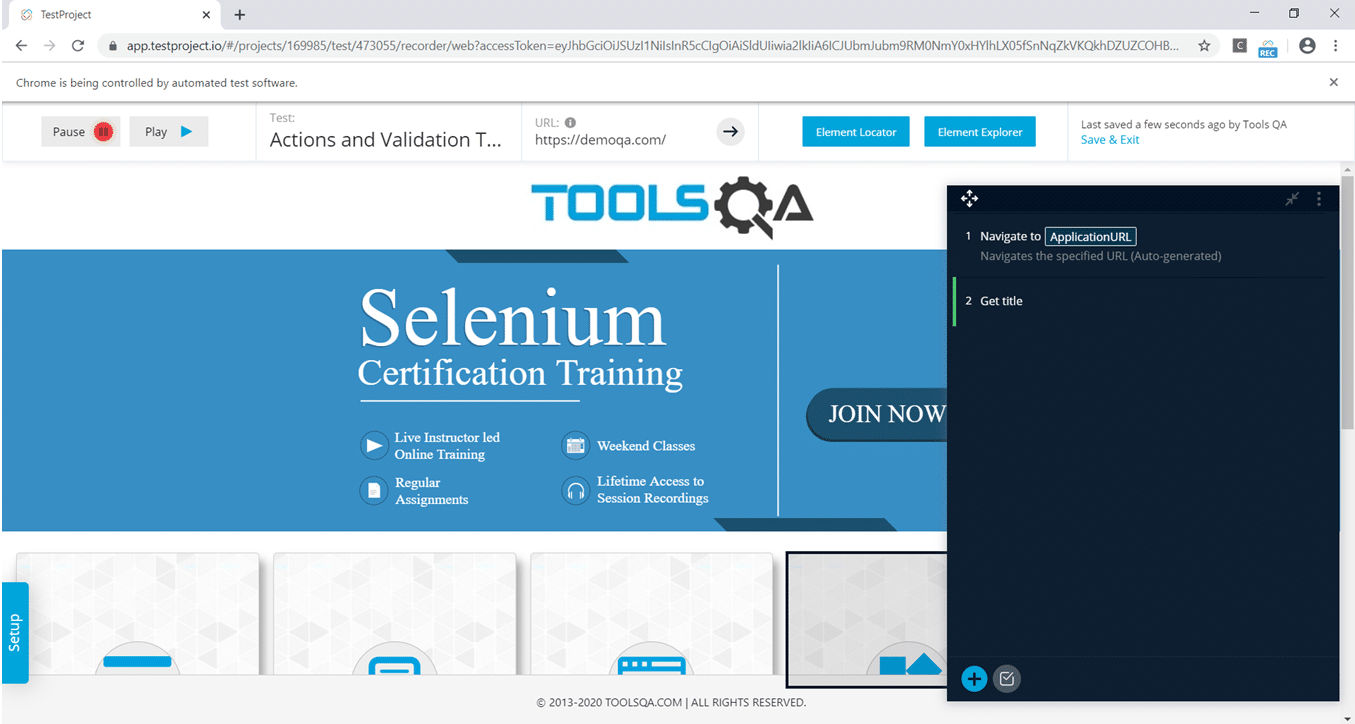
As you can see in the snippet below, a test step, "Get title", has been added.
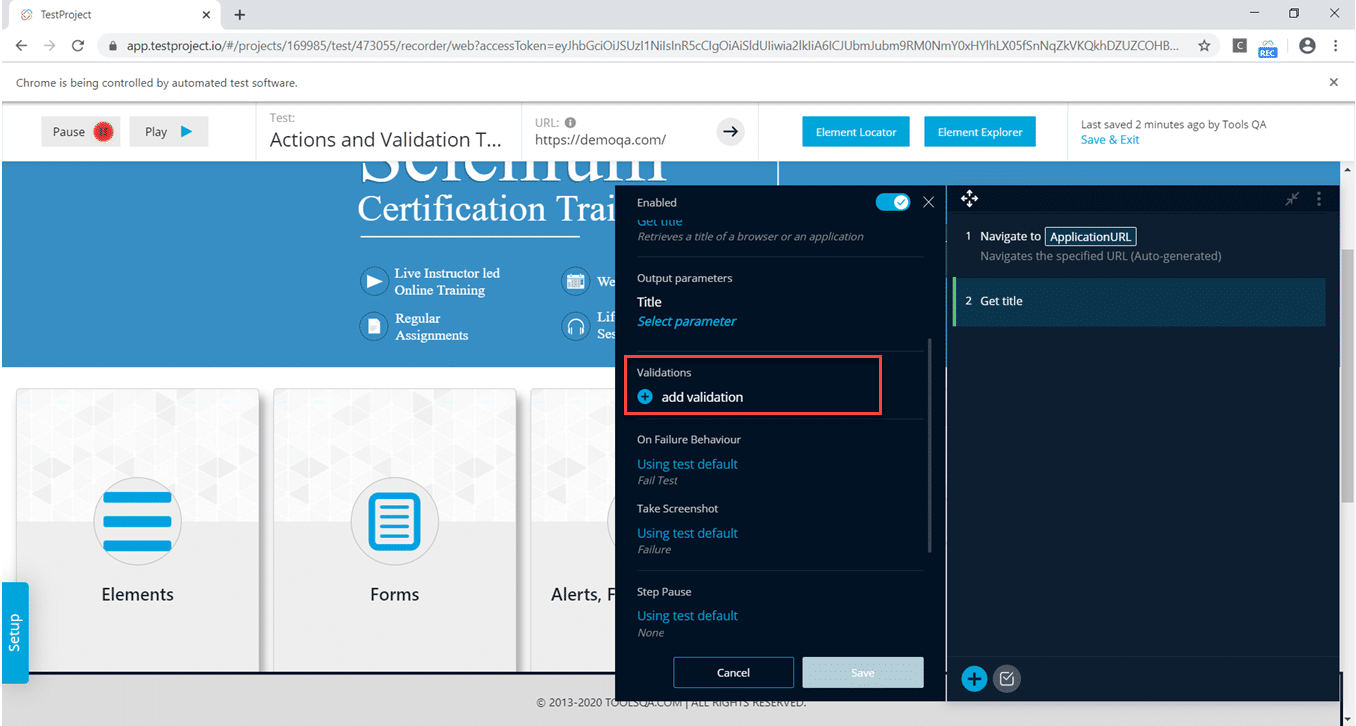
Step 3: Thirdly, we need to validate that the title equals "ToolsQA". Implementing this step is straightforward:
-
First, click on the "Get Title" step added in the previous step. After that, click on the "add validation" link highlighted in the below screenshot:
-
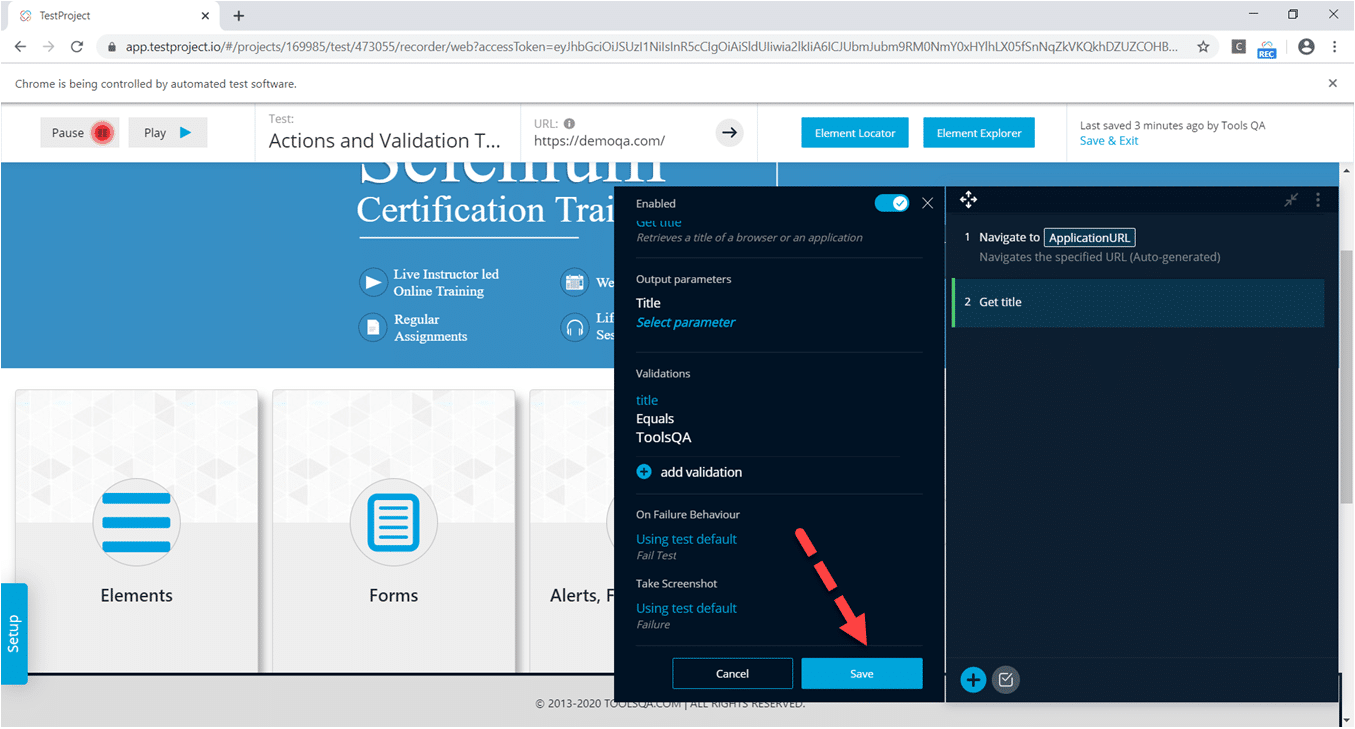
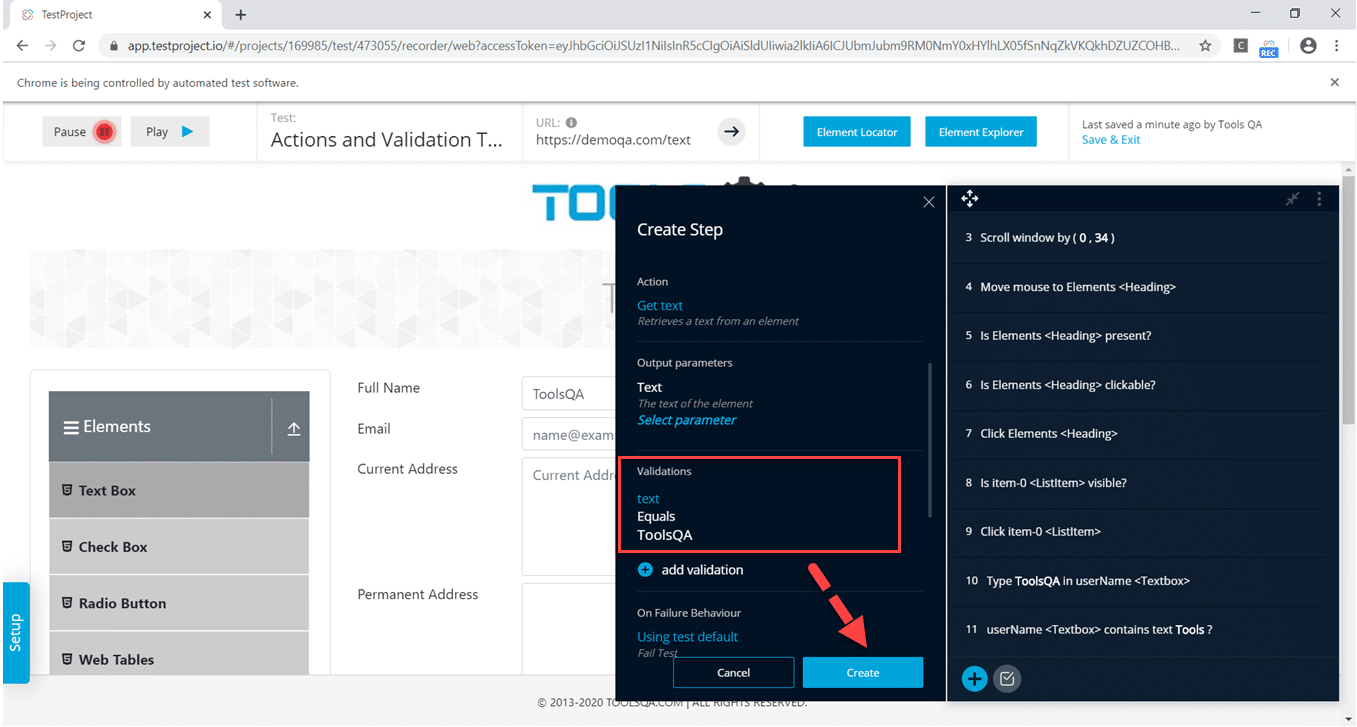
After that, do the following steps, which are mentioned by corresponding markers in the below screenshot:
- First, select the value title from Select Field dropdown.
- Second, select the value Equals from Select validation Type dropdown.
- After that, Type " ToolsQA" in the text box.
- Finally, Click on the check sign.

- Consequently, in the above image, we can see that we added an action to get the title of the page and further validated that the title matches our expectations. Therefore, now we are going to validate whether the extracted title is equal to the expected title. Now click on the Save button.
Step 4: Fourthly, we need to move the mouse cursor to the "Elements " link on the "demoqa " homepage. To add this test step, follow the steps as mentioned below:
- First, hover over the Elements label and press the shift button 2 times.
- Second, expand the Actions option.
- Now, search move text in the search box and select Move mouse to element option.
Note: Corresponding markers show all these actions in the following screenshot:
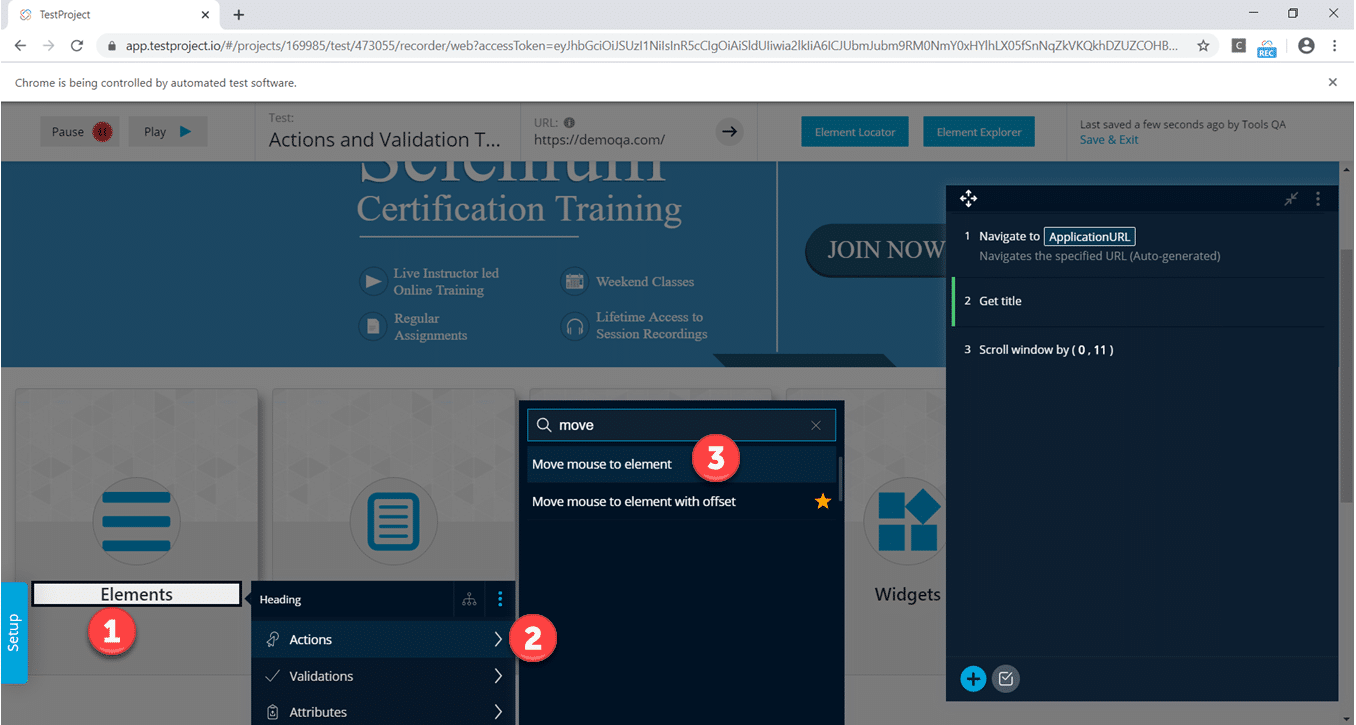
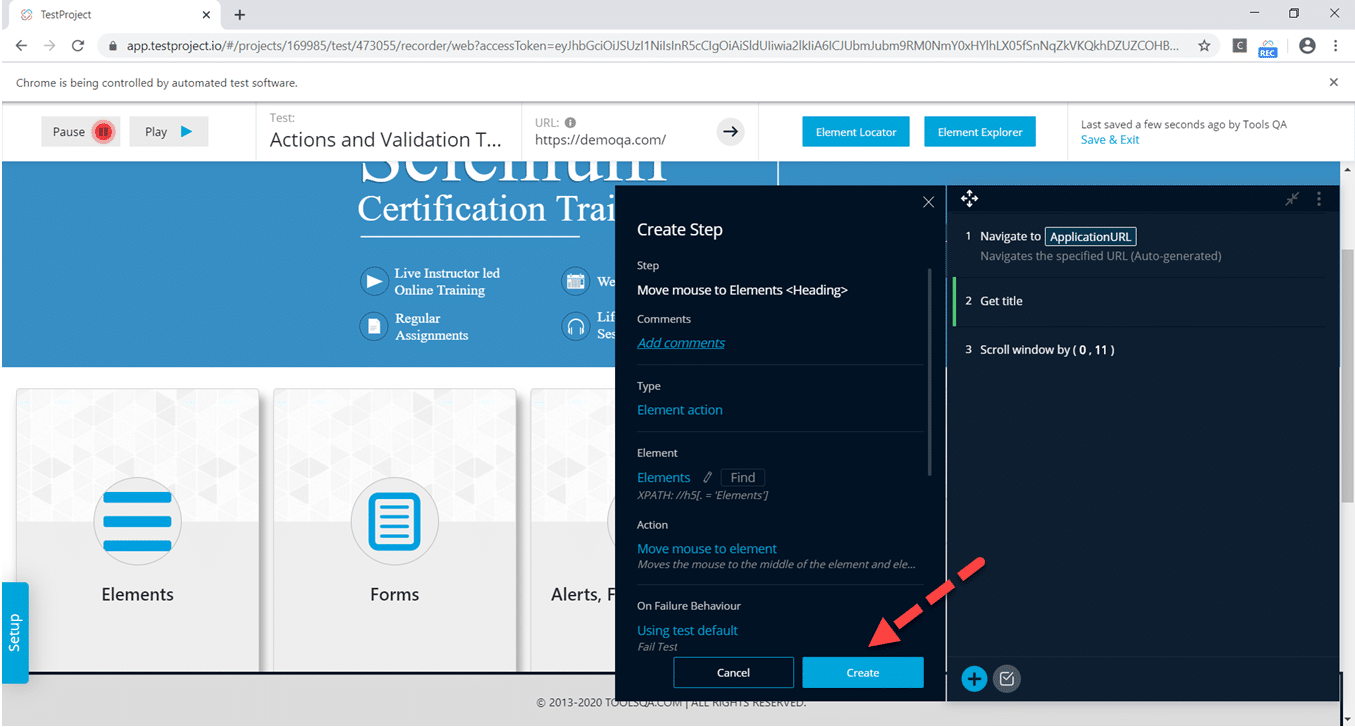
- After that, click on the Create button (as shown in the below screenshot) to add the test step.
Step 5: Fifthly, the next step is to "validate that the Elements label is Present". Consequently, we need to perform the following steps to implement it:
- First, hover over the "Elements" label and press the shift button 2 times.
- Second, expand the Validations option.
- Third, search "Is Present" text in the search box and select the "Is Present" option.

So, we added the Validation step to validate whether the Elements Label is present or not. Now, we simply click on the Create Button to add this validation in our test step.
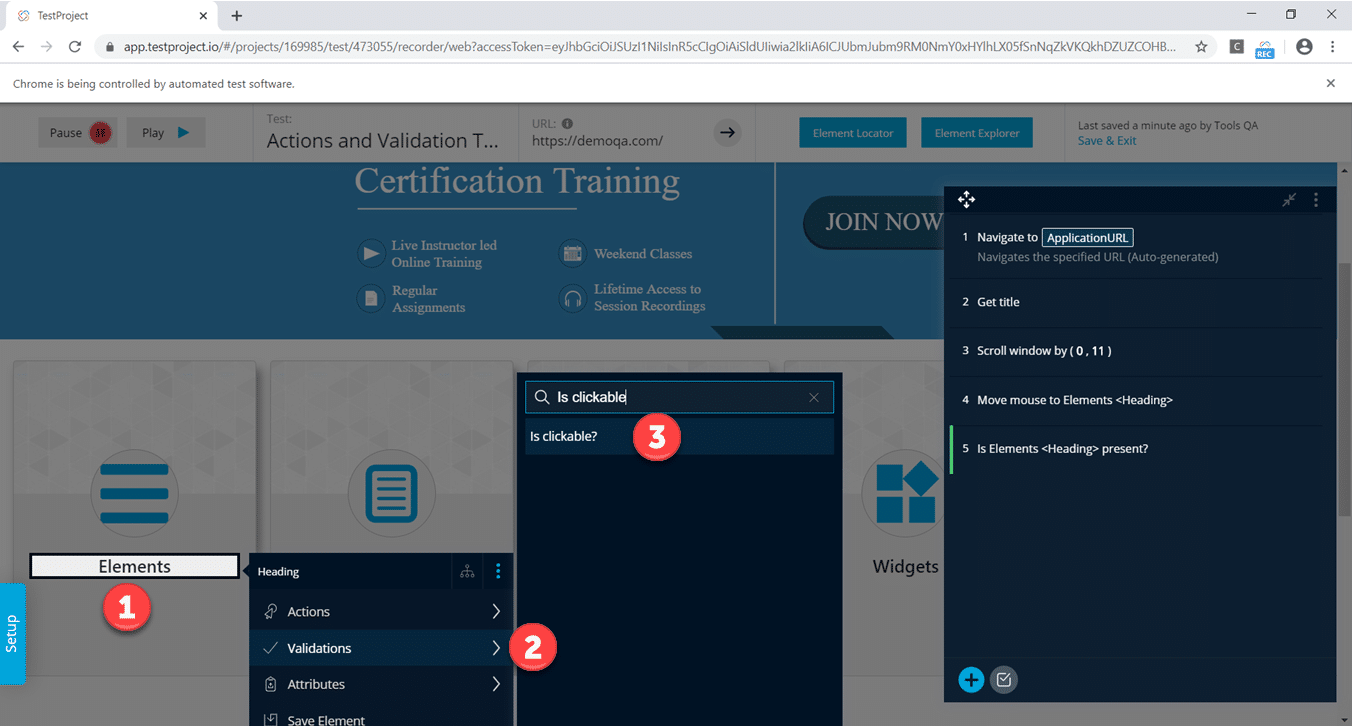
Step 6: After that, the next step in the test scenario is to "validate that Elements link Is Clickable". Subsequently, follow the below steps to implement it:
-
First, hover over the "Elements" label and press the shift button 2 times, as highlighted by marker 1.
-
Second, expand the Validations option, as highlighted by marker 2.
-
After that, search for "Is clickable" text in the search box. Additionally, select the "Is Clickable" option, as highlighted by marker 3.
-
Finally, click on the Create Button to add this validation in the test.
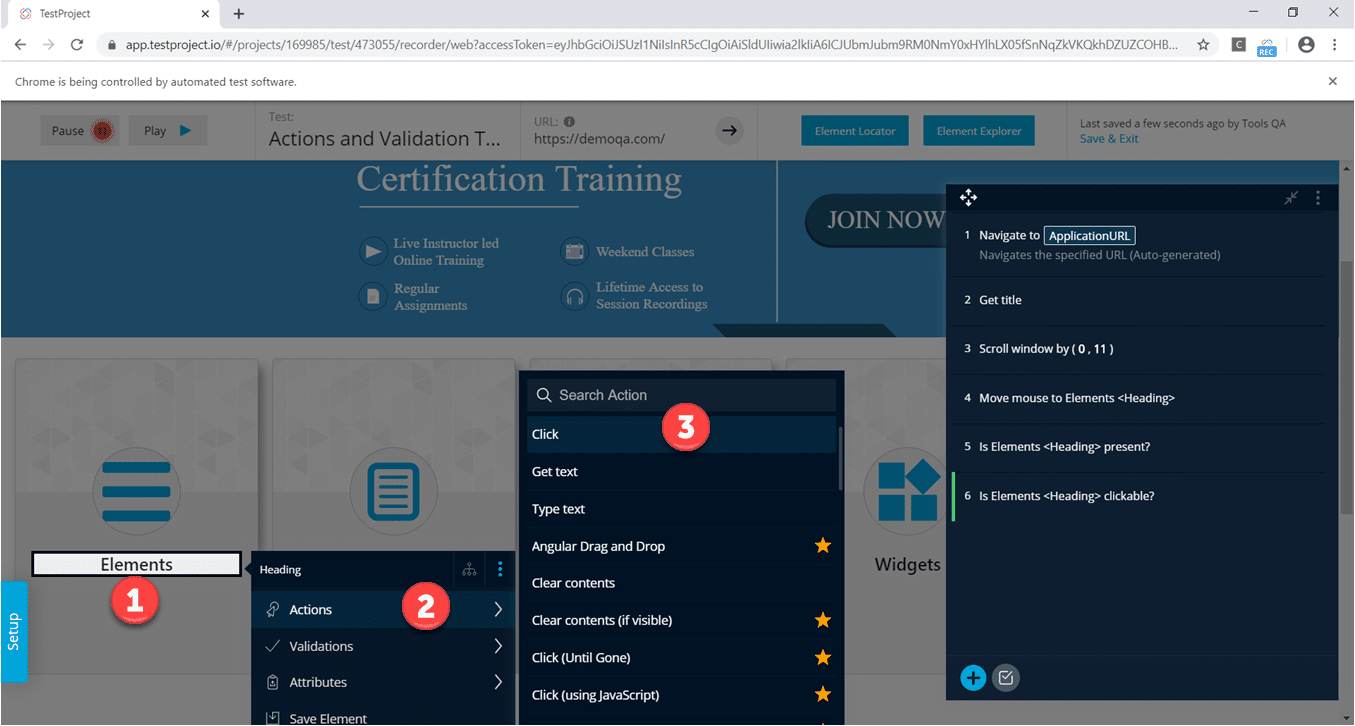
Step 7: Seventhly, we click on the "Elements" link. Follow the below steps to implement it:
-
First, hover over the Elements label. After that, press the shift button 2 times, as highlighted by marker 1.
-
Secondly, expand the Actions option, as highlighted by marker 2.
-
Now, select the click option, as highlighted by marker 3
-
Lastly, simply click on the Create Button to add this test step.
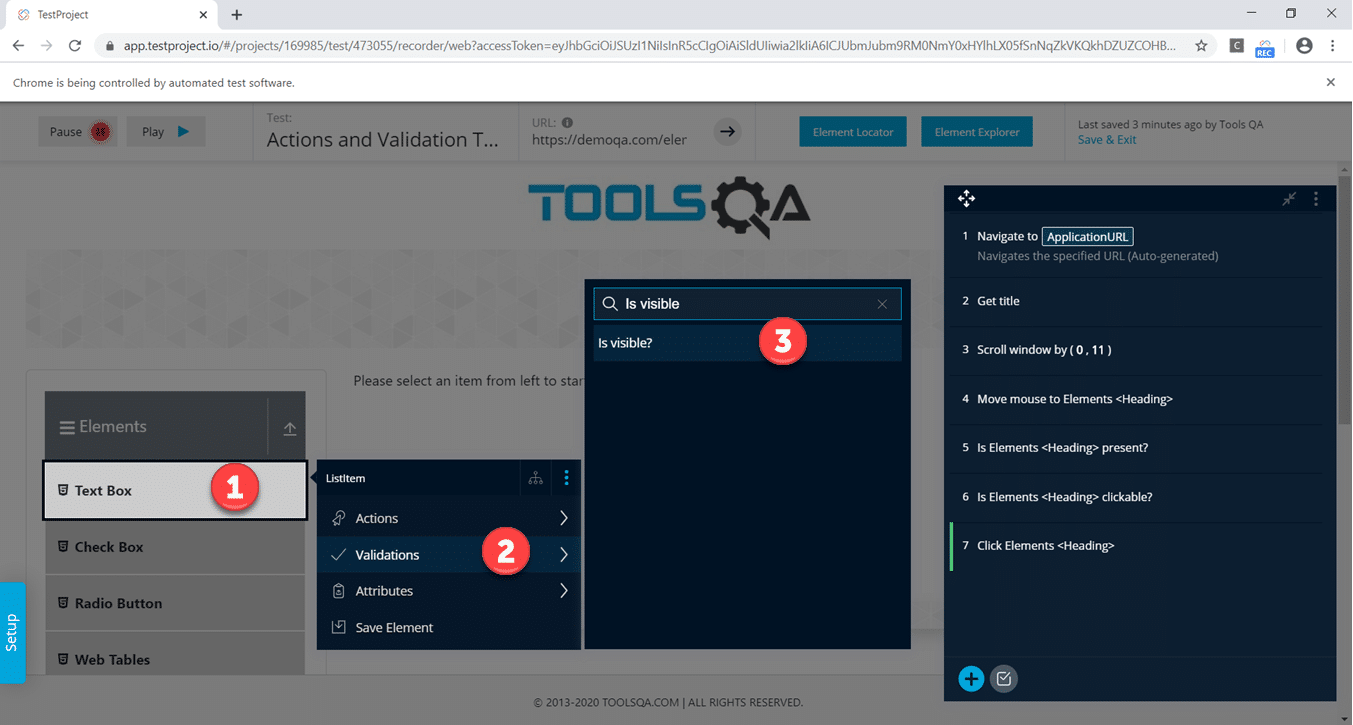
Step 8: After that, the next step is to "Validate that TextBox link is visible". Consequently, follow the below steps to implement it:
-
First, hover over the TextBox link. After that, press the shift button 2 times.
-
Second, expand the Validations option.
-
Now, search Is Visible text in the search box select Is Visible option.
-
Finally, just click on the Create Button to add this test step.
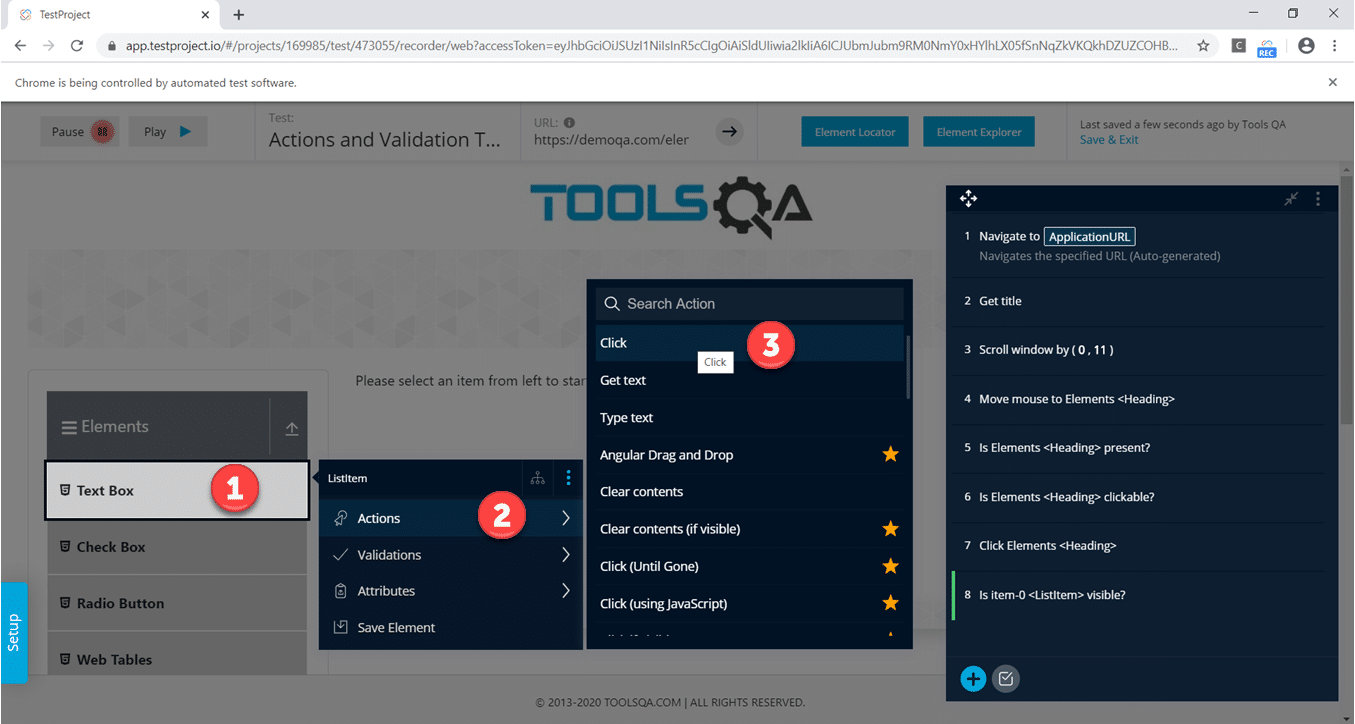
Step 9: In addition to that above, the next step is to "Click on the TextBox Link". Subsequently, follow the below steps to implement it:
-
First, hover over the TextBox link and press the shift button 2 times.
-
After that, Expand the Actions option.
-
Now, search click text in the search box select click option.
-
Lastly, just click on the Create Button to add this test step.
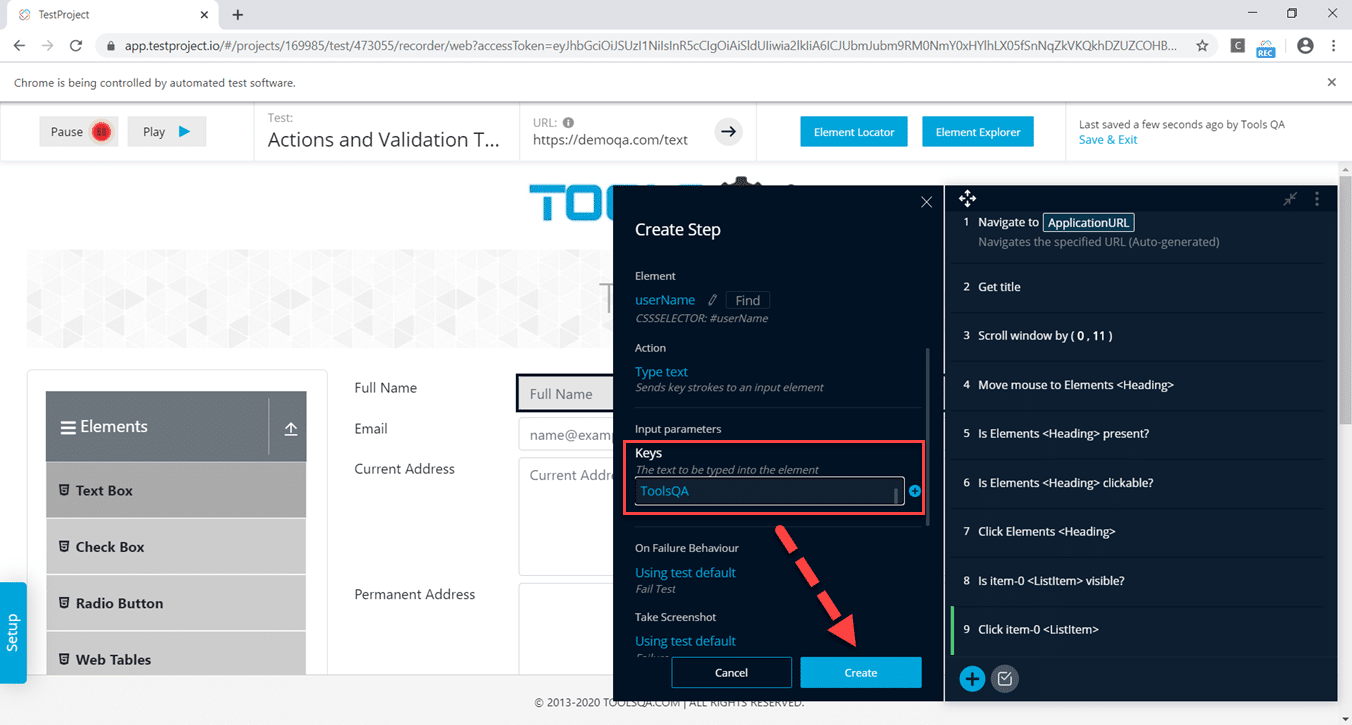
Step 10: Subsequently, the next step is to Type the text "ToolsQA" in the Full Name Text Box." Follow the below steps to implement it:
-
First, hover over the "Full name" textbox and press the shift button 2 times.
-
Second, expand the Actions option.
-
Now, search type text in the search box select Type text option.

-
Finally, type the text " ToolsQA" in the Keys section and click on the create button.
Step 11: After that, the next step is to "Validate that the Text box contains the text 'Tools'". Follow the below steps to implement it:
-
First, hover over the Full name Textbox and press the shift button 2 times.
-
Second, expand the Validations option.
-
Now, search contains text in the search box and select the contains text option.
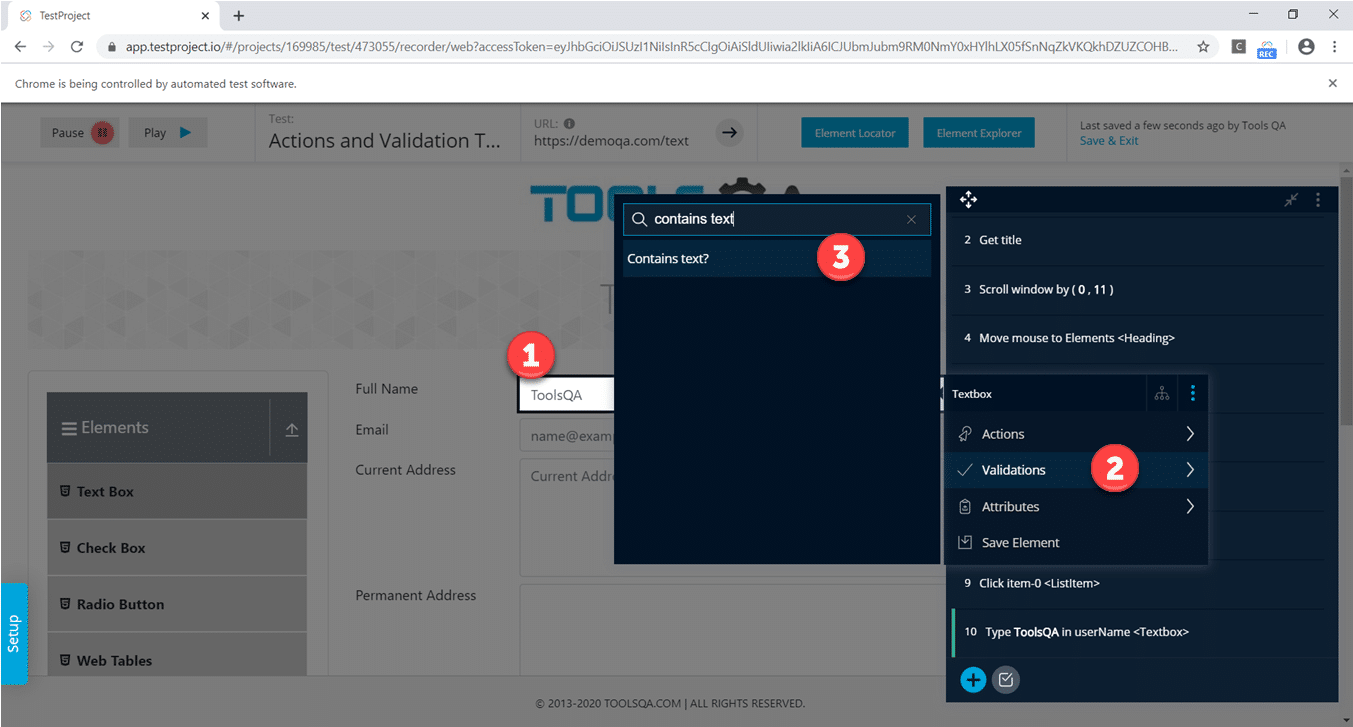
-
Finally, type the text "Tools" in the Text section and click on the Create button.

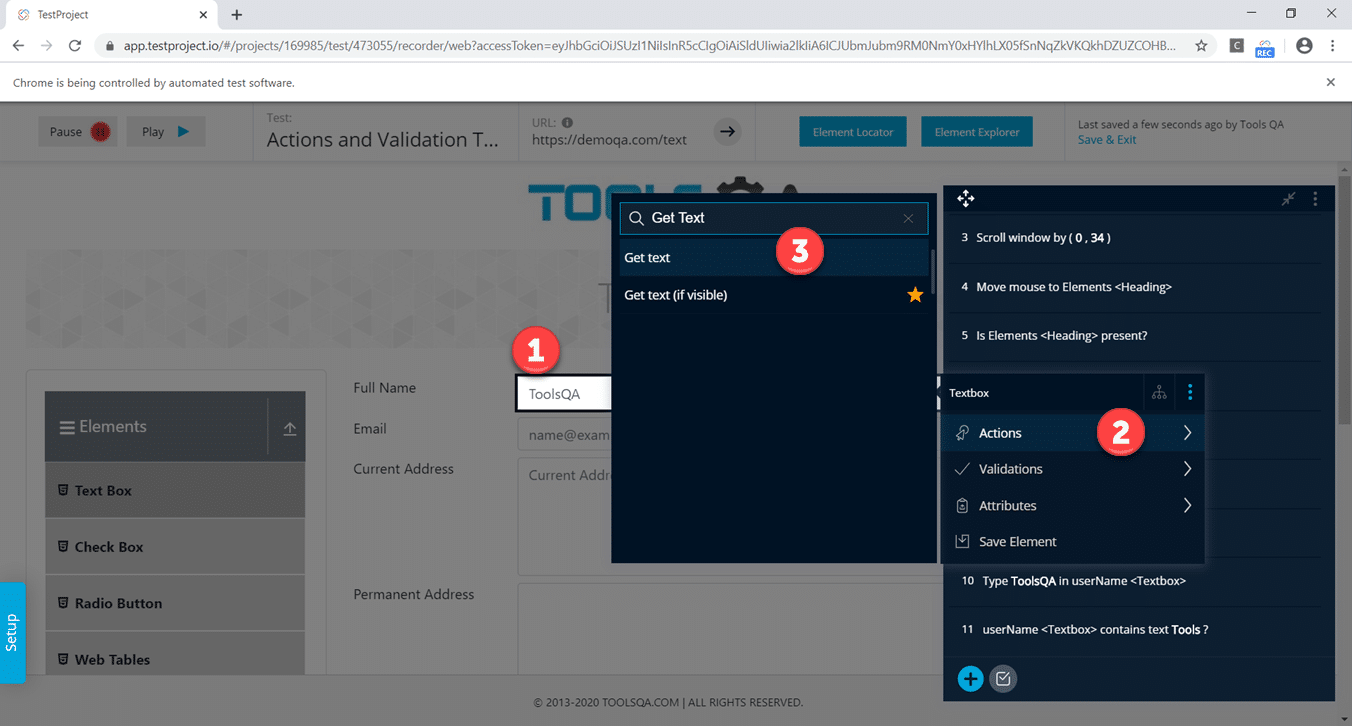
Step 12: The next step is to "Get Text Action on the Full Name Text Box". Subsequently, follow the below steps to implement it:
-
First, hover over the Full name Textbox and press the shift button 2 times.
-
Second, expand the Actions option.
-
Now, search Get text in the search box and select the Get text option.
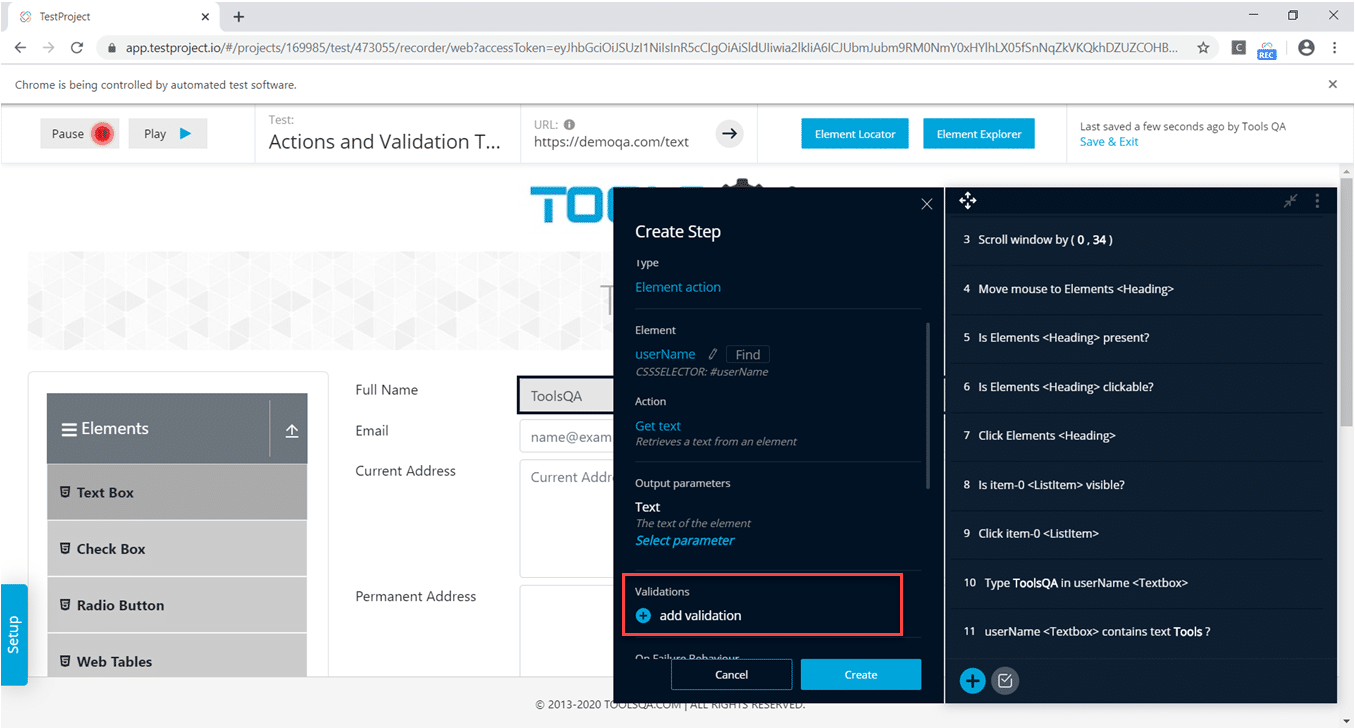
-
Finally, we need to validate the extracted text. Click on the "add Validation" link as highlighted below.
-
Perform the following steps to add validation, as highlighted by the markers in the below image.
-
Firstly, select the value text from the Select field drop-down.
-
Secondly, select the value Equals from the Select validation type drop-down.
-
Thirdly, put ToolsQA in the Textbox.
-
After that, click on the check sign.
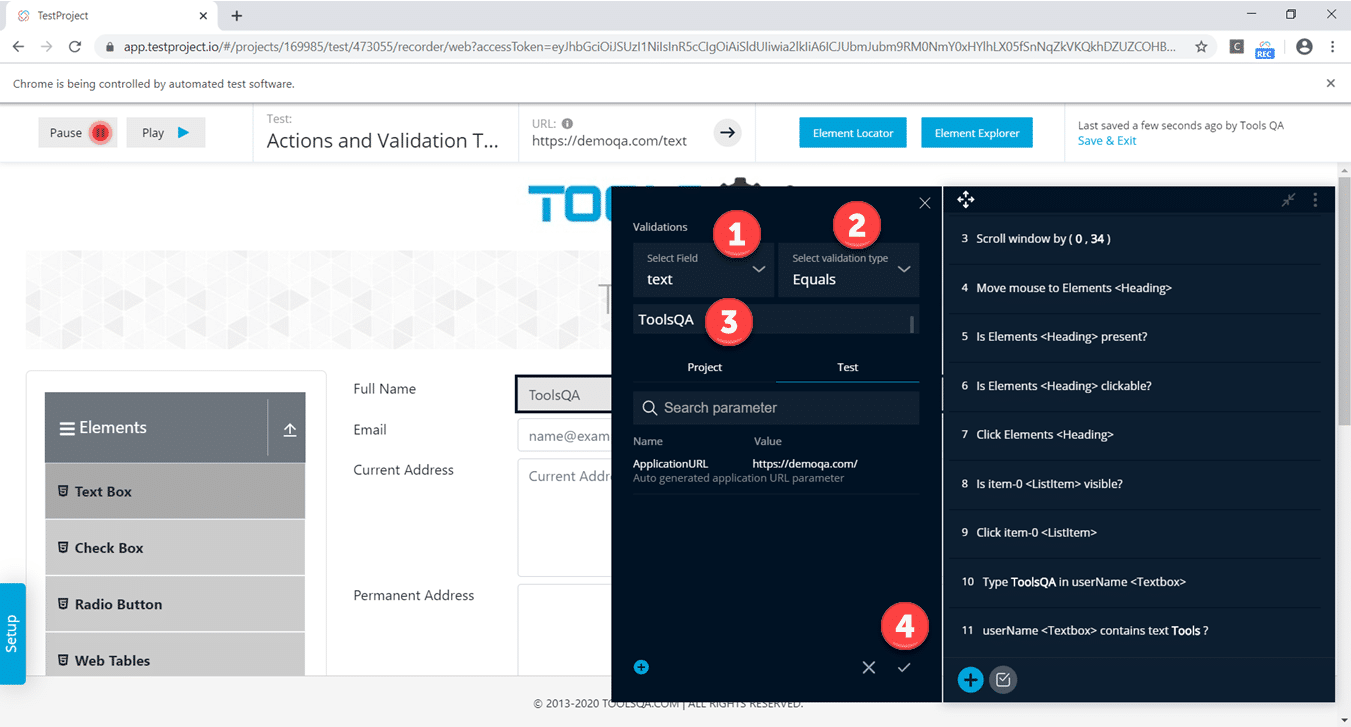
-
We can see that the Validation adds in our test step. Now, click on the Create button.
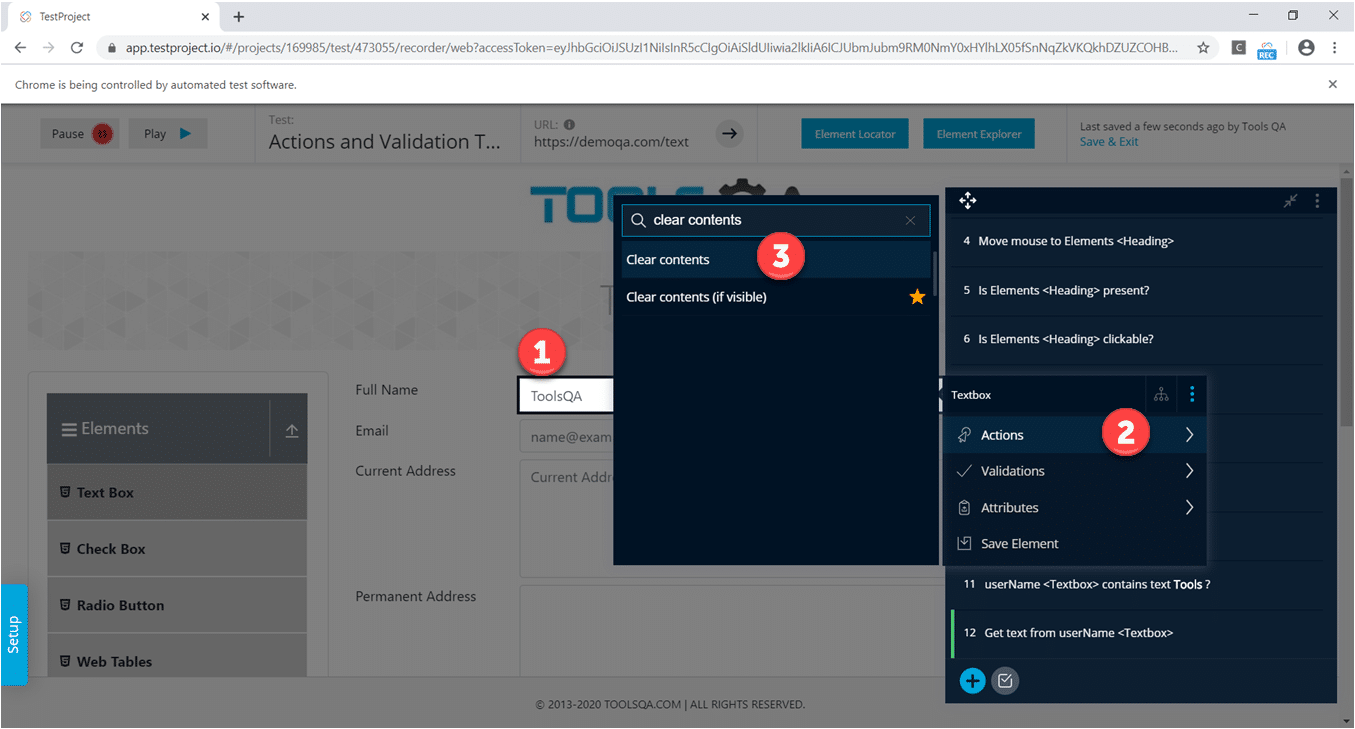
Step 13: The next step is to "Clear the contents for the Full Name Text Box". Follow the below steps to implement it:
-
First, hover over the Full name Textbox and press the shift button 2 times.
-
Second, expand the Actions option.
-
Now, search for the clear content's text in the search box and select the clear content option.
-
Finally, click on the Create Button to add this test step.
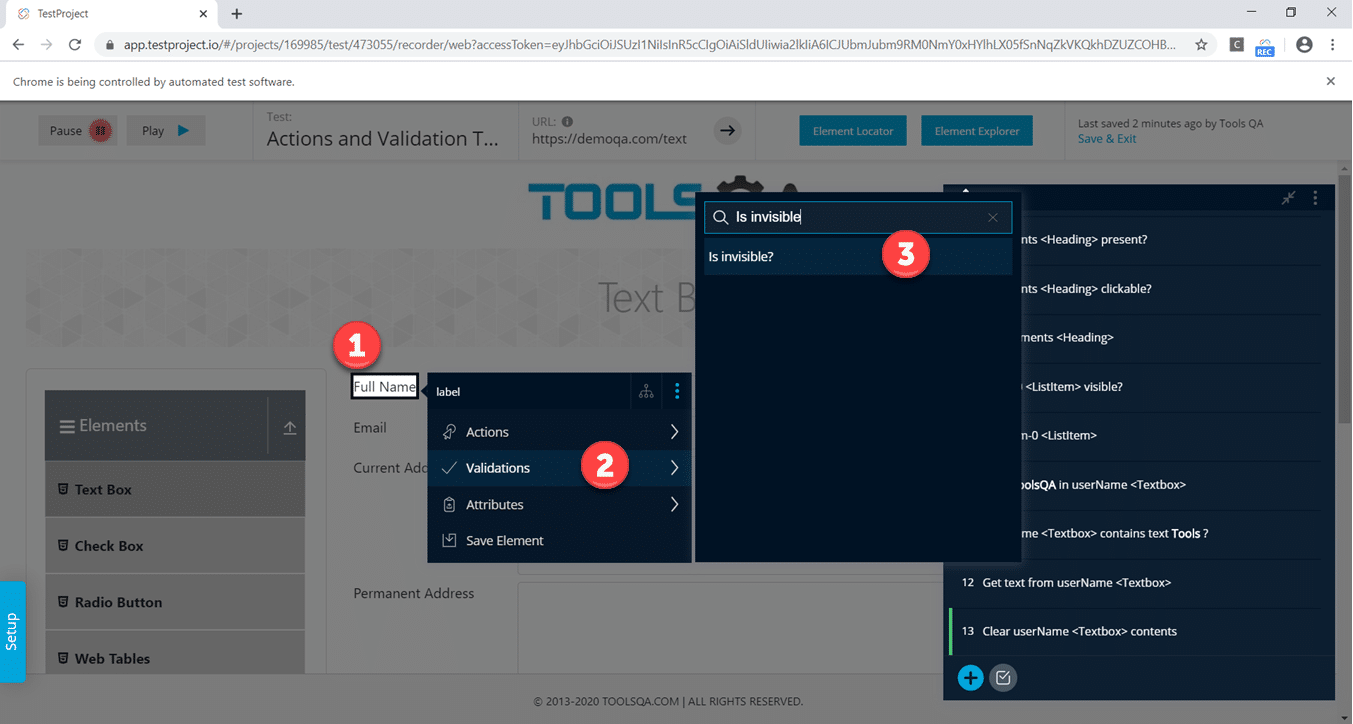
Step 14: The next step is to "Validate that the Automation text Is invisible? ". Subsequently, follow the below steps to implement it:
-
First, hover over the Full name Label and press the shift button 2 times.
-
Second, expand the Validations option.
-
Third, search for the "is invisible" text in the search box and select the "is invisible" option.
-
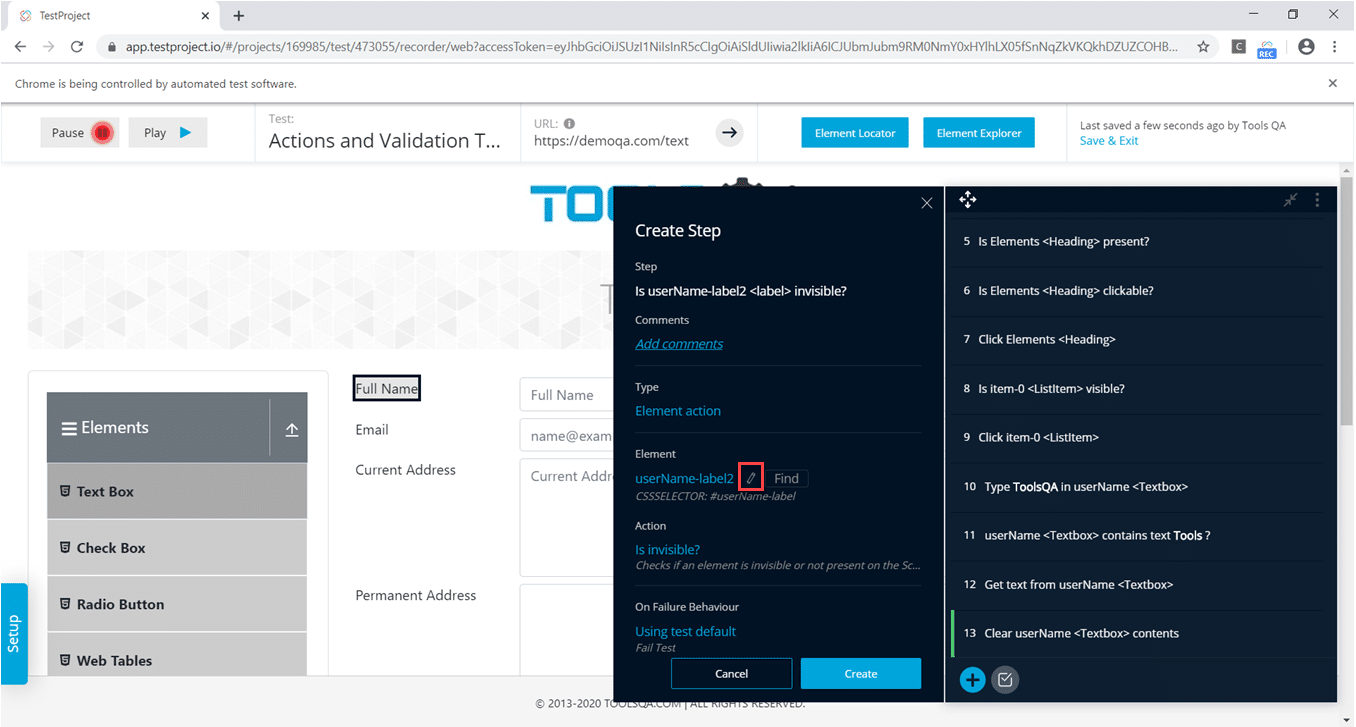
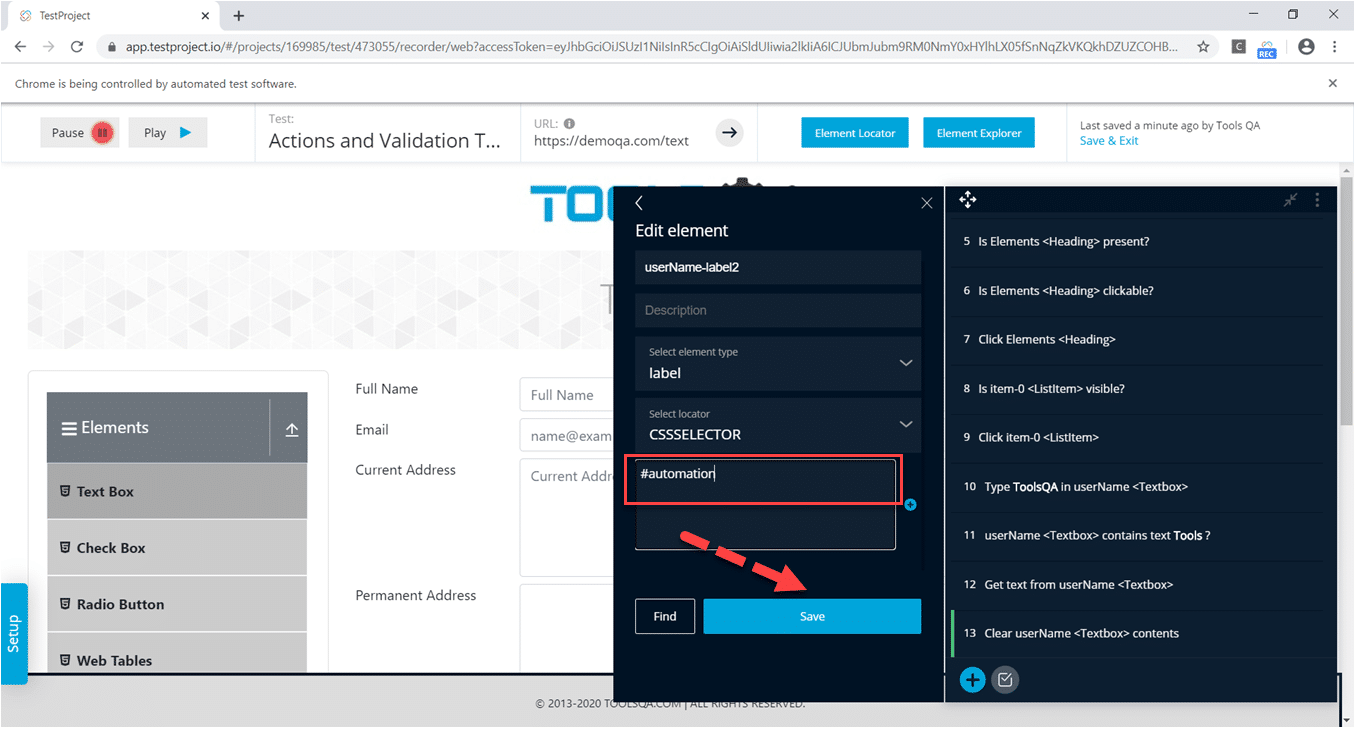
Now, we need to type the text, which is not visible on the current web page. So, we chose the word "automation". Click on the highlighted section in the below image:
-
Finally, type the text automation in the highlighted section and click on the Save button.
-
After that, click on the create button.
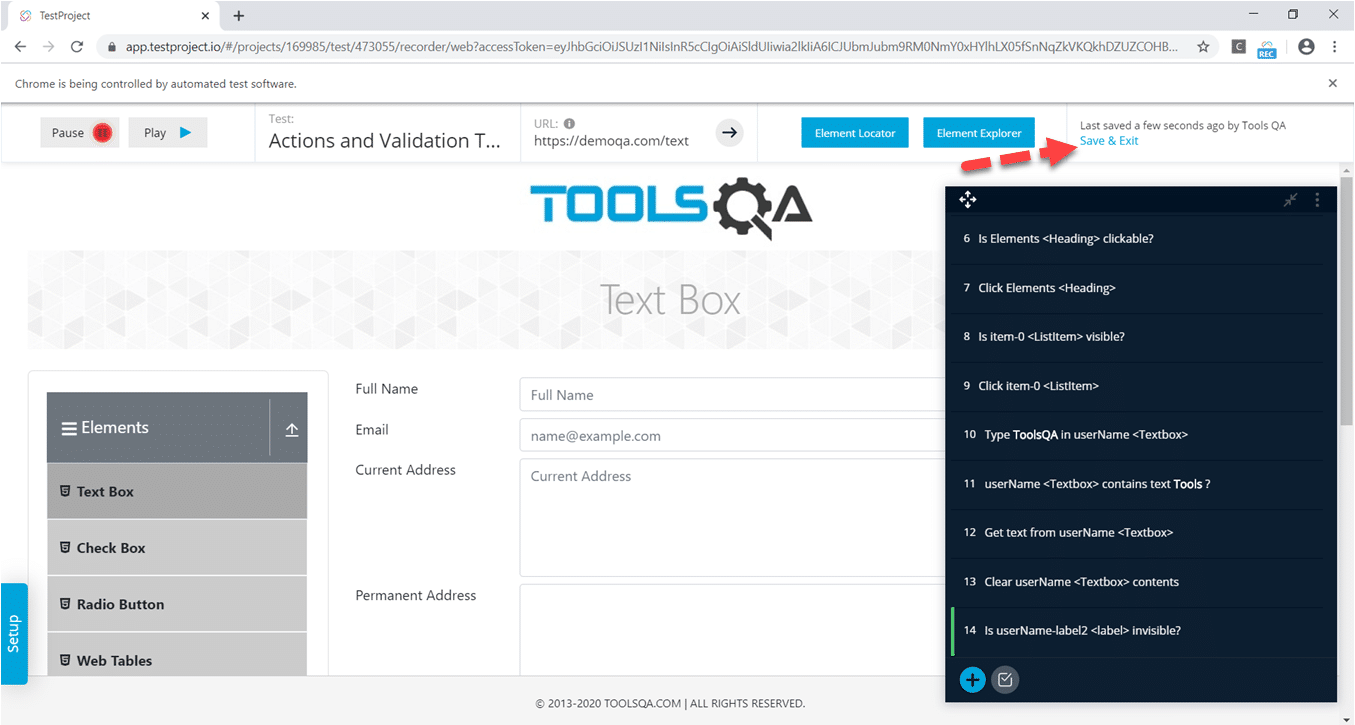
We can see that all the Test steps add, so click on the Save and Exit button to save the test case.
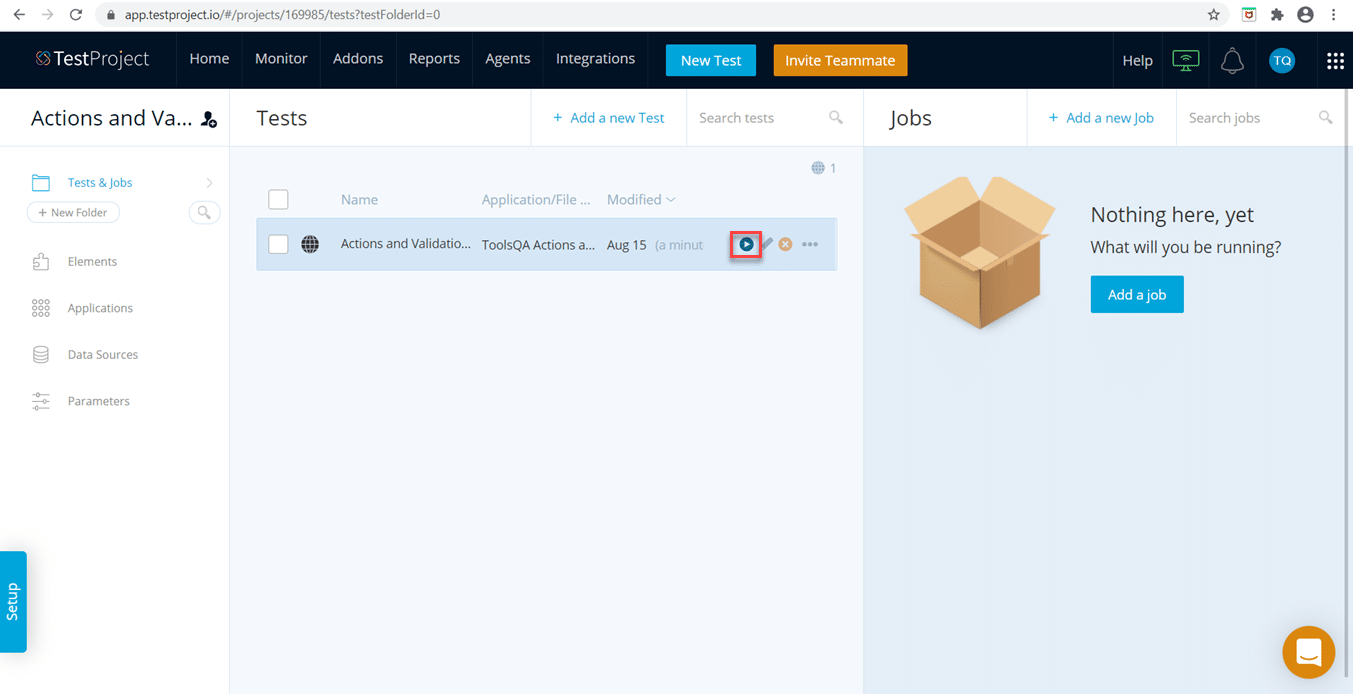
Step 15: After that, run the recorded test and generate a Test Report, as shown below:
After running the test, we can access the report from the "Reports " section in the toolbar.
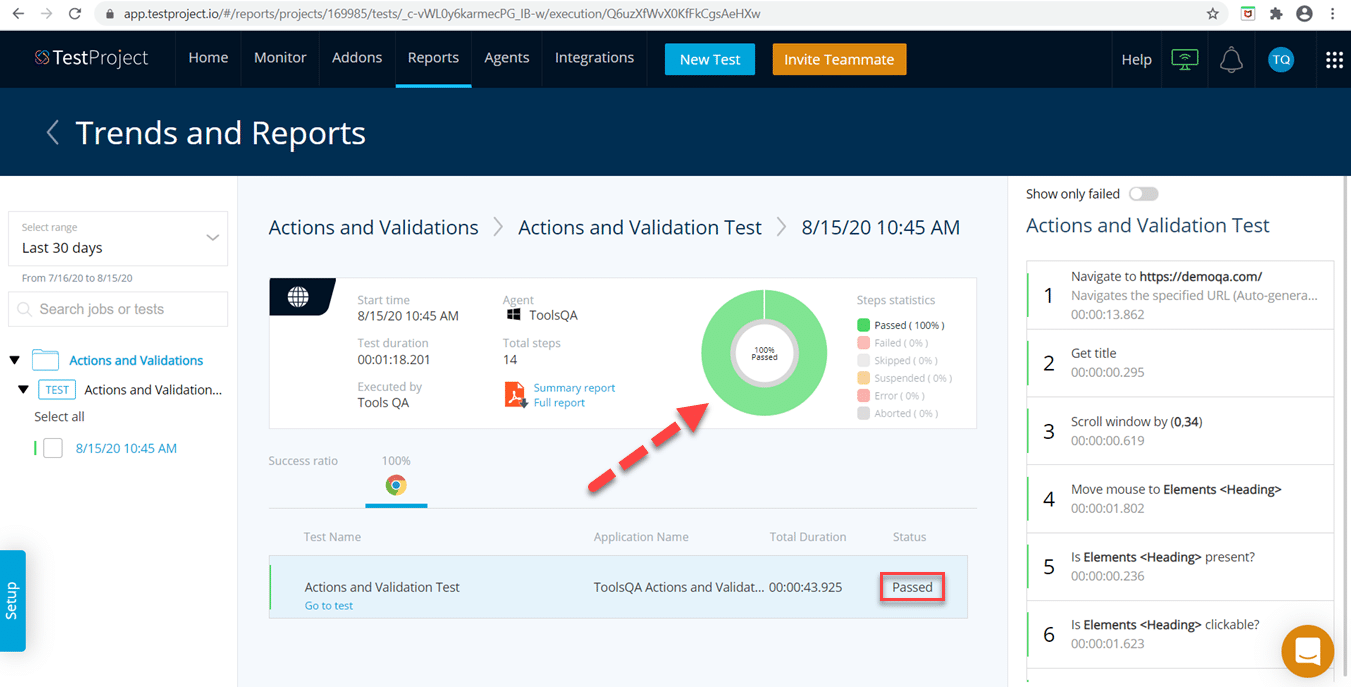
In the report, we can validate the various actions and the corresponding validations performed on multiple web elements. This way, we can use a combination of Actions and Validations for automating any application using TestProject.
Key Takeaways:
- An Action is a "To Do" process, which is the basis of the test steps we create.
- Additionally, actions can be of two types: Element Actions and NonElement Actions.
- Also, validation is a checkpoint to certify the comparison between the actual and expected results.
- Finally, TestProject provides an easy interface to perform actions and add validations for robust automated testing.