In today's fast-paced development environment, QA Engineers and developers need to deliver quickly. With time being limited, how can you quickly create a reliable, robust, and maintainable automated test? TestProject has you covered with the Smart Test Recorder. Additionally, TestProject allows users to quickly create powerful and efficient automated tests at a rapid pace to match their stringent delivery timelines. Moreover, TestProject's combination of usability and features helps the user tackle most of their day-to-day challenges while developing tests. Even for scenarios that may pose a challenge to the average testing tool, TestProject can easily handle those by combining recorded and coded parts together to outwit any problematic situation.
Subsequently, in this article, TestProject: Smart Test Recorder, we will help you in creating your first test with the help of TestProject's Smart Test Recorder. In addition to that, we will discuss its features and capabilities during our step-by-step lesson. By the end of this lesson, you will be familiar with TestProject without needing any prior experience or coding skills. Consequently, we will be covering the following details related to the Smart Test Recorder provided by TestProject.
- What is the Smart Test Recorder?
- How to create a project in TestProject?
- How to record and playback a test case in TestProject?
- Also, how to set up an application for testing?
- How to record a test with Smart Test Recorder?
- How to execute a test in TestProject?
What is the Smart Test Recorder?
TestProject's Smart Test Recorder is a powerful in-browser component of TestProject that offers record and playback capabilities. The recorder provides unmatched features and functionalities that can help users quickly automating tests for web, Android, iOS, and APIs. Additionally, the built-in recorder captures all user actions via a browser interface and automatically generates the corresponding steps. While a recorded test can run on virtually any browser, the Smart Test Recorder requires the Chrome Browser for test recording. Some of the notable features of the Test Recorder are:
- Faster Test Development: It accelerates the development pace of automation tests. As almost all of the test steps can be auto-generated using the recorder, test case development time cuts down dramatically.
- Element Inspector: It inspects any element present in the web or mobile app. In other words, you can use it to perform any actions, set validations, or define locator strategy. Moreover, it allows users to create more robust tests and interact with complicated UI's.
- Test Editor: It provides visibility to all your test steps and their details. It can edit or organize your tests for better reuse. You can also set parameters for data-driven testing, take screenshots, timeouts, and even define a failure condition.
- Configure Test Steps: refine the test steps by adding timeout or pauses at an individual test step level. Moreover, tests steps can also configure to take screenshots for reporting purposes or validate an expected outcome during a failure condition.
- Add details to the Test step: add comments and test step types to the step. Comments can give information on the test to improve readability and collaboration.
- Edit Web Element: edit the web element associated with a particular step. Additionally, users can add a familiar element name, element description, element type, and even edit the locator for the element.
- Repeat Step: set the number of times a particular step should repeat in a test. Moreover, it is quite useful if you need to execute the same step multiple times during the scenario.
Note: We will go into a more detailed understanding and implementation of all these actions in future articles.
Now, before we can create a test case, we must have created a project in TestProject. Subsequently, let's understand how to do the same.
How to create a project in TestProject?
Before we start creating our tests, we need to have a project in which we can store our test. A project allows users to manage test cases and results while granting access only to the relevant team members. Moreover, you can add an unlimited number of users to a project and control their specific permissions. It allows the entire team to collaborate on automation test script development. We will be covering the details of managing projects in more detail in upcoming articles.
To create a project, first, we need to log in to our TestProject account. After that, navigate to TestProject Login to log in to the TestProject platform. Please make sure to create your free account before logging in. Moreover, you can read about "How to create your TestProject account" in our previous tutorial. Now to create a new project, follow the steps as mentioned below:
-
First, click on the "Add a New Project" button present on the home page of the TestProject, as highlighted in the image below.

-
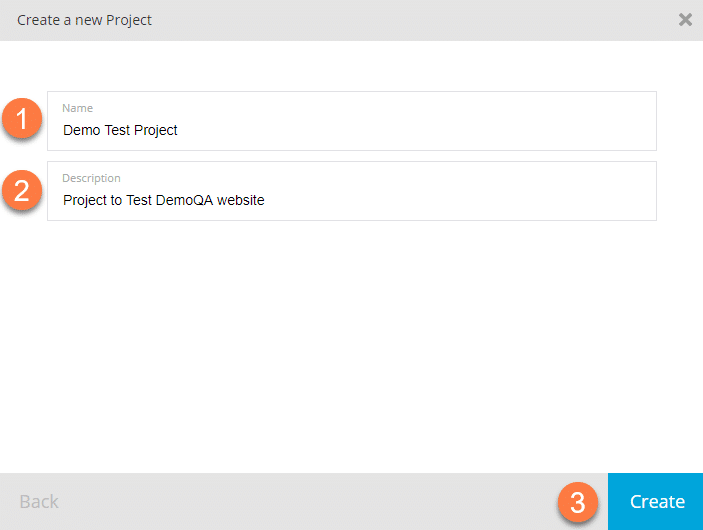
Secondly, once you click on the button, another pop-up will open up asking you to specify the project name and project description. After that, enter the project name as shown in the below image marked "1" and project description as marked by "2". Once done, click on the "Create" button.
-
Thirdly, your test project is created. Subsequently, you will be taken to the project page, as displayed below.
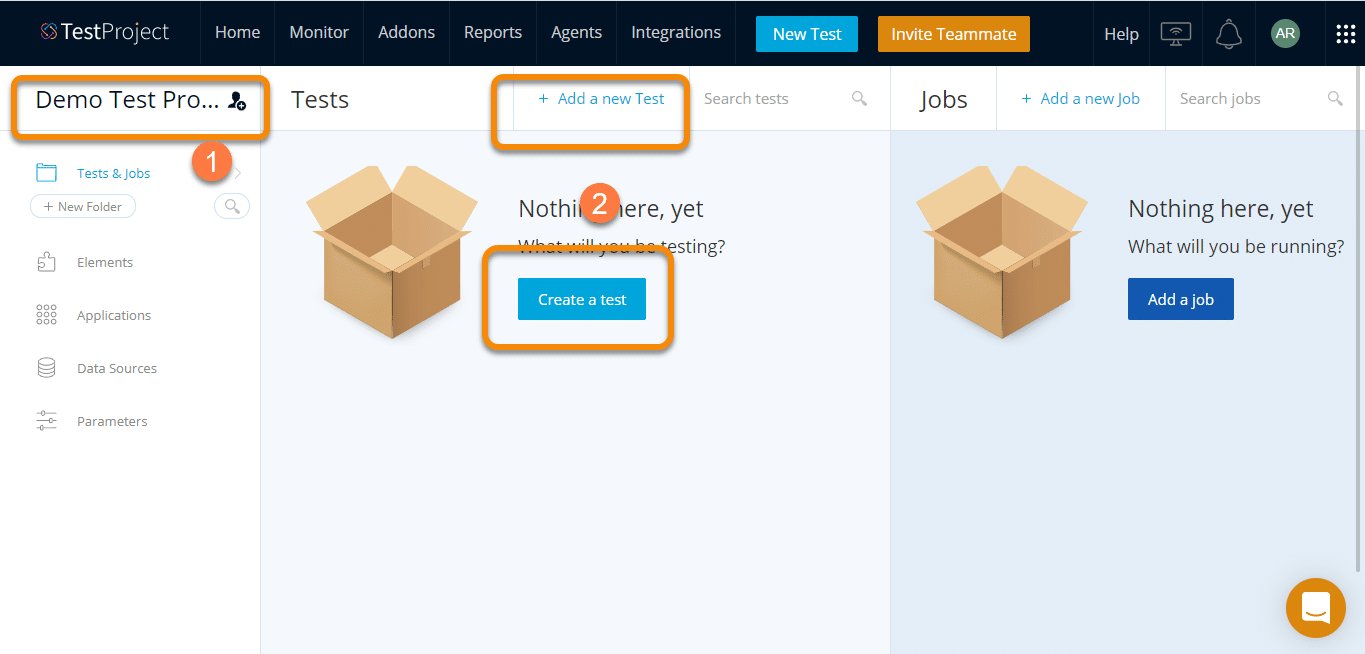
On the project page, you can find your previously selected project name as denoted by step "1". It represents that you have successfully created a project in TestProject, and now you can start putting your test cases under this project.
How to record and playback a TestCase in TestProject?
As we mentioned, TestProject provides the functionality to record Test Cases with the "Smart Test Recorder". Let's try to record a test case for a web application, say "https://demoqa.com", and below is our scenario, which we need to automate.
- First, open https://demoqa.com/text-box page.
- Second, enter the Full Name.
- After that, enter the Email.
- Enter the Current Address.
- Enter the Permanent Address.
- Finally, click on the "Submit" button.
Before we can start recording our test, we need to specify while recording, which application needs consideration, and where will the recorded steps be saved. For that, we will need to create a test placeholder and specify the application URL where the application resides. Let's see how to set up the application URL for which the test case needs to record:
How to setup applications for testing?
Follow the steps below, for making the TestProject ready for starting the recording of a test case:
-
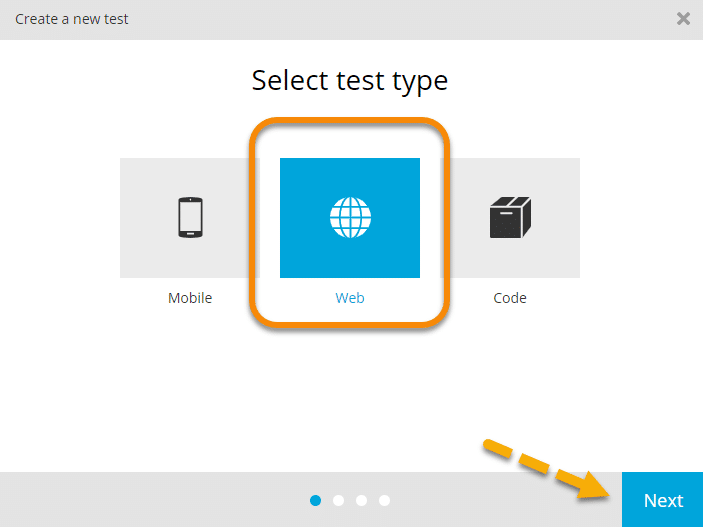
Click on the "Create a test" button or by using the "Add a new Test" link on the project page, as shown in the previous screenshot.
-
A "Create a new test" pop-up will appear, select "Web" from the pop-up, and then click on the "Next" button as shown in the image below.
-
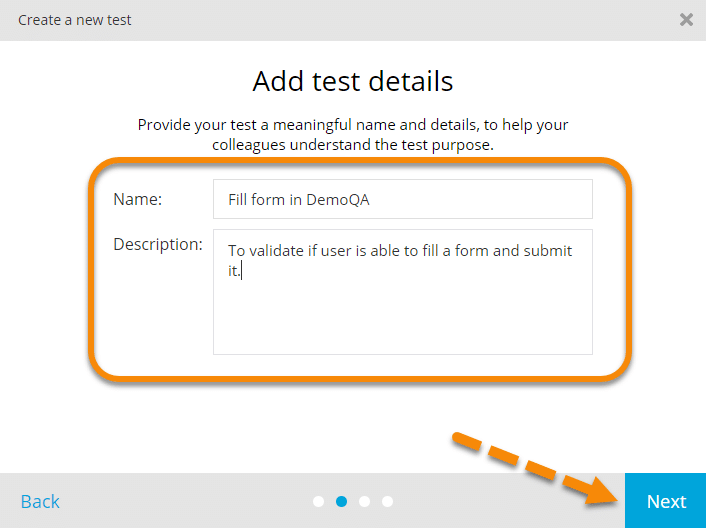
It will open the "Add Test Details" page. Now add the name of the test and test description.
-
Click on the "Next" button to proceed further.
-
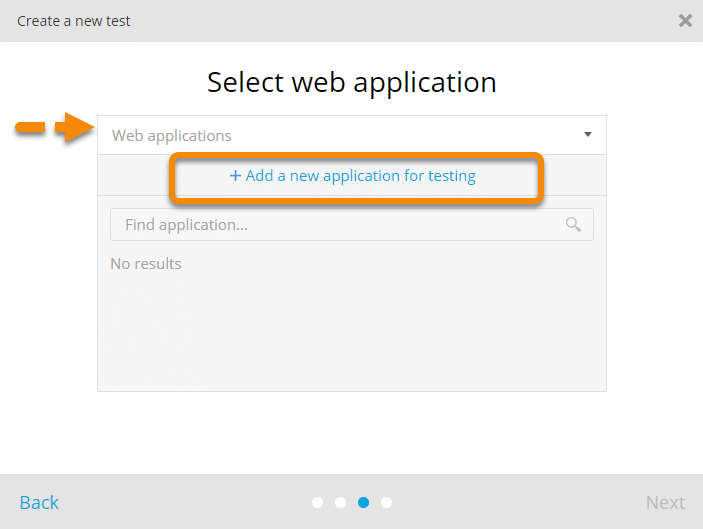
Now, the "Select Web Application" window will open. Click on the "Web Applications" (marked by the arrow in below image) drop down to find your application. If you are creating your first test, click on the "Add a new application for testing" link, as shown in the image below.
-
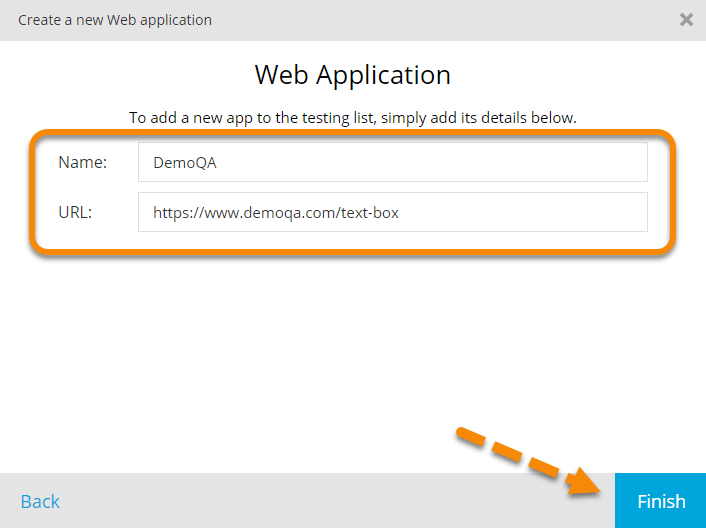
As we are adding the application first time, we will click on the link "Add a new application for testing". It will open the "Web Application" page. On this page, provide the name and URL of your web application and then click on the "Finish" button.
Now your test is ready with the application under test configured. Let's proceed to record the steps under the test case.
How to record a Test with Smart Test Recorder?
As we finish the application setup, Once you click on the "Finish" button in the above section, you will be taken back to select a Web Application page. After that, follow the steps mentioned below, to record the test case:
-
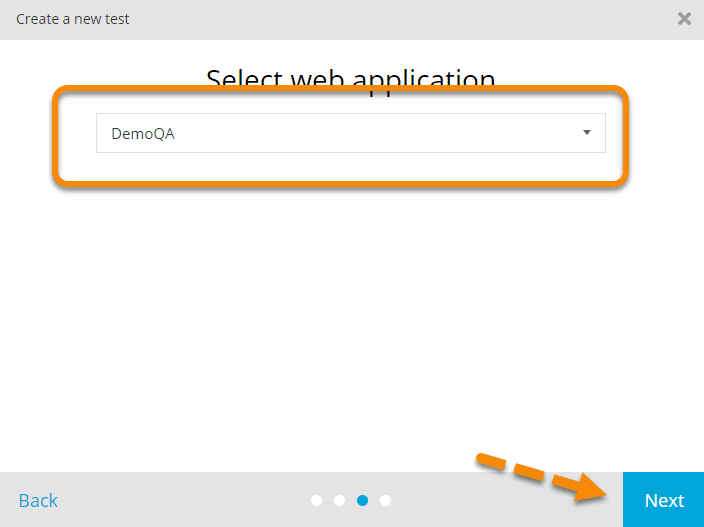
On the "Web Application" page, either your application will get selected by default, or if your application is not selected, use the drop-down to select it, as shown below. Then click on the "Next" button.
-
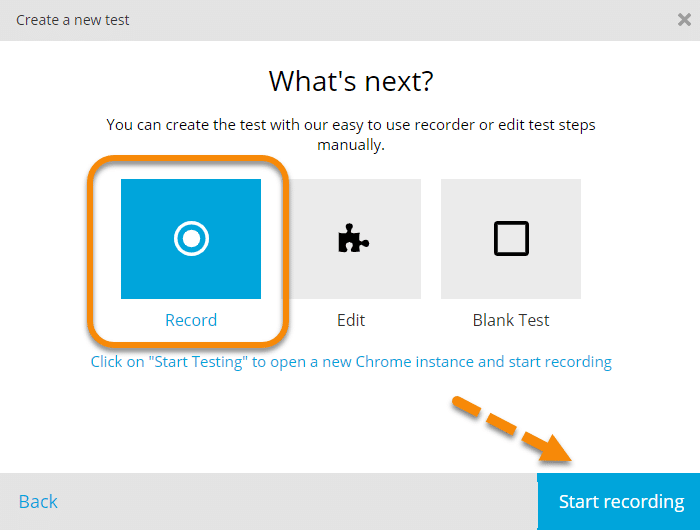
The next button will take you to "What's next?" window. Consequently, here you can begin recording your first test.
-
The recorder will open a new window. You can see the recorder highlighted in the below image.
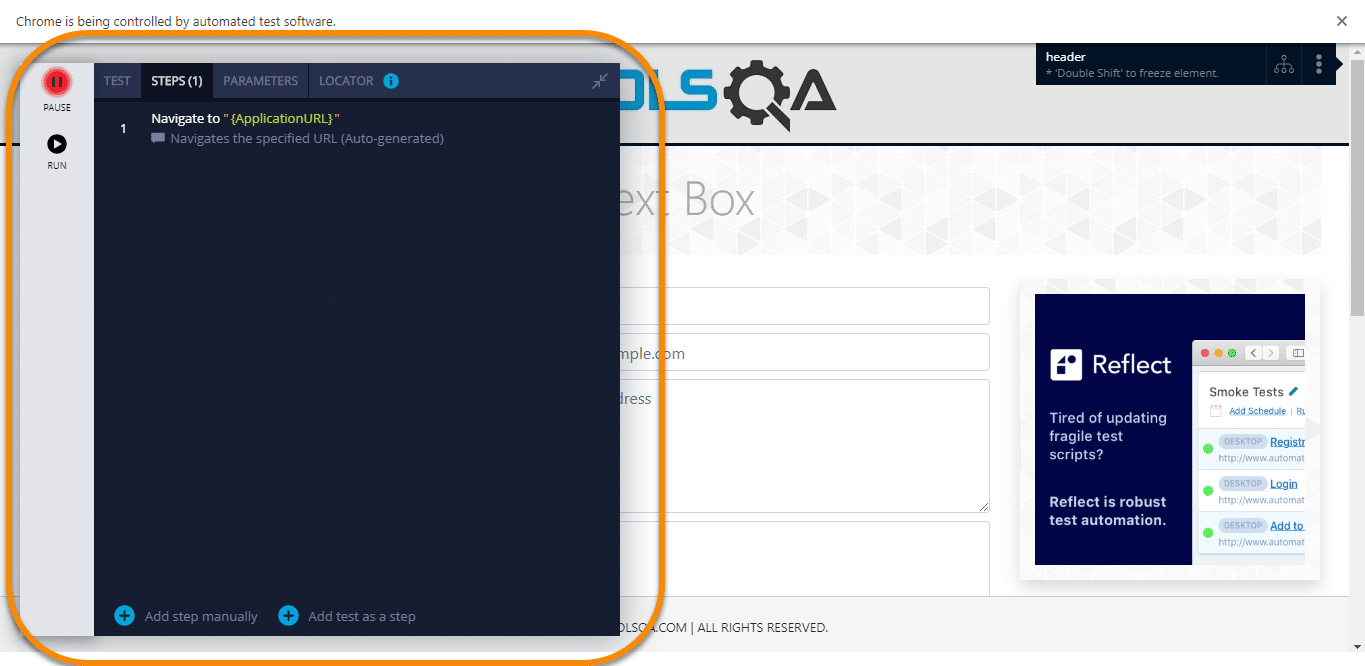
-
Now, all we need to do is perform the necessary actions on the web page, i.e., start filling up the form. Let's put some test data in Full Name, Email, Current Address, and Permanent Address. The recorder will track your actions and will create the corresponding test steps. You can see all the recorded test steps denoted by marker "2" in the below screenshot. You can use the Record button marked by step "1" to pause the recording, in case there is any action you plan to perform that don't need recording in the test case.
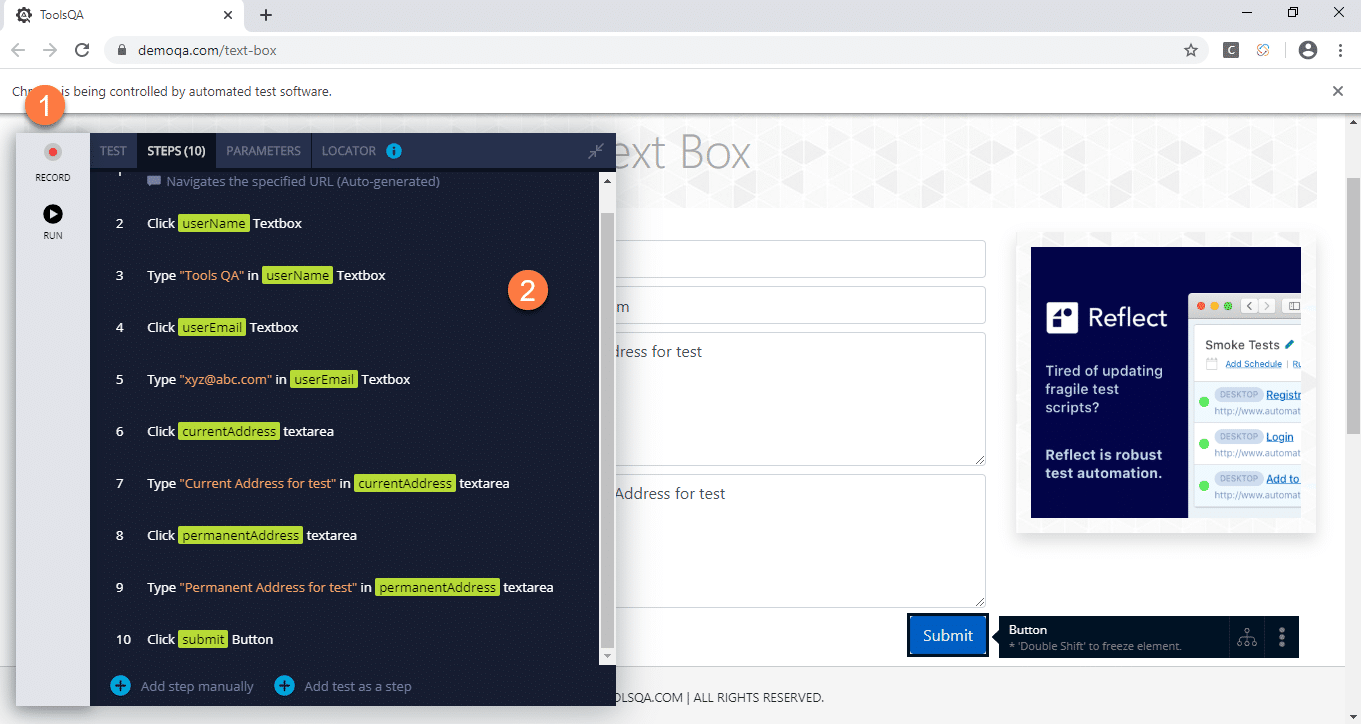
-
Simply close the browser window once the recording is complete, and TestProject will automatically save your progress. Then, go back to the TestProject platform, and you will notice all the steps have been added to your test, as shown below:

Voila! Your first recorded test case in the TestProject platform is complete. Now, let's see how we can replay this recorded test case for validation of the application under test.
How to execute a test in TestProject?
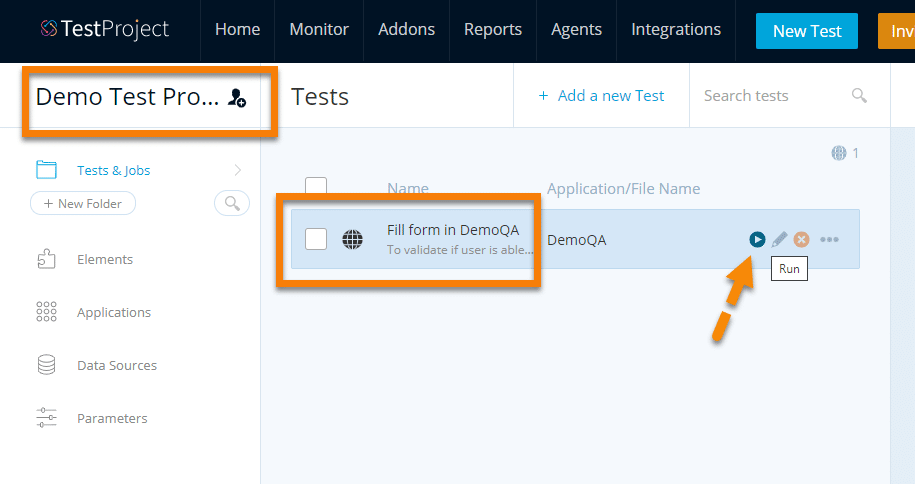
Now once you go to the "Home" page and click on your project to open it, you will see the recorded test present inside it. As you can see in the below image, we have navigated to our project page. It contains our recorded test, along with different options.
Follow the steps as mentioned below to execute the recorded test case:
-
Firstly, to execute a test, we will need to click on the "Run" button. The run button has been highlighted in the below image using an arrow.
-
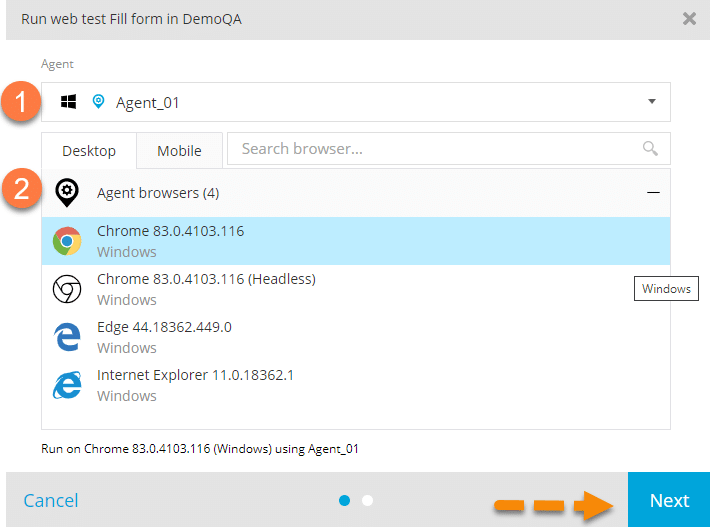
Secondly, click on the "Run" button, and a pop-up window will appear, asking details about your test agent and browser. Select your local agent from the "Agent" drop-down list, as shown in the below image as step 1.
-
The next step is to select a browser. As seen in Step 2, the list will contain all the browsers installed on your local system. Select the browser in which you want to execute your tests and click on the "Next" button.
-
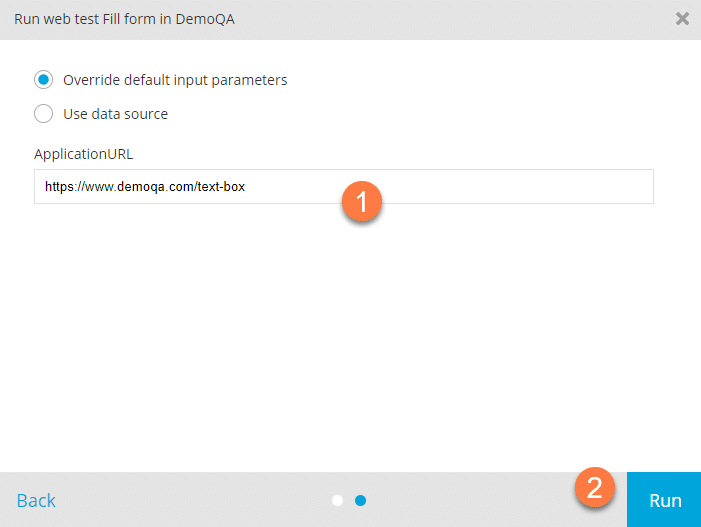
In the next pop-up window, verify the Application URL. After that, click on the "Run" button, as shown in the image below.
-
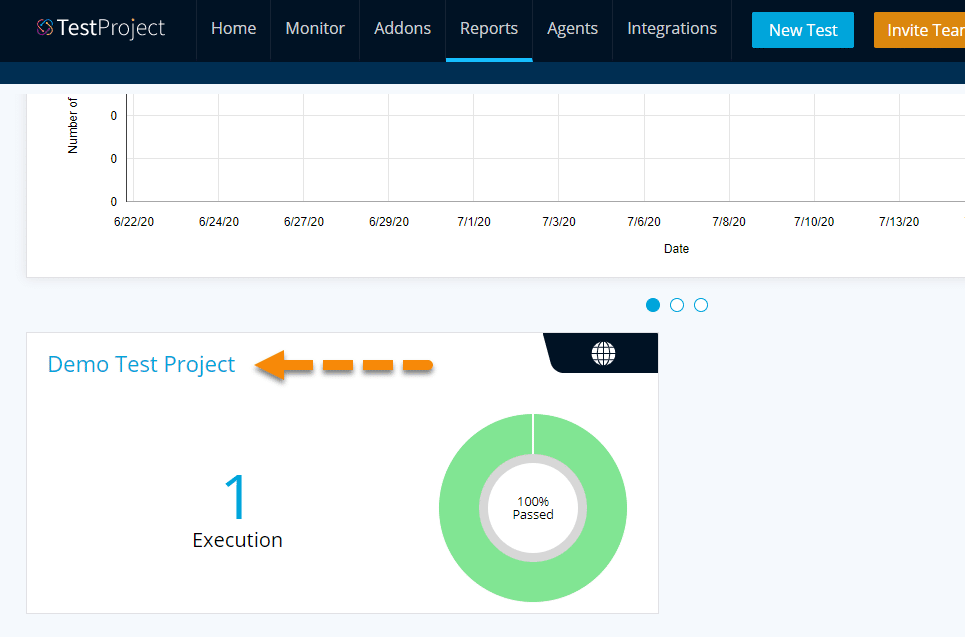
Your test will start executing. To see the report or validate the result, click on the "Reports" tab in the TestProject. Scroll down a little, and you will see your project name, as shown below.
-
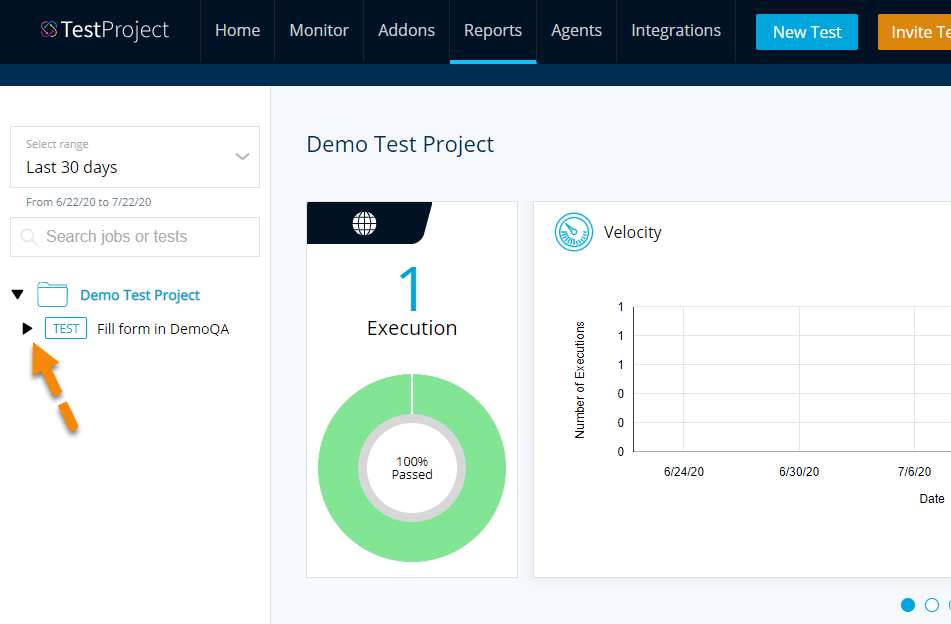
Click on the Project, to get the detailed report as shown below:
-
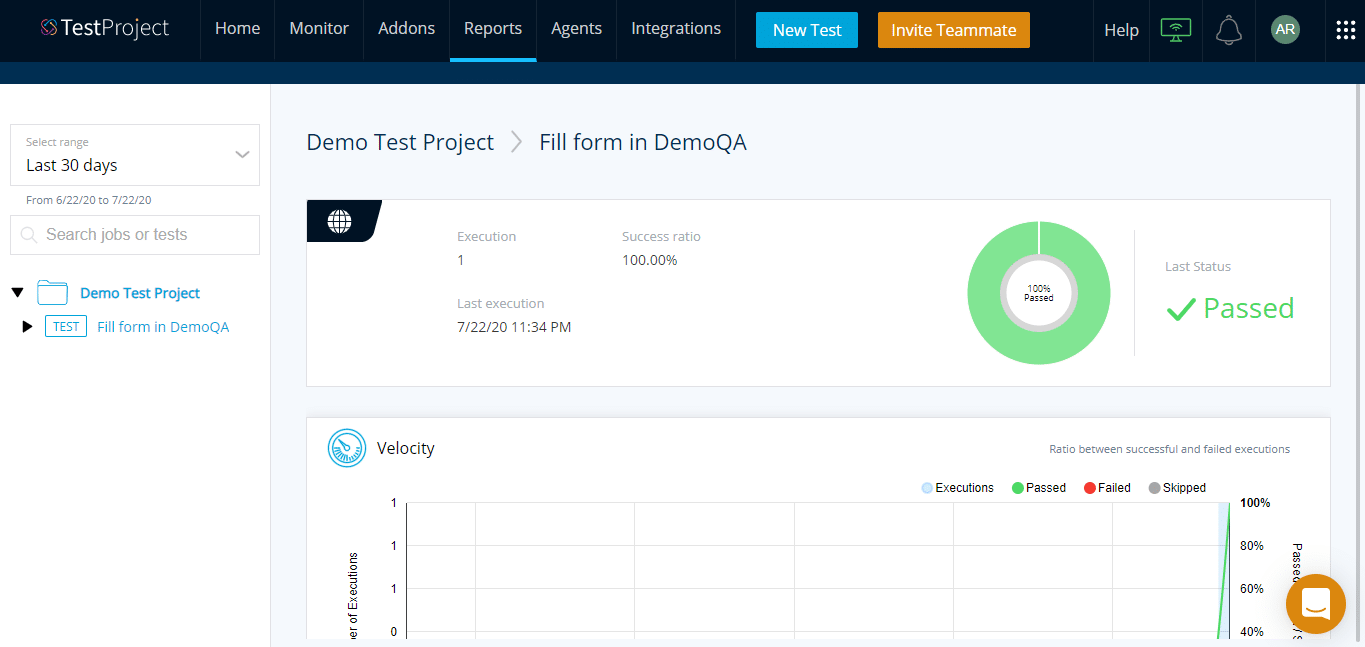
Click on the test name to view test details. We can easily view the details of test case execution here. Additionally, we can see execution count, last execution, and success ratio for the test. We also have a pie chart depicting the pass/fail for the test case.
-
The report, as mentioned above, gives a holistic idea of the test execution status. In case the user wants to have a detailed analysis of the report, it's achievable by expanding the test. Click on the arrow beside the test; this will open the execution details of the test, showing the date and time of the execution:
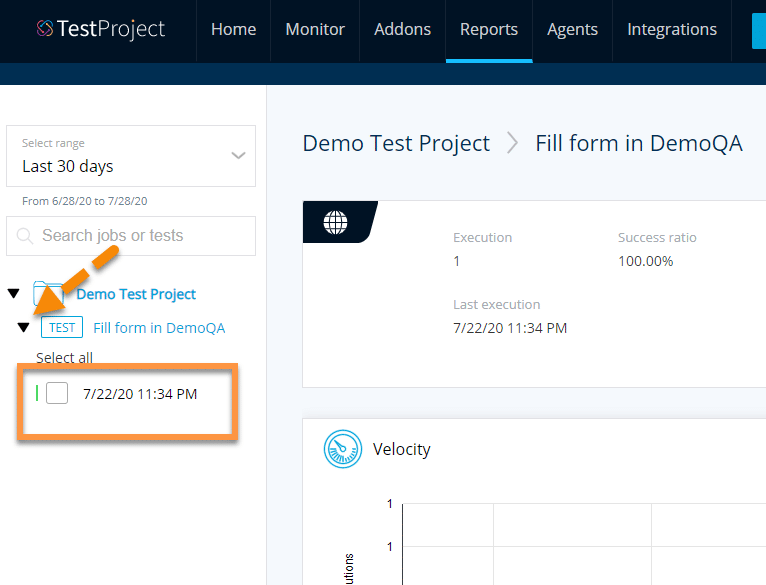
-
As indicated in the above image, if we expand the test case by clicking on the arrow, it will show all the execution details of that particular test. To get more details, click on the date/time of the execution. Another page will open up with all the details, as shown below:
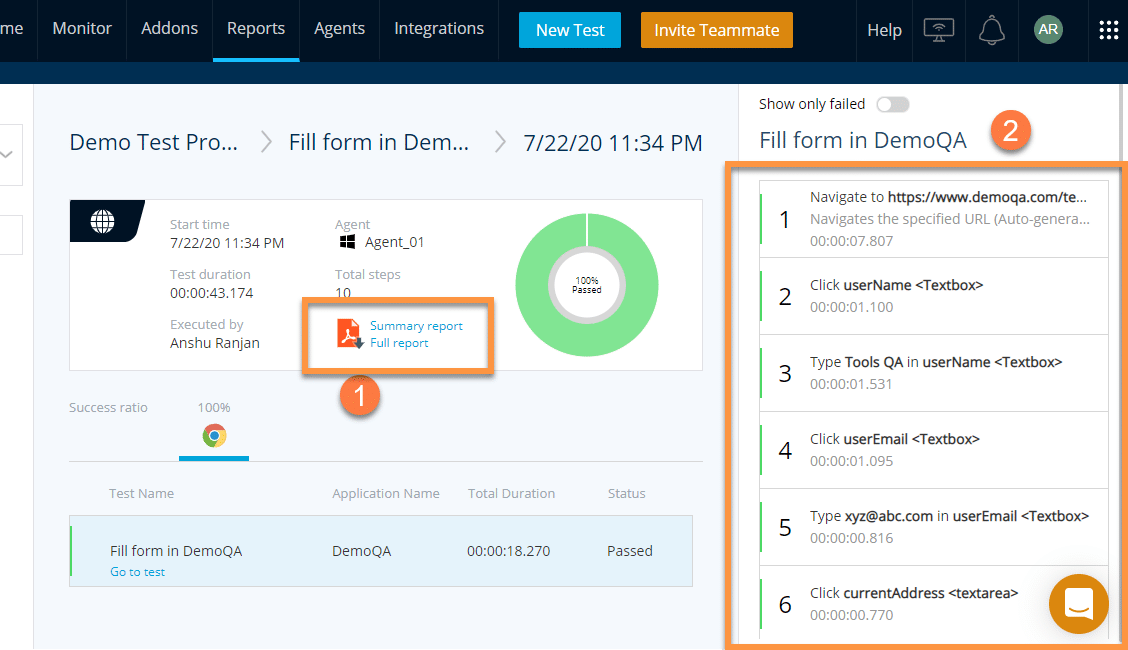
-
As you can see in the above image, we have a detailed execution report. We have all the details like, the agent on which it executed, comprehensive PDF report, browser used, time duration, and step by step marking of pass/fail.
-
PDF report, as denoted by Step 1 in the above image, can be downloaded by clicking on the "Summary Report Full Report" link. It contains all the details shown on this page. The PDF execution report is quite useful if you need to send an execution report to stakeholders or external parties. It creates a detailed view of all the information present in the report page without requiring anyone to log in to TestProject.
As you can see, we were able to successfully able to record and execute a test case using TestProject and can view all the detailed test reports on the Reports Page.
Key Takeaways
- TestProject's smart test recorder offers built-in features to develop automation tests for web and mobile applications rapidly, and even API's.
- Moreover, creating a new test with TestProject is pretty straightforward; we simply need to name the test and assign the web app. Consequently, the recorder will open in a different window and will start recording all user actions automatically.
- Additionally, the built-in element inspector can adequately inspect any web element, suggest various actions, perform validations, gather attributes, and save all elements.
- Also, the Test Editor offers test step customization. Users can add comments, step types, and edit or even parameterize/data-driven test execution. Morever, it can also set screenshot behavior or to set timeouts.
Conclusively, the tutorial for recording your TestProject: Smart Test Recorder finishes. In the next tutorial, we will discuss more details about "test case execution, job creation, and job scheduling".