Now, we understand the necessary details of TestProject, including its various architectural components and the different types of operating systems and applications it supports. Subsequently, we will learn about the installation and setup of multiple parts of the TestProject. As we have learned, TestProject primarily relies on two components: Cloud-based services and TestProject Agents. So, we will learn about How to Install TestProject Agent for both of these components on various supported platforms, by covering the details under the following topics:
- How to create an account with TestProject?
- Also, how to download and install TestProject Agents?
- How to download TestProject Agent from Welcome Screen?
- Also, how to download TestProject Agent from the Agents tab?
- How to install TestProject Agent on Windows?
- And, how to install TestProject Agent on Mac?
- How to setup TestProject Agent to work with TestProject Platform?
- How to run TestProject Agent on Windows?
- And, how to run TestProject Agent on Mac OSX?
- How to register TestProject Agent with TestProject platform?
How to create an account with TestProject?
Creating an account with TestProject is quite simple. The TestProject team advertises a free-forever promise, which means that the TestProject automation framework is free to use for both businesses and individuals - no questions asked.
-
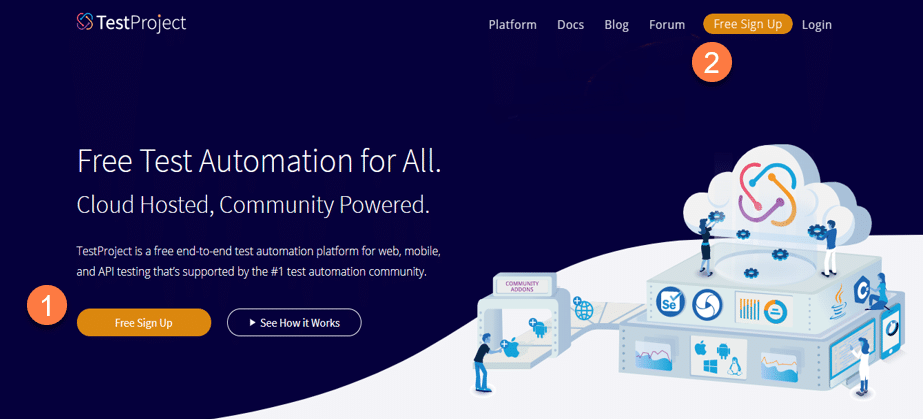
Firstly, to start with the account creation process lets first navigate to the testproject.io website. Consequently, you will go to the homepage, which looks like below. Now, click on either of the “Free Sign Up” button present on the page.
-
Secondly, once you click on the “Free Sign Up” button denoted by marker "1" or "2" in the above snippet above, it will take you to the “Create your free account” page.
-
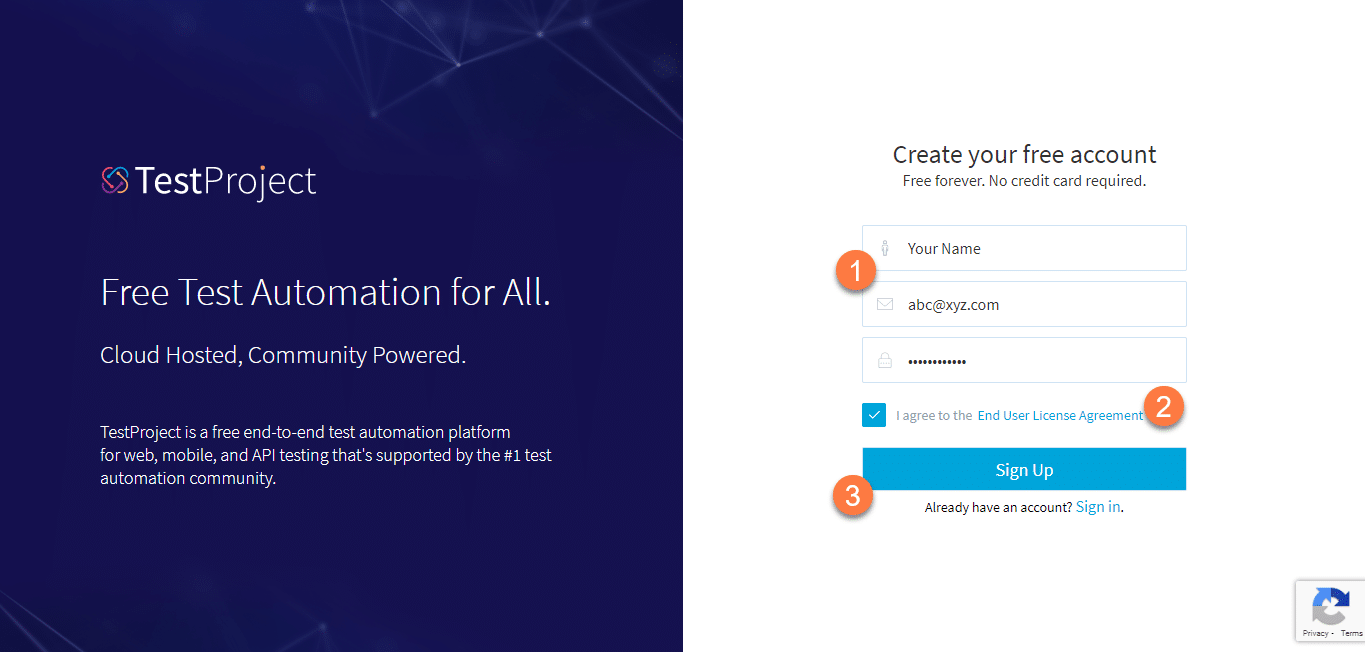
Thirdly, TestProject doesn’t require much information to get started. Provide your full name, email id, and password of your choice. Additionally, do follow the minimum password criteria mentioned for the password selection.
-
Once done, agree to the terms and conditions. After that, click on the “Sign Up” button.
-
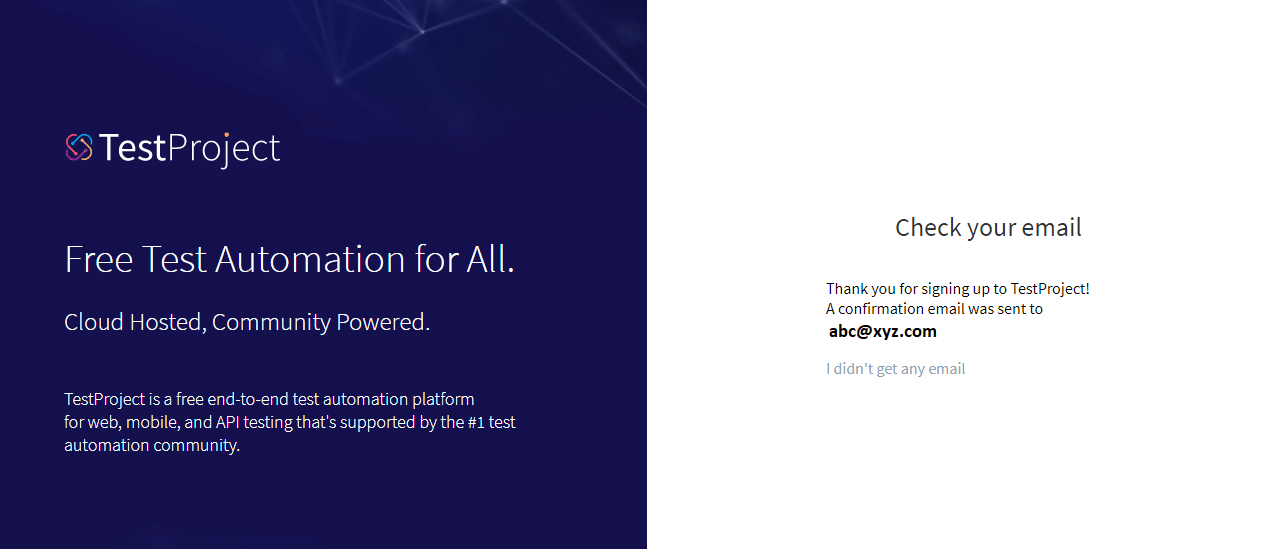
After that, once you click on the “Sign Up” button. You will get an email on your email id, and you will get the following “Check your email” instruction with your email mentioned.
-
Now, navigate to your email inbox. Subsequently, you will find an email with the subject line “Welcome to TestProject.io Automation Platform! - Please confirm your email” from [email protected]. Click on the “Confirm my email” button, as indicated in the below image.

-
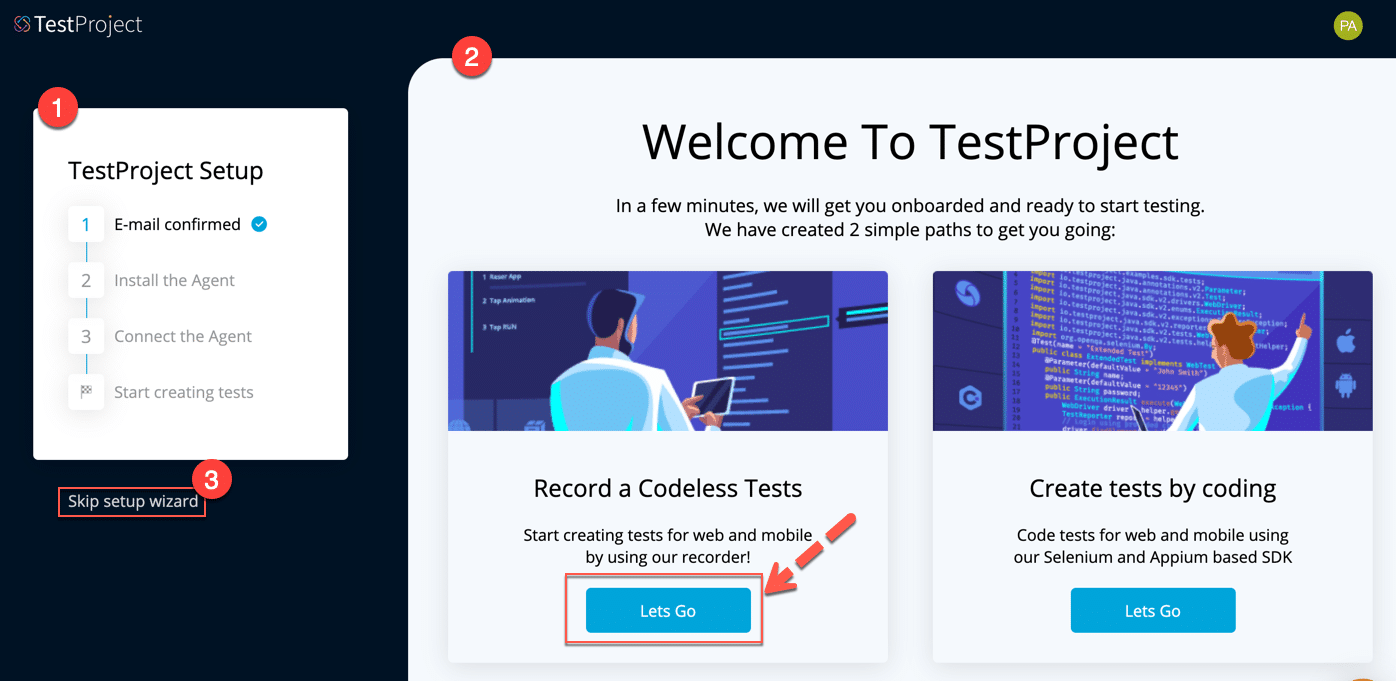
Finally, it will take you to the Welcome to TestProject page, as shown in the image below, where you will find different options available to guide you through the setup of TestProject on your system.
- The first section, marked by step 1, shows the steps that you need to perform to complete the TestProject setup on your machine.
- The main section has two parts; select the first option if you want to create a codeless test or the second one if you're going to use code to create your test. Based on your selection, the setup process will guide you through the relevant steps. For this tutorial, we will explore the codeless test option.
- Click on the link "Skip the wizard"to skip the wizard and jump straight into TestProject. We don't recommend this option, as the wizard will help with getting your agent installed and connected.
-
After that, click on the "Let's Go" button in the Record a Codeless Test section from the given page.
-
It will take you to the second step, "Install the Agent " in the TestProject setup, and "Download the Agent" page will open.
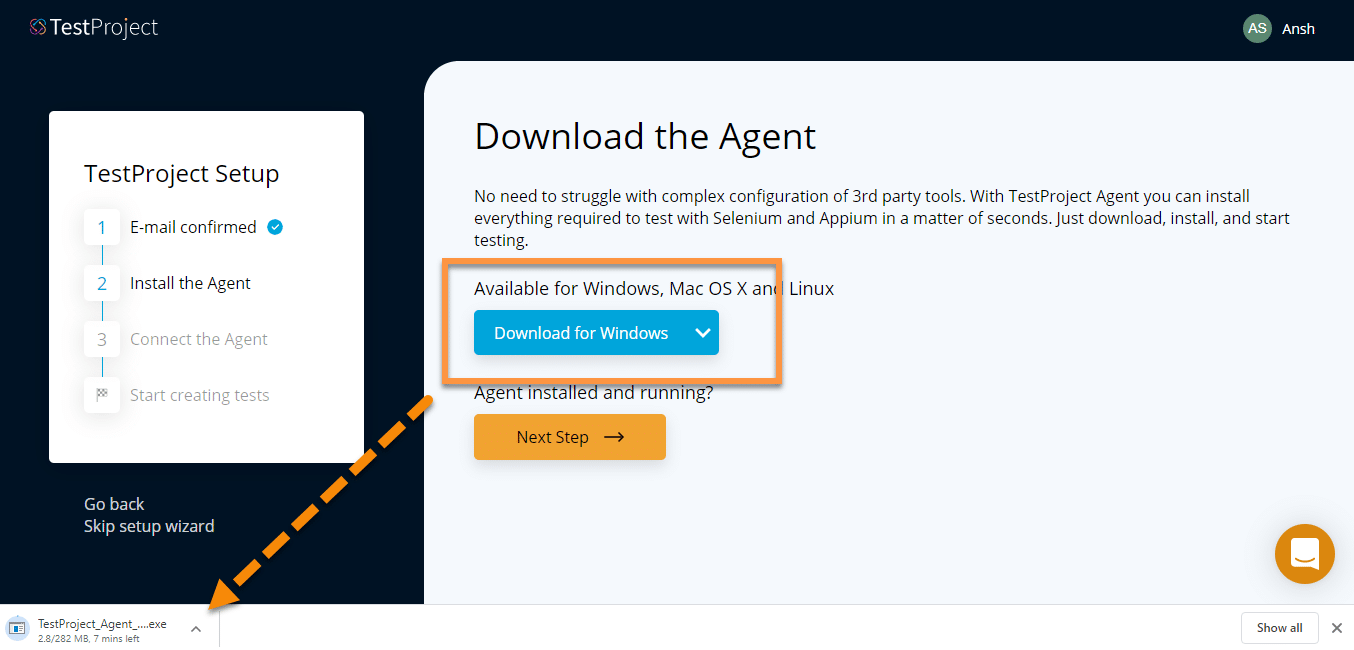
As marked in the above image, the next step is to download the proper agent for your machine and install it. Consequently, we will discuss more on this in the next section.
How to Download and Install TestProject Agents?
Installation and setup of TestProject on your local machine are unique when compared to other traditional test automation tools. In addition to that, TestProject comprises two different components, the TestPrject Platform, which is the web application version, and the TestProject Agent, which has to install on the local system.
Once you finish creating an account with the TestProject, you will need to install the TestProject Agent on your local machine to be able to create and execute tests locally. Moreover, the estProject Agent allows the TestProject platform to interact and communicate with the local system to run tests.
There are two ways to install the TestProject Agents:
- First, download the TestProject Agent from "Download the Agent" Screen. (This option will be available for the first-time login only).
- Second, download the TestProject Agent from the Agents Tab.
How to download the TestProject Agent from Welcome Screen?
Once you are on the Download the Agent page, follow the steps as mentioned below to download the TestAgent:
-
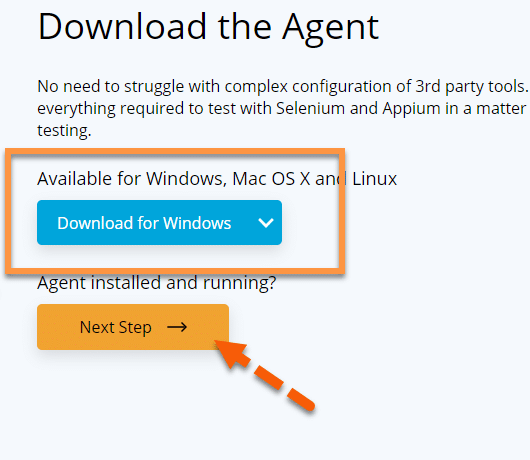
Firstly, from the “Download the Agent” screen, click on the “Download for Windows” button as marked in the below image. It will start the download, as shown in the image.
-
Secondly, we can also use the "Download for Windows" drop-down for downloading Mac OS X and Linux agents. Also, TestProject should automatically detect and suggest the compatible agent for your local machine.
-
Finally, once downloaded, the installation file can install the agent on our machine.
How to download TestProject Agent from the Agents tab?
Another way to download and install the TestAgent is by using the Agents tab in the TestProject platform. It is as in the below image.
-
Firstly, click on the “Agents” tab in the TestProject home page. Once clicked, it will take you to the Agents page. Once on the page, click on the "Download Agent" button, as shown in the below image.

-
Secondly, select the "Targeted Operating System" from the Drop-down (Shown by marker1) under the "TestProject for Desktop" option.
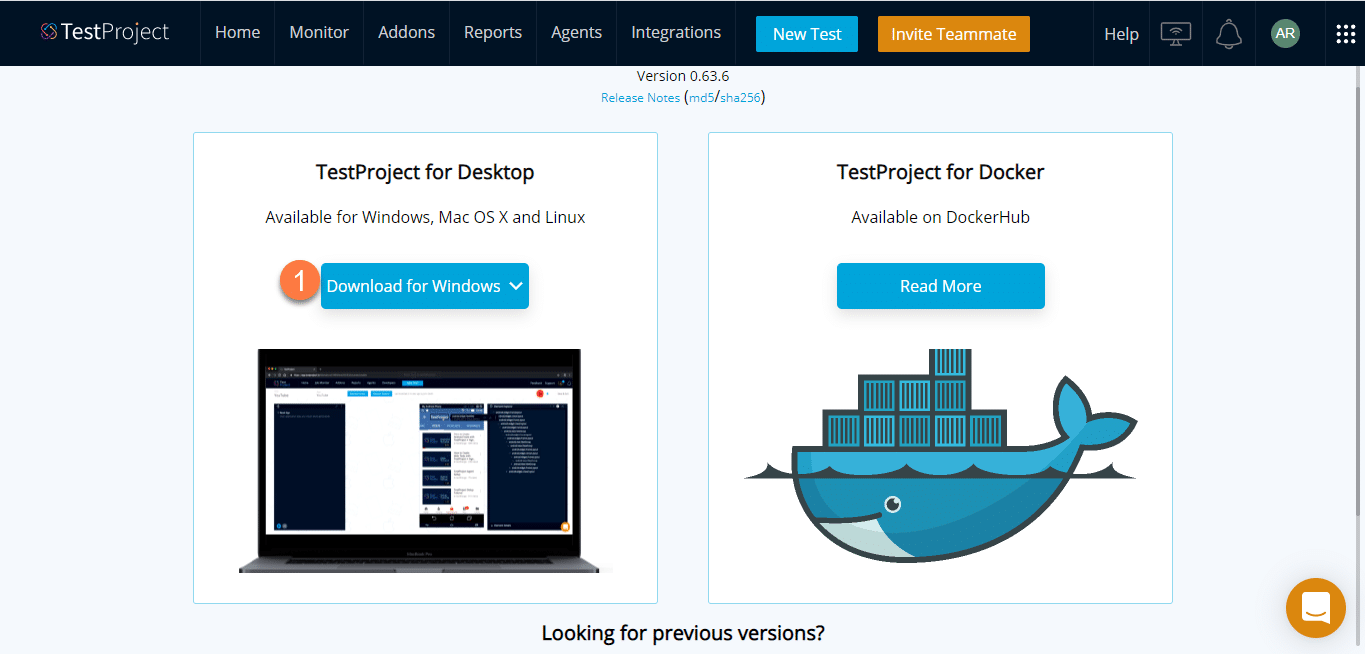
It will download the TestAgent installer for the selected operating system.
Now, after downloading the installer for a specific platform, let's see how to install the TestAgents on specific platforms:
How to Install TestProject Agent on Windows?
-
Firstly, once you click on the “Download for Windows”, TestProject Agent will start downloading the Windows operating system package. As shown in the previous sections, wait for the download to finish before continuing with the installation.
-
Secondly, locate the downloaded file in the local machine. Double-click on the setup files to start TestProject Agent installation.
-
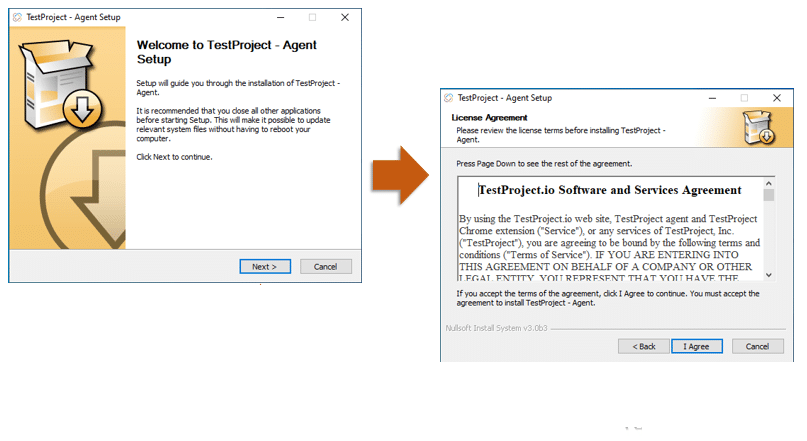
Thirdly, the TestProject Agent setup window will open. After that, click on the next button to navigate to the next page.
-
Fourthly, click on the “I Agree” button to agree to the TestProject.io Software and Services Agreement, as shown in the below image.
-
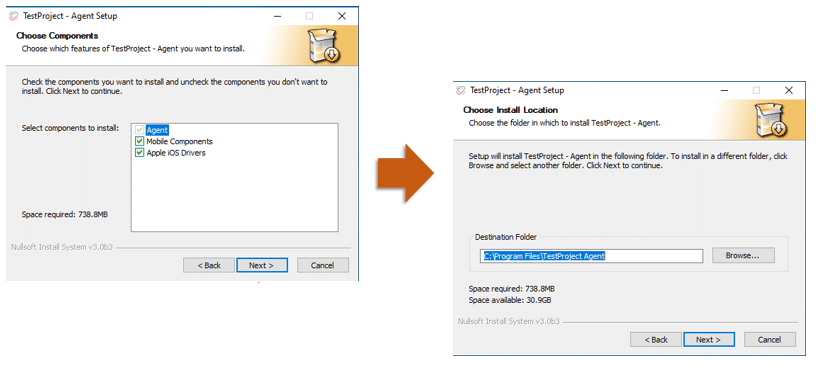
After that, click on the “Next” button in the “Choose Components” window. Subsequently, it will take you to the next page, where you will need to select the installation location.
-
After that, provide an installation location and click on the “Next” button.
-
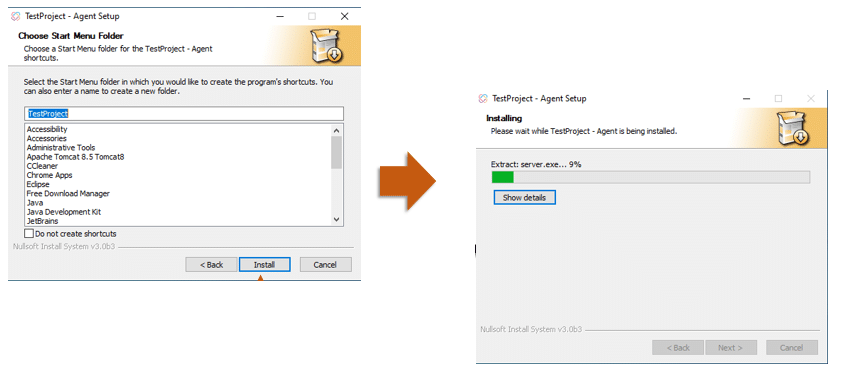
Select the start menu folder under which you want your TestProject Agent. If you're going to choose the default, directly click on the “Install” button.
-
Finally, the installation will start, and you can check the progress bar to check the current installation status.
-
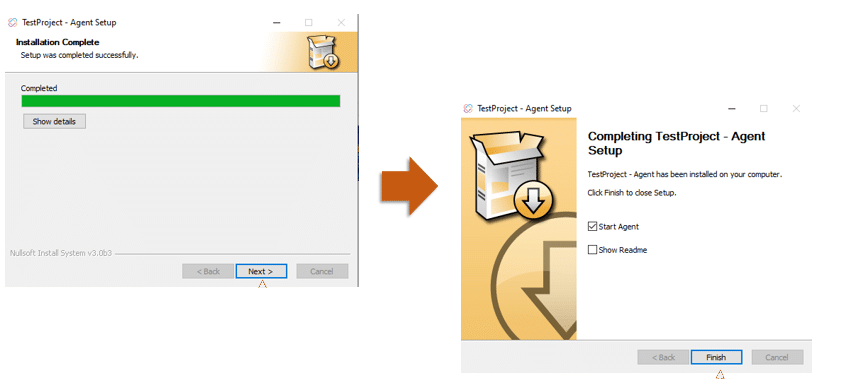
Wait for the installation to complete. Consequently, once the installation finishes, click on the “Next” button.
-
It will take you to “Completing the TestProject –Agent Setup” window. Finally, click on the “Finish” button to complete the installation and close the setup window, as shown in the image below.
It completes the installation and setup of the TestProject Agent on the Windows operating system.
How to install TestProject Agent on Mac?
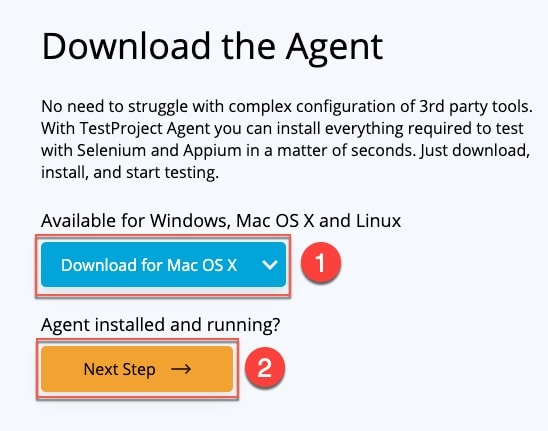
Installing the TestProject Agent for Mac is not all that different from installing it on a Windows machine. From the drop-down, select “Download for Mac OS X” as shown below:
-
As highlighted by step 1, select the operating system as Mac OSX.
-
Click on the "Next Step" button as highlighted by step 2, and the download will start immediately.
-
Locate the downloaded file in the local machine. Double click on the setup file to begin TestProject agent installation.
-
TestProject Agent setup window will open. Click on the “I Agree” button to agree to the TestProject.io Software and Services Agreement.
-
After that, drag & drop the agent to your applications to install, as shown in the below image.
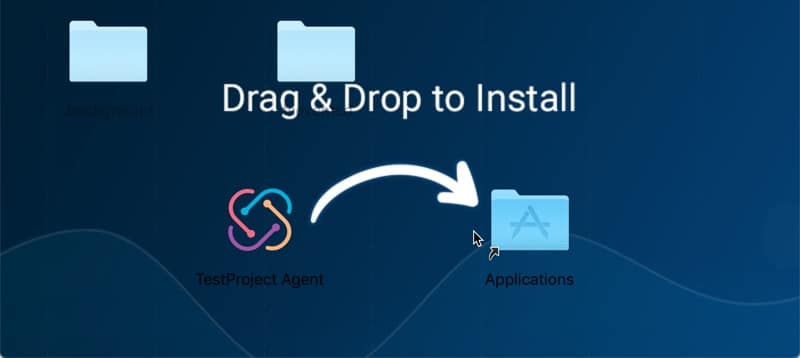
It completes the installation and setup of the TestProject Agent on the Mac OSX operating system.
How to Set up the TestProject Agent to work with the TestProject Platform?
Once you have installed the TestProject Agent on your system, you will need to login to the https://app.testproject.io/ using the credentials that we entered while creating the account with the TestProject. As a first step for setting up the TestProject Agents, we need to run and then validate that the TestProject Agent is running on the machine. Let's see how to achieve the same on various platforms:
How to run the TestProject Agent on Windows?
Follow the steps as mentioned below to run the TestProject Agent on the Windows operating system:
-
Select and run the TestProject Agent from the desktop icon or navigate to TestProject Agent using the start menu.
-
Once it starts running, you will be able to seethe TestProject Agent icon in the System Tray of the Window.
-
Clicking on it will open a small window showing current status, as shown in the below image.

Now, we can quickly validate whether the TestProject Agent is running on the Windows machine or not.
How to run the TestProject Agent on Mac OSX?
As we know, the TestProject Agent is available as an application in the Applications folder. Follow the steps as mentioned below to launch the TestProject Agent on a Mac:
-
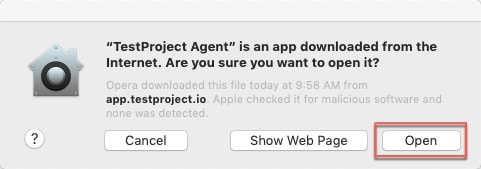
Double click on the application, and it will open a pop up indicating that the "TestProject Agent" is an app downloaded from the internet. Are you sure you want to open it? As displayed below, if you are running the agent/application for the first time as we are doing now.
-
Click on the open and button, and it will start the agent, which can be verified from the status bar at the top, click on the "TestProject Agent" icon:

-
As shown, the "TestProject Agent" is now running.
Once we are sure that the TestProject Agent is up and running, we need to register those agents with the TestProject platform. Let's continue to see how to complete this process.
How to register TestProject Agent with TestProject platform?
As we saw, there are two ways to download TestProject Agent, so similarly, TestProject provides two flows to register the already installed agents.
- The continuation of flow from registration to downloading agents via the welcome screen, so you can register this agent, post-installation.
- In the TestProject Platform post-registration flow, again via agents link.
Both these processes are in detail below.
How to register an agent for the first time using the TestProject Setup screen?
-
Once you have downloaded and installed the test agent using the "Download for Windows" button in the Download the Agent page. Click on the "Next Step" button as marked by the arrow in the below image.
-
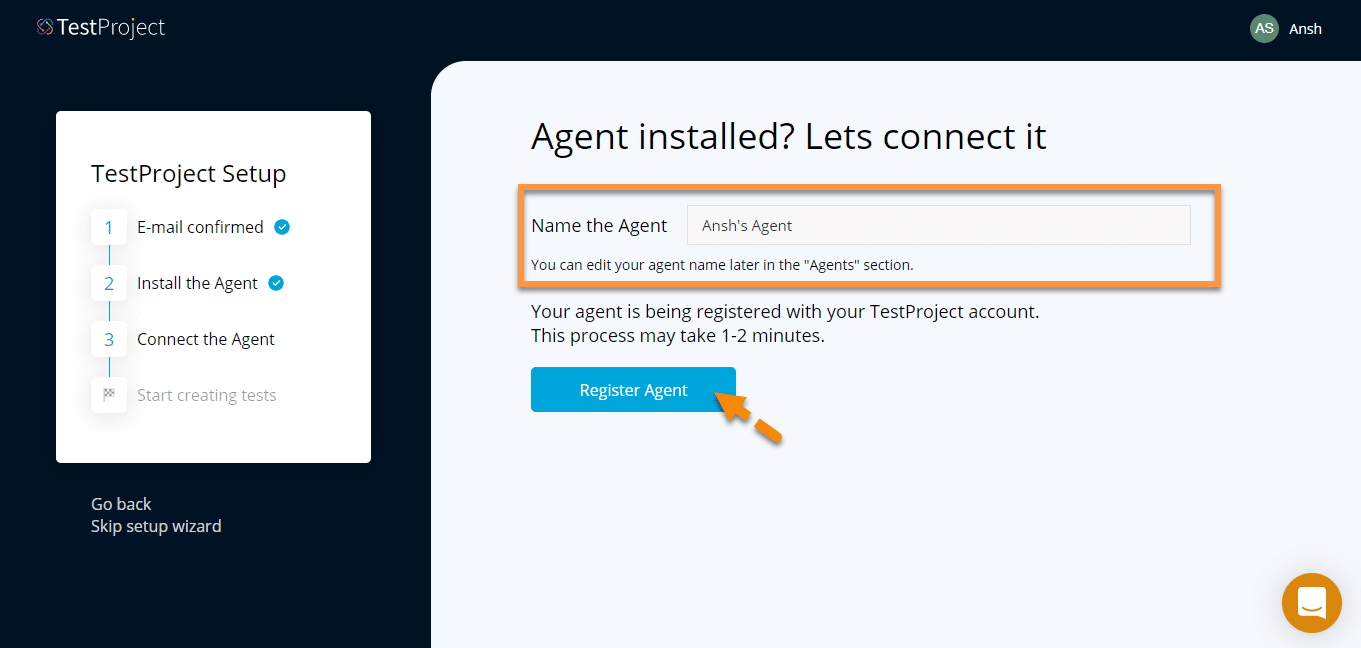
Once clicked on the next step button, this will take you to the next setup step, "Connect the Agent".
-
On the page, you can provide a name to your agent as marked in the image, or you can choose to keep the default name as provided by the TestProject. Note: TestProject requires that agents each have their unique name.
-
Click on the "Register Agent" button as marked by the arrow, and the system automatically will detect any online TestProject Agent on your local machine.
-
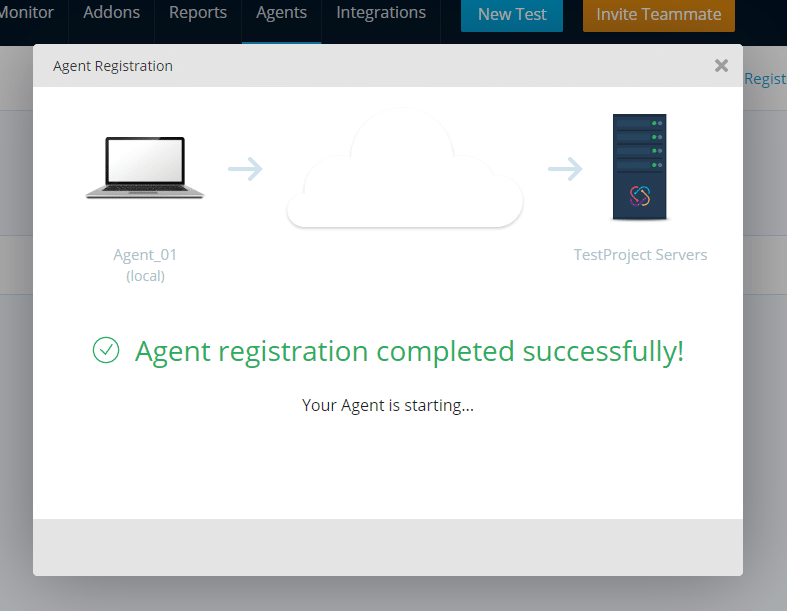
Once the agent registration is complete, "Agent registration completed successfully!" message will appear.
-
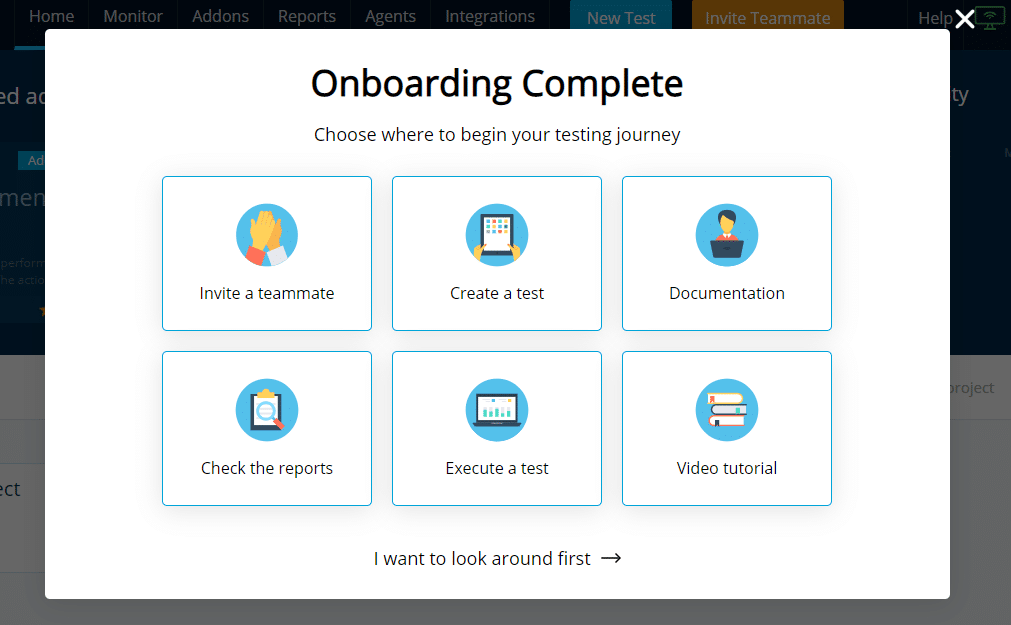
Once the above message has appeared, the page will automatically navigate to the next step. Now the "Onboarding Complete" pop-up will appear with different options for you to choose from, as shown in the image below.
-
You can choose from inviting a teammate to starting your tests, reports, or even learning more about TestProject by going through documentation and video tutorials.
-
You can also choose to skip these tutorials by selecting "I want to look around first" link at the bottom to take your journey through the TestProject application.
How to register an agent from Agents Tab?
Login to the TestProject cloud platform and navigate to the Agents tab in the TestProject platform and follow the steps below to register the Agent:
-
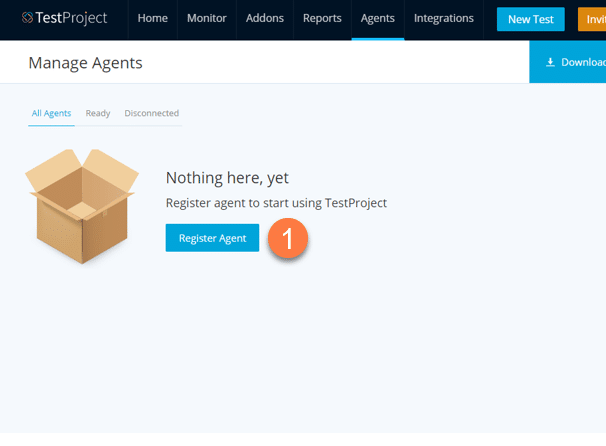
In the Manage Agents page, look for the “Register Agent” button, as shown at "1" in the image below. After that, click on the button.
-
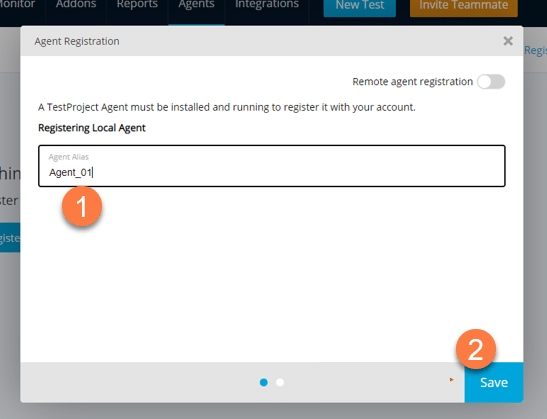
The “Register Agent” button will open an “Agent Registration” pop-up window. In the “Agent Alias”, text box provide an alias for the agent running on your system. You can give an alias such as "Agent_01" at designated by marker "1". It will identify the agent for your system. Click on the “Save” button, as shown by marker "2" in the image below.
-
The Agent Registration page will then display the status of connecting to an active agent on your local system. Once we find the agent, it will establish a connection with the agent, and “Agent Registration completed successfully!” message will be displayed as shown in the image given below.

-
Once the registration completes. The registration window will be closed, and you will navigate back to the “Manage Agents” page, as shown in the image below.
-
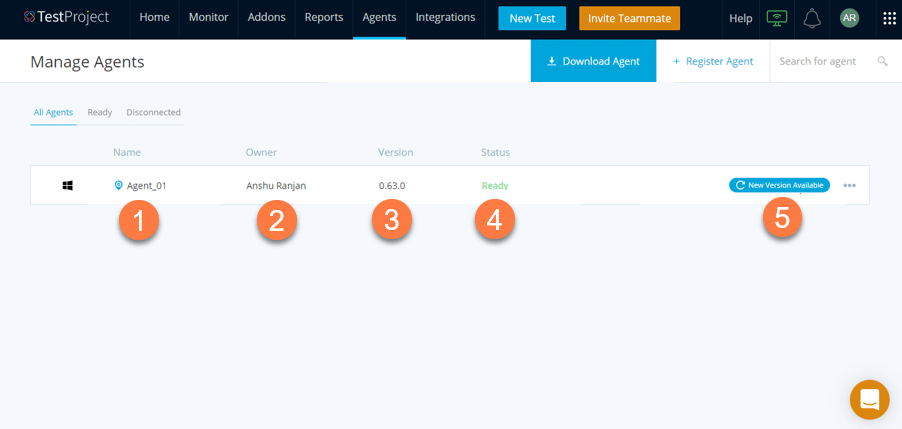
The Manage Agents page will now have details of the registered agent. It will show different details like Agent Name, Owner, Version of the TestProject Agent software installed and status of the agents as denoted in the image below by markers "1", "2", "3", "4" respectively. It will also show if there is any newer version of the TestProject Agent software available. The latest version can be downloaded directly from here, as shown in the below image at "5".
-
You can see the details as highlighted, click on the platform icon for more detailed view, as highlighted below:
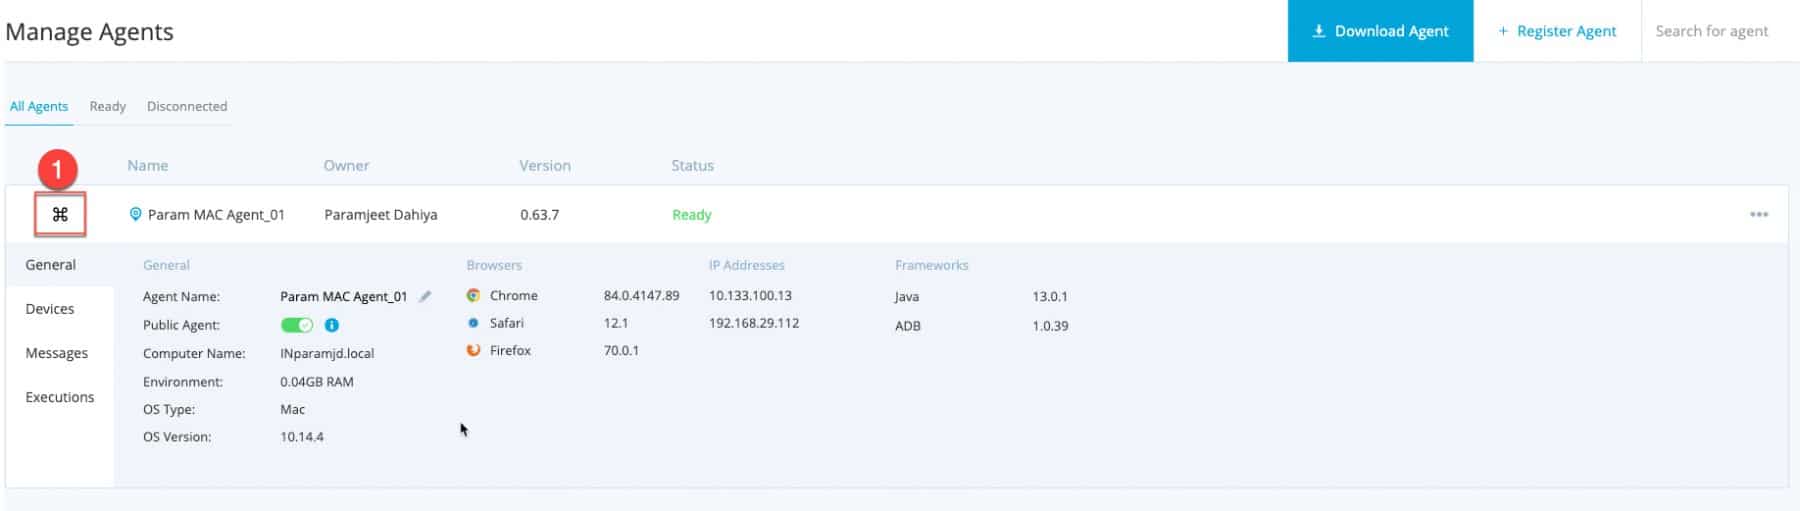
Using this, you can view all the details of the agent, and your agent is now ready for the execution of test cases.
Note: In this article, we have covered details for the installation and setup of a conventional local agent only. We will include the details of Docker and Remote Agents in future articles.
Key Takeaways:
- To start with TestProject, first, we need to create a free account. Once we build it, the rest of the installation process is relatively straightforward.
- With the TestProject account, we can download the TestProject agent installation file version designed for our local operating system (Windows, Mac, or Linux). Once downloaded, the installation process is simple. We can download and install the TestProject Agent software on multiple machines if we so desire.
- The final step of the process is to register the TestProject agent with the TestProject platform. Make sure that the agent is active and running on your local system. Once the TestProject platform recognizes the agent running on your local machine, Agent registration will complete.
Now, we are all done with the basic TestProject Installation and Setup of the TestProject. In the next article, we will look into details on "How to record your first test case with TestProject? "