We know that Jenkins is an automation tool that helps in automating the various parts of the SDLC process. Additionally, all these different parts of the SDLC can be considered as various tasks that need to be accomplished for the delivery of the product/software. So, ideally, Jenkins needs to provide a mechanism to automate all these individual tasks, and that mechanism is known to build jobs in Jenkins. Subsequently, in this article, we will understand the various deep concepts of the Jenkins build jobs, by covering the details under the following topics:
- What are Jenkins jobs?
- How to create a job in Jenkins?
- How to configure a job in Jenkins?
- And, how to run Jenkins job?
- How to trigger another job in Jenkins post-build?
What are Jenkins jobs?
Jobs are the heart of Jenkins's build process. A job can be considered as a particular task to achieve a required objective in Jenkins. Moreover, we can create as well as build these jobs to test our application or project. Jenkins provides the following types of build jobs, that a user can create on a need basis. Consequently, the following image highlights a few of the Jenkins build jobs, which are used very frequently these days:
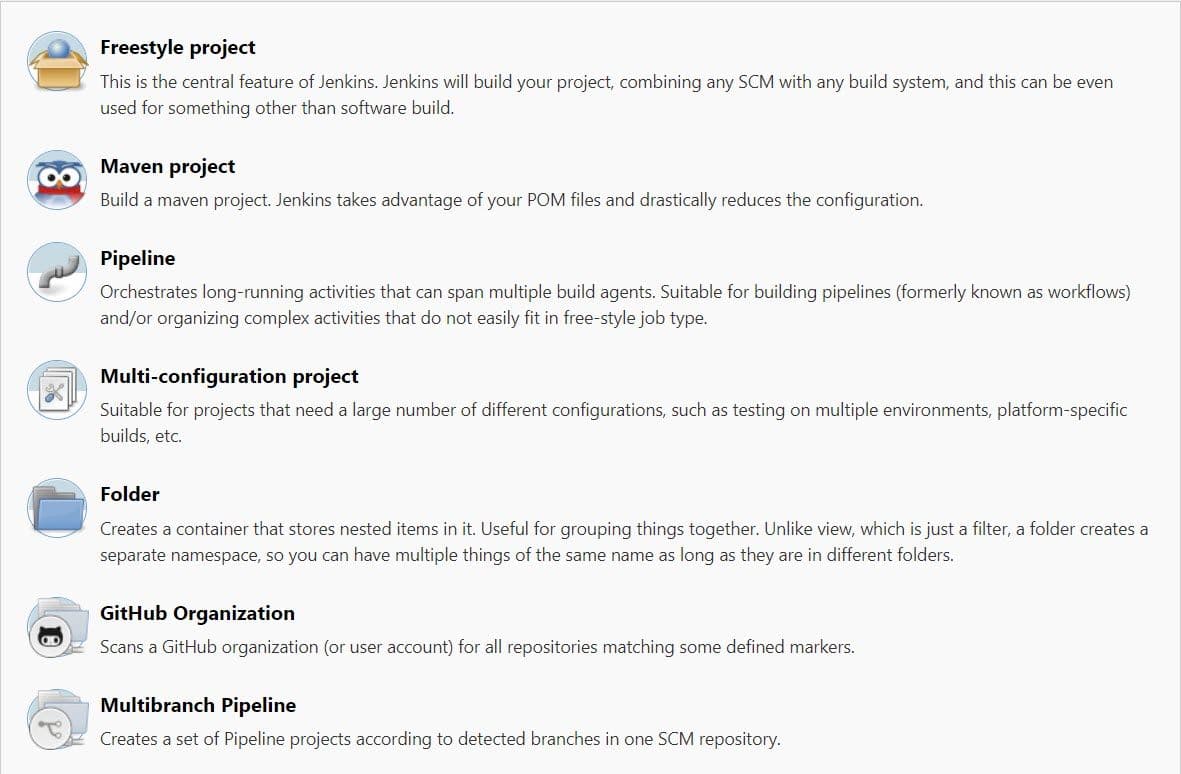
Let's understand the details of these various types of Jenkins build jobs:
| Options | Description |
|---|---|
| Freestyle Project | Freestyle Project in Jenkins is an improvised or unrestricted build job or task with multiple operations. Operations can be a build, pipeline run, or any script run. |
| Maven Project | Maven project is selected for managing as well as building the projects which contain POM files. Jenkins will automatically pick the POM files, make configurations, and run our build. |
| Pipeline | Pipeline demonstrates long-running activities that contain multiple build agents. It is suitable for running pipelines that cannot run through normal freestyle type jobs. |
| Multi-configuration Project | This option is suitable in those conditions where different configurations like testing on multiple environments, platform-specific builds are required. |
| GitHub Organization | This option scans the User’s GitHub account for all repositories matching some defined markers. |
So, that's all the brief introductory aspect of Jobs in Jenkins. In the next section, we will start our journey to create a job in Jenkins.
Note: In this article, we will take the Freestyle job for demonstration. We will demonstrate other types of job in further articles.
How to create a job in Jenkins?
Creating a job in Jenkins is the first part for proceeding towards running any build. To create a standalone job, follow the steps mentioned below:
Step 1: Firstly, login into Jenkins account with valid credentials. After that, click on the "New Item" option in Jenkins dashboard.
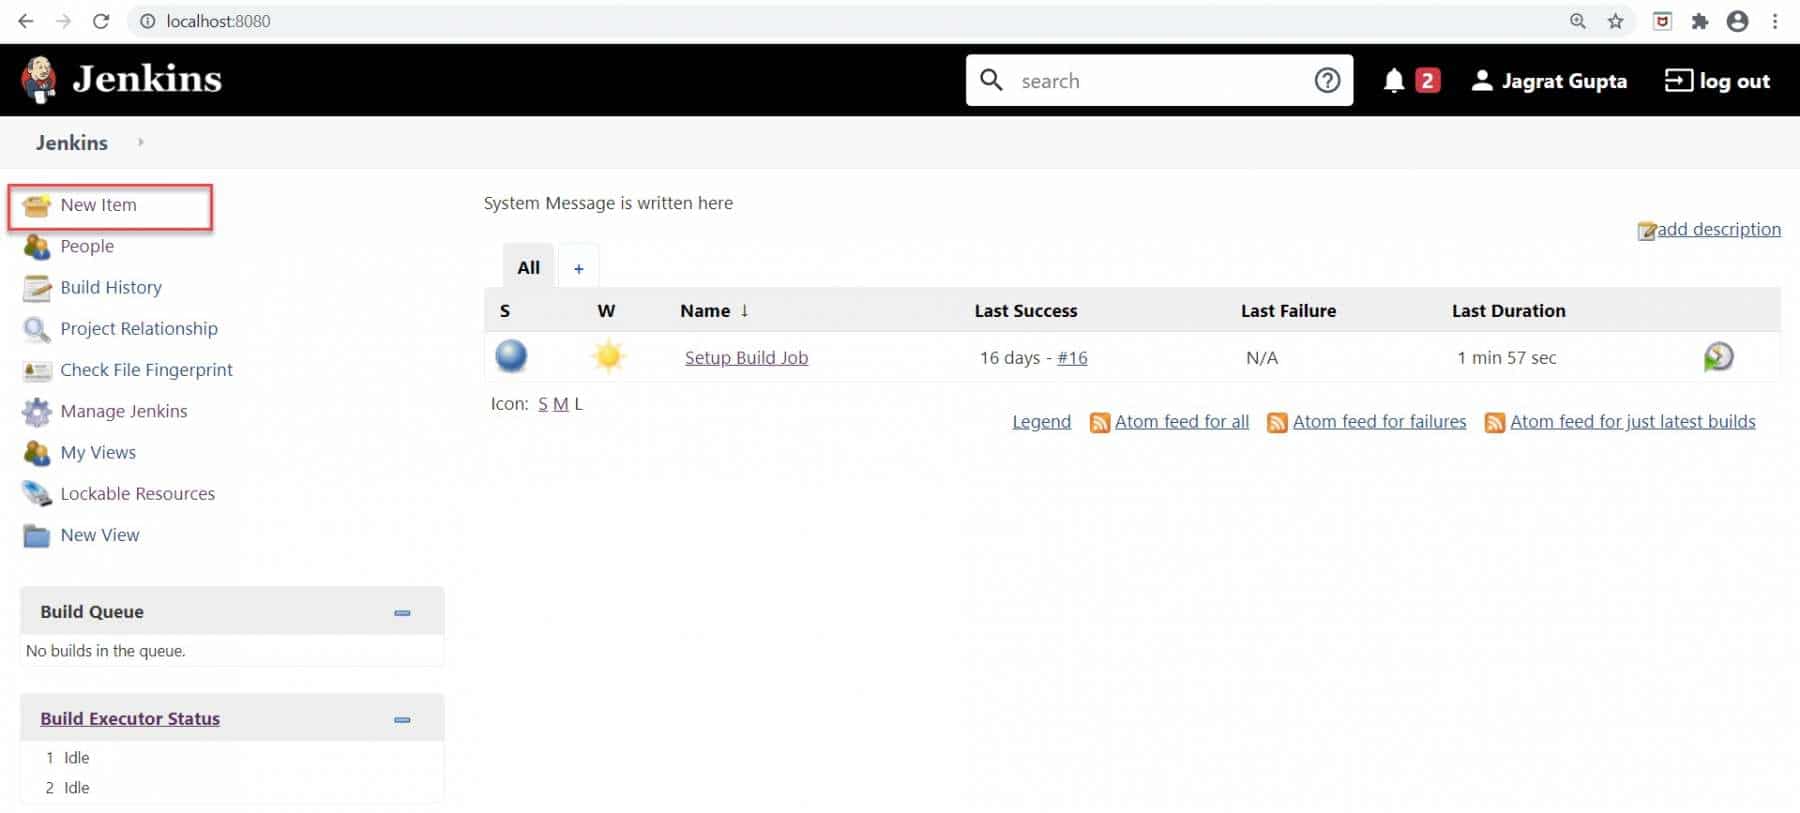
As soon as, we will click, we will be redirected to a new page where we need to fill in the name of the job and select the type of job.
Step 2: Secondly, let's create a Freestyle project to build and run the project stored in the GitHub repository:
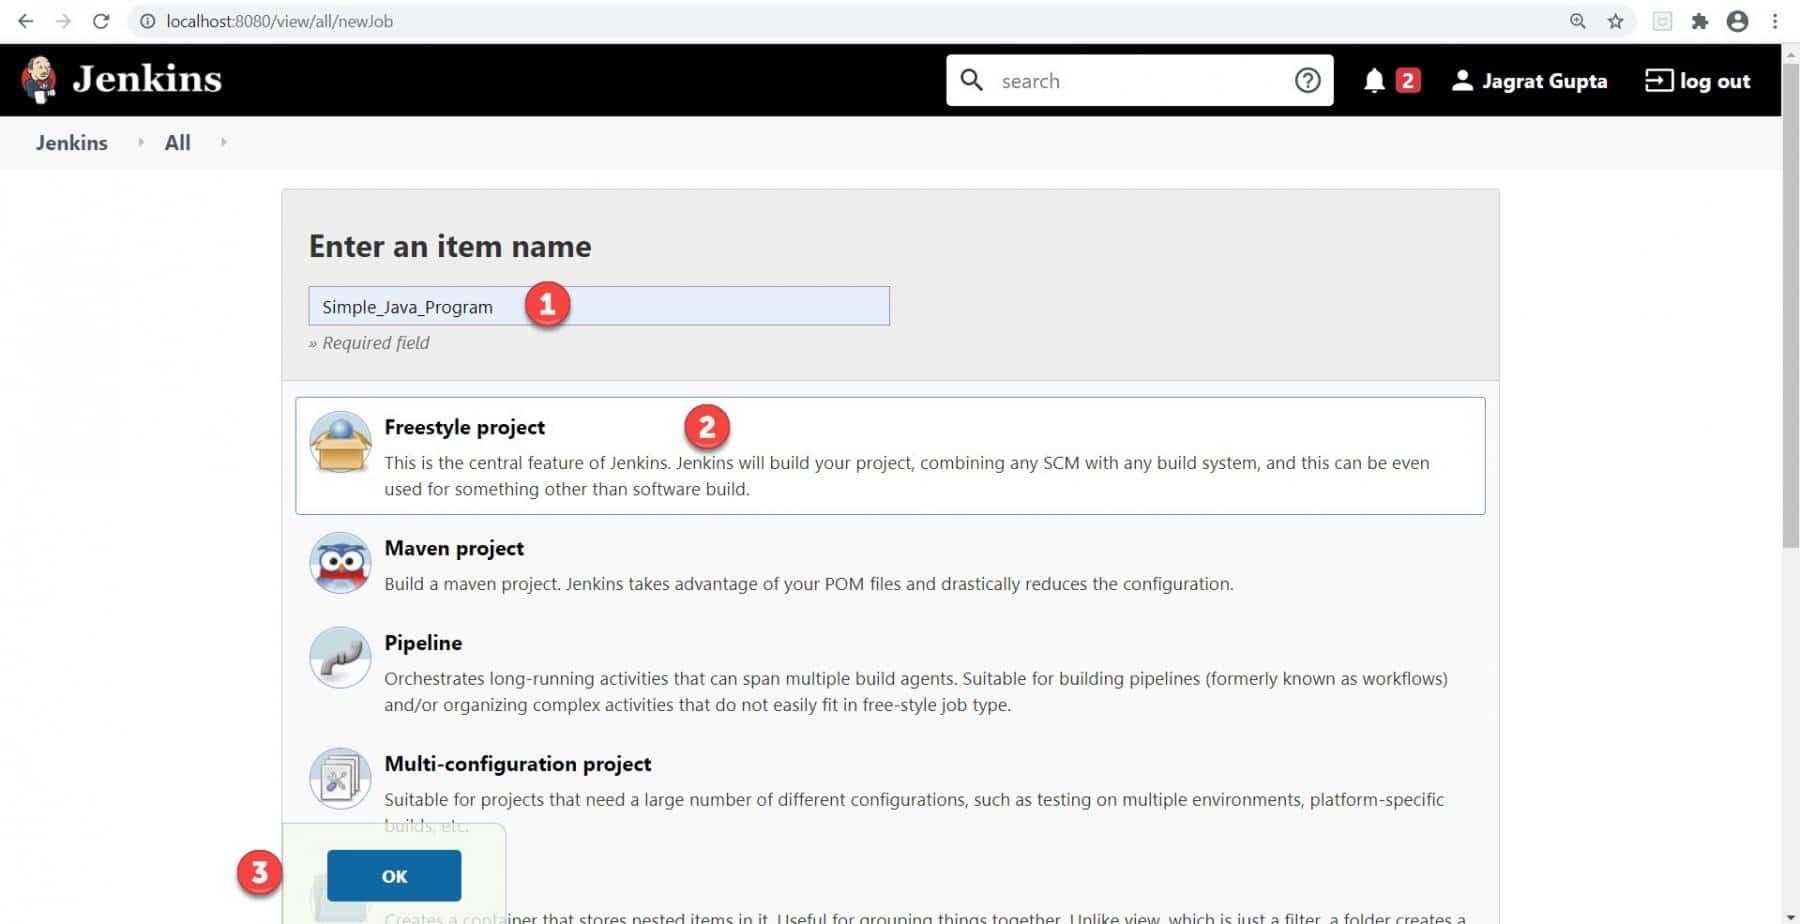
- First, enter the item name.
- Second, select the project type ( I selected the Freestyle project).
- Third, click on the Ok button.
As soon as we click on the OK button, the Jenkins Job will be created.
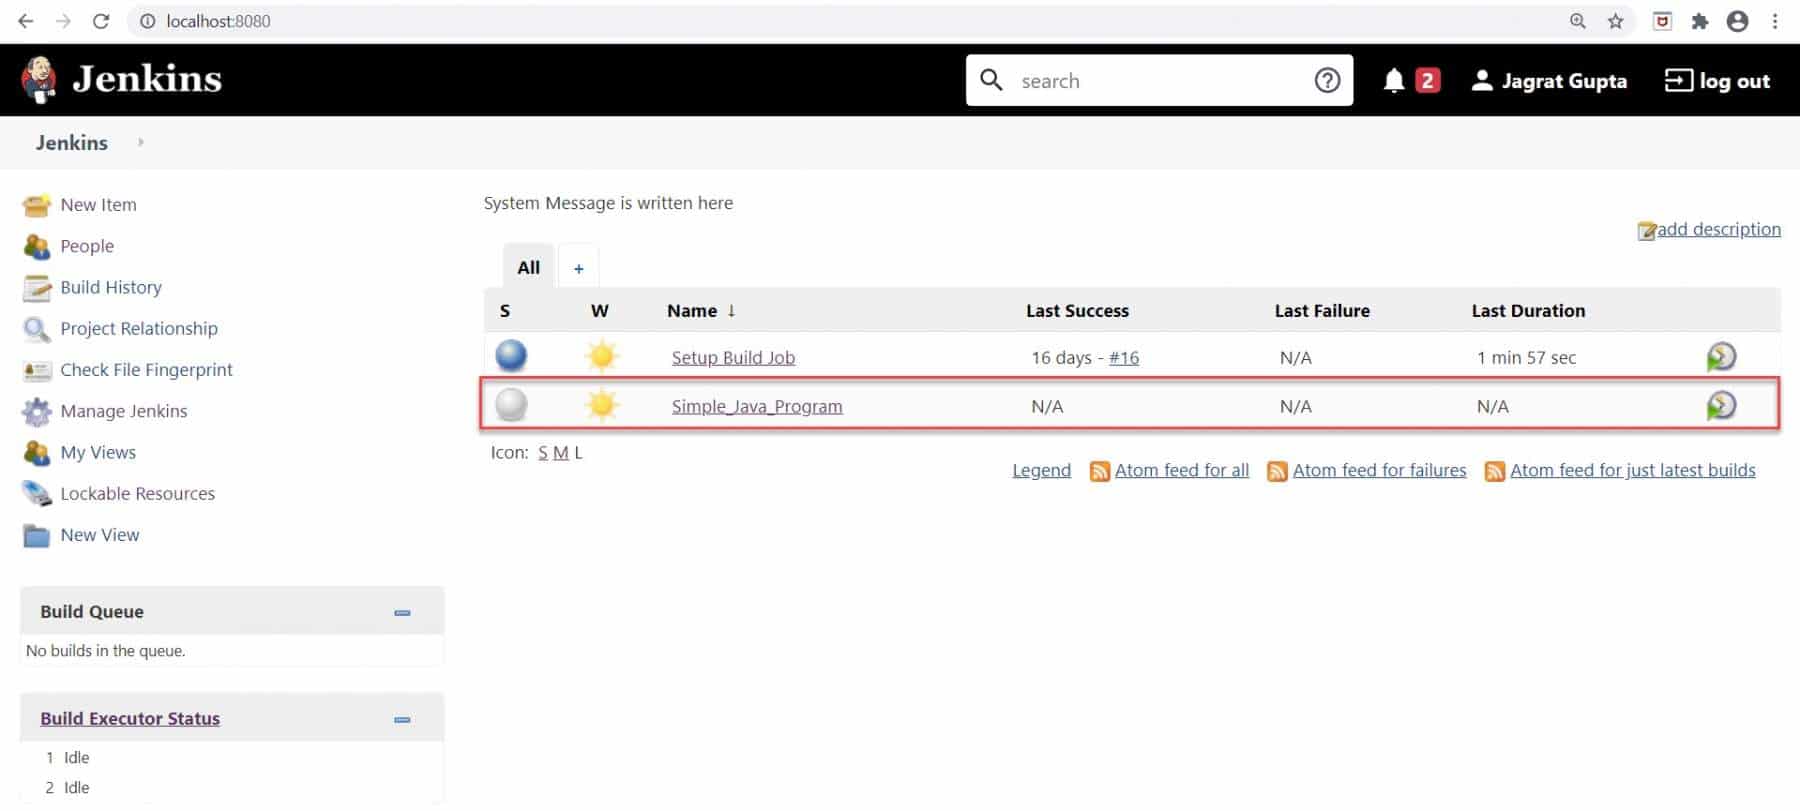
So, in this way Job can be created in Jenkins. in the next section, we will see how to configure this newly created job.
How to configure a job in Jenkins?
In the previous section, we created a FreeStyle job in Jenkins. Let's see in this section that how to configure the above created Jenkins build job? Kindly follow the below steps:
Step 1: First, select the "Configure" option that is shown in the dropdown in the below image.
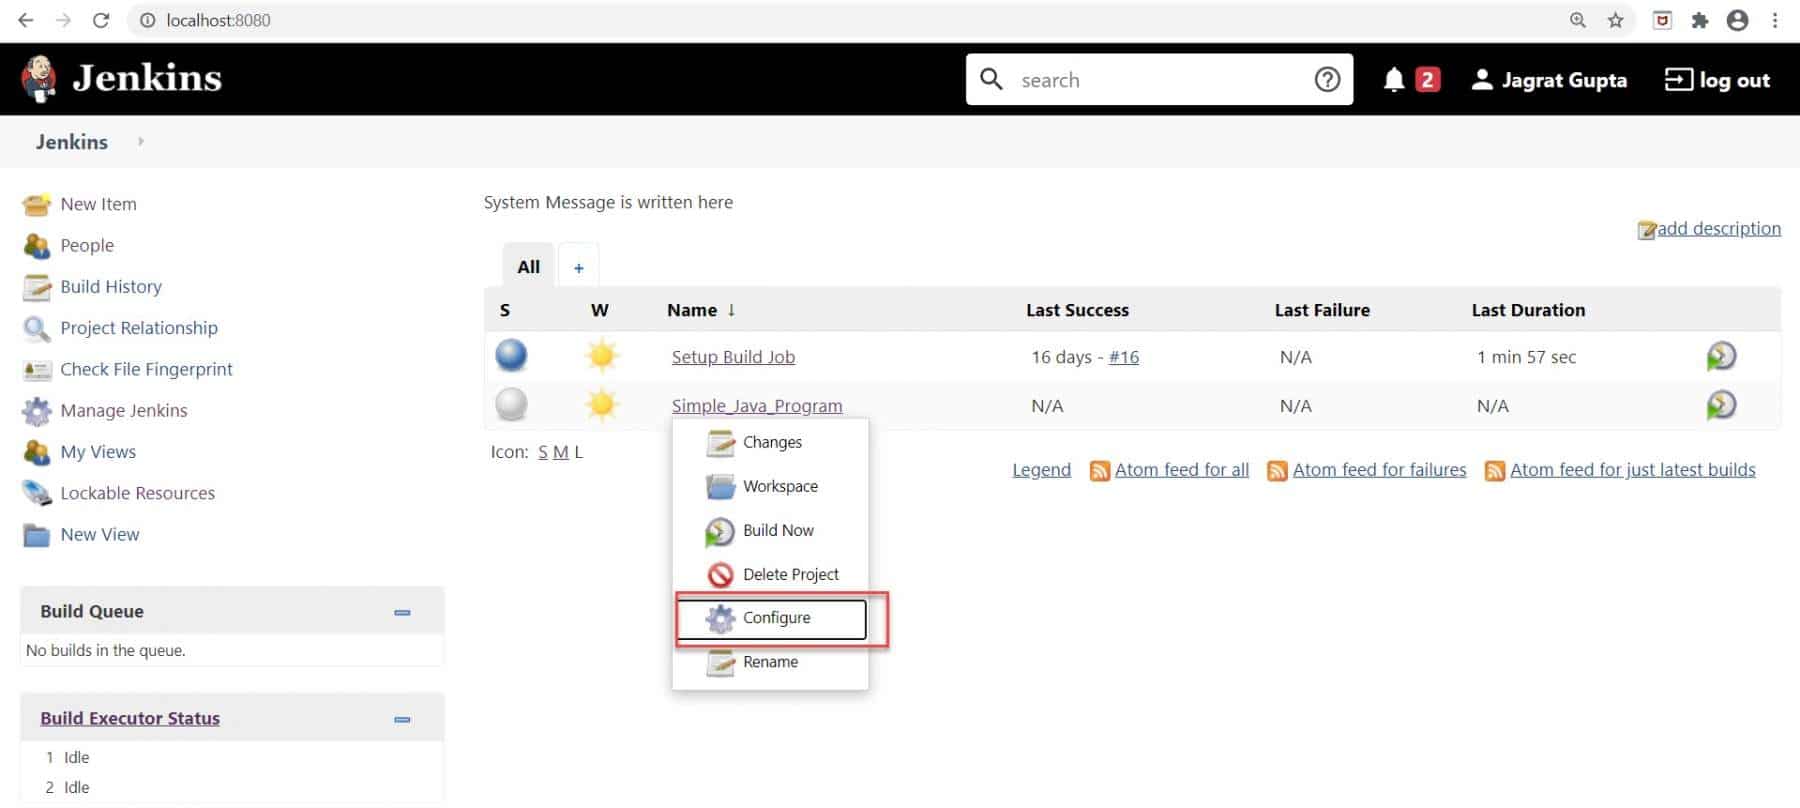
Moreover, as soon as we will click on the configure option then we will redirect towards the Configuration page.
Step 2: Secondly, set the purpose of the job in the "Description" section.
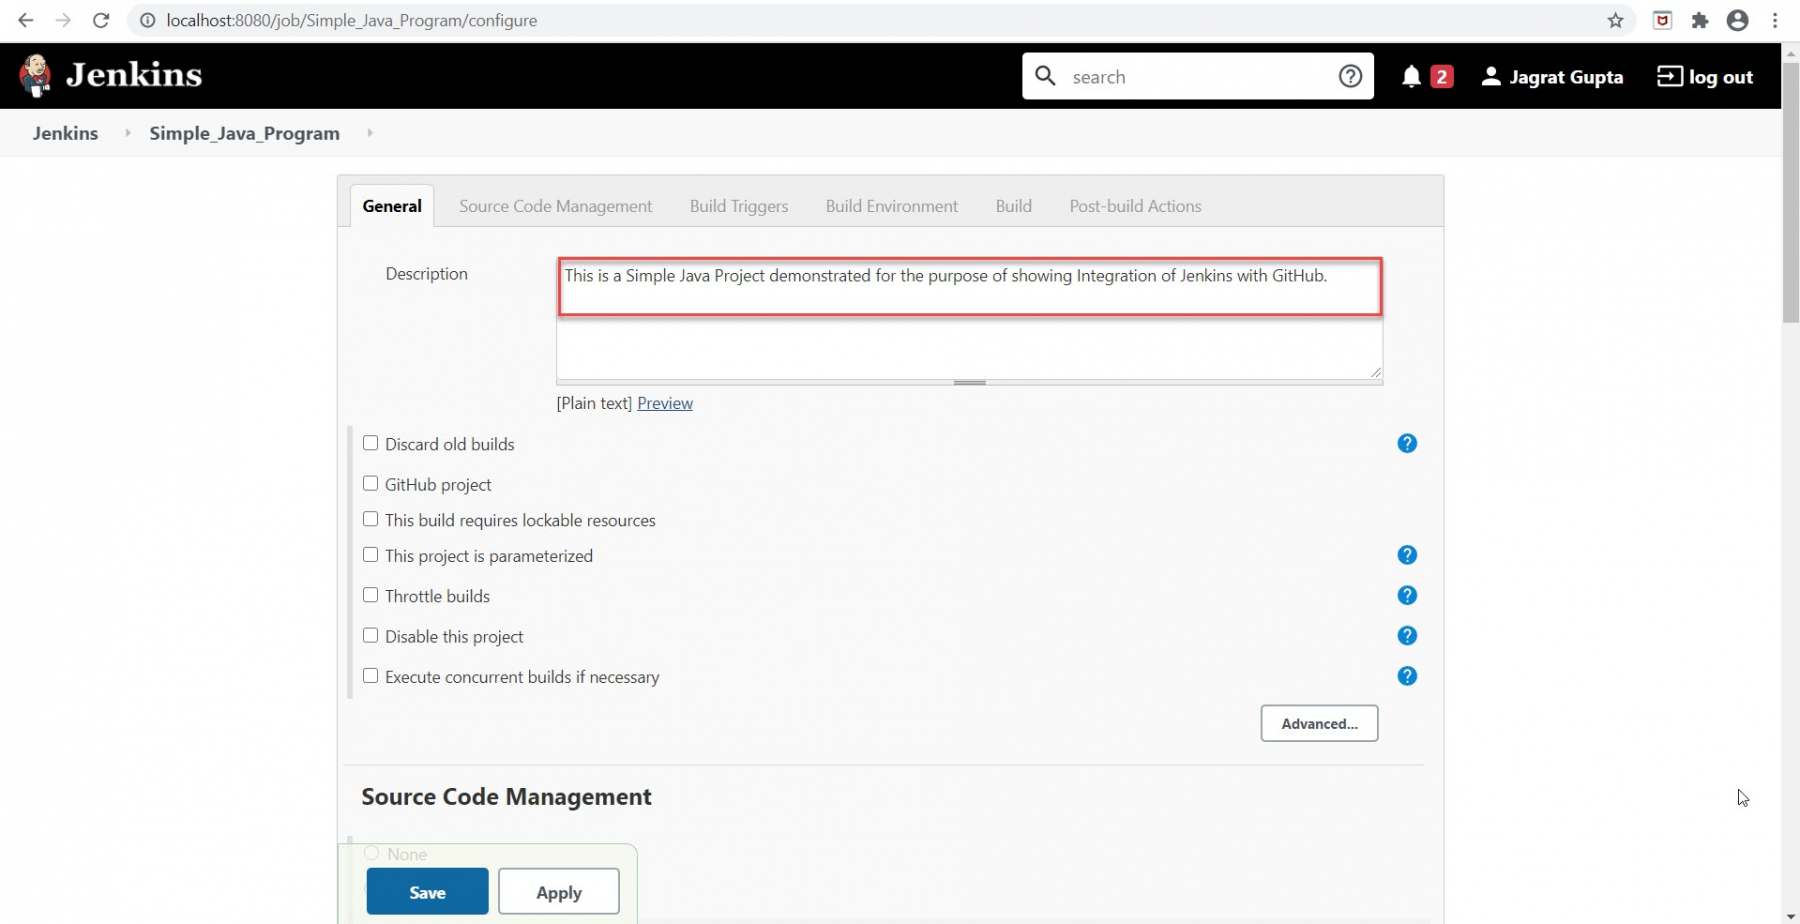
Apart from the description, there will be some options in the General section. Let's shortly see those options:
| Options | Description |
|---|---|
| Discard old builds | If we want to discard old builds while starting the execution of the new build then we select this option. |
| GitHub Project | This option specifies that we are running our build with GitHub. We specify the URL of the GitHub project. |
| This project is parameterized | If we want to run our build with different parameters that would be passed during run time then we will use this option. Every parameter has some Name as well as Value. |
| Throttle builds | This option enforces a minimum time between builds based on the desired maximum rate. |
| Disable this project | If this option will be checked then no new build of this project will be executed. |
| Execute concurrent builds if necessary | If this option will be checked then we can execute multiple builds of this project in parallel. |
After putting the description and other options, we will move towards the "Source Code Management" section.
Step 3: Thirdly, in the Source Code Management section, we need to select the repository where we pushed our code.
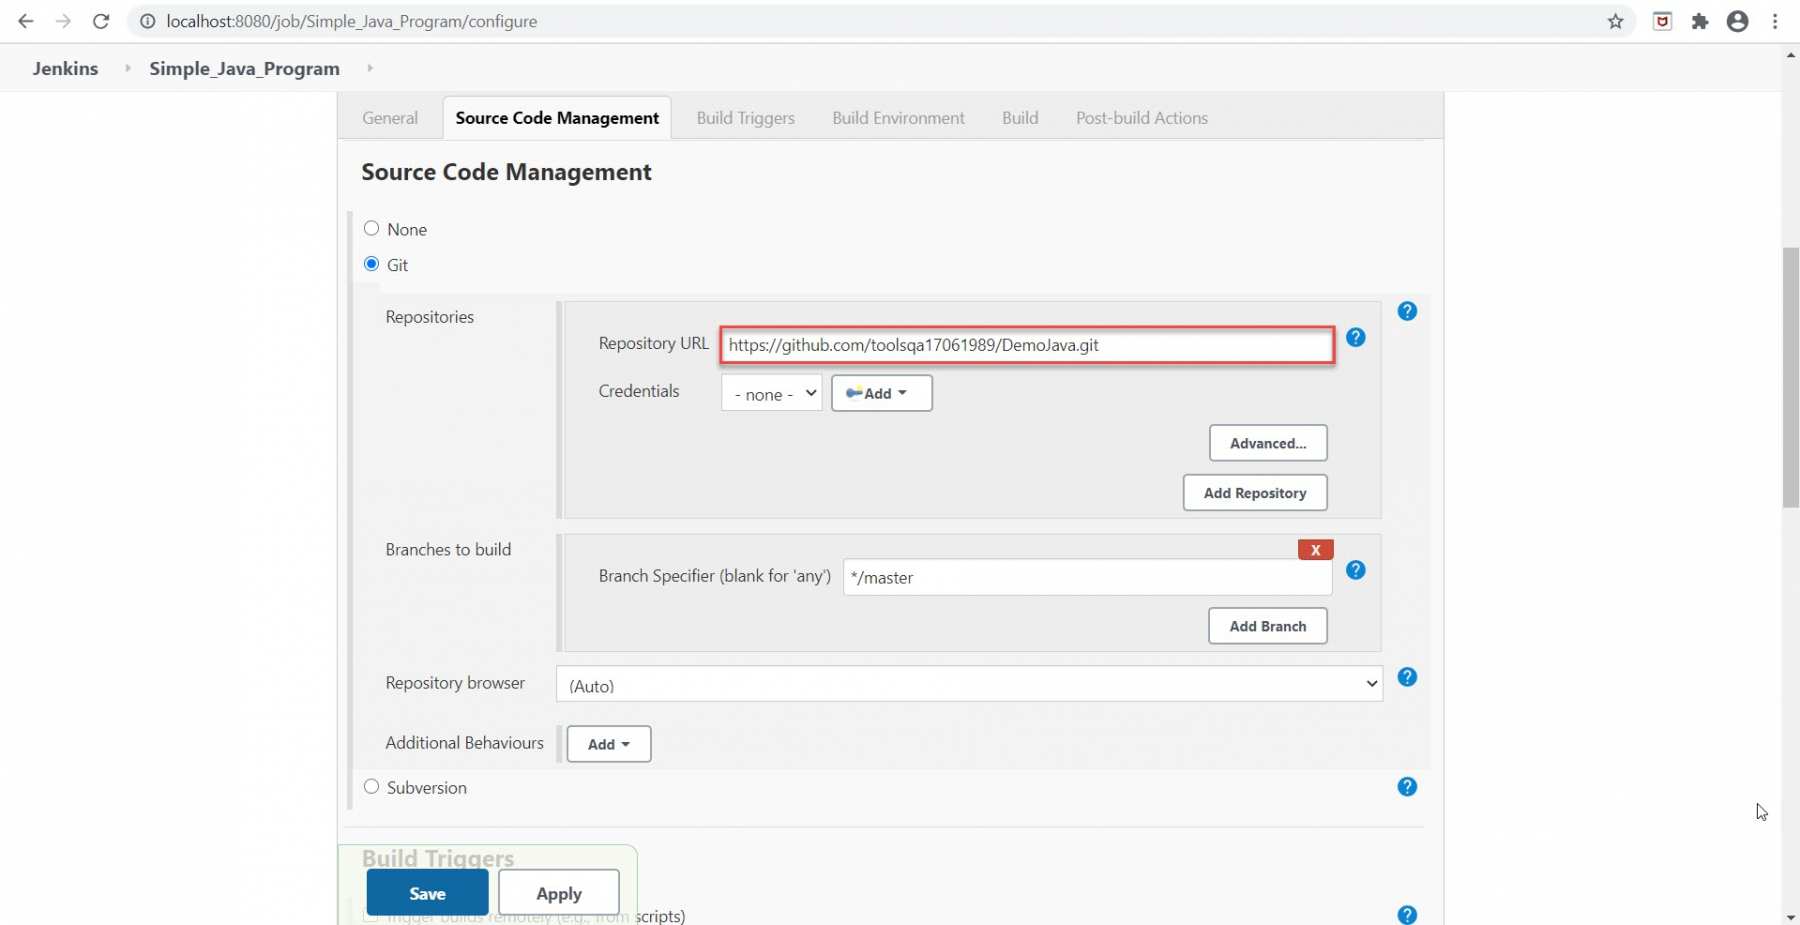
As I pushed our code in the GitHub repository so I selected the Git option in the above image.
Step 4: Fourthly, go to the "Build triggers" section and select the appropriate option as per requirements. There are different options available here under the build triggers section.
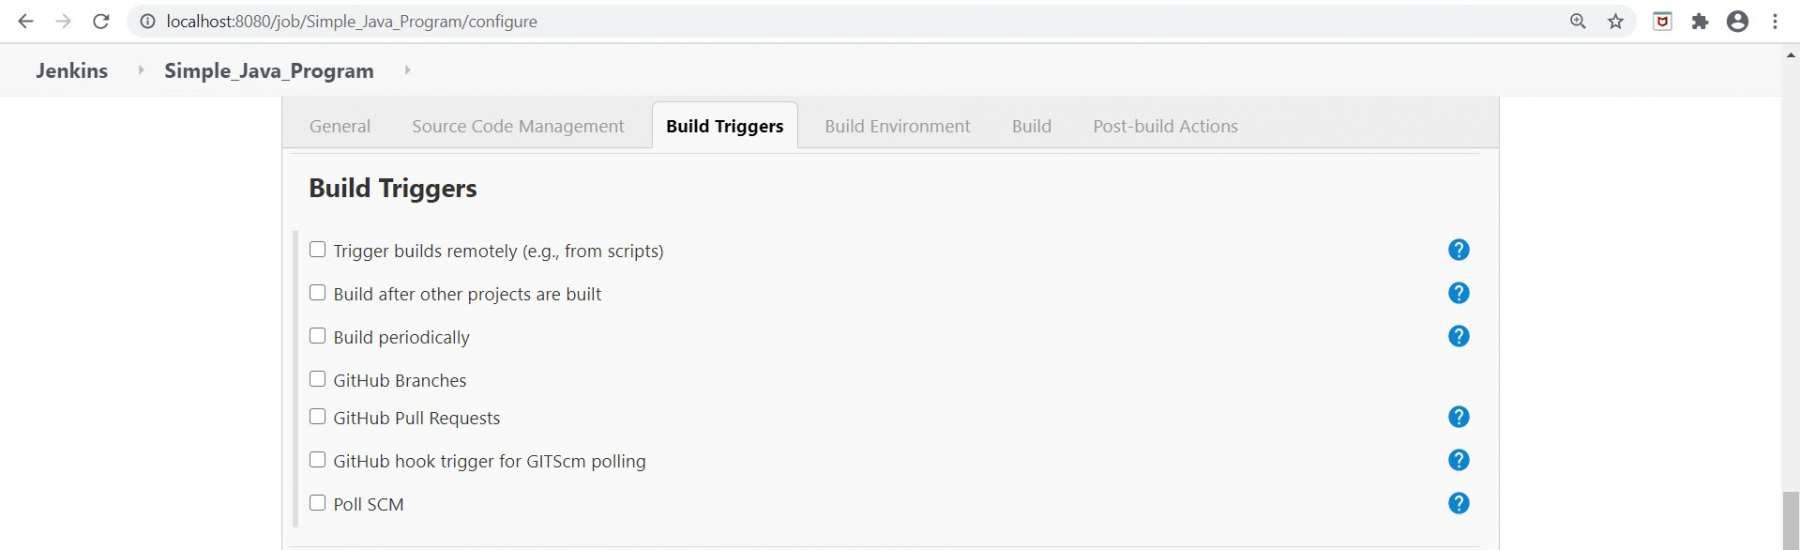
Let's understand the details of all these options:
| Options | Description |
|---|---|
| Trigger builds remotely | This option is used when we want to trigger new builds by accessing a special predefined URL. |
| Build after other projects are built | A new build will be triggered for this project just after other builds are finished. |
| Build periodically | In the build periodically option, we need to give a proper format of time during which we need to build our job. |
| GitHub Pull requests | Trigger that integrates with GitHub Pull Requests and Issues activities and launches runs in response. |
| GitHub hook trigger for GITScm polling | If this option is checked, it means the build will be executed with the help of GitHub webhooks. |
| Poll SCM | Poll SCM option is almost similar to the build periodically option. Here also, we can give the timer but the difference is that build will only be executed when any code changes will be detected during that time duration. |
In the next section, we will use some most commonly used build triggers options and run the build through these options.
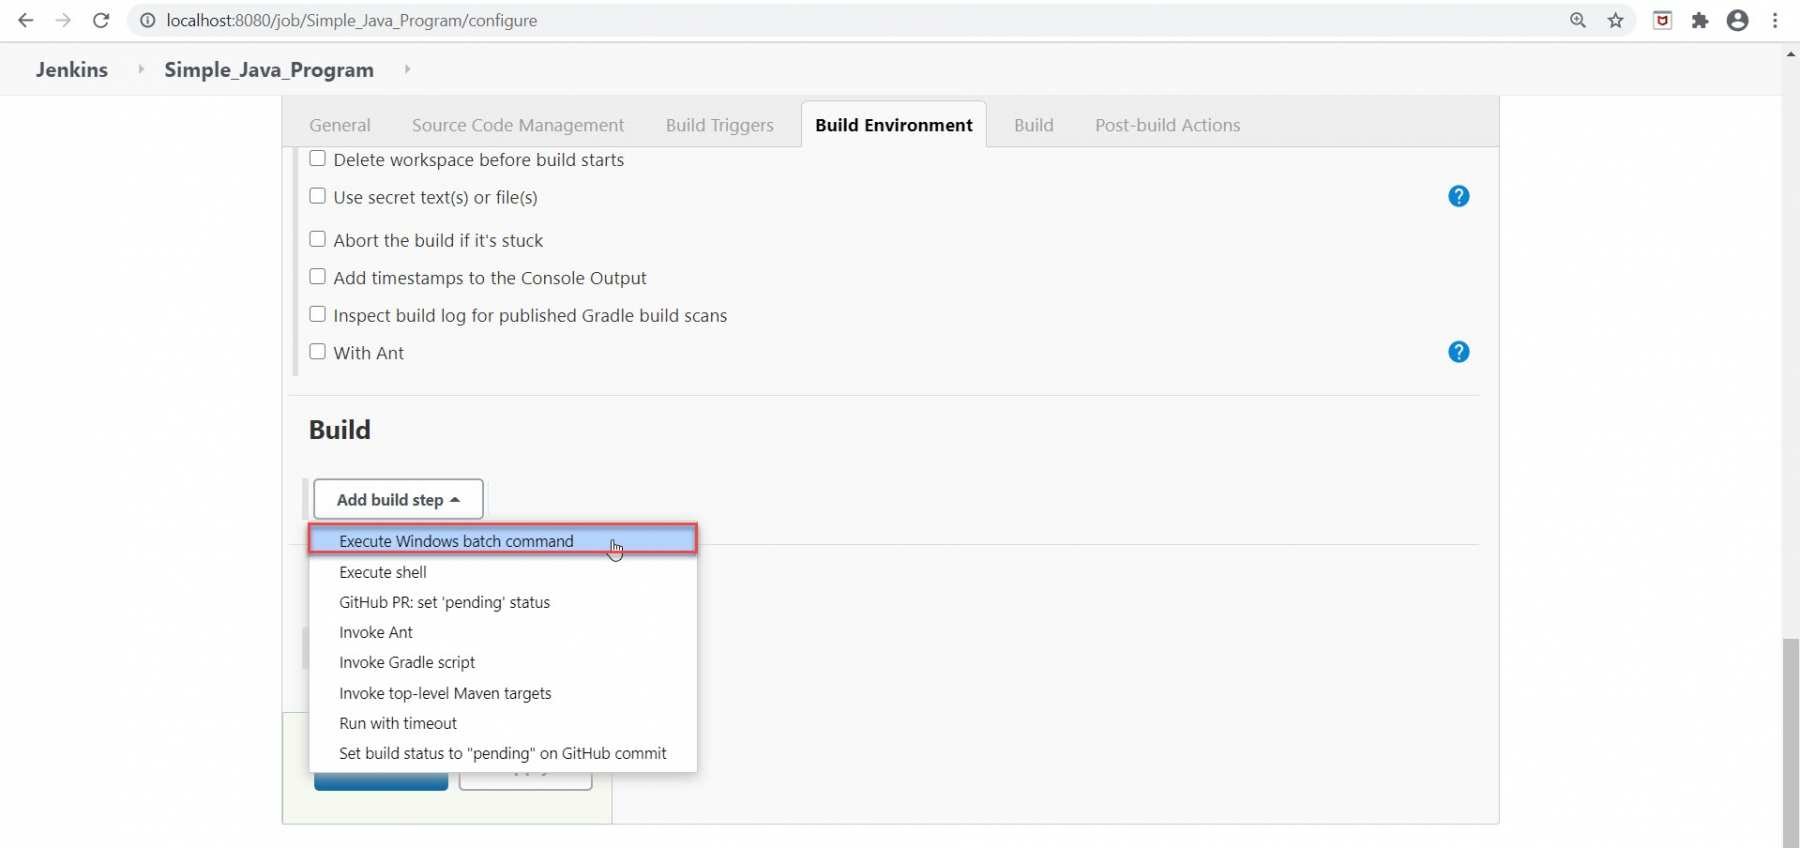
Step 5: Fifthly, go to the "Build" section. In this section, there are some most popular options available that are listed in the below table:
Subsequently, let's understand the details of all the Build options:
| Options | Description |
|---|---|
| Execute Windows batch command | This option runs a windows batch script for building the project. The script runs with the workspace as the current directory. |
| Execute shell | This option runs a shell script for building the project. The script runs with the workspace as the current directory. |
| Invoke Ant | This option specifies a list of Ant targets to be invoked (separated by spaces ), or leave it empty to invoke the default Ant target specified in the build script. |
| Invoke Gradle Script | This option is for those projects that use Gradle as the build system. Here, Jenkins invokes Gradle with the given switches and tasks. |
| Invoke top-level Maven targets | This is for those projects that use Maven as the build system. This leads Jenkins to invoke Maven with the given goals and options. Jenkins passes various environment variables to Maven, which you can access from Maven as "${env. VARIABLE NAME} ". |
| Run with timeout | If a build does not complete by the specified amount of time, then the build will be terminated automatically and marked as aborted. Default time would be at least 3minutes. |
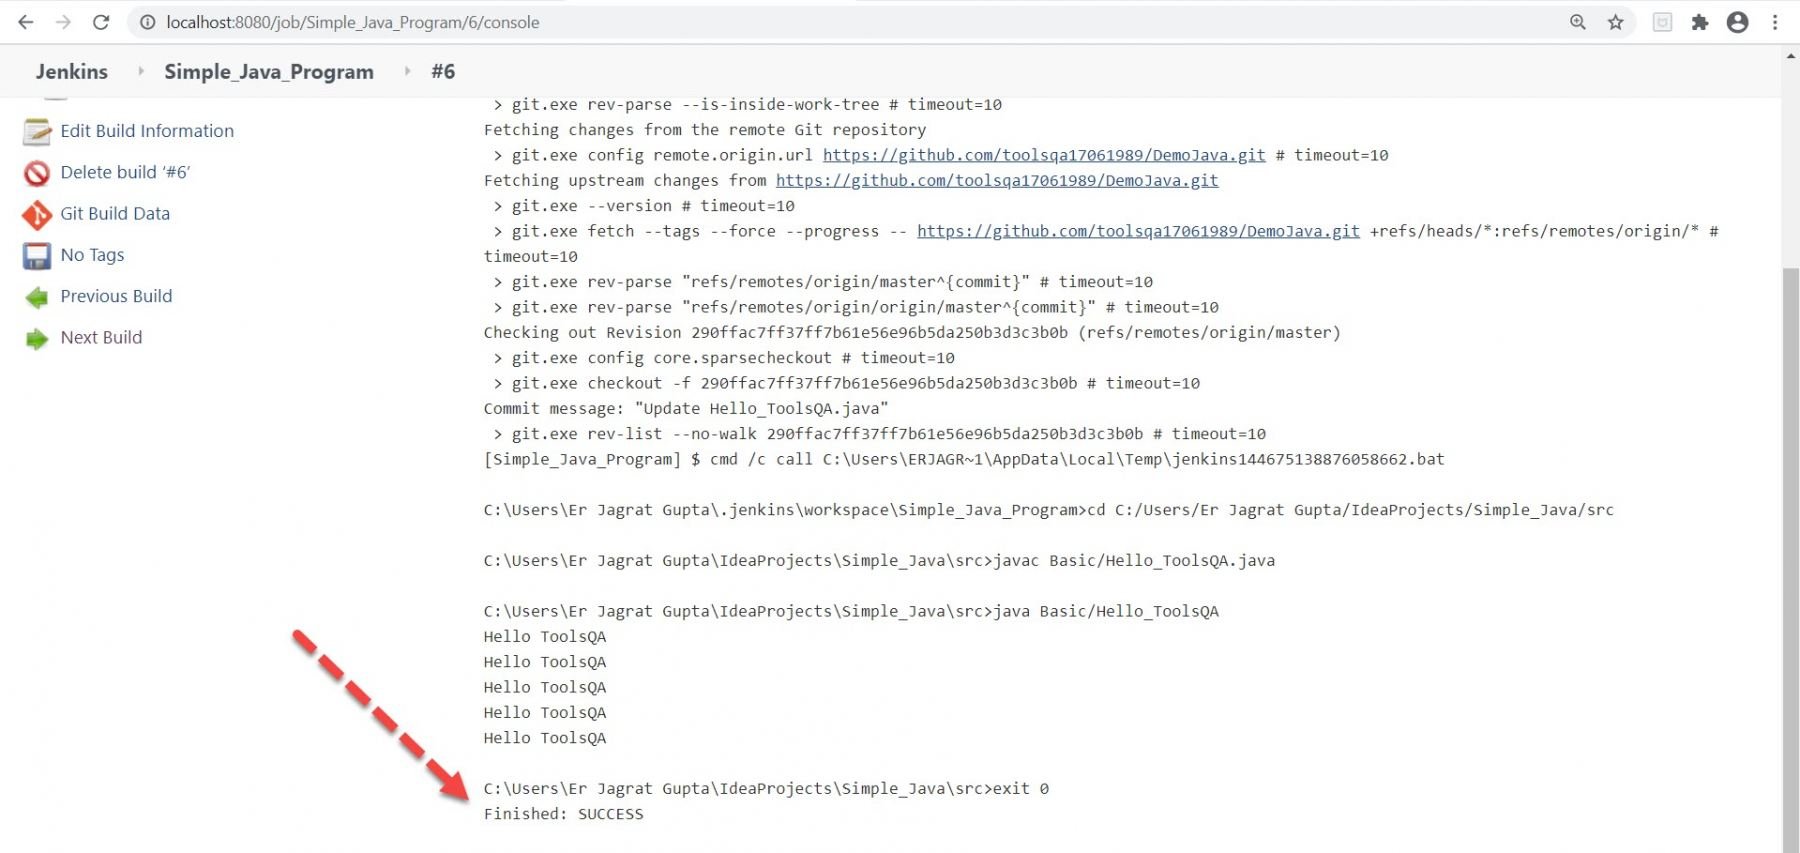
As I will run our java project with the help of the Windows batch command so I selected "Execute Windows batch command".
Step 6: As soon as we will click on the above option, we will see the text area in which we will write the commands mentioned below:
cd C:/Users/Er Jagrat Gupta/IdeaProjects/Simple_Java/src
javac Basic/Hello_ToolsQA.java
java Basic/Hello_ToolsQA
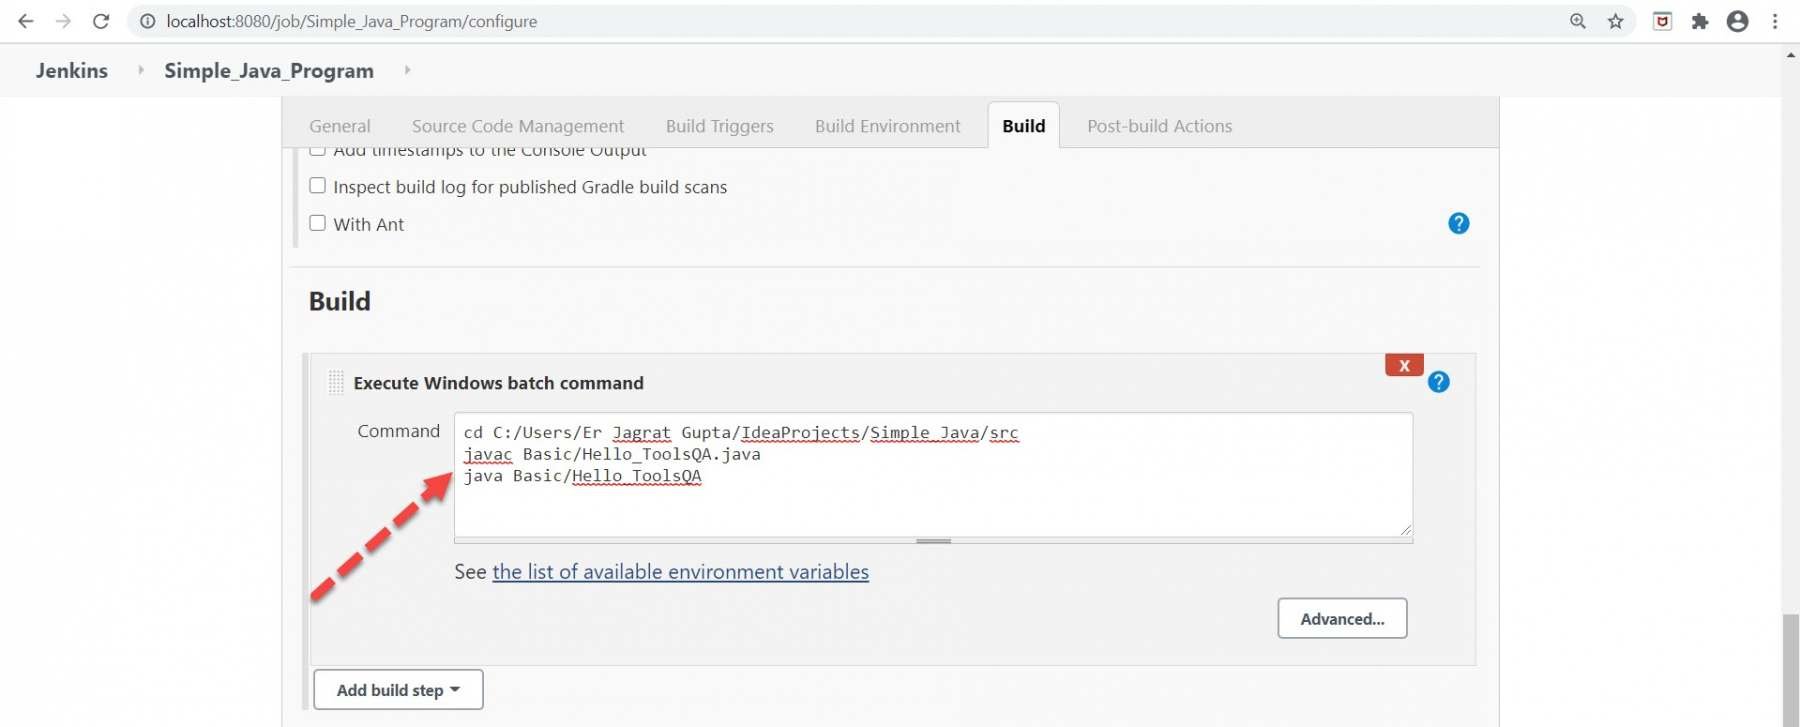
At last, click on the Save button. So, in this way, we can configure our job in Jenkins. In the next section, we will see the most commonly used build triggers options and run our build using those options.
How to run Jenkins job?
In the previous section, we configured our job and it is ready to run. In this section, we will run our job manually as well as with the most commonly used build triggers options.
How to run Jenkins job manually?
As we already saw the configuration part in the previous section so now in this section, we are good to run the Jenkins build jobs. Kindly follow the below steps for running the job manually:
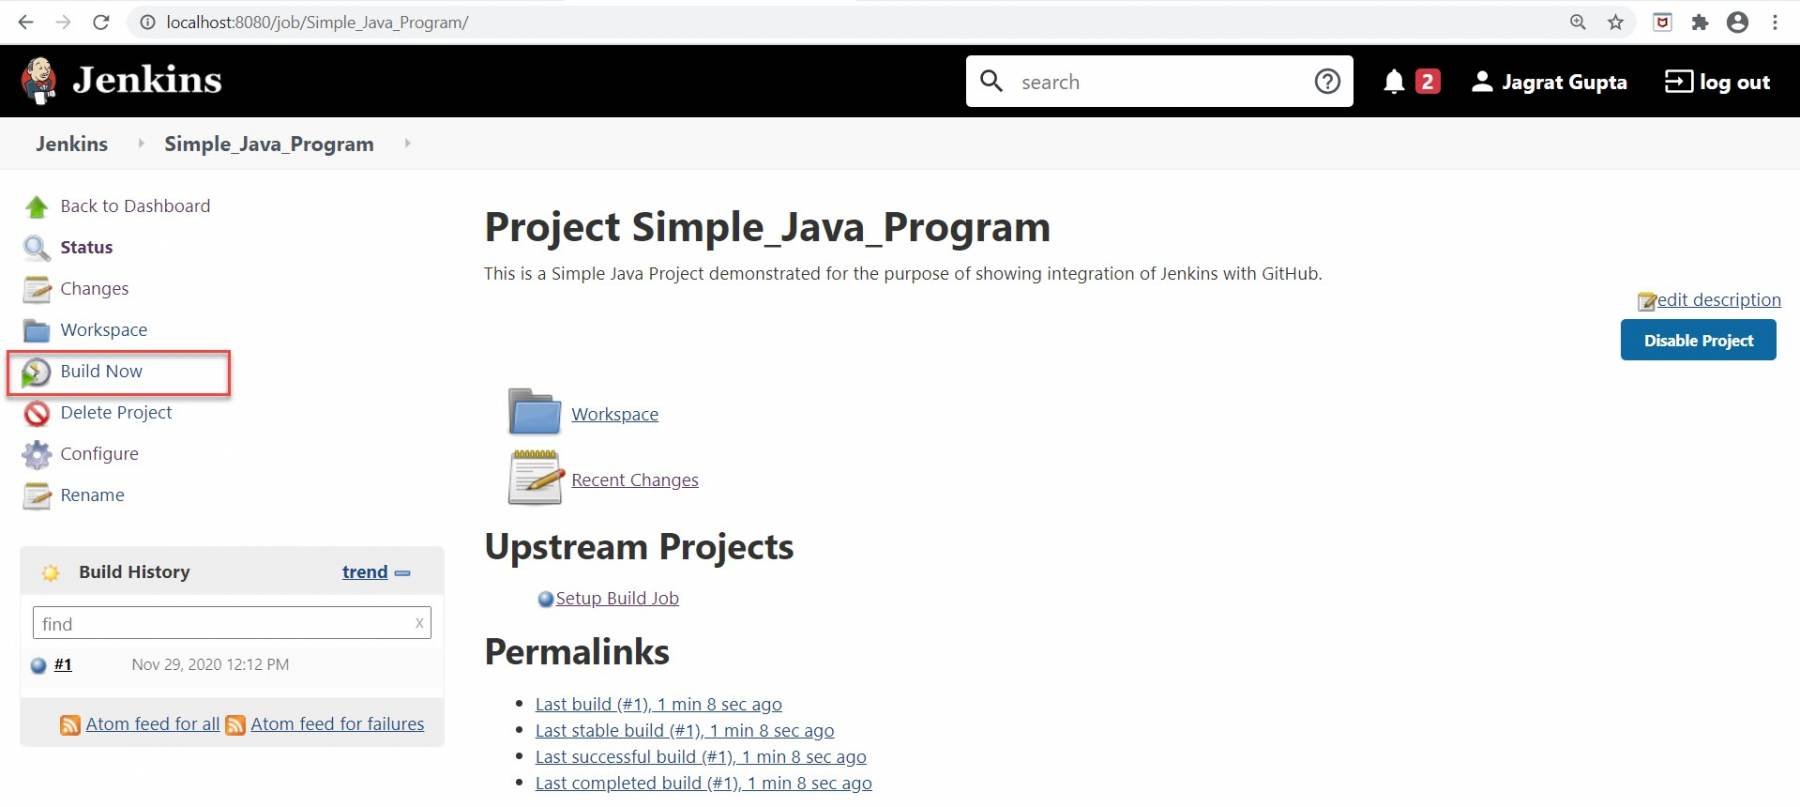
Step 1: Go to the respective job that we want to run and click on the "Build Now" link highlighted in the below image:
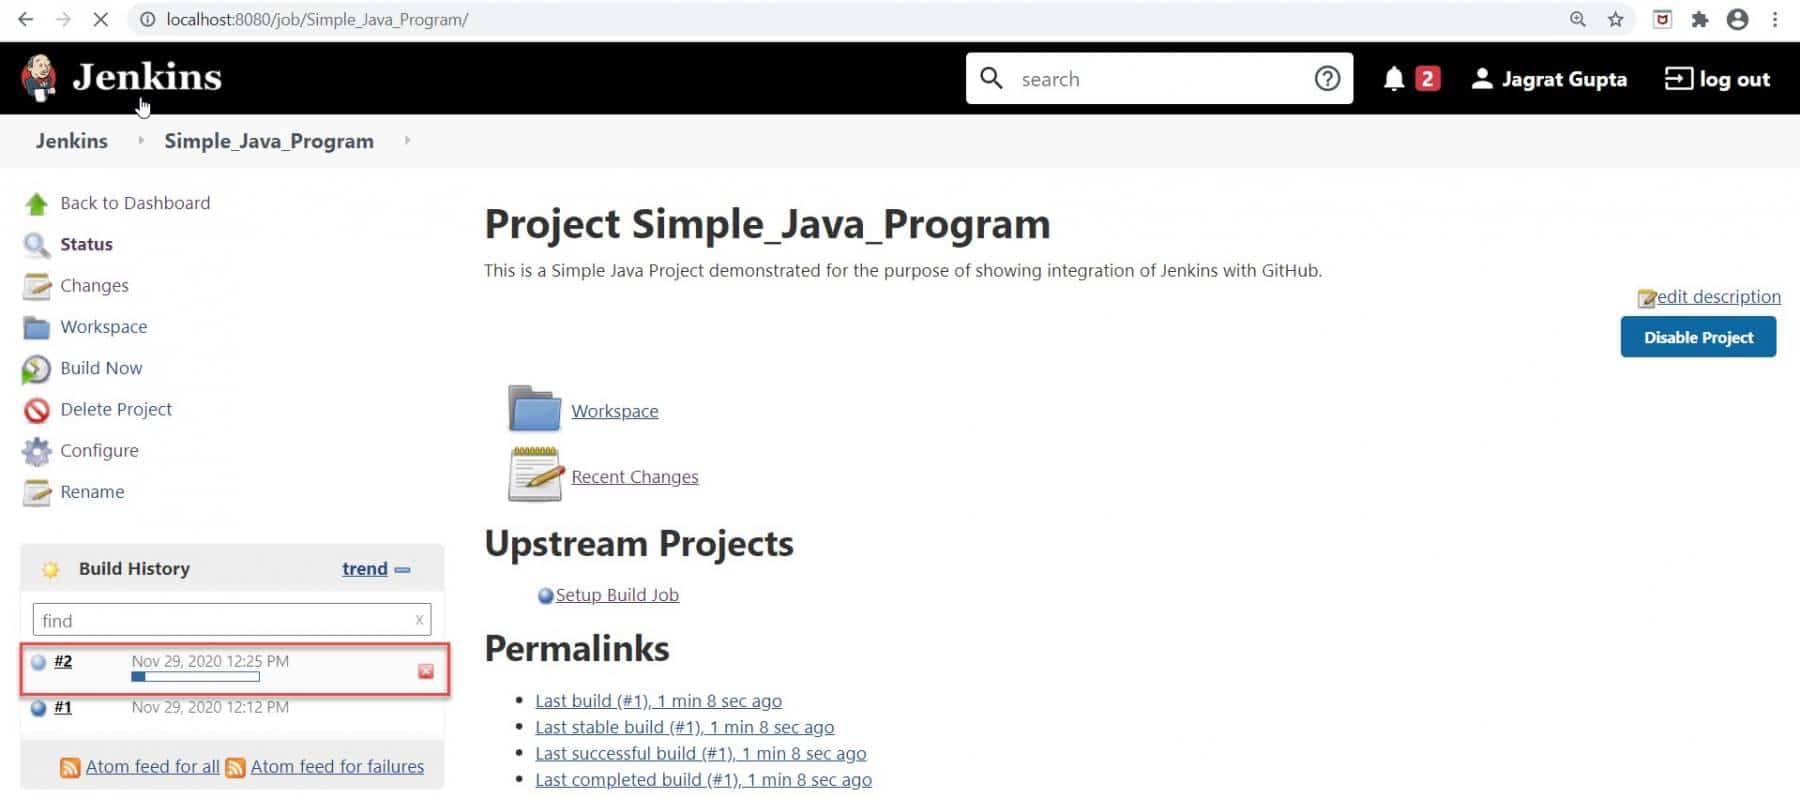
Step 2: As soon as we will click on the Build Now link, the build will be started successfully. We can see the execution of the build on the Build history highlighted in the below image:
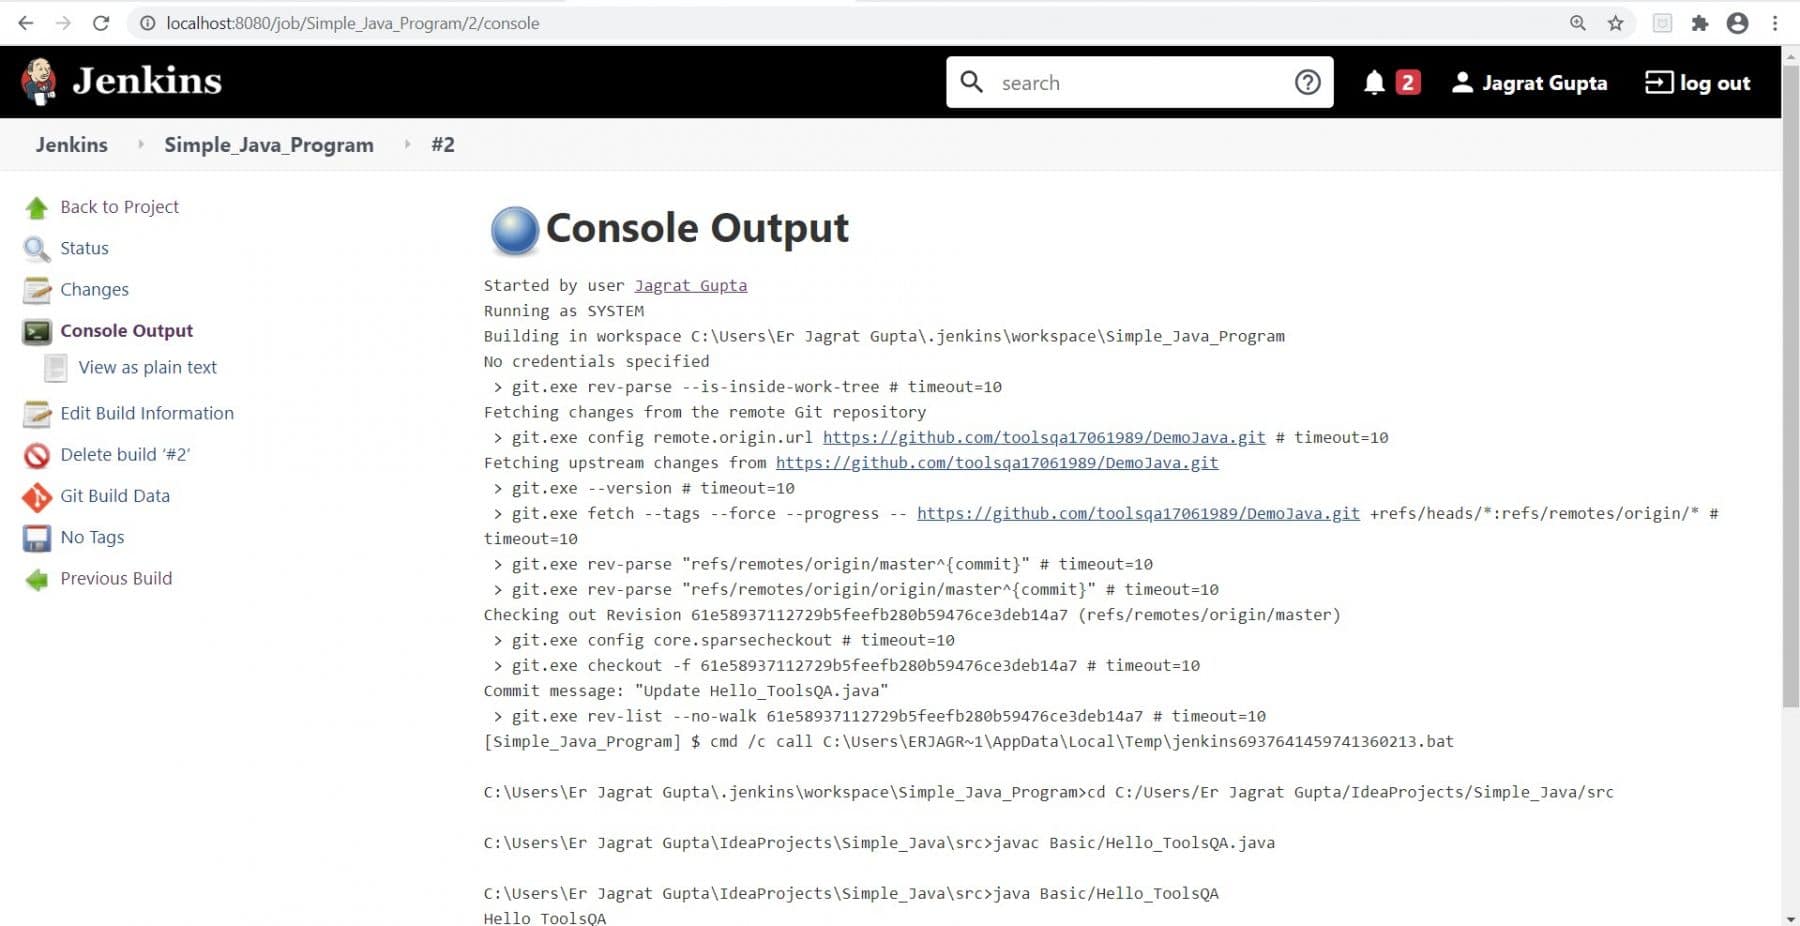
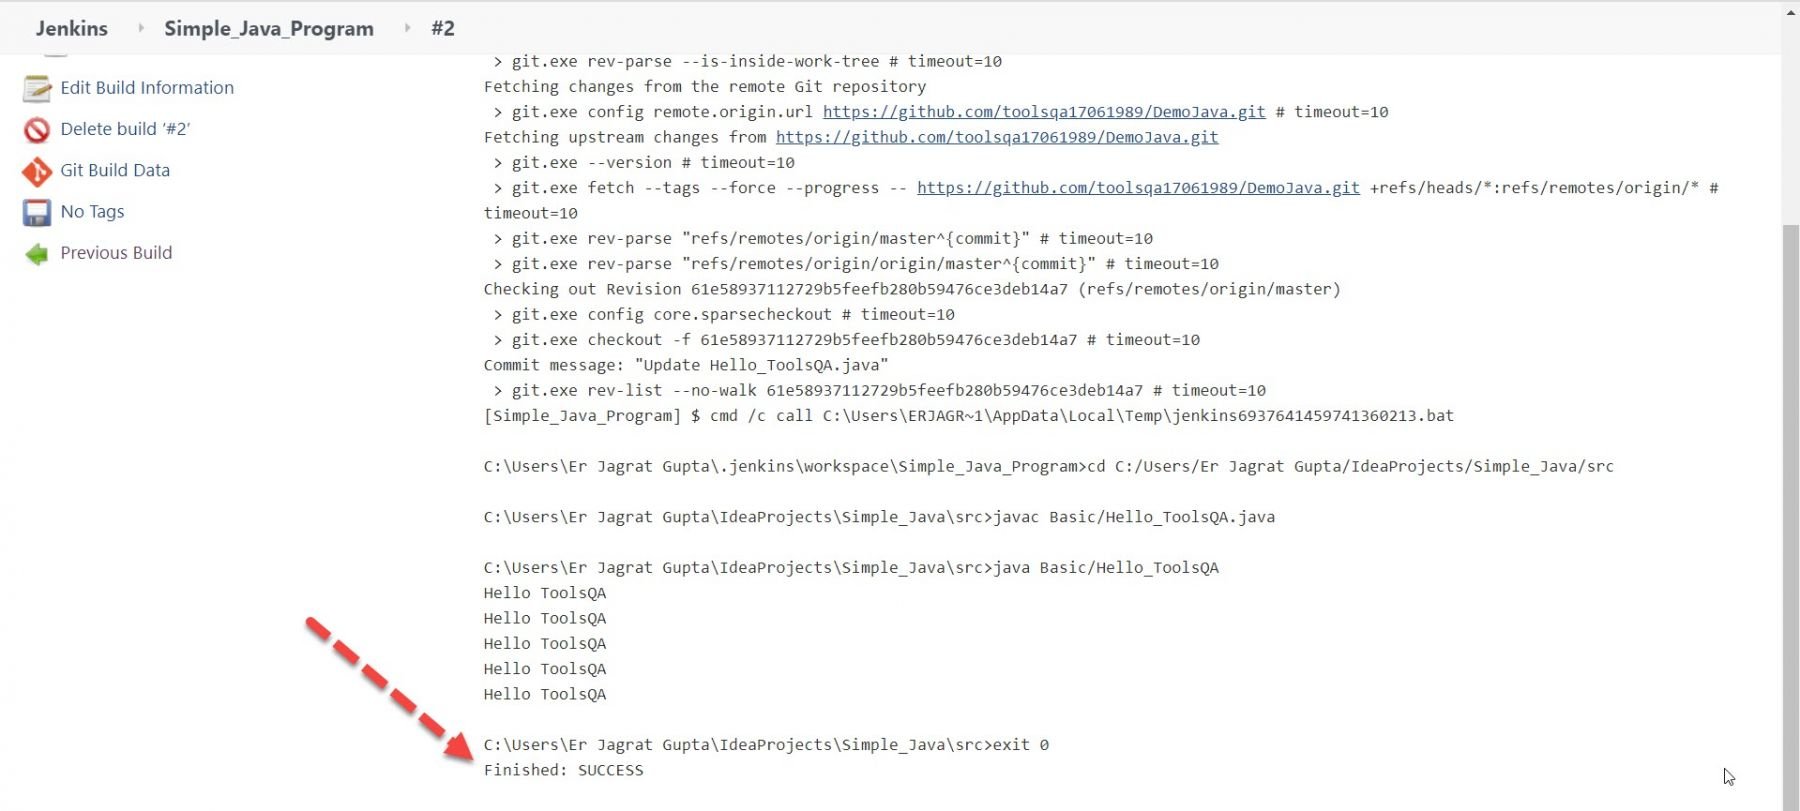
Step 3: As soon as the build execution will be complete, we can see the build results on the console output screen.
So, in this way, we can run our job manually. In the next subsection, we will see that how can we run our build automatically.
How to run Jenkins job automatically?
In the previous subsection, we saw how to run the Jenkins job manually. So, in this section, we will discuss how to run the Jenkins build jobs automatically with the help of different build trigger options. So, let's see the most popular options one by one:
How to trigger Jenkins job with GitHub hook trigger for GITScm Polling?
Follow the steps as mentioned below to trigger a Jenkins job automatically based on GitHub's webhook configurations:
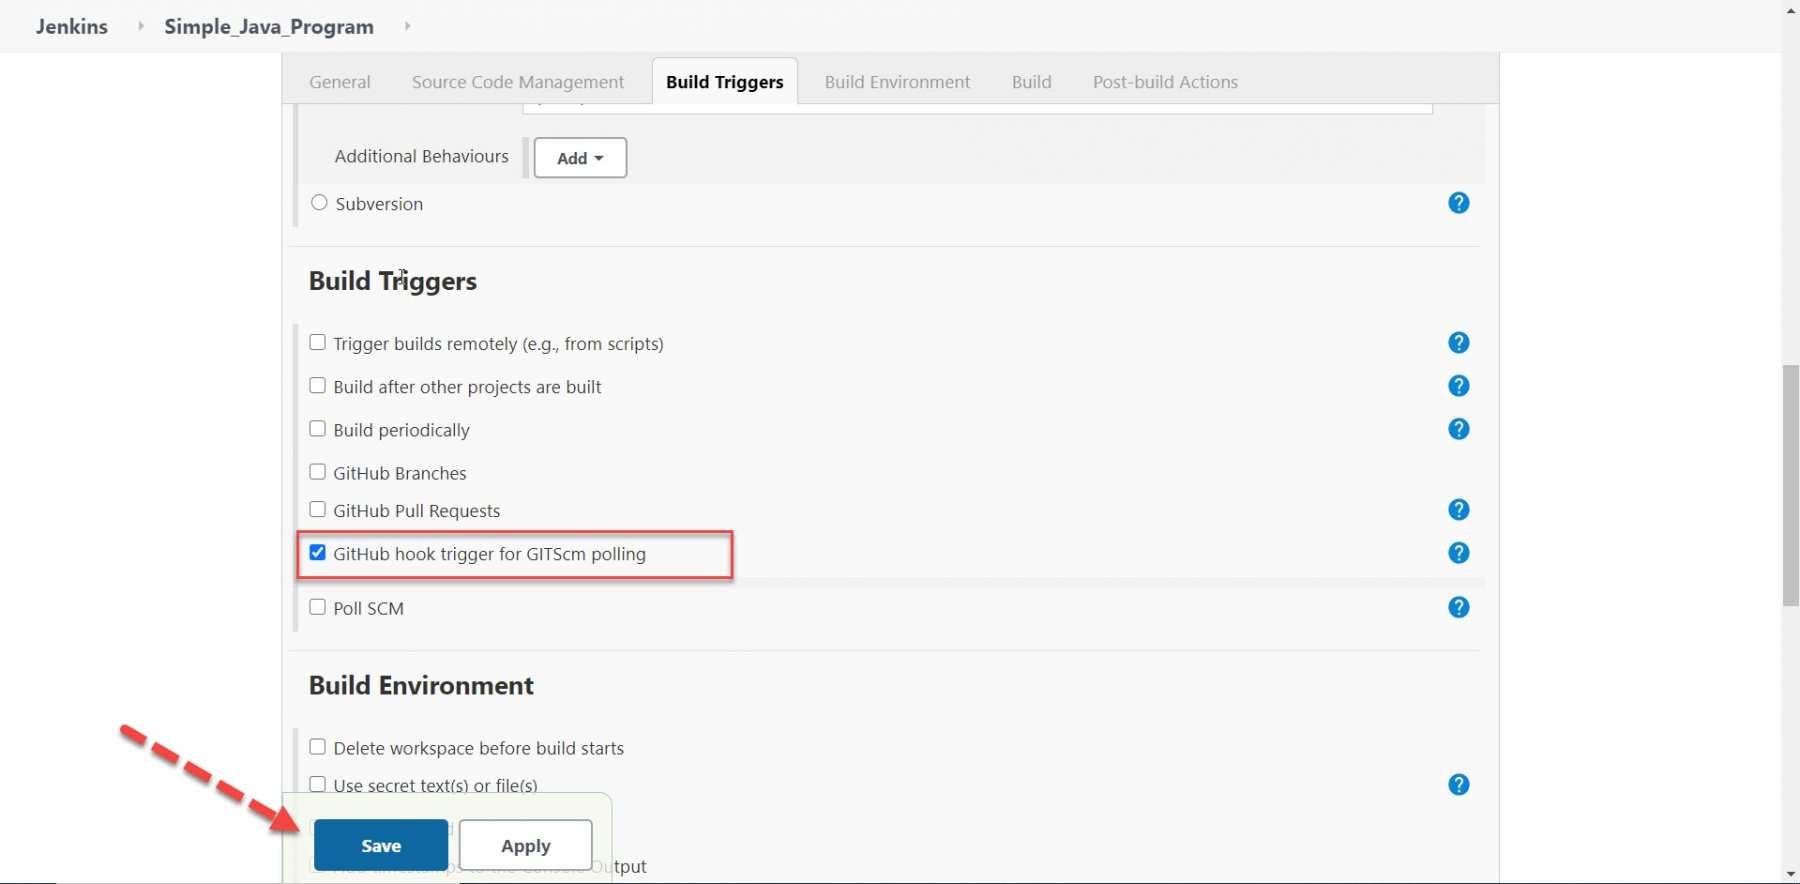
Step 1: Go to the Configuration page of the respective job and under the build trigger section, check the "GitHub hook trigger for GITScm polling" checkbox and click on the Save button.
Step 2: We have already set a WebHook for this project in the GitHub repository Kindly visit the article "Jenkins GitHub Integration" for knowing that how to set up webhooks in GitHub. Now do some changes in the code in the GitHub repository and observe the build in Jenkins. It will automatically start as soon as Jenkins detects some changes in code via hookup.

We can see the build result also like shown in console output like below image.

How to trigger Jenkins job periodically?
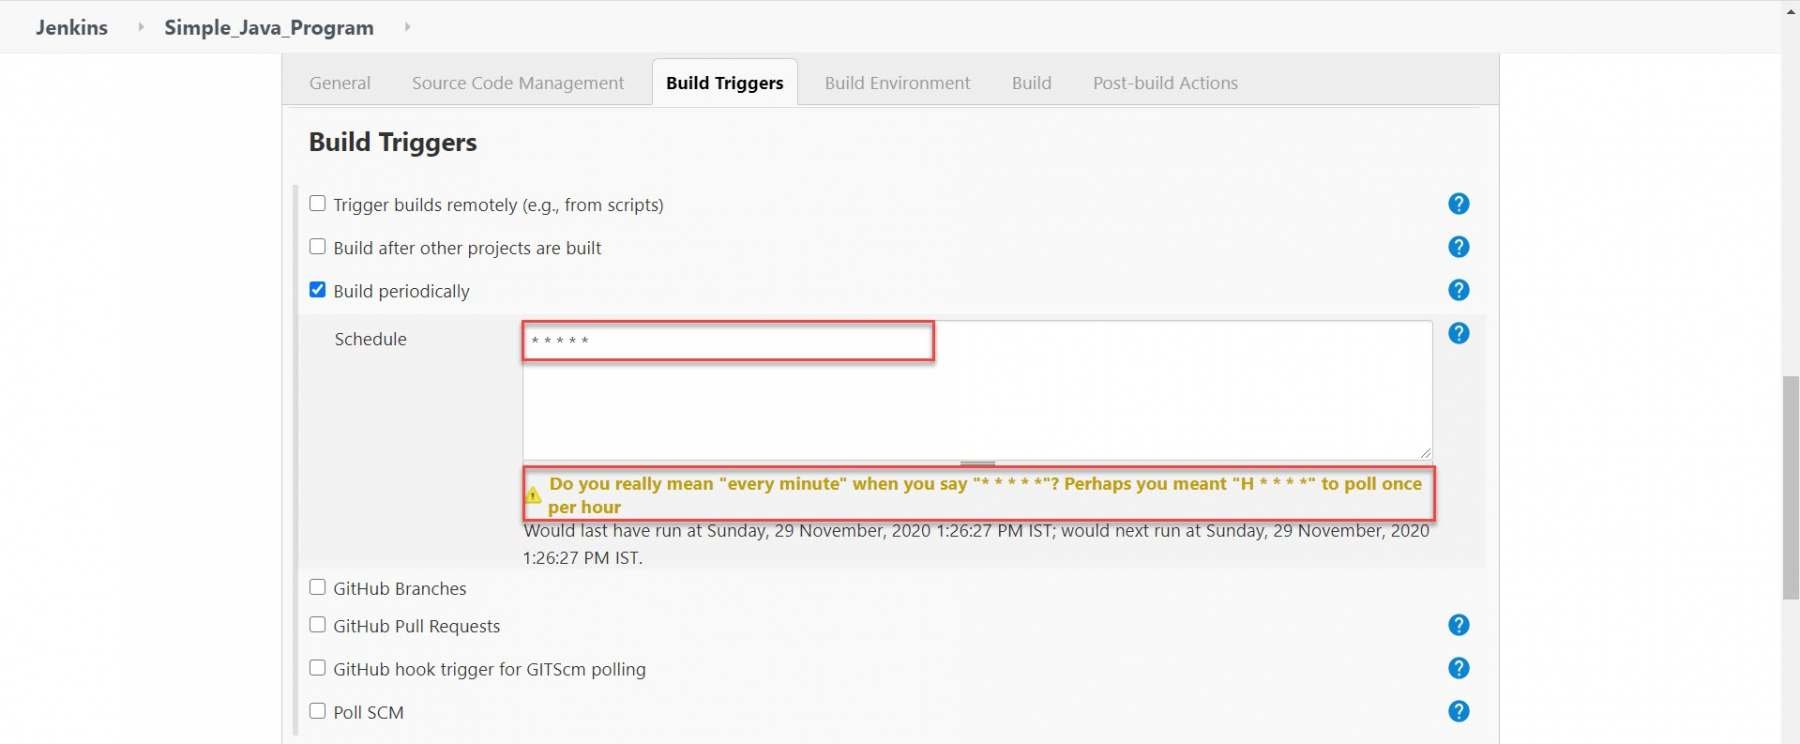
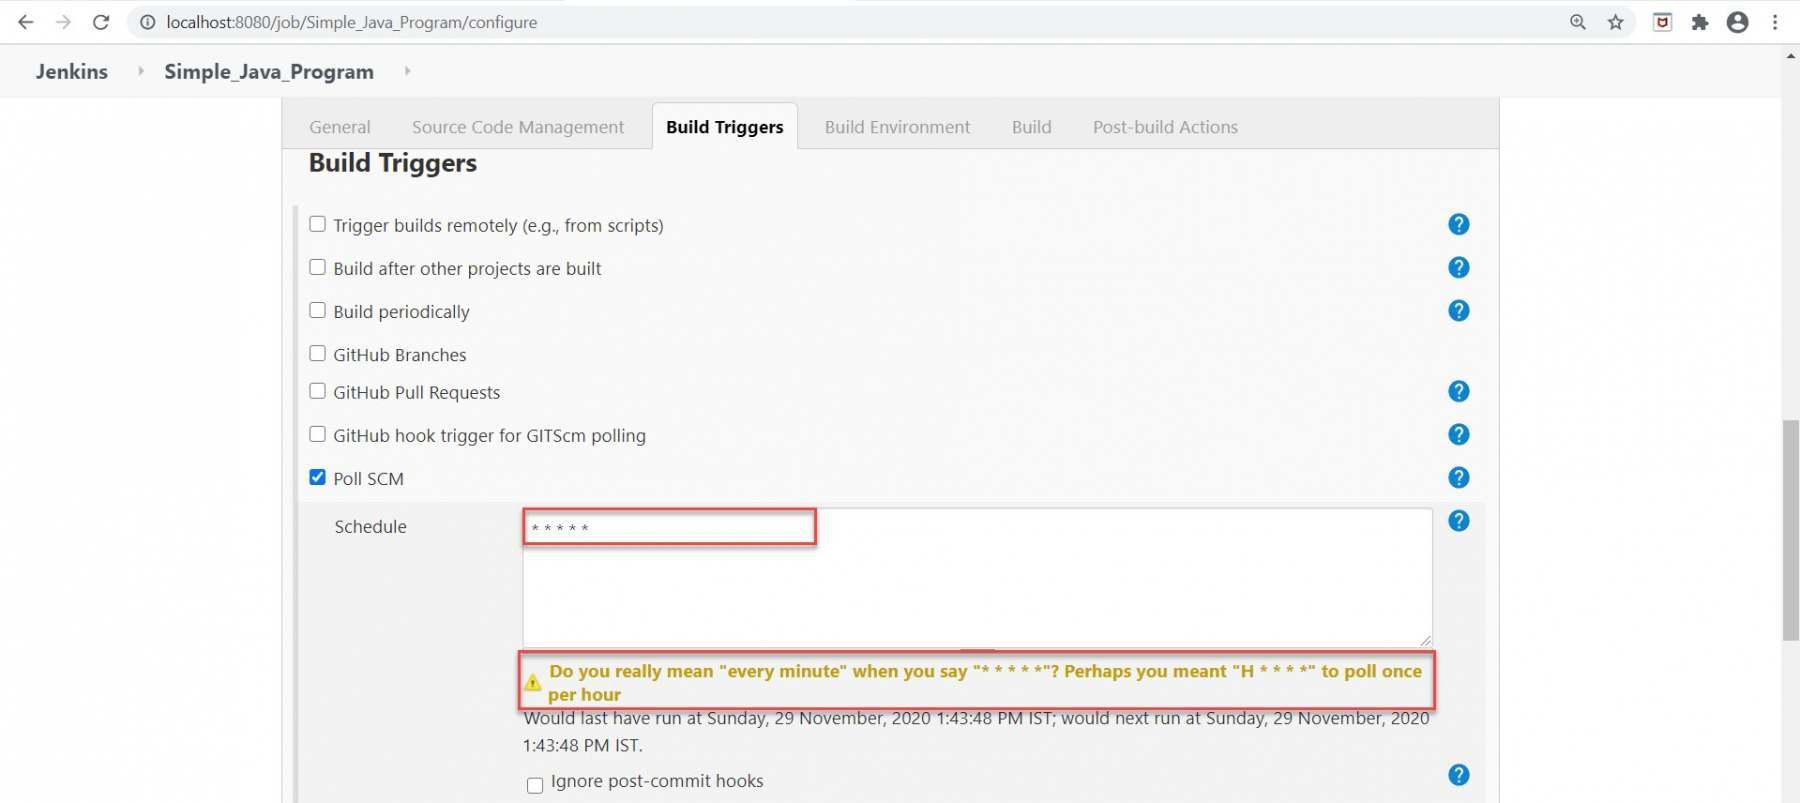
In the Build Periodically option, we need to give a proper format of time during which we need to build our job. In the below image, we can see the complete format:

Now, in Jenkins, we need to select the "Build periodically " option and give the correct format of time. As in the below image, I gave format as * * * * * because I want to run our build in every minute. As soon as we will give the format, Jenkins will automatically give the interpretation of the format as shown in the below image:
Additionally, when we click on the "Save" button, we will redirect to the Jenkins dashboard of the respective job, and just after the next minute, we will see that Build has triggered automatically.
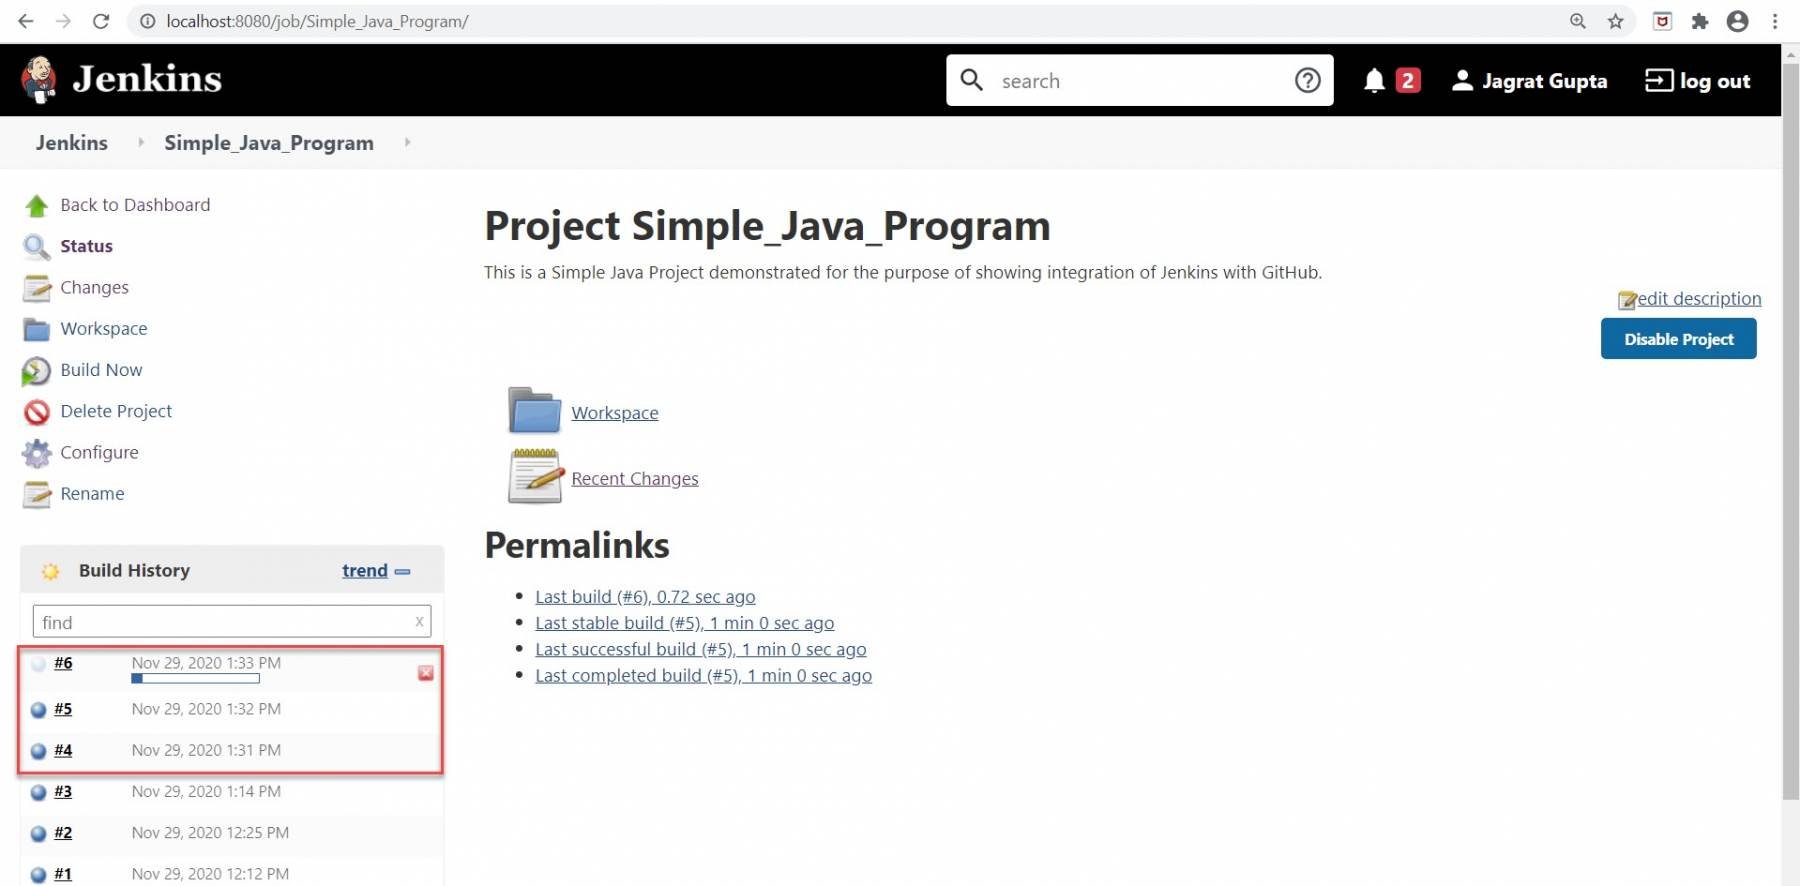
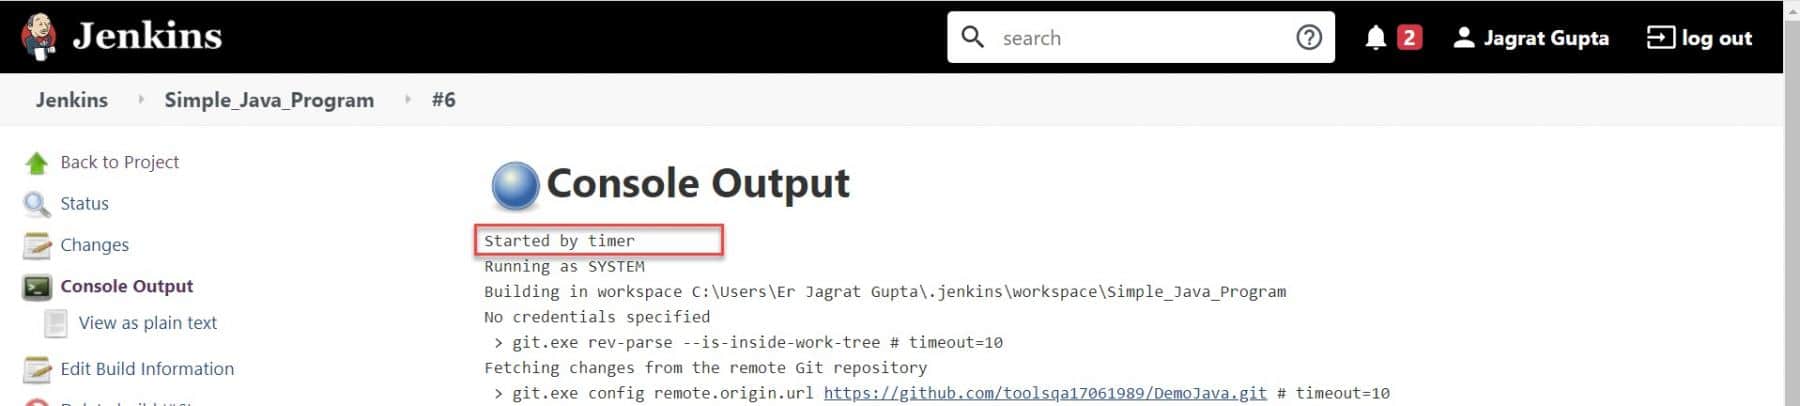
As in the above image, we can see that the 4th build-id triggered and every minute a new build will be initiated as a part of the next build. We can see the build result in console output for this run. In the build result, we can see the text "Started by Timer" because we triggered our build using the build periodically option.
So, in this way, we can build our job through the build periodically option.
How to trigger Jenkins job by Polling SCM:
Poll SCM option is almost similar to the build periodically option. Here also, we can give the timer but the difference is that build will only be executed when any code changes will be detected during that time duration while in build periodically option build will run automatically during that time duration even code changes will be happened or not.
As we can see in the above image that we set the timer like this every minute it will seek that any code changes detected or not and as soon as we committed some changes in the code, in the very next minute build will be automatically triggered. like in the below image.

we can see the build results in console output for this run. In the console output, we can see the text "Started by an SCM Change". It means we trigger the build via the Poll SCM option.
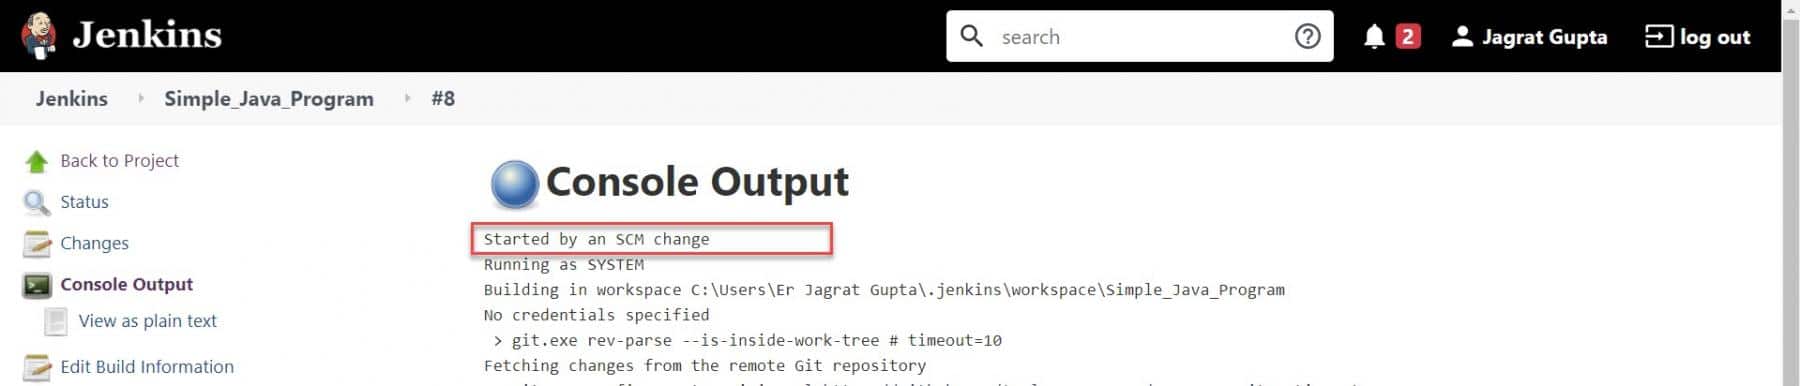
In the end, we can see the build result as a success.

So in this way, we can trigger our build via Poll SCM.
How to trigger Jenkins job remotely?
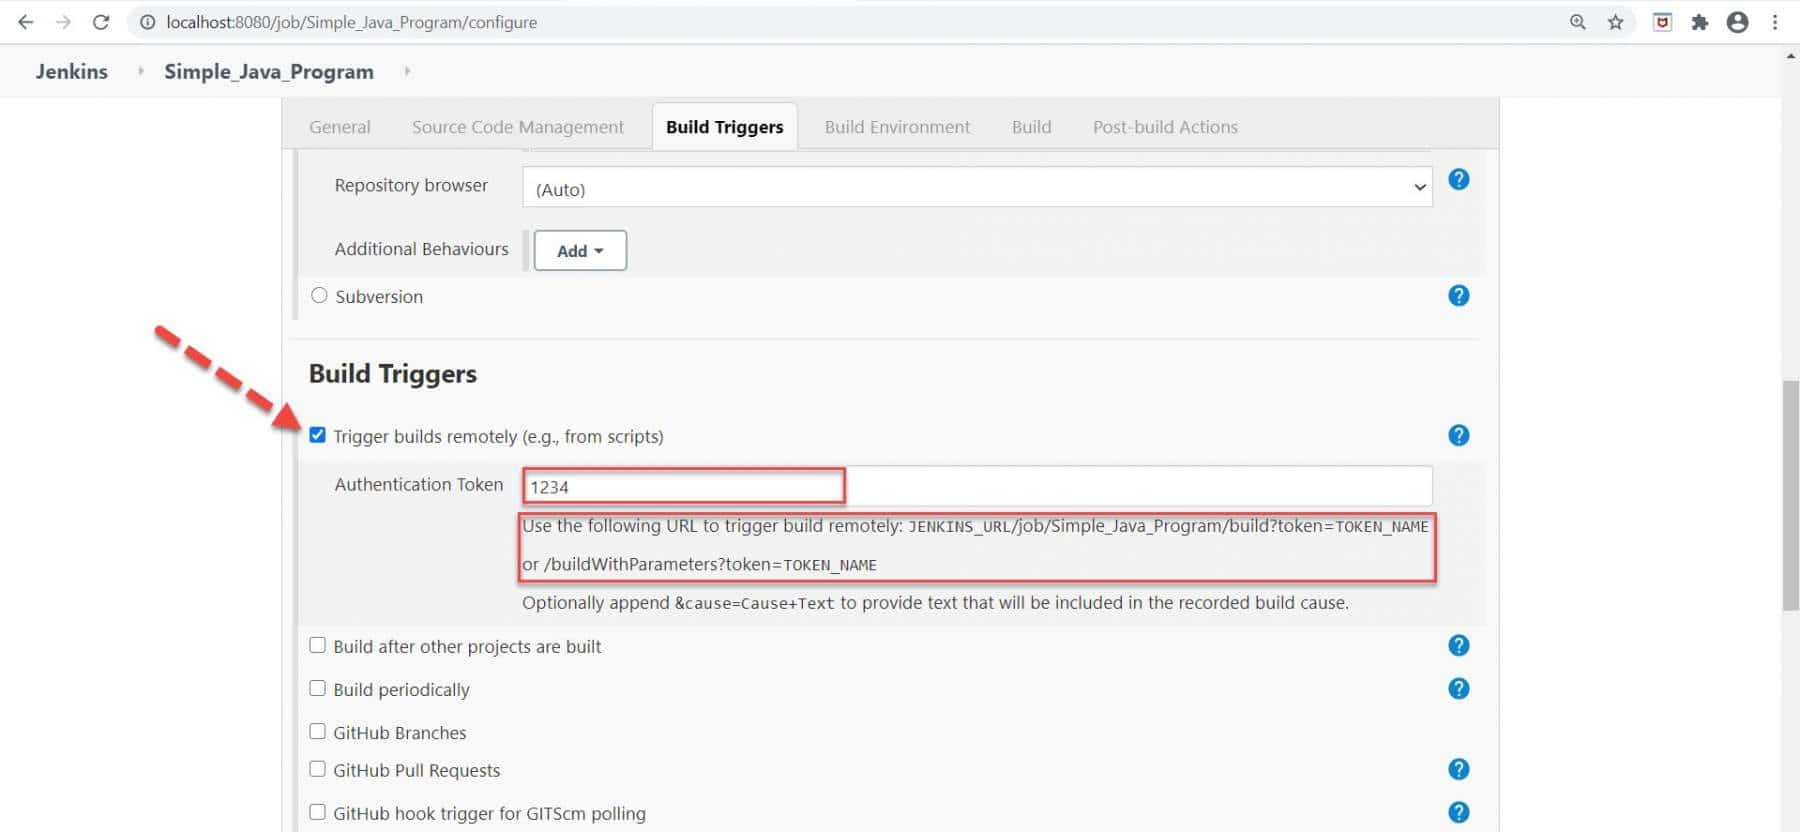
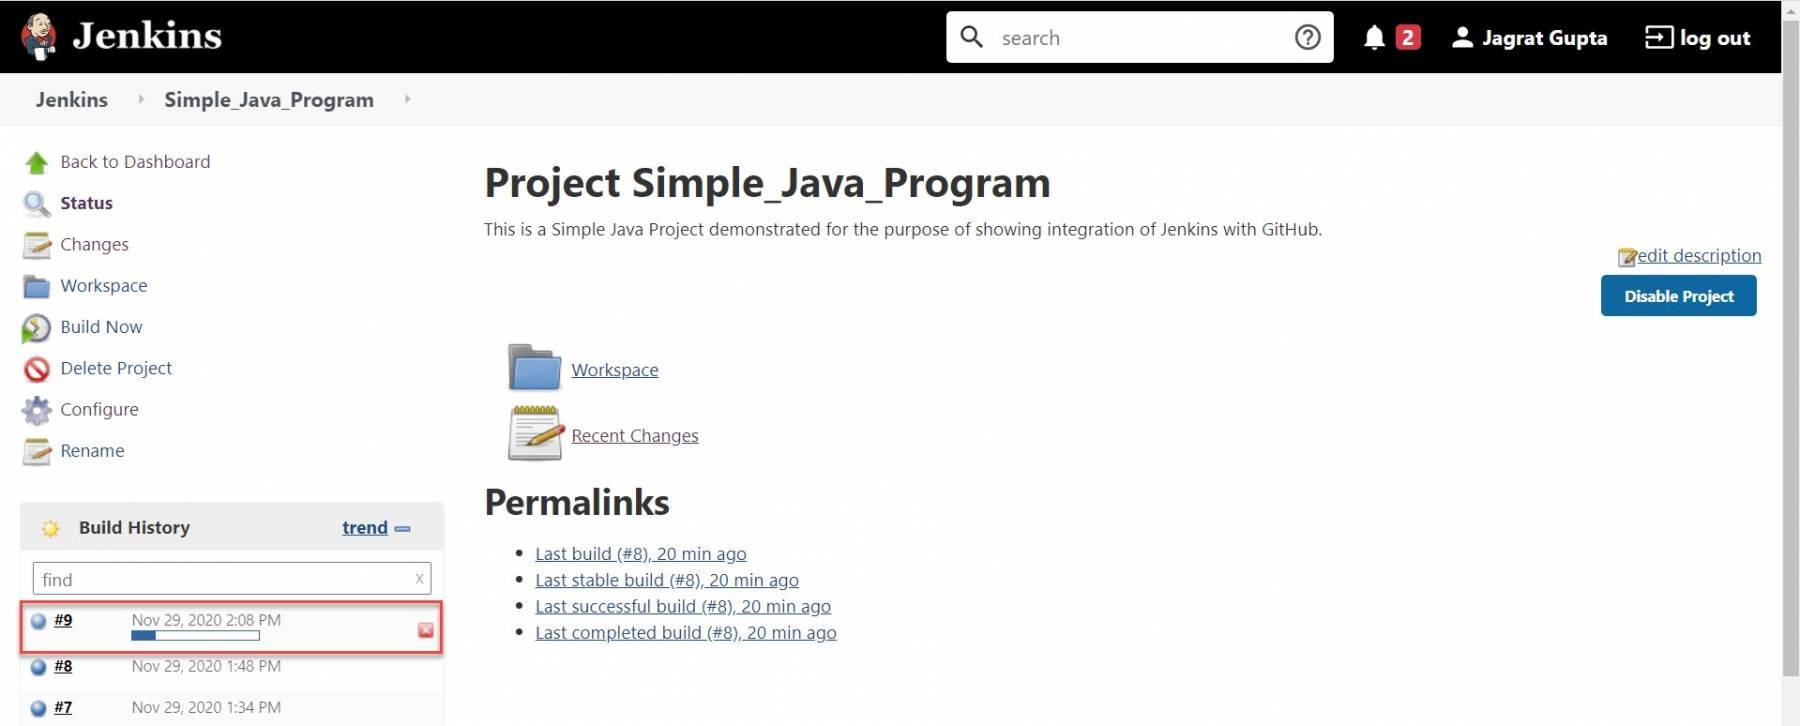
We use this option when we want to trigger new builds by accessing a special predefined URL. In Jenkins, as soon as we select the "Trigger builds remotely" option, we can see the suggested URL. Now our task is to build this URL and hit that URL in the browser. As part of it, we need to follow below steps:
- Copy URL (JENKINS_URL/job/Simple_Java_Program/build?token=TOKEN_NAME) and paste this URL somewhere in notepad.
- Put Jenkins URL like in case of mine it is http://localhost:8080/ in place of JENKINS_URL.
- Put the token name in place of TOKEN_NAME like I put 1234 in this case. We need to put the same token name in the Authentication token text box.
Now, as per the above steps, our URL will be like below:
http://localhost:8080/job/Simple_Java_Program/build?token=1234
Now, we will hit the above URL in a separate browser.

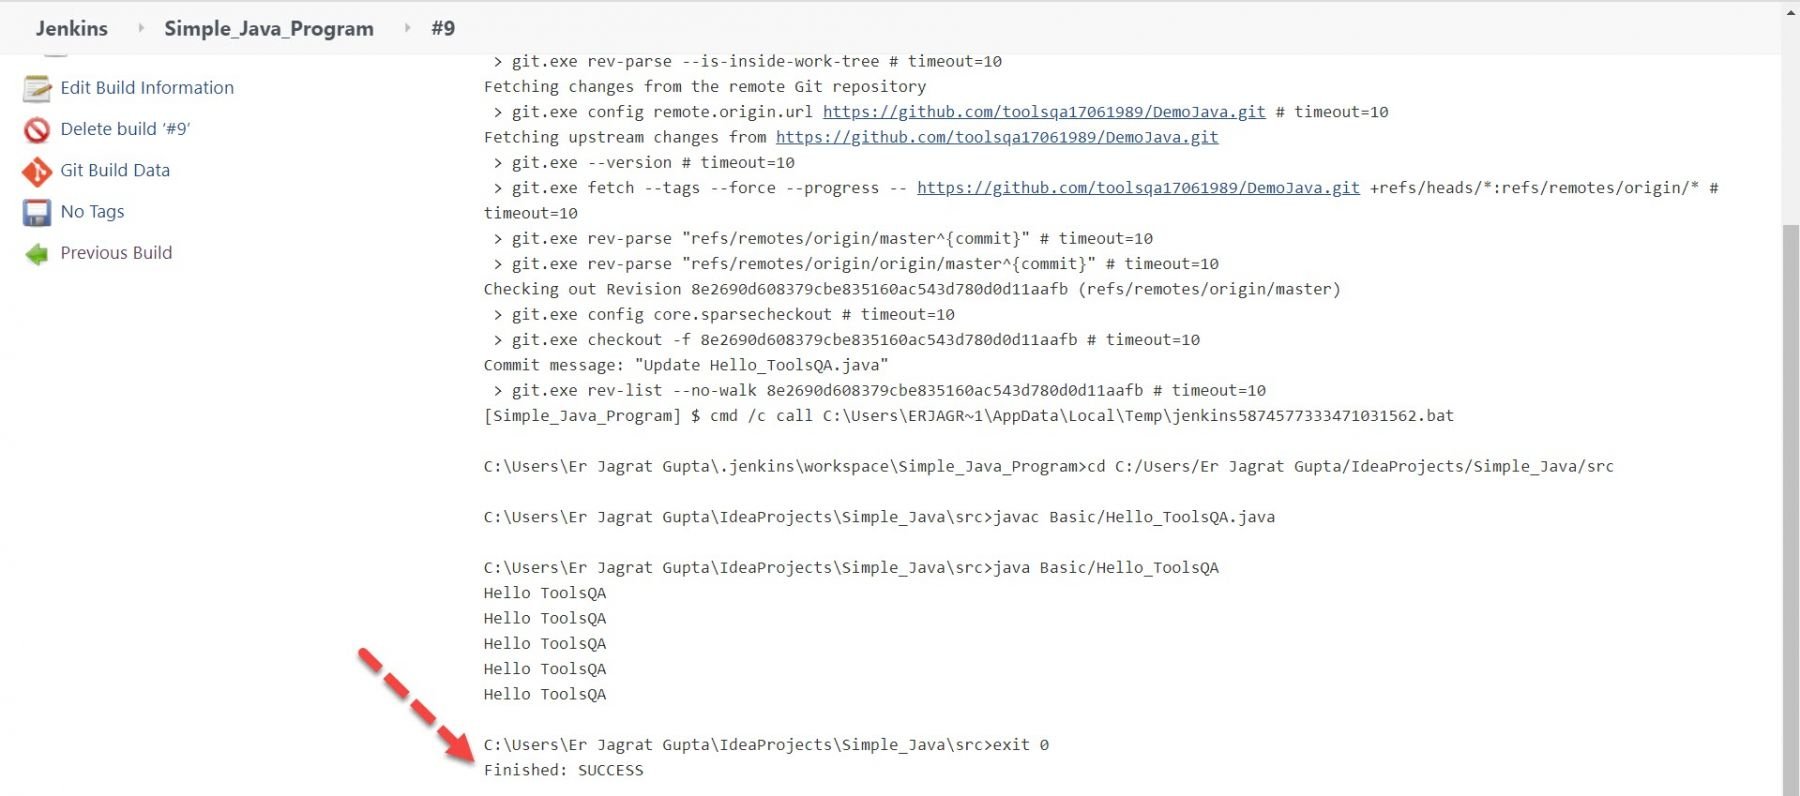
As soon as we will hit the URL in the browser, Jenkins will trigger the build automatically like in the below image.
For the above build, we can see the result in console output. In the console output, we can see the text "Started by remote host". It means that the build triggers remotely.
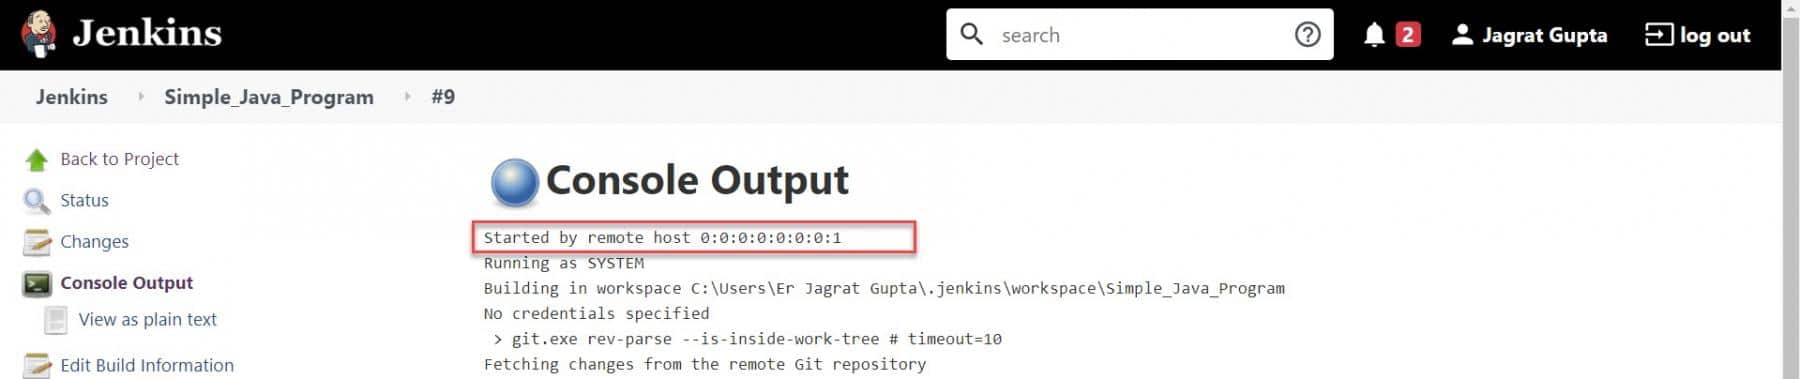
We can also see the build result as a success in console output.
So, in this way, we can trigger our Jenkins build job via a remote URL. That's all for this section. In the next section, let's see how to trigger another job in Jenkins post-build.
How to trigger another job in Jenkins post-build?
Sometimes, we need to run multiple jobs in Jenkins and those jobs are dependent or even not dependent on each other. For dependent jobs, we can say like "If one job build is successful then another job should run" and for the independent job, we can check like "If for one job, the build will be successful then only new build will be checked for another job". In this section, we will see that how can we implement the above scenarios for executing the Jenkins build jobs. Kindly follow the below steps to implement it:
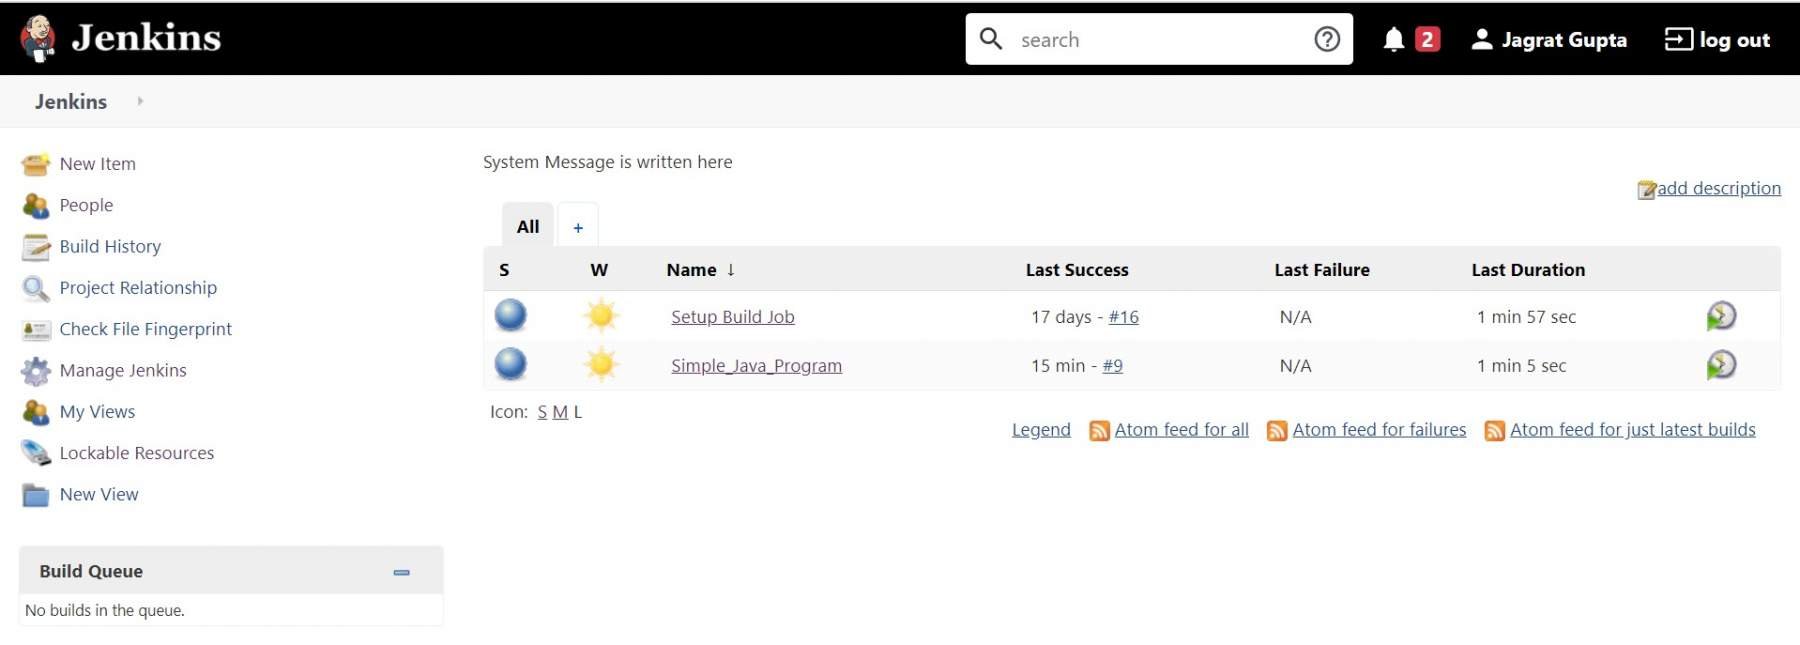
Step 1: As we can see in our Jenkins dashboard, we have two jobs and I want that if "Simple_Java_Program" is successful then only the "Setup Build Job" job should run.
Step 2: Now go to the configuration section of Simple_Java_Program job. Go to "Post-build actions" and we will see the "Add post-build action" dropdown.

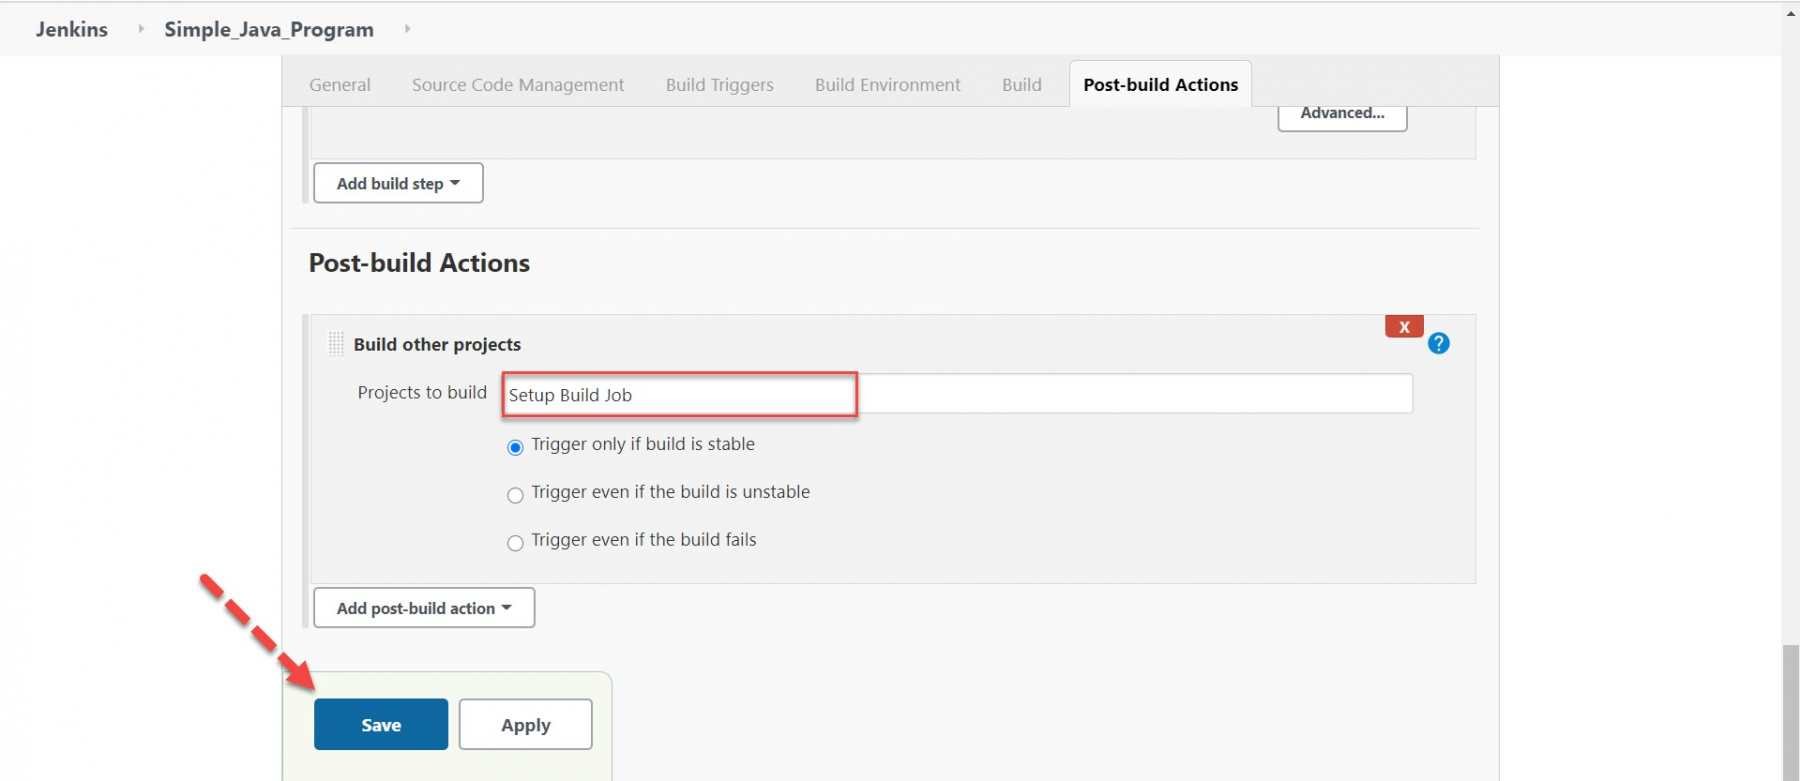
Step 3: Click on Add post-build action dropdown and select the option "Build other projects".

Here, we need to give the project name that we want to run.
Step 4: Give the project name "Setup Build Job" inside the "Projects to Build" textbox. By default, we will select the "Trigger only if build is stable" option, which is fine. After mentioning another job name, now click on the Save button.
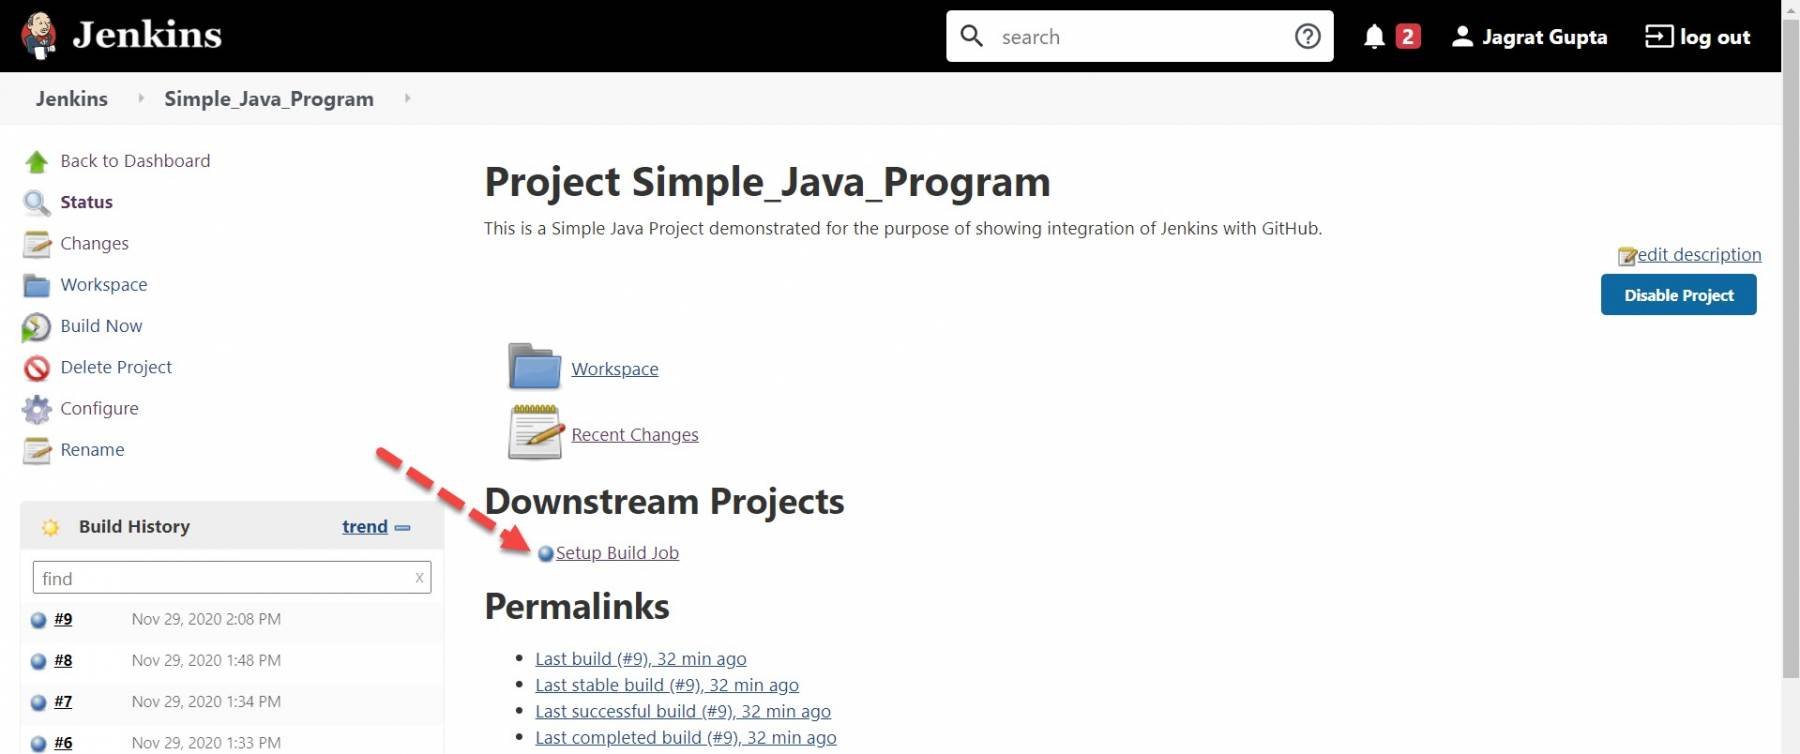
Step 5: As soon as we will click on the Save button, we will reach towards the Setup build job page and we will see the same job name that we mentioned in the above step just below the "Downstream Projects" text. So here, we will refer to "Simple_Java_Program" as "Upstream Project" and "Setup Build Job" as "Downstream Project".
Step 6: Now we will click on the "Build Now" option to run this job. The important point is that "As soon as a simple java program will run successfully, immediately another job that is "set up build job" will run automatically".
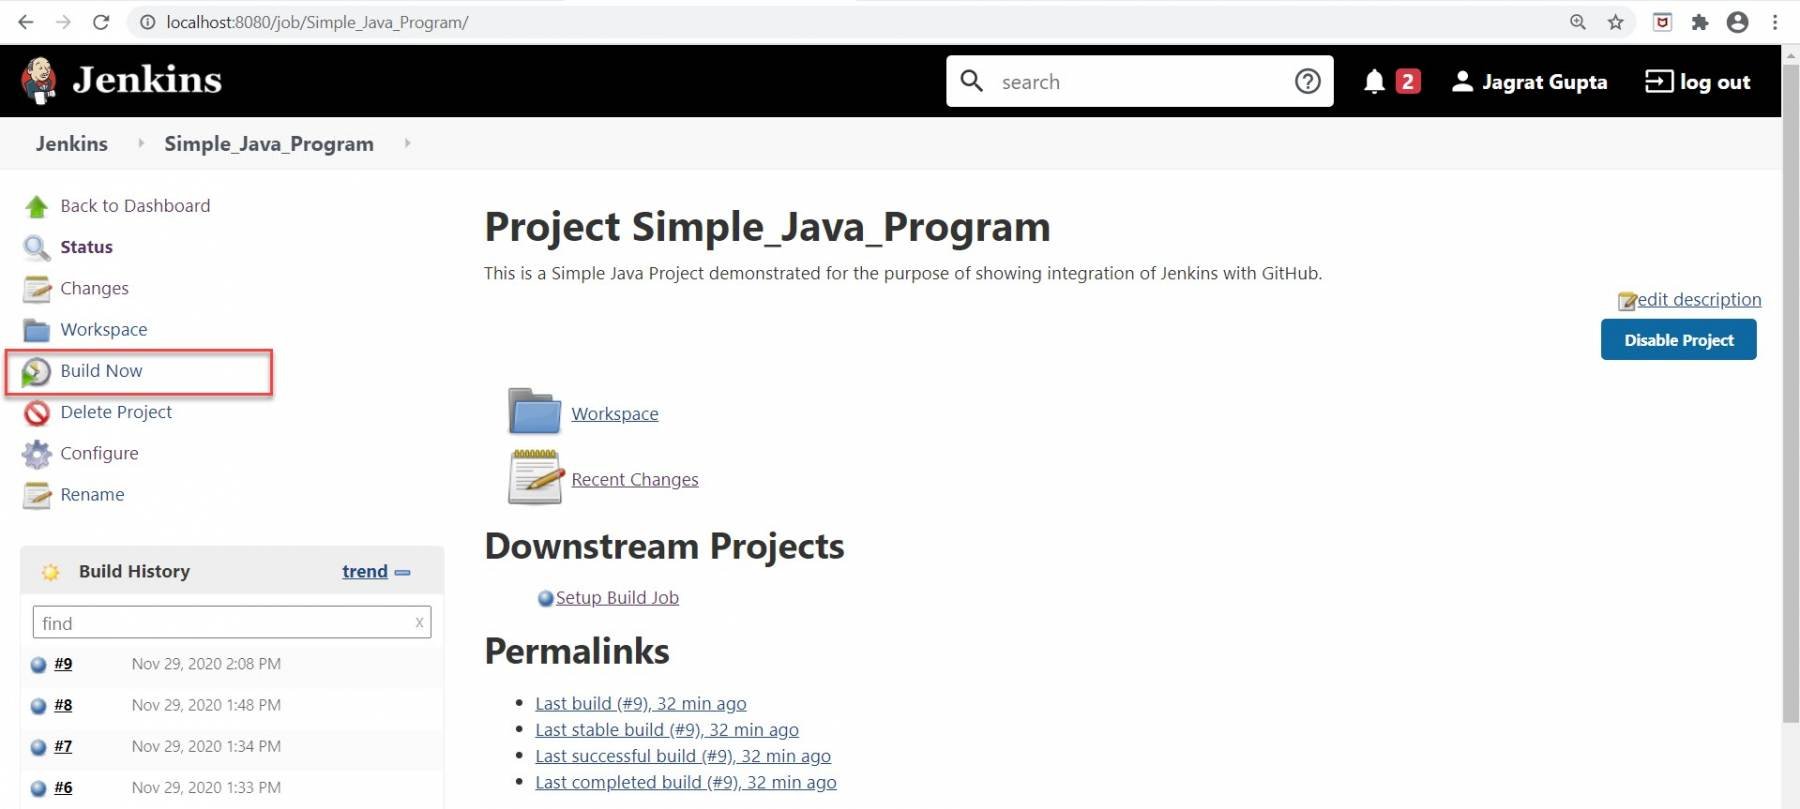
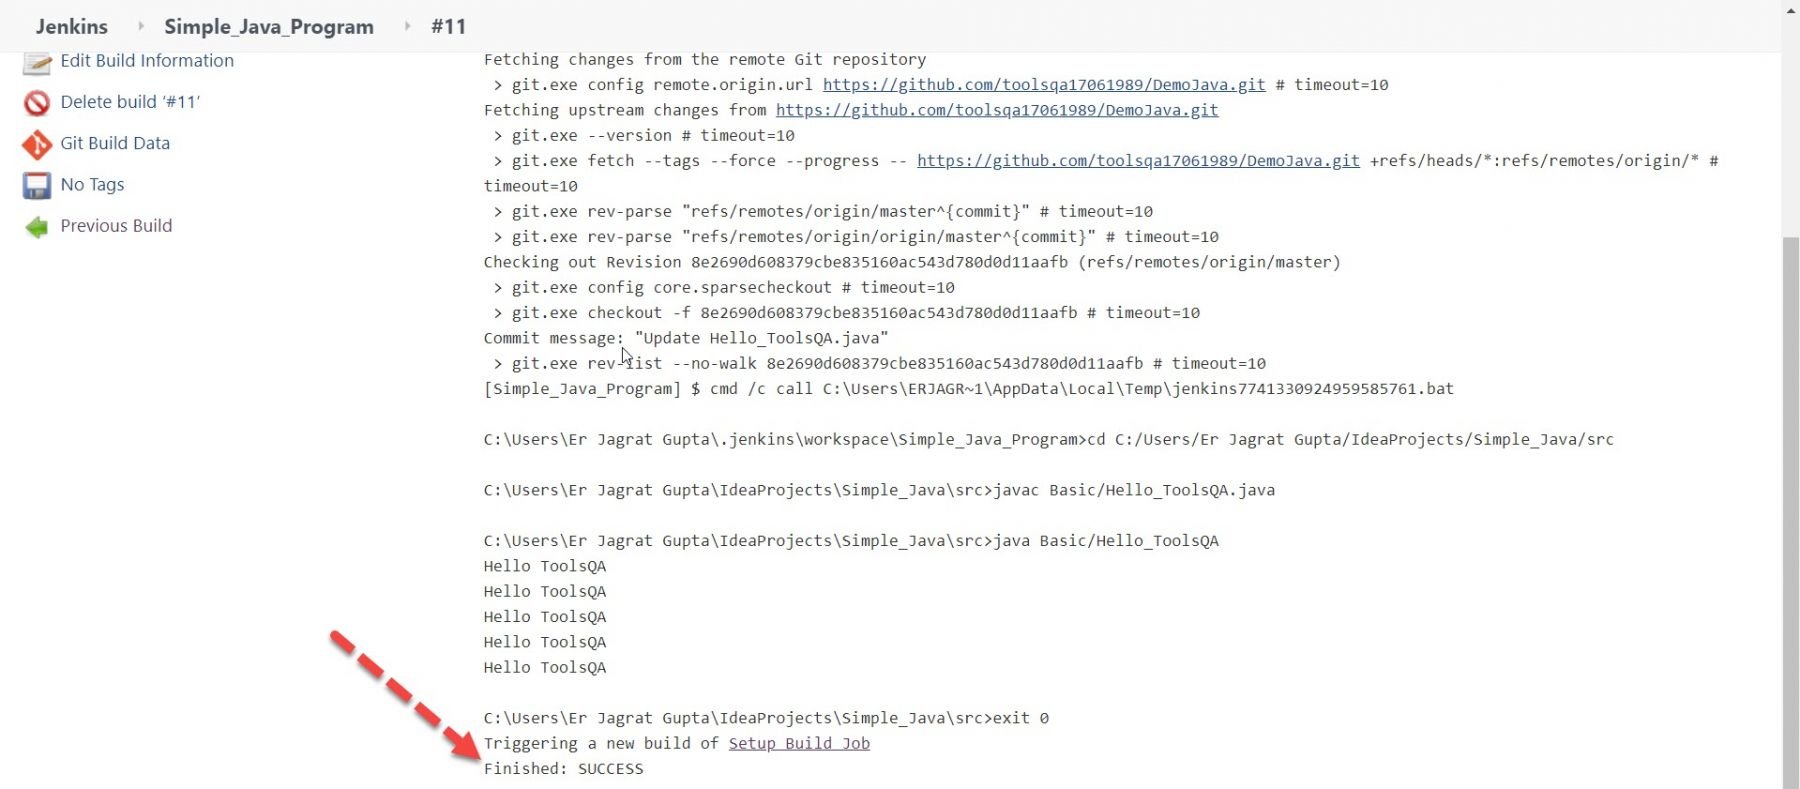
Step 7: Here, we can see in the below image that the Simple java program job is starting to run.
We can see the build results in the console output.
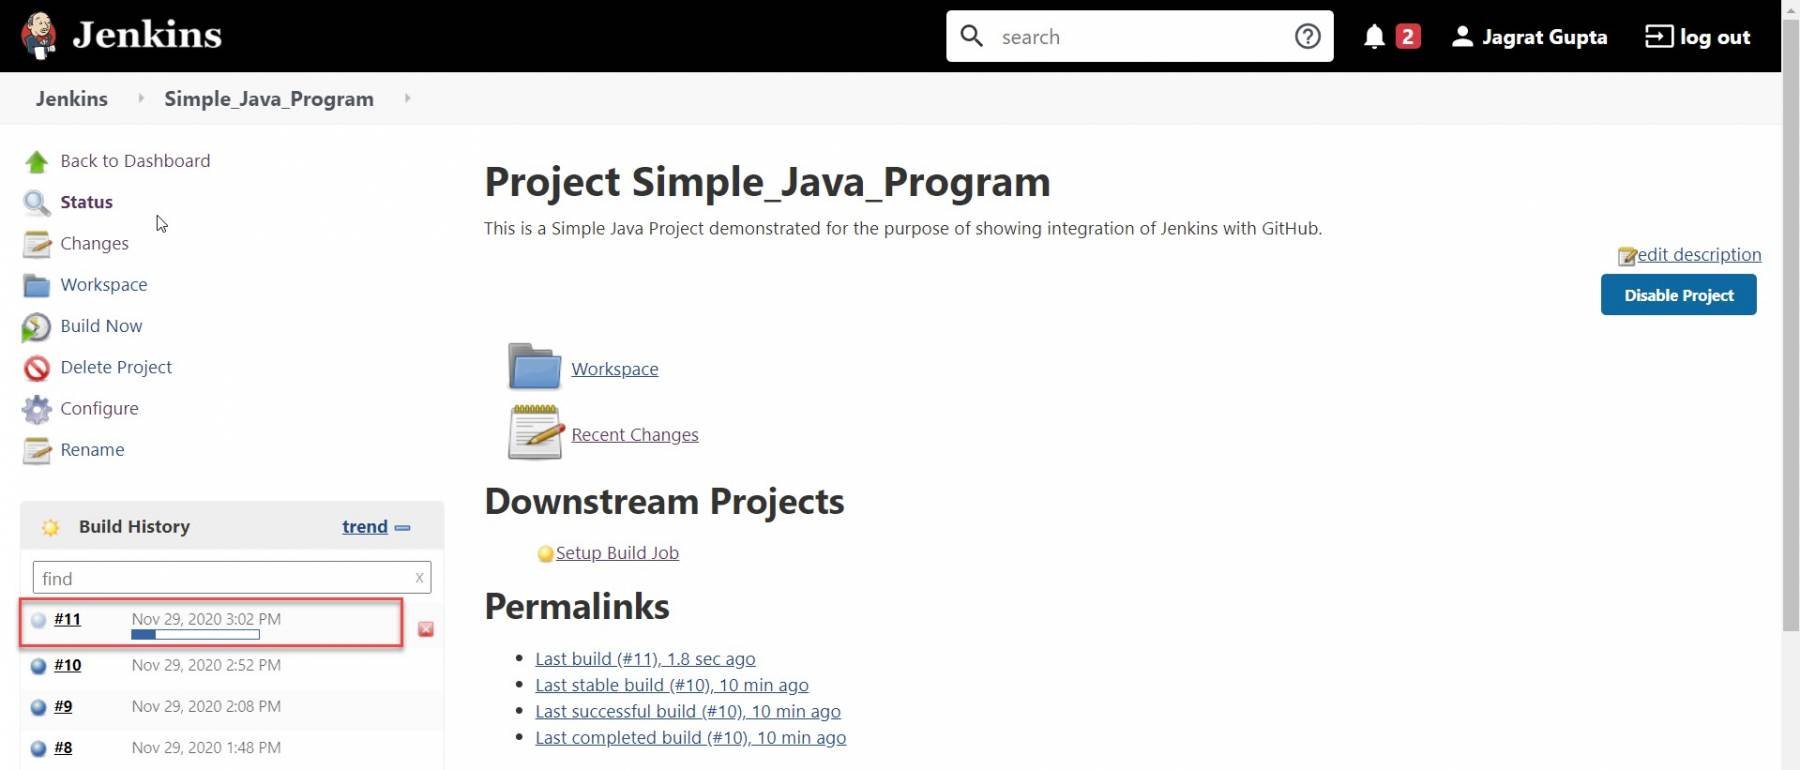
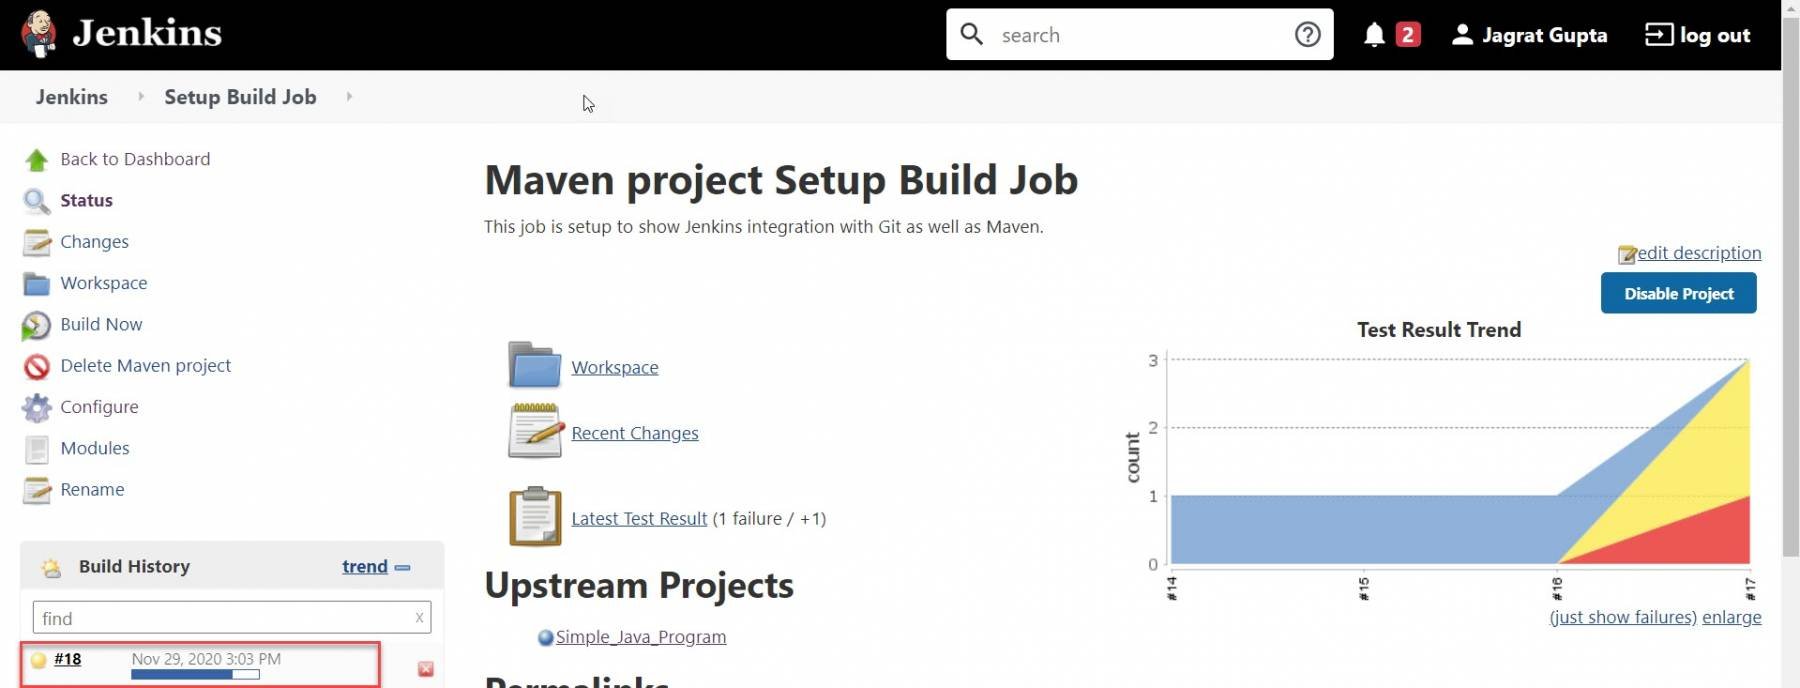
Step 8: As soon as the above build will be successful, another job will automatically be started.
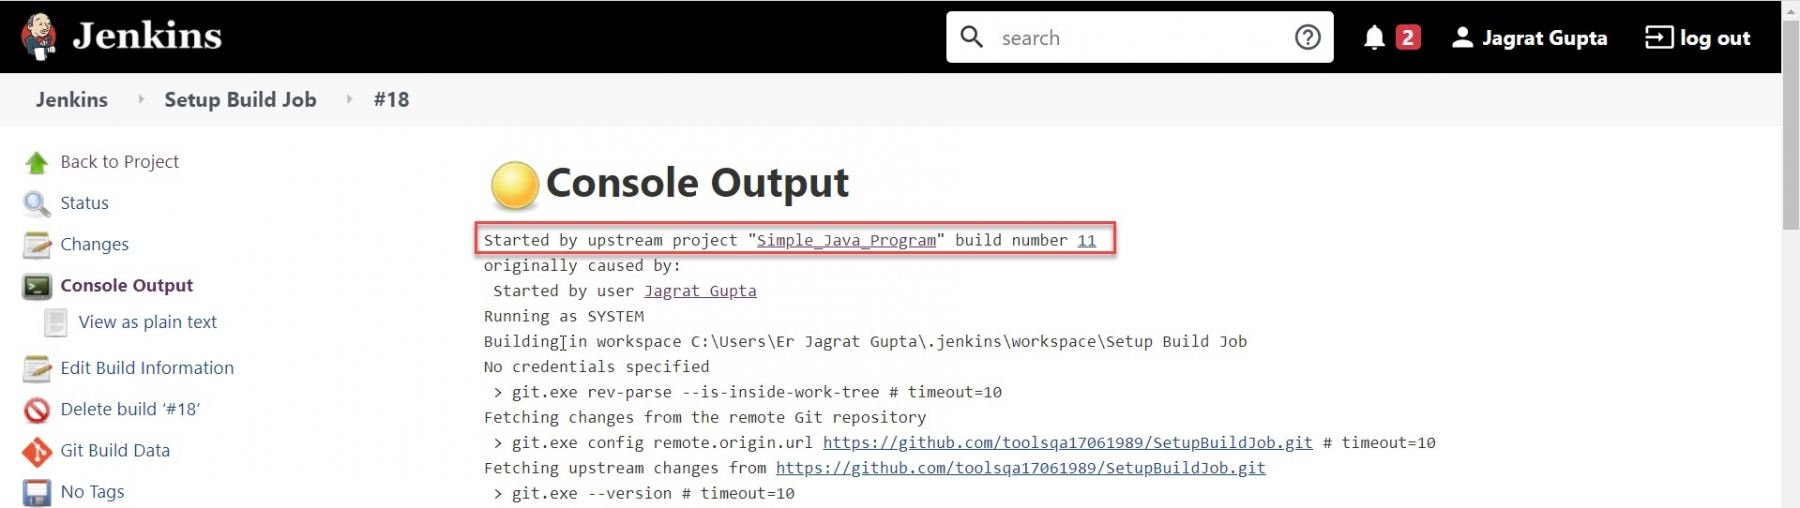
Step 9: As soon as execution will be finished then we can see build results in the console output. In the console output, we can see the text "Started by upstream project" which indicates that this job automatically starts after successful execution of the upstream job.
So in this way, we can run another job via post-build action.
Key Takeaways:
- A job is a runnable task that Jenkins controls to achieve a required objective.
- Also, we can create a new job by clicking on "New Item" in the Jenkins dashboard.
- We need to configure our jobs according to our requirements for making it fully runnable.
- Additionally, we can trigger our build either through GitHub hookup or build periodically or Poll SCM or trigger build remotely. These are the most common methods that we use in the IT world.
- Lastly, another job can automatically trigger through the Post-build action in Jenkins.