****In our last chapter, we introduced the Docker platform with a very brief introduction to the Docker images. Subsequently, in this article, we will see these images (and Docker hub) in great detail.
Everything in Docker is based on images. An image put is a combination of a file system and its parameters. Moreover, for anyone intending to use Docker for the first time, Docker Image is the starting point. A Docker image is a read-only template. It usually contains an instruction set to create a container that executes on the Docker platform. It packages applications and the entire server environment (preconfigured) for us. Consequently, we can then use this image privately or share it publicly.
Now let us go ahead and discuss some of the topics related to them.
- What are Docker images?
- Docker run image command.
- Docker container registries.
- And Docker container repositories.
- How to view Docker images?
- Docker image command.
- How does it work?
- Docker image layers.
- Docker container layers.
- Parent image.
- Docker base image.
- Docker manifest.
- How to build a docker image?
- Dockerfile
- How to create a docker file?
- Docker build command.
- How to Save docker Images?
- Docker save command
- How to pull Docker images?
- Popular Docker commands.
- Docker image vs. container.
What are Docker images?
A Docker image is a file that consists of many intermediate layers used to execute code in a container. Additionally, these layers are responsible for increased reusability and decreased disk usage in the Docker environment. An image builds from a set of instructions for a complete, working version of an application. Moreover, the application version relies on the host OS.
So when we say we are running an image, we are running single or multiple instances of the container.
Docker run image command
Docker run image is a very common command used in the Docker ecosystem. Additionally, the description of the same is as below:
docker run hello-world
- The above command urges the Docker program on the OS to do something (in this case, run).
- Moreover, the "run" command specifies we need to create an instance of specified images. This instance will then be called a container.
- The argument specified, "hello-world" is an image, and we make a container from this.
The next command is
docker run -it centos /bin/bash
In the above command, we are trying to use the CentOS image from the Docker Hub to run CentOS on a Linux Ubuntu machine.
Additionally, the output of this command is as below:
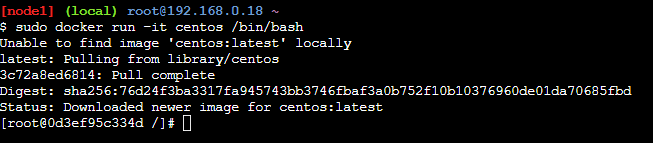
Here CentOS is the name of the image we want to create an instance of and install CentOS on our host machine. As we can see from the output, the command first tries to use the local image. However, since it is not present, the image gets pulled from Docker Hub.
Moreover, they store in specific locations, which we are going to discuss next.
Docker Container Registries
Docker container registries are catalogs that include storage locations or repositories. Moreover, we can push/store or pull/download them from these repositories, which we can publicly or privately on the docker hub.
We have the following main types of registries.
- Self-hosted registries: This is a registry model preferred by organizations. Here, organizations host the image on their infrastructure (on-premise). This way, they can ensure compliance, security, or lower latency requirements.
- Docker Hub: Docker Hub is Docker's official image resource. We can access more than 10k container docker images on Docker Hub. Anyone like software vendors, community users, or open-source projects can share container images on Docker Hub. At the same time, we can use the Docker Hub service to host and manage our private container images.
- Third-party registry services: Third-party registry services are fully managed services that manage all operations related to container images. Additionally, some of the third-party registry services popular today are Amazon ECR, Google Container Registry, Azure Container Registry, and JFrog's Container registry service.
Docker Container Repositories
Specific physical locations in a repository act as storage for the images. Each repository consists of a collection of related images having the same name.
For example, for the Ubuntu version of Linux, the official repository on the Docker hub is "ubuntu". So we can navigate this link and find that there will be different versions of images for this Linux version.
How to view Docker images?
Now that we know what they are and where we can find them, the next question arises how to view them?
The answer is by using the Docker command "docker images". We will discuss this command below.
Docker images command
The docker images command lists the images available on a particular machine. Additionally, the general/ typical syntax of this command is as follows:
docker images [OPTIONS] [REPOSITORY [: TAG]]
The default "docker images" command will show all the top-level images along with their repository, tags, and also their size. However, the intermediate layer of the image (these are explained later in this chapter) is not displayed by the default command.
For example, when we give the command "docker images" on our machine with Docker installed, it will list the following output.
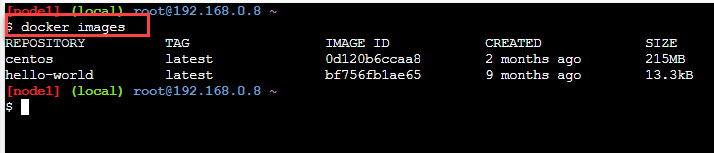
As shown in the screenshot above, the machine where we executed this command has two images as listed. So this command will list these images and their corresponding TAG, IMAGE ID, CREATED, and SIZE.
The "size" of the Docker image is the collective space of the image and all its parent images. Additionally, it is also the disk space used by the "tar" file that is created by the "docker save" image.
In addition to the above, if the image appears multiple times in the repository, it will have different tags and will list more than once.
How does it work?
A Docker image collects files like application code, installations, binary files, and dependencies bundled together. We require these files for configuring and making the container environment operational.
Subsequently, let us now discuss this concept to understand how they work? Below shown is an image within a container. It shows an image and multiple layers within that image.
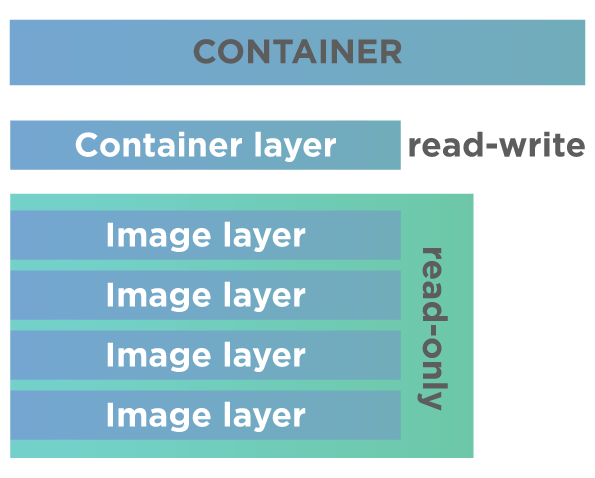
As shown in the above diagram, we create a container based on a particular image, and we cannot alter it (the image layer is shown read-only). Moreover, when we run a container, we create a read-write copy of the image inside the container that inserts a container layer. Consequently, this container layer permits us to perform modifications on the copy of the image.
We can infer from the above diagram that we can make an unlimited number of images from one image base. Moreover, each time we do this, a new template with an additional layer is created on top of it (as shown by multiple read-only image layers in the above diagram). Additionally, image layers are discussed below in more detail.
Docker Image layers
A layer in an image is each file that makes up a Docker image. They form numerous intermediate images built on top of another in various stages. Additionally, each of these layers is dependent on the layer immediately below the current one.
This hierarchy of layers is essential for the lifecycle management of images. Note that the image layers should be organized so that changes are often placed as high in the stack as possible.
Why should this frequently changing layer be on top? Because whenever an image layer changes in the image, Docker rebuilds that particular layer and all the other layers built from it. Therefore, when the frequently changing layer is at the top of the stack, we require the least amount of computations to rebuild the entire image.
Docker Container Layers
We know that when we run an image, actually Docker launches a container from the image. Every time this happens, the Docker adds a "thin writable layer". Additionally, this layer is also called a "container layer" and is responsible for storing all changes made to the container throughout its execution or runtime.
This thin writable layer acts as the only difference between an operational live container and a Docker image. Hence, any number of containers can access to same underlying image without interfering with other containers. In addition to this, note that when containers share the same image, there is a considerable reduction in resource overhead.
Parent Image
The first layer of the Docker image is usually called "Parent image". Based on this parent image, the other layers build. Therefore, the parent image provides the foundation for the container environment.
The public container registry Docker Hub provides numerous ready-made images. As also other private container registries listed earlier in this article.
For example, the CentOS image we used in our earlier example is a parent image.
Docker Base Image
If we want to build a Docker image from scratch, then we have an empty first layer. It is called the docker base image. Additionally, with the docker base image, we have complete control over the image contents. Therefore, Docker base images are generally suitable for more advanced Docker users.
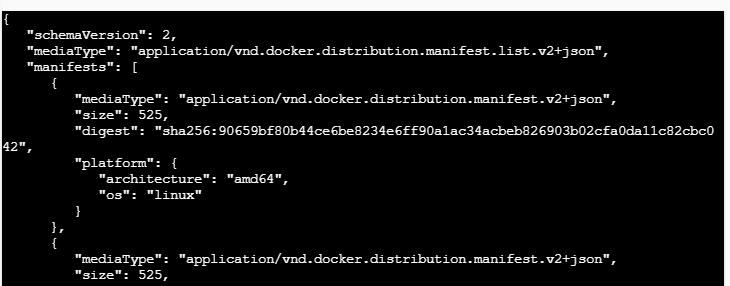
Docker Manifest
It is an additional file associated with Docker image in addition to other sets of individual layer files. Moreover, the Docker manifest contains image description in JSON format and contains information like image tags, information to configure containers based on the type of host machine, and digital signature. For example, the command
docker manifest inspect hello-world
will produce the output containing detailed information for the image "hello-world". Additionally, the partial output for the above command is in the following screenshot.
Now that we know the constituents and working of the Docker image, let us move on to how to create them.
It can be created in two ways as follows:
- Interactive Method: Here, we run or execute a container from an existing image. Moreover, to do this, we manually change the container environment and save the obtained state in a new image.
- Dockerfile Method: A DockerFile method is more popular. Here we construct a simple plain-text file called "Dockerfile" containing the specifications to create a new image.
Subsequently, we will focus on creating and building an image using Dockerfile.
How to build a Docker Image?
We can build an image from scratch using a Dockerfile. So, what is a Dockerfile?
Dockerfile
A Dockerfile is a simple text file containing the script with an instruction sequence to build an image. Additionally, the instructions or sequence of commands are somewhat identical to Linux commands. Docker executes these commands automatically in the Docker environment and builds the image.
How to create a Docker file?
The following steps will help you in writing a Dockerfile from scratch.
Create a Dockerfile
- Firstly, create a new directory, "myDockerdir", using the following command
mkdir myDockerdir
- Secondly, move into the "myDockerdir" directory.
cd myDockerdir
- Then create a file named "Dockerfile".
touch Dockerfile
- Now, open this file using any editor like 'vi'.
vi Dockerfile
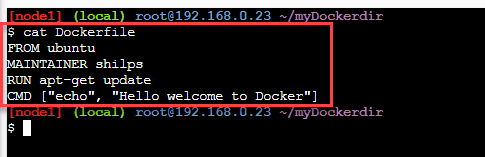
- Next, edit the file 'Dockerfile' and insert the following code in this file.
FROM ubuntu
MAINTAINER shilps
RUN apt-get update
CMD ["echo", "Hello World, welcome to Docker"]
The explanation of the commands used in the above code is as below:
- FROM => This is the base of the image that we create. Usually, we start with parent images (ex. ubuntu in the above example) or base images (from scratch).
- MAINTAINER => Here, we specify the author of the image.
- RUN => The RUN instruction executes a command when building an image in a layer on top of it. Moreover, there can be more than one RUN instruction in Dockerfile.
- CMD => A Dockerfile can have only one CMD instruction. Therefore, it provides defaults for the executing container. Additionally, we can also set a default command with the CMD instruction, and we can execute it if the container runs without specifying the command.
Once the above code saves to Dockerfile, exit the editor.
The Dockerfile we just generated looks as shown below.
Now let us follow a sequence of steps to build a Docker image from the Dockerfile written above.
Docker build command
The command to build an image using Dockerfile is "docker build".
Moreover, the general syntax of the docker build command is:
docker build [OPTIONS] PATH | URL | -
Generally, we use the following command to build a Docker image.
docker build [location of Dockerfile]
In case we are still in the same directory as our Dockerfile, we can simply say
docker build .
Now to build an image using the above Dockerfile, we follow the following steps.
- Firstly, switch to the directory "myDockerdir". It is the directory where we have our Dockerfile.
- Once we are in the "myDockerdir", execute the following command.
docker build .
Note that in this command, we have provided the current directory as the argument. It is because Docker will automatically search for a file named 'Dockerfile' and execute it.
Additionally, the output from the above command is as follows:
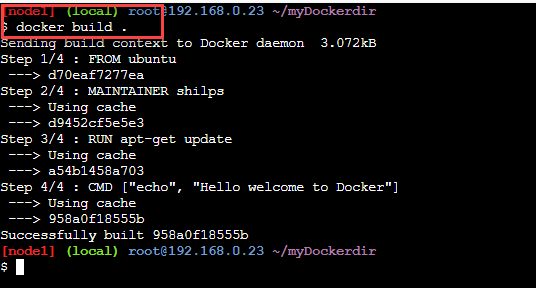
The above command shows the output of the "docker build" command.
- To verify the creation of the image, we can use the following command to list the images available.
docker images
The above command gives the following output.

Note the image details in the above screenshot. The generated image has no tag and name. It is because we did not specify the name of the image.
- If we have to provide a proper name to the image, we can specify it with the "-t" flag followed by the image name as done in the following command.
docker build -t first_docker_image .
In the above command, we have provided the name for the image that will generate. The output of the command is shown below:
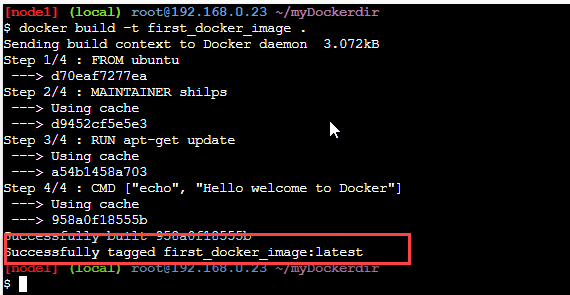
Note that now the docker build output has shown the image name also.
- To verify the image generation, let us list the images using the "docker images" command.
It generates the following output.

- Now that the image creation is successful, we have to launch a new Docker container to execute the image. We use the "docker run" command to achieve this.
docker run --name test_container first_docker_image
In this command, we provide a container name as "test_container" and associate the image we just created with it. For example, the "docker run" command output is as below:
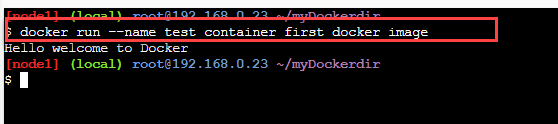
As seen from the above screenshot, when the container executes, the message we provided in CMD instruction in the Dockerfile displays.
With this, we have successfully built and executed a simple Docker image. For more details on the "docker build" command, refer to the docker build command.
How to Save Docker Images?
Once we build an image, we might want to use it in the future. Hence we need to save it on the host machine. So how do we achieve this?
For this purpose, we "save" it. Docker provides a "docker save" command to save the image.
Additionally, let us discuss this command now.
Docker save command
The command "docker save" saves one or more images to an archive, usually a 'tar' file.
The general syntax of the 'docker save' command is given below.
docker save [OPTIONS] IMAGE [IMAGE...]
This command generates a tarred repository to the standard output stream. The tarred repository contains all the versions, tags, or specified "repo: tag" for each argument provided.
This command has the following options that we can specify with the command.
- -- output, -o: this implies we can write to a file instead of STDOUT.
Let us see an example of a docker save command usage. The following screenshot shows the working of this command.
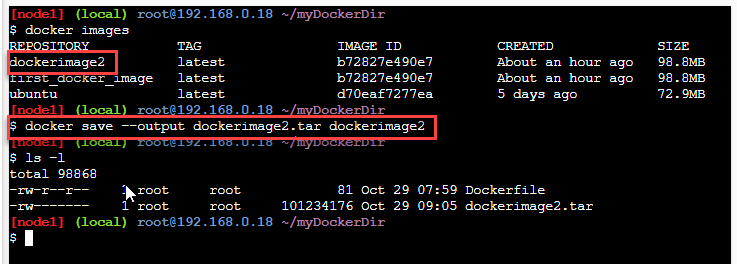
We can see from the above screenshot that first, we list the images present. There are two of them on the host machine. Let us save the first image, 'dockerimage2 (first rectangle)' to a tar file.
For this, we have used the "docker save" command (shown in a 2nd rectangle). When we execute this command and then list the files present, we can see the tar file that the 'docker save' command generated.
How to pull Docker images?
Most of the time, they will be created using existing images. However, there are thousands of images present on Docker Hub, which we can use to create our images. For this, we need to pull these images from the Docker Hub.
Docker provides a command 'docker pull' to allow the user to pull required images from the docker registry like Docker Hub.
Subsequently, let us discuss more on this.
The general syntax of the 'docker pull' command is:
docker pull [OPTIONS] NAME[:TAG|@DIGEST]
This command supports the following options
| Option | Default | Description |
|---|---|---|
| --all-tags, -a | this option is used to pull/download all tagged images | |
| --disable-content-trust | true | Skip image verification |
| --quiet, -q | Suppress verbose output | |
| --platform | Set platform if the server is multi-platform capable |
Now let us try to pull an image from the repository as an example. Additionally, consider the following screenshot.
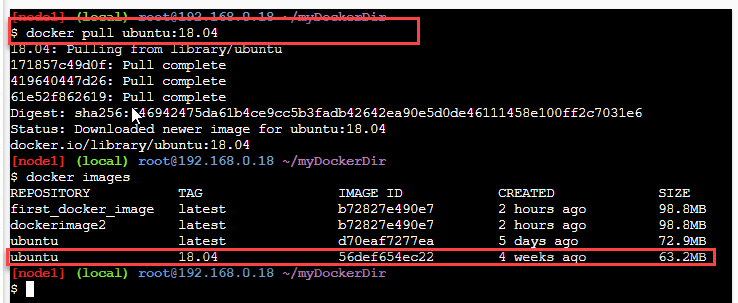
Here we specified the image name 'ubuntu' as well as digest '18.04' since we want to pull a fixed version of ubuntu 18.04.
Moreover, the above screenshot also shows the just pulled image when we list the images.
Popular Docker commands
Apart from the main commands/operations, we have discussed above for Docker image; there are more popular Docker commands related to it. Subsequently, these are shown in the list below.
| Docker Command | Syntax | Description |
|---|---|---|
| Remove image | docker rmi ImageID | Remove the image specified by ImageID. |
| docker inspect | docker inspect Repository | This command sees the details of an image or container specified by the ‘Repository’. |
| Docker history | docker history ImageID | Allows seeing all the commands that ran with an image given by ImageID via a container. |
| Load image | docker image load | Loads an image from a tar archive or streams for receiving or reading input (STDIN). |
| Prune image | docker image prune | This command removes unused images. |
| Push image | docker image push | pushes an image or the repository into the registry. |
Moreover, to learn these commands in more detail, please refer to Docker commands.
Docker Image vs. Container
The following table differentiates the Docker image from the container.
| Docker image | The Docker Container |
|---|---|
| It is the Blueprint of the Container. | It is an instance of the Docker image. |
| Image is a logical entity, not a physical one. | The container is a real-world physical entity. |
| We create an image only once. | We create containers using a Docker image, and we can create any number of times. |
| It is immutable in nature. | Container changes when the old image is deleted or a new image is used to build the container. |
| Since images do not run by themselves, they do not require computing resources to work. | Containers run as Docker virtual machines. Hence, they require computing resources to run. |
| We create it using a script written in Dockerfile. | We make containers by running the ‘docker build’ command. |
| It packages up applications and pre-configured server environments. | Containers operate using server information and file system provided by the image. |
| Images get shared on Docker Hub. | Since the container is a running entity, it does not get shared. |
| They do not have a ‘running’ state. | Containers are in a running state. |
Key TakeAways
- The Docker image act as a template or blueprint of a particular system.
- Additionally, it may contain the application, code, and other runtime environments bundled together.
- Moreover, it is a read-only entity, and we need to associate it with a container to run it.
- Also, we can associate one image with more than one container at the same time.
- Additionally, we can build, save, archive, etc., them by using various docker image commands.
After learnings the basics of the Docker image, we will subsequently move to Docker containers in our next article.