As we know, Selenium is a set of tools that offers vast features to automate complex web applications. Moreover, its popularity has given rise to an extensive community fan base, and the fact that it is open-source helps it add top-notch features every day. Selenium WebDriver offers multiple methods that allow users to automate various user journeys on the web applications under test. For testing a web application, the user needs to open the application in a browser and then need to perform specific actions/validations on the various web elements. Subsequently, in this article, we will learn how to run your first Selenium test script by performing multiple steps on a web application using a Selenium WebDriver by covering the details under the following topics:
- How to write your first Selenium test case?
- How to open a browser using Selenium WebDriver?
- How to navigate to a web page using Selenium WebDriver?
- Also, how to locate a web element on a web page using Selenium WebDriver?
- How to perform actions on web elements using Selenium WebDriver?
- How to perform validations on web elements using Selenium WebDriver?
- And, how to close the browser using Selenium WebDriver?
- How to run your first Selenium test script?
- How to execute the Selenium test case in Eclipse?
How to write your first Selenium test case?
Before start running the first Selenium test script, we need to fulfill a few pre-requisites as mentioned below:
Once done with the above steps, you are now all set to write your First Selenium Test Script. Suppose we take the next user journey for automation using Selenium WebDriver:
- Firstly, open the browser.
- Secondly, navigate to the ToolsQA Demo Website.
- Thirdly, maximize the browser window.
- After that, retrieve the title of the page.
- Fifthly, log in to the Website by specifying credentials.
- Sixthly, validate the LogOut button is visible.
- Lastly, we logout from the Website.
Note: We will use the login username - 'testuser' and password- 'Password@123' for our test script. Additionally, you can create a user for yourself if need be.
Let us now begin with the step by step journey of writing our first Selenium test script.
How to open a browser using Selenium WebDriver?
The first step for automating any test case using Selenium WebDriver is "Open a Browser". The Selenium WebDriver provides multiple drivers for different browsers like ChromeDriver for Chrome browser, InternetExplorerDriver for IE, GeckoDriver for Firefox browser. Consequently, depending on your requirement, you can choose the desired driver and instantiate the WebDriver for the specified browser.
As we know that WebDriver is an interface which can instantiate using the driver class of any of the browser. A few of the samples for instantiating the WebDriver using Firefox and Chrome driver is as shown below:
Instantiate WebDriver using Firefox Driver:
import org.openqa.selenium.WebDriver;
import org.openqa.selenium.firefox.FirefoxDriver;
System.setProperty("webdriver.gecko.driver", "<Gecko Driver executable location on your system>");
WebDriver driver = new FirefoxDriver();
Instantiate WebDriver using Chrome Driver:
import org.openqa.selenium.WebDriver;
import org.openqa.selenium.chrome.ChromeDriver;
System.setProperty("webdriver.chrome.driver", "Chrome Driver executable location on your system");
WebDriver driver = new ChromeDriver();
Subsequently, let's understand the details of the above code snippets:
Import WebDriver packages:
As we can see, both the above code snippets start with two import statements. Java import statements allow access to classes/methods that we declare in other packages. We can use the import keyword to import the built-in and user-defined packages in our java source file. Additionally, in doing so, our class can refer to a class that is in another package by directly using its name.
You can see that the first import statement is common for all the three examples, i.e.,
- import org.openqa.selenium.WebDriver; -- This import statement references the WebDriver interface that instantiates the browser.
The second import statement, i.e.
- import org.openqa.selenium.firefox.FirefoxDriver; , import org.openqa.selenium.chrome.ChromeDriver; on the other hand, references the Driver class, which instantiates browser drivers using the WebDriver interface.
Set path of browser driver:
Selenium 3 onwards, Selenium WebDriver expects an external executable, which will act as a medium of communication between the Selenium test and the corresponding browser. Moreover, the path of this executable needs to be explicitly set. There are various means of setting up the paths of the driver's corresponding to each browser, and one of them is using the "System.setProperty " method, using which we can set up various driver specific properties, such as "webdriver.chrome.driver " for chrome and "webdriver.gecko.driver " for firefox.
Object Instantiation of WebDriver
The fourth and most important statement is creating an Object of driver class by referencing the WebDriver interface. As already said above, this object/instance will call various WebDriver methods in our test script. Let us consider the chrome example here,
WebDriver driver = new ChromeDriver();
The above line of code would instantiate a Chrome browser in safe mode, with no plugins and extensions.
Additionally, for details of other browsers and various ways of instantiating the WebDriver, you can refer to the following articles:
- Running Selenium test cases on the Firefox browser.
- Running Selenium test cases on the Chrome browser.
- Similarly, you can read about Running Selenium test cases on the Edge browser.
- Running Selenium test cases on the Safari browser.
- Running Selenium test cases on the Internet Explorer browser.
Once we have created the object of WebDriver corresponding to a specific browser, the next step is to open our test application in the browser. Subsequently, let's see how we can achieve the same using Selenium WebDriver:
How to navigate to a web page using Selenium WebDriver?
Once the WebDriver instantiates, we will navigate to the desired web page. There are two methods in Selenium WebDriver using which you can navigate to a particular web page.
- driver.get("URL") - Navigates to the URL passed as an argument and waits till the page loads
- driver.navigate().to("URL") - Navigates to the URL passed as an argument and didn't wait for the page load. Additionally, it maintains browser history to navigate forward and backward.
You can use either of these two methods, but generally, the get() method is preferred since it would halt any further action until the page fully loads. We will be using the get() method in our examples. Moreover, the code for it would look like below-
driver.get("https://demoqa.com/login");
The driver variable would invoke the get() method to navigate to the website URL, which passes as a String argument.
Generally, when Selenium WebDriver opens the browser, it doesn't open the browser in a full window, which is how users use any browser. So, even in test automation, we should open the browser in full size. Let's see how we can achieve the same using Selenium WebDriver:
Maximize browser window using Selenium Webdriver?
When you launch the browser using Selenium WebDriver, it might not launch in full size. We can anytime maximize the browser window using a simple line of code-
driver.manage().window().maximize();
Where the manage() method returns an instance of the Options interface, now this Options interface has a window method that returns Window type. We then use the maximize method of the Window interface to maximize the browser window.
Retrieve the title of the page:
Just like the get() method, the getTitle() is another interesting method offered by WebDriver. It fetches the title of the currently opened web page and returns the same as a String. In the code below, the driver variable calls the getTitle() method and stores the values in a string variable 'title'. We are then printing this string variable on the console window using the Java print statement:
String title = driver.getTitle();
System.out.println("The page title is : " +title);
So, now that we have understood what Selenium WebDriver provides, different browser-specific methods, and how we can navigate to a specific page, maximize the browser and get the title of the currently opened webpage in the browser. Now, let's see how Selenium WebDriver can locate a particular web element on which we need to perform a specific action:
How to locate a web element on a web page using Selenium WebDriver?
The next step towards writing the automation scripts is locating the web elements we want to interact with. Selenium WebDriver provides various locator strategies using which it can locate various web elements on a page. The "By" provides all these locators. Class of Selenium WebDriver. For our example scenario, we have used the XPath locator strategy for locating the userName, password, and login button elements, as shown below:
import org.openqa.selenium.By;
import org.openqa.selenium.WebElement;

WebElement uName = driver.findElement(By.xpath("//*[@id='userName']"));
WebElement pswd = driver.findElement(By.xpath("//*[@id='password']"));
WebElement loginBtn = driver.findElement(By.xpath("//*[@id='login']"))
As you can see that the different Web Elements store in variables that would perform actions on these elements. With this, you will also notice two more import statements added to your code:
- import org.openqa.selenium.By; - It references the By class through which we call the locator type.
- import org.openqa.selenium.WebElement; - It references the WebElement class that helps instantiate a new web element.
Now that we have located the web elements, let's see how we can perform various actions, such as type, click, etc., on these web elements:
How to perform actions on web elements using Selenium WebDriver?
After we have located the web elements and stored them as WebElement instances, we will be performing actions on them like entering text for the user name and password and clicking on the login button. Selenium WebDriver provides multiple methods to perform actions on various web elements. A few of those methods exposed by the WebElement interface are:
- sendKeys() - used to enter text in the web element
- submit() - used to submit a form
- click() - used to perform click on the web element
- clear() - used to clear entered text
For example, we can use the methods as mentioned above, to enter the user name and password, as shown below:
uName.sendKeys("testuser");
pswd.sendKeys("Password@123");
loginBtn.click();
Note: The different WebElement commands can be learned more from the article WebElement Commands.
How to perform validations on web elements using Selenium WebDriver?
Once we perform the corresponding actions on the web elements, the next step should be to perform validations on certain web elements, which will ensure that the action which we performed execute successfully and result in the needed state of the element.
For Example, for the test user journey, once we will be able to log in to the ToolsQA Demo Site successfully, the logout button should be visible. Let's see how we can validate the visibility of the logout button and click on the logout button if it is visible:
try {

WebElement logoutBtn = driver.findElement(By.xpath("//div[@class='text-right col-md-5 col-sm-12']//button[@id='submit']"));

if(logoutBtn.isDisplayed()){
   logoutBtn.click();
   System.out.println("LogOut Successful!");
 }
}
catch (Exception e) {
     System.out.println("Incorrect login....");
}
Where,
- We first locate the logout button using the XPath
- After this, we check if it is displayed using the "isDisplayed()" method.
- If yes, we go on clicking it and printing the success message. If not, we print the error message. Notice that we are surrounding our code within the try-catch block. Since there might be an exception in case of incorrect login credentials, our test script would fail. Using the try-catch block, we can handle such situations and gracefully exit execution.
Note: You can refer to the article on Exception Handling for understanding more about this.
Now that the actions and validations needed for the test script are complete, the final step will be to close the browser. Let's see how we can close a browser using Selenium WebDriver:
How to close the browser using Selenium WebDriver?
The last step that marks the closing of your test script is the closing of the browser. You can close the browser using any of the following methods provided by Selenium WebDriver:
- close() - It closes the current browser window.
- quit() - It calls the dispose() method of the WebDriver that closes all the browser windows opened by the WebDriver and terminates the WebDriver session. It's always recommendable to use the quit() method as it releases the driver.
The below code is used for the driver to call the quit method.
driver.quit();
Now, we can club all the steps as mentioned above to create the complete test script. The consolidated code would look like below:
package firstPackage;

import java.util.concurrent.TimeUnit;

import org.openqa.selenium.By;
import org.openqa.selenium.WebDriver;
import org.openqa.selenium.WebElement;
import org.openqa.selenium.chrome.ChromeDriver;

public class MyFirstTestClass {

	public static void main(String[] args){
		//Setting the driver path
		System.setProperty("webdriver.chrome.driver", "E:\\Softwares\\chromedriver.exe");

		//Creating WebDriver instance
		WebDriver driver = new ChromeDriver();

		//Navigate to web page
		driver.get("https://demoqa.com/login");

		//Maximizing window
		driver.manage().window().maximize();

		//Retrieving web page title
		String title = driver.getTitle();
		System.out.println("The page title is : " +title);

		//Locating web element
		WebElement uName = driver.findElement(By.xpath("//*[@id='userName']"));
		WebElement pswd = driver.findElement(By.xpath("//*[@id='password']"));
		WebElement loginBtn = driver.findElement(By.xpath("//*[@id='login']"));


		//Peforming actions on web elements
		uName.sendKeys("testuser");
		pswd.sendKeys("Password@123");
		loginBtn.click();

		//Putting implicit wait
		driver.manage().timeouts().implicitlyWait(10, TimeUnit.SECONDS);

		try {

			//Locating web element
			WebElement logoutBtn = driver.findElement(By.xpath("//div[@class='text-right col-md-5 col-sm-12']//button[@id='submit']"));
			//Validating presence of element
			if(logoutBtn.isDisplayed()){

				//Performing action on web element
				logoutBtn.click();
				System.out.println("LogOut Successful!");
			}
		}
		catch (Exception e) {
			System.out.println("Incorrect login....");
		}

		//Closing browser session
		driver.quit();

	}

}
Now that we have our Selenium WebDriver test case ready, let's see how we can execute this test script:
How to run your first Selenium test script?
Executing a Selenium test case varies how it's written and which test executor got used. There are various test executors available, such as Junit, TestNG, but to make it simpler, we have put all the details in the "main" method of the Java class, So we can execute this test script the same way as we can run a simple Java class. Let us see how we can do that through Eclipse IDE:
How to execute the Selenium test script in Eclipse?
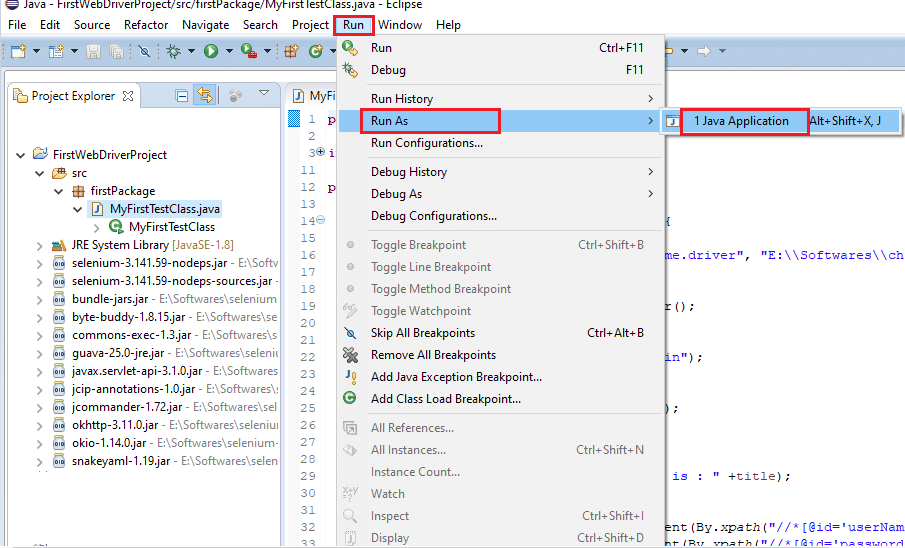
Suppose we have saved the above Selenium test script as "MyFirstTestClass" under the package "firstPackage". To execute the test script, we perform the following steps:
- Go to Run> Run As > Java Application. Alternatively, you can Right Click on the Eclipse code and Click Run As > Java Application.
- Next, you will see that the Chrome browser launches, and as per our script, the demo website would open. The title captured through the test script will print in the Eclipse console window, and then Login would happen. You will see successful logout on complete execution. Console logs would look like below, and there you go with your first Selenium WebDriver test script successful execution!
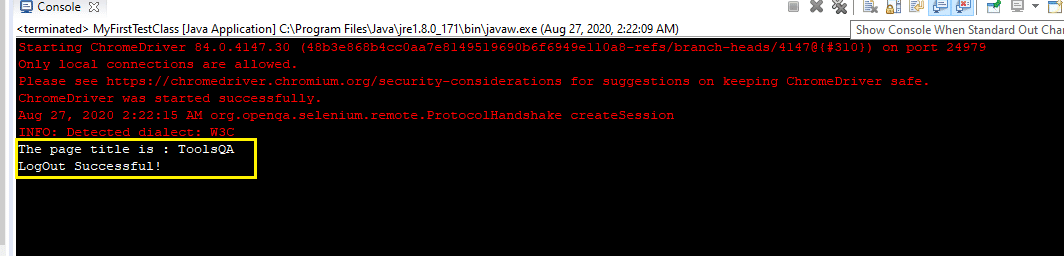
As is evident from the above screenshot, the test script was able to successfully log in to the demo site and then log out by clicking on the "logout" button.
Key Takeaways
- You are now all enabled to write your first Selenium WebDriver test script in a step-by-step manner, covering all necessary actions.
- Moreover, you can quickly locate the Web Elements you wish to work with and perform them.
- Additionally, you have understood the most basic selenium commands, including the wait command, and will incorporate them in your first script.
- In addition to the above, you will now be able to validate your web pages through Selenium WebDriver using java concepts.
- Lastly, you can quickly execute the tests through either the Eclipse IDE.