Automating a test will have no use if we don't have a proper solution to quantify and analyze the results. Whether it's a simple automated test or a Cucumber-based BDD framework, it needs to produce the execution's detailed result. Moreover, the result has to be in a format that can be understood and comprehended easily by stakeholders. Hence, imparting the capability to create an effective, detailed, well-documented, and easily understandable report is one of the most vital parts of the automation test framework development.
Cucumber offers inbuilt reported plugin like; progress, pretty, HTML, JSON, rerun, JUnit, etc. We have extensively covered these Cucumber reports in our previous tutorial on Cucumber Reports. Additionally, these in-built reports provide the user with basic test execution information like the number of tests executed or pass and fail count. Other third-party plugins like Extent Report can use these basic reports to create fancy and detailed execution reports. The detailed execution report can hold all the required information, including step-by-step analysis, screenshots, and better visuals.
- What is an Extent Report?
- Can we use the extent report with Cucumber?
- Can we use the extent report with JUnit?
- How to integrate the extent reports in a Cucumber-Junit project?
- How to generate the extent report?
- Cucumber Extent Reporter Features
- How to customize the report folder name?
- How to add screenshots to scenario steps?
- And, how to add screenshots only for failed scenario steps?
What is an Extent Report?
Extent Report is an open-source, powerful reporting library used for creating beautiful, detailed, and visually appealing reports for automation tests. Moreover, it can integrate with almost all the major testing frameworks like JUnit, TestNG, etc. Extent reports are HTML-based documents that can carry detailed information about the test executed along with custom logs, screenshots and use a pie chart to represent an overview of the test.
Can we use the extent report with Cucumber?
Extent reports cannot directly integrate with the Cucumber framework. But if you want to generate extent reports for your Cucumber features, you will need to use some adapter plugin. Additionally, this plugin will allow the Extent report to recognize and capture scenarios and features present in the framework. It is where the grasshopper cucumber adapter plugin comes into the picture. The plugin is built on top of the ExtentReport and allows you to quickly generate extent reports for your cucumber framework. Moreover, this plugin helps in reducing the pain of implementing the reporting in your framework.
Can we use the extent report with JUnit?
As we discussed in the previous topic, we cannot directly use the Extent report with Cucumber. But there are some plugins available that we can use to generate these reports. Let's see how we can implement this in our Cucumber framework. Moreover, if you want to learn how to set up your cucumber framework with JUnit, you can go through our previous tutorial on the same at the JUnit test runner class.
How to integrate the extent reports in a Cucumber-Junit project?
So, we now know that it's possible to integrate the Extent report with JUnit. Let look at the steps through which we can add an extent report to our Cucumber-Junit project.
Step 1: Firstly, add dependencies to the maven project.
Before we can configure the extent report for cucumber, we need to add its maven dependencies to our project. It is one of the perks of using a maven project instead of going through all the pain of downloading them as a separate library and adding them to the project build path. All you need to do is go ahead and mention your required library in the pom.xml file. Subsequently, let's add the following dependency from the maven repository to our project.
- Add Cucumber and JUnit dependencies to the project - Before we can proceed to add extent report dependencies to the project. As we will be using JUnit and Cucumber as a base of our project, it would be wise to add these dependencies first. Consequently, we will be adding the following dependencies to our project.
- cucumber-java
- cucumber-picocontainer
- cucumber-junit
- gherkin
- cucumber-jvm
These are the basic dependencies that are required to create and execute the Cucumber JUnit project. Subsequently, let's begin by adding these dependencies to our pom.xml file.
		<!-- https://mvnrepository.com/artifact/io.cucumber/cucumber-java -->
		<dependency>
			<groupId>io.cucumber</groupId>
			<artifactId>cucumber-java</artifactId>
			<version>6.8.1</version>
		</dependency>
		<!-- https://mvnrepository.com/artifact/io.cucumber/cucumber-picocontainer -->
		<dependency>
			<groupId>io.cucumber</groupId>
			<artifactId>cucumber-picocontainer</artifactId>
			<version>6.8.1</version>
			<scope>test</scope>
		</dependency>
		<!-- https://mvnrepository.com/artifact/io.cucumber/cucumber-junit -->
		<dependency>
			<groupId>io.cucumber</groupId>
			<artifactId>cucumber-junit</artifactId>
			<version>6.8.1</version>
			<scope>test</scope>
		</dependency>
		<!-- https://mvnrepository.com/artifact/io.cucumber/gherkin -->
		<dependency>
			<groupId>io.cucumber</groupId>
			<artifactId>gherkin</artifactId>
			<version>15.0.2</version>
		</dependency>
		<!-- https://mvnrepository.com/artifact/io.cucumber/cucumber-jvm -->
		<dependency>
			<groupId>io.cucumber</groupId>
			<artifactId>cucumber-jvm</artifactId>
			<version>6.8.1</version>
			<type>pom</type>
       </dependency>
- Add grasshopper extent report adapter plugin to the project - You can find the required grasshopper extent report adapter plugin at Maven Repository- Extent reports cucumber6 adapter.
Notes: To work with extent report 5, you will need to add your pom's latest available version. For earlier versions like Extent Report 4, please use version 1.2.
<!-- https://mvnrepository.com/artifact/tech.grasshopper/extentreports-cucumber6-adapter -->
<dependency>
    <groupId>tech.grasshopper</groupId>
    <artifactId>extentreports-cucumber6-adapter</artifactId>
    <version>2.1.0</version>
</dependency>
- Add Extent Report Library to the project - Next step is to add the Extent report library to the project. You can get all the dependency information from the maven repository official site here at Maven Repository- Extent Reports.
Please select the required version you want to use and then copy the dependency information from the maven tab and paste it into your pom.xml file.
<!-- https://mvnrepository.com/artifact/com.aventstack/extentreports -->
<dependency>
    <groupId>com.aventstack</groupId>
    <artifactId>extentreports</artifactId>
    <version>5.0.4</version>
</dependency>
Note: All these dependencies need to add between <dependencies> ..... </dependencies> tags present in the pom.xml file. Also, do update your project once you add the dependencies.
How to generate the extent report?
Once we provide all the required dependencies like Cucumber, JUnit, grasshopper extent plugin, etc., we are left with few configurations that need to finish. Once we finish a few configuration changes like adding properties file and adding extent report plugin to cucumberOptions. After finishing it, we will be ready to generate our reports. Let's look at the steps that we need to follow.
Step 1: Add Extent properties file to the project
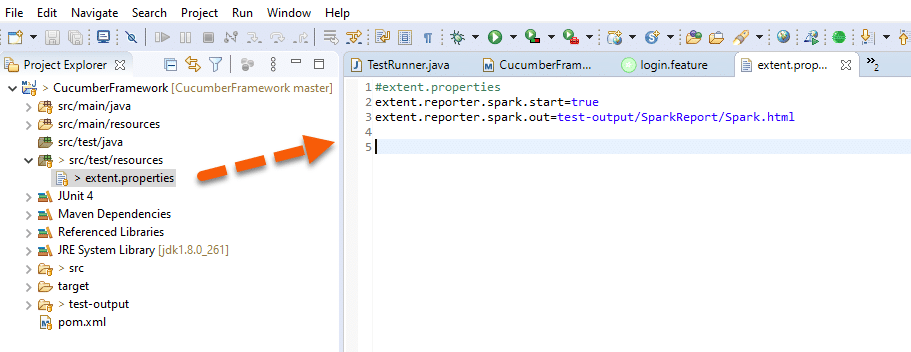
If you want to define some custom properties for the extent report, you will require a way to allow the Grasshopper cucumber extent report plugin to read those properties. Extent properties file offers you the way to activate the report. So, the first step to start the report is by defining it in the extent.properties file. We need to create the extent.properties file at the src/test/resources folder for the grasshopper extent report adapter to recognize it. Using properties file for reporting is quite helpful if you want to define several different properties.
Subsequently, let's add the following information to the properties file:
extent.reporter.spark.start=true
extent.reporter.spark.out=test-output/SparkReport/Spark.html
As you can see in the image below, we have created an extent.properties file in the src/test/resources folder. We can use this file to add all required properties for the extent report. Here we are putting generate and store reports at a given location.
Step 2: Modify TestRunner to Implement Cucumber Extent Reporter
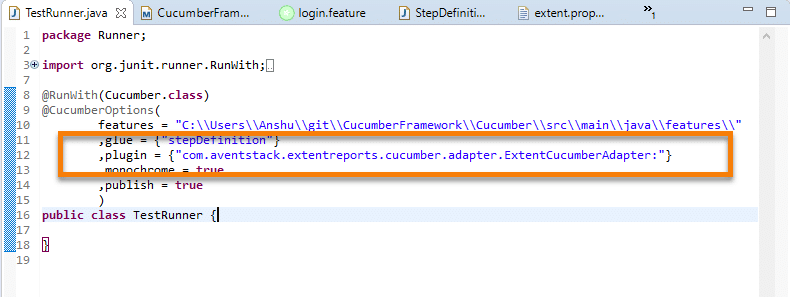
Secondly, the next step in the cucumber extent report configuration is to add the extent report cucumber adapter to the CucumberOption annotation present in the runner class. It is one of the essential parts of the configuration. Moreover, it makes sure that the cucumber runner class recognizes and initiates the extent report adapter for cucumber. Please include the following text as a plugin in the CucumberOptions as mentioned below.
@CucumberOptions(plugin = {"com.aventstack.extentreports.cucumber.adapter.ExtentCucumberAdapter:"})
Let's go back to our Eclipse IDE and update the same in our Cucumber project. To make the changes navigate to the Runner class of your cucumber framework. In the runner class, look for CucumberOptions annotation. In the CucumberOptions annotation, we will add a "plugin" as mentioned above. Moreover, be sure to keep the colon ":" at the end, as mentioned. After adding to our project, this is how your runner class should look:
Once added to the Runner class, you complete your Extent Report for Cucumber's basic setup. Unlike Extent reports for other Selenium frameworks, you don't need to start, log or flush extent reports. Additionally, the Grasshopper cucumber plugin adapter will automatically identify your Scenarios, features, and steps. It will automatically add these to the extent report to create basic but structured and visually appealing cucumber reports.
Step 3: Run Cucumber Test to generate Extent Report
We have completed all the basic setup of the Extent report for cucumber. Now let's execute a simple end-to-end cucumber test to validate the working of our extent report plugin.
Subsequently, our feature file looks something like this:
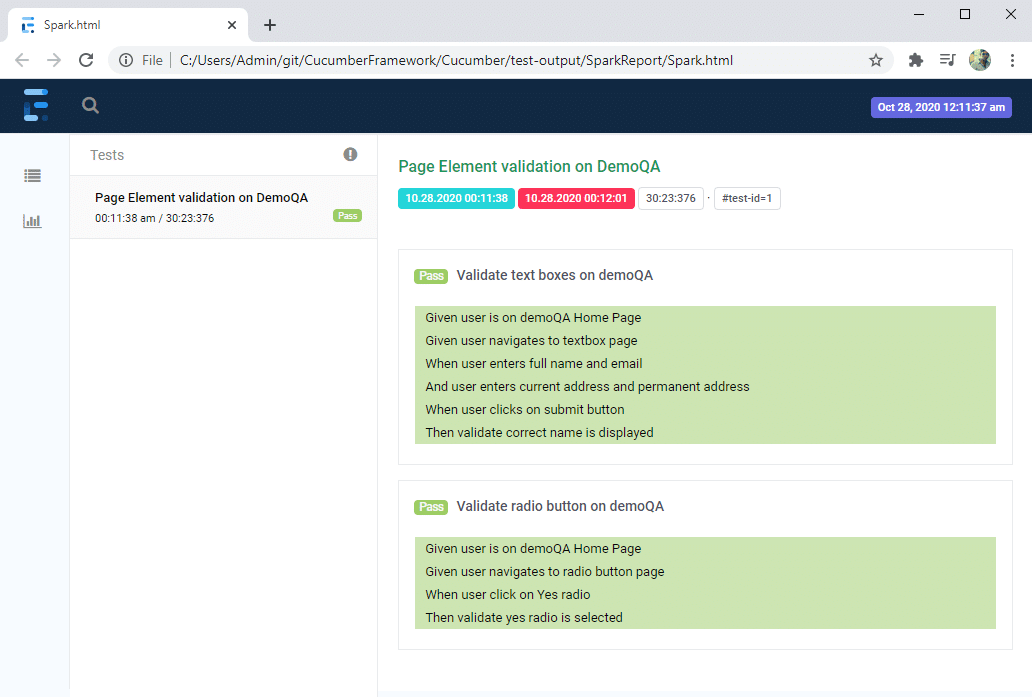
Feature: Page Element validation on DemoQA

Background: User is on demoQA home page
	Given user is on demoQA Home Page

Scenario: Validate text boxes on demoQA
	Given user navigates to textbox page
	When user enters full name and email
	And user enters current address and permanent address
	When user clicks on submit button
	Then validate correct name is displayed

Scenario: Validate radio button on demoQA
	Given user navigates to radio button page
	When user click on Yes radio
	Then validate yes radio is selected

The step definition file will look something like this:

package stepDefinition;


import java.util.List;
import java.util.concurrent.TimeUnit;

import org.openqa.selenium.By;
import org.openqa.selenium.Keys;
import org.openqa.selenium.WebDriver;
import org.openqa.selenium.WebElement;
import org.openqa.selenium.chrome.ChromeDriver;
import org.openqa.selenium.interactions.Actions;

import io.cucumber.datatable.DataTable;
import io.cucumber.java.After;
import io.cucumber.java.en.And;
import io.cucumber.java.en.Given;
import io.cucumber.java.en.Then;
import io.cucumber.java.en.When;
import junit.framework.Assert;


public class StepDefinition {
	 WebDriver driver;

	 @Given("^user is on demoQA Home Page$")
	 public void user_is_on_demoQA_Home_Page(){
	 System.setProperty("webdriver.chrome.driver","C:\\Selenium_Drivers\\chromedriver\\chromedriver.exe");
	 driver = new ChromeDriver();
	 driver.manage().window().maximize();
	 driver.manage().timeouts().implicitlyWait(10, TimeUnit.SECONDS);
	 driver.get("https://www.demoqa.com");
	 }

	@Given("^user navigates to textbox page$")
	public void user_navigates_to_textbox_page() {
		driver.navigate().to("https://www.demoqa.com/text-box");

	}

	@When("^user enters full name and email$")
	public void user_enters_full_name_and_email() {
		driver.findElement(By.id("userName")).sendKeys("Tools QA");
		driver.findElement(By.id("userEmail")).sendKeys("[email protected]");

	}

	@And("^user enters current address and permanent address$")
	public void user_enters_current_address_and_permanent_address() {
		driver.findElement(By.id("currentAddress")).sendKeys("Current Address");
		driver.findElement(By.id("permanentAddress")).sendKeys("permanent address");

	}

	@When("^user clicks on submit button$")
	public void user_clicks_on_submit_button() {
		WebElement btn = driver.findElement(By.xpath("//div/button"));
		btn.sendKeys(Keys.TAB);
		btn.click();

	}

	@Then("^validate correct name is displayed$")
	public void validate_correct_name_is_displayed() {
		WebElement name = driver.findElement(By.xpath("//p[@id='name']"));
		if(name.getText().contains("Tools QA")) {

		}else {
			Assert.assertTrue(false);
		}
	}


	@Given("^user navigates to radio button page$")
	public void user_navigates_to_radio_button_page() {
		driver.navigate().to("https://www.demoqa.com/radio-button");
	}

	@When("^user click on Yes radio$")
	public void user_click_on_Yes_radio() {
		driver.findElement(By.xpath("//label[text()='Yes']")).click();
	}

	@Then("^validate yes radio is selected$")
	public void validate_yes_radio_is_selected() {
		Assert.assertEquals("Yes", driver.findElement(By.xpath("//p/span")).getText());
	}


	@After
	public void quite() {
		driver.quit();
	}
}
Our Test Runner file with the added definition for extent report cucumber adapter will look similar to this:
package Runner;

import org.junit.runner.RunWith;

import io.cucumber.junit.Cucumber;
import io.cucumber.junit.CucumberOptions;

@RunWith(Cucumber.class)
@CucumberOptions(
		features = "C:\\Users\\Admin\\git\\CucumberFramework\\Cucumber\\src\\main\\java\\features"
		,glue = {"stepDefinition"}
		,plugin = {"com.aventstack.extentreports.cucumber.adapter.ExtentCucumberAdapter:"}
		,monochrome = true
		//,publish = true

		)
public class TestRunner {

}
Once we have all our files in place, we can execute our feature file to generate the report. In this example, we have created two scenarios, one each for validation of text box and radio button. We will be using our DemoQA website for this example.
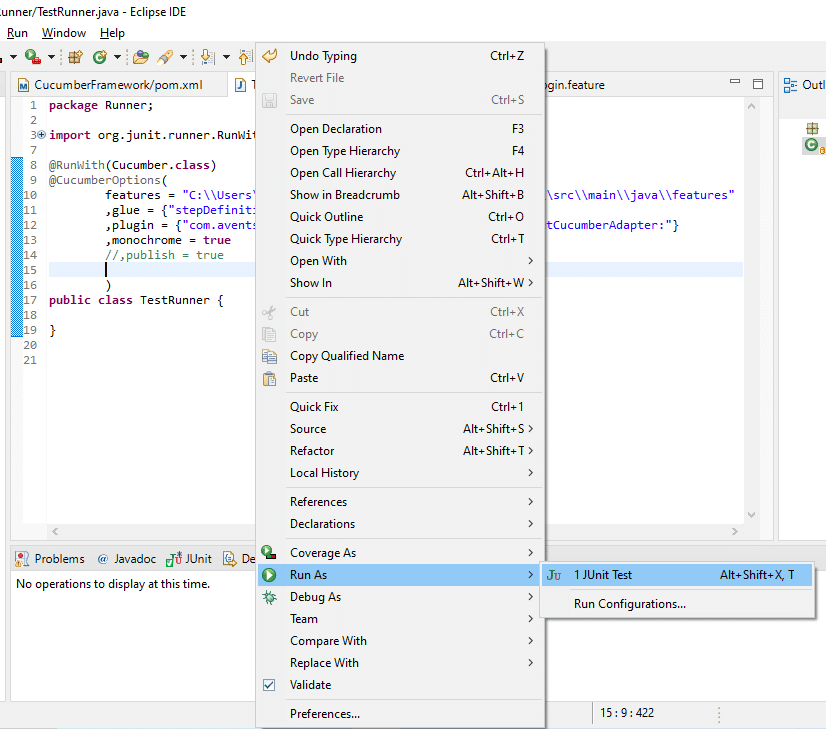
Run As JUnit
To execute a cucumber test, navigate to your test runner class. Right-click inside the class. From the menu, select "Run As", then select "JUnit Test", as shown in the image below. Once selected, execution will start.
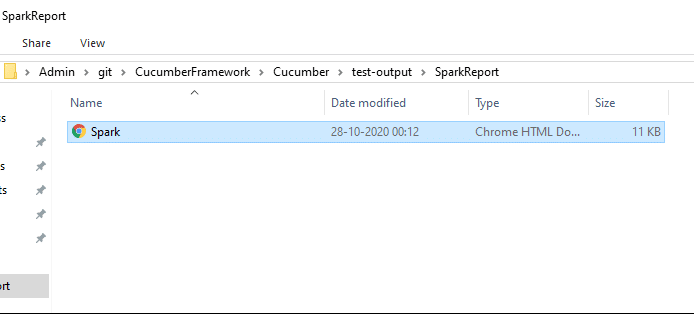
Once the execution is complete, the grasshopper extent report plugin will automatically generate the extent report with details of each step, scenario, and features. The extent report will generate in the location defined in the extent.properties file. In this tutorial, we will define the output location by the "extent.reporter.spark.out" keyword in the properties file by assigning the value as "test-output/SparkReport/Spark.html".
So, the output file with the name Spark.html will generate at the defined location. Let's navigate to the given location to check the generation of the extent report file. As we can see in the image below, the extent report file with the name Spark.html generates at the defined location.
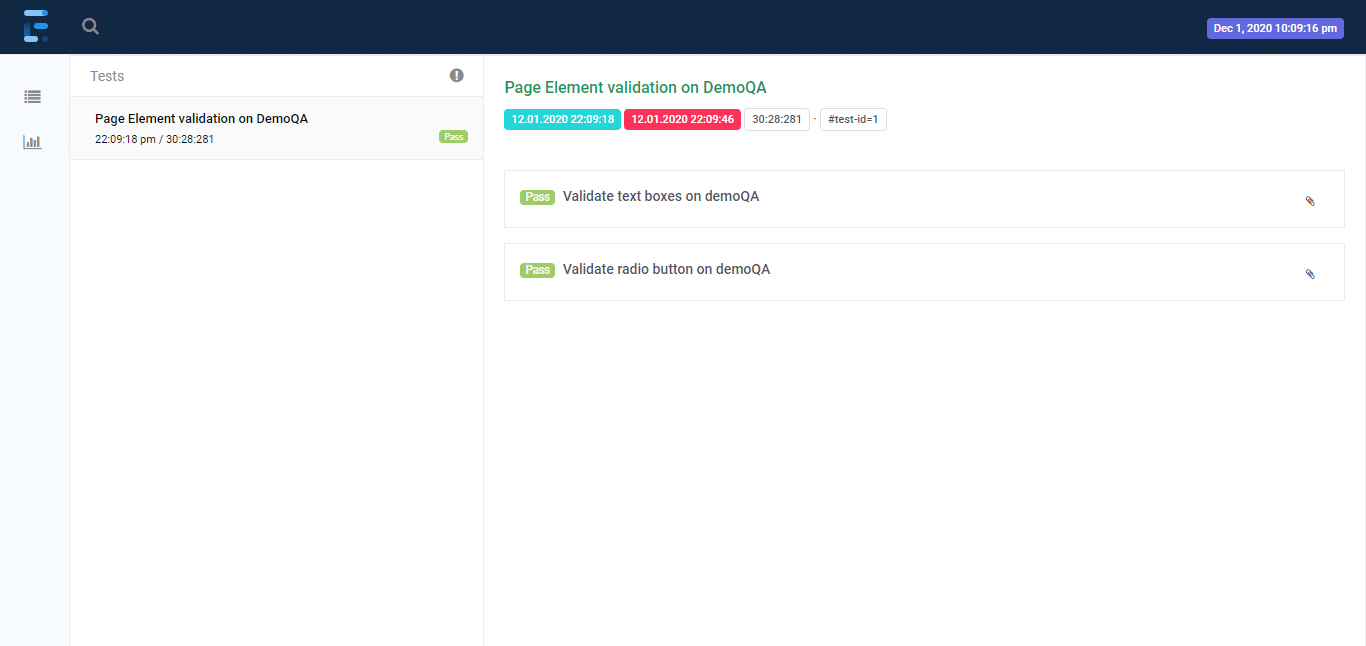
Now, let's open the file and validate if all the scenarios have been captured or not. The feature as defined in the feature file will exist at the left column of the report. Scenarios will be displayed on the right side of the report, as seen in the image below.
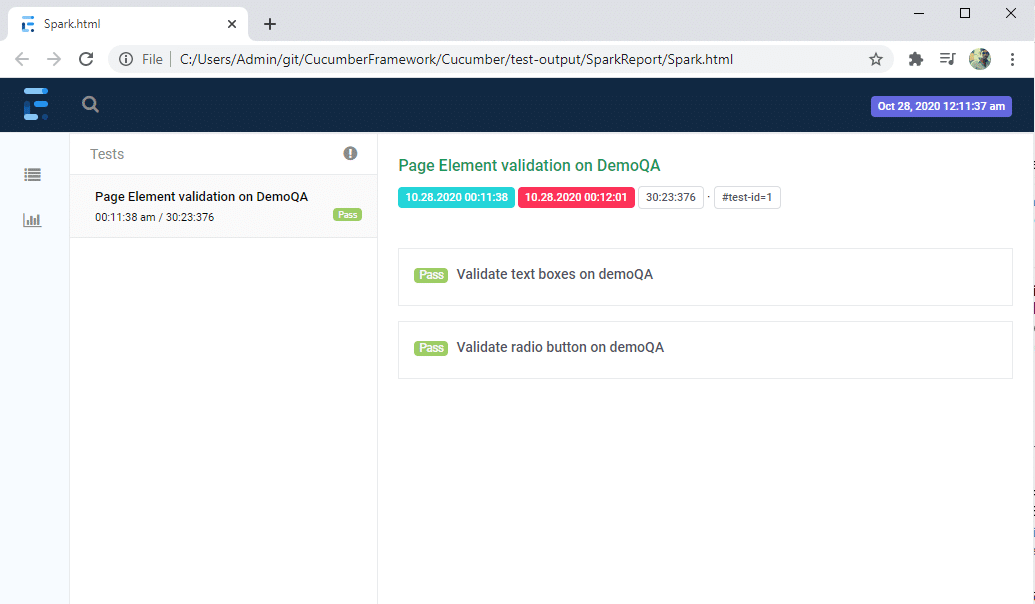
To view the details about the steps, click on the scenarios. Clicking on the scenario will expand, showing off the details of the steps of each scenario.
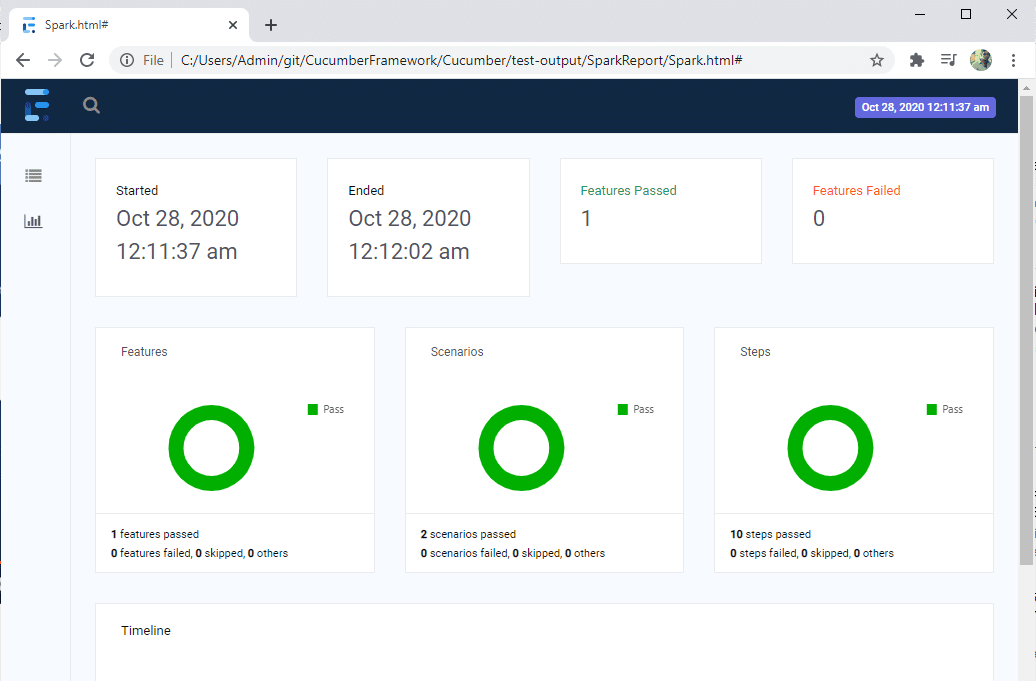
The report also has a summary section that displays the summary of the execution. The summary includes the overview of the pass/fail using pictogram, start time, end time, and pass/fail details of features as shown in the image below.
Cucumber Extent Reporter Features
Apart from generating nice and understandable reports, the extent report plugin also allows users to modify the report. Let's have a look at few more details that we can capture with this report.
How to customize the report folder name?
In the previous section, we have learned how we can generate an extent report in Cucumber Junit. But the problem with the previous approach is; it will keep on overriding the previous report once the new report creates. Usually, we need to maintain the backup of all the reports generated from previous tests. To do this, we need to save each report with a different report name or folder name. Let's have a look at how to achieve that.
With the Extent reporter plugin adapter, it's pretty easy to create reports in the different folder names. We need to add two settings to our extent.properties file; basefolder.name and basefolder.datetimepattern. The values assigned to these will merge to create a folder name. Consequently, a report will generate inside that. The value for the basefolder.datetimepattern should be in a valid date-time format. (refer to oracle formatter pattern for details).
To add this, navigate to the extent.properties file and add both the settings as shown below.
#extent.properties
extent.reporter.spark.start=true
extent.reporter.spark.out=Report/Spark.html

#Adding folder name and non repeating pattern
basefolder.name=test-output/SparkReport
basefolder.datetimepattern=d-MMM-YY HH-mm-ss
In the above snippet, we have provided the value for basefolder.name as "test-output/SparkReport". It means that the folder's name will be SparkReport, and it will create an inside test-output folder in the project directory. You can provide your folder location. In the next setting we have used a date time stamp that will concatenate with the report name to produce unique folder names.
So, if we run the report, it will generate at the following location as shown in the image below:
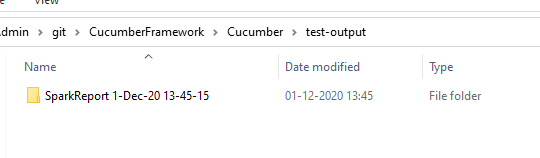
As we can see, the report's name is "SparkReport", concinnated with the date and time of the execution. The name is as per the properties mentioned in the extent.properties file.
How to add screenshots to scenario steps?
Sometimes we may want to add screenshots to our report. It offers better analysis capabilities, and users can effectively understand the test failure by viewing screenshots. Extent report cucumber adapter has made screenshot addition to the report relatively easy. We need to change some settings and add screenshot instruction to the cucumber hooks scenario. Let's have a look at how we can do this.
1. Take a screenshot and add it to scenario steps - We will need to add @AfterStep annotation to our Hooks class. Here we have used after-step annotation as we want to capture screenshots after each step. Depending upon your requirement, you can use this method with any annotation you wish to.
Let's add the following method to Hooks class.
	@AfterStep
	public void addScreenshot(Scenario scenario){

	      final byte[] screenshot = ((TakesScreenshot) driver).getScreenshotAs(OutputType.BYTES);
	      scenario.attach(screenshot, "image/png", "image");

	}
In the above example, we have created a method addScreenshot. This method accepts a Scenario type object. The Scenario is present inside the io.cucumber. Inside the method, we have used the code snippet to take screenshots in Selenium. Then we read the file as byte[], as a scenario.attach method accepts the byte[] parameter. Scenario.attach attaches the screenshot to each step.

2. Add screenshot settings to the extent.properties file - To complete the screenshots' configuration, we will need to add the settings to the extent.properties file. We will need to add two settings basefolder.name, and basefolder.datetimepattern. The first setting will accept the name of the folder inside test-output, where you want to save your screenshots. The second setting will accept the relative path of the image from the report folder. So, our extent.properties file will look something like this:
#extent.properties
extent.reporter.spark.start=true
extent.reporter.spark.out=Report/Spark.html

#Screenshot
screenshot.dir=Screenshots/
screenshot.rel.path=../Screenshots/

#Adding folder name and non repeating pattern
basefolder.name=test-output/SparkReport
basefolder.datetimepattern=d-MMM-YY HH-mm-ss
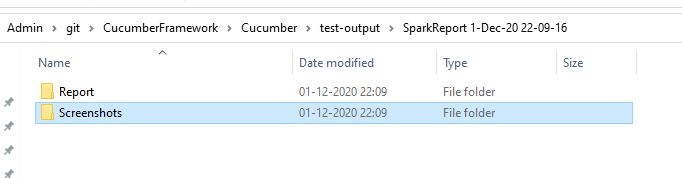
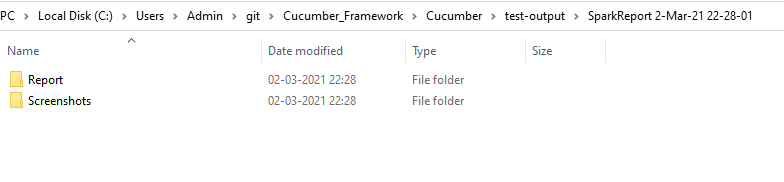
Let's execute the tests and see if screenshots are in there. Now navigate to the folder generated for the test execution in a test-output folder. As you can see in the below image, a folder creation happens with today's date and time.

If we open the folder, as defined in the extent.properties, we will find two folders; Report and Screenshots.
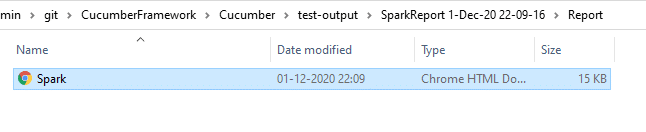
Let's first navigate to the report folder to see whether the report generates. As you can see in the below image, the report gets created.
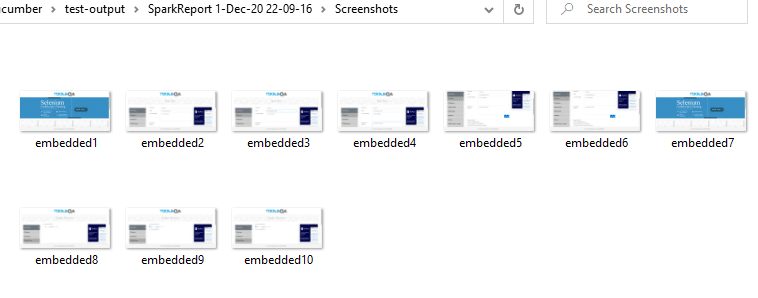
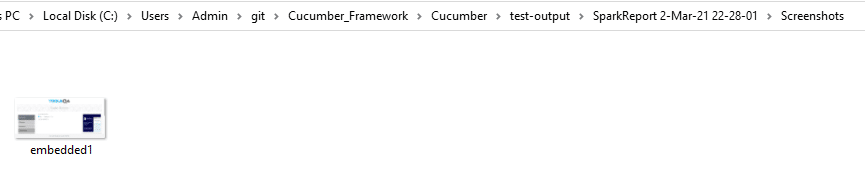
Now, we will navigate to the Screenshots folder and will see that the screenshots generate. The screenshots generated will be named automatically, and we don't need to provide any other details.
Once we have checked, both the report and screenshots generate. Subsequently, let's open the report generated. In the image below, we can see that two scenarios execute.
If we click on the features, it will expand, and all the screenshots of the attachment will be on display. Moreover, to view a larger image, you can click on the image.
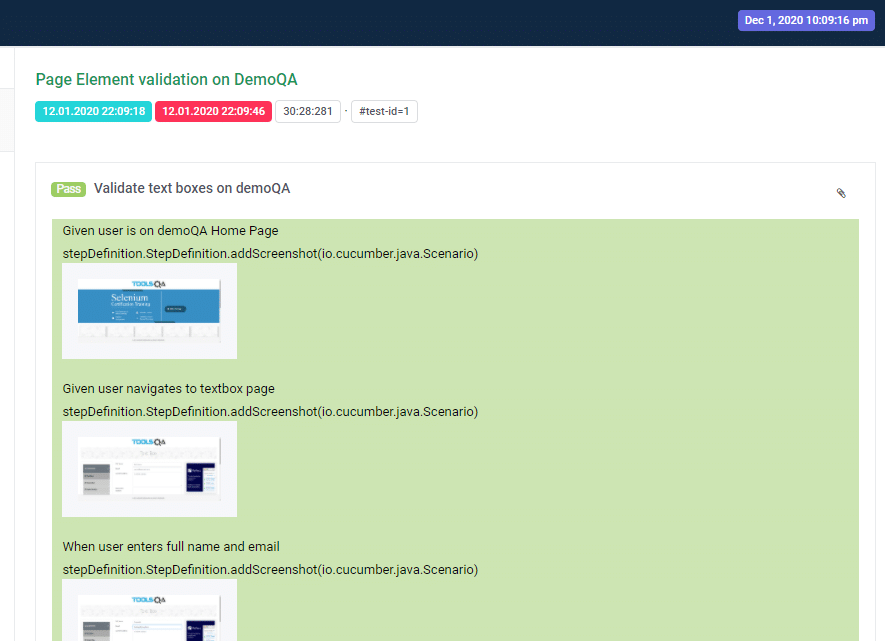
Similarly, the second scenario will also have all the screenshots.
How to add screenshots only for failed scenario steps?
In the previous section, we learned how to add screenshots to each scenario step of the extent report. But sometimes, we may not need screenshots for each step; instead, we may require screenshots for specific steps like failed steps.
In this section, we will discuss how we can attach screenshots only for failed steps. Let's have a look at the @AfterStep annotation we added in the previous step.
	@AfterStep
	public void addScreenshot(Scenario scenario){

	      final byte[] screenshot = ((TakesScreenshot) driver).getScreenshotAs(OutputType.BYTES);
	      scenario.attach(screenshot, "image/png", "image");

	}
In the above code snippet, we capture the screenshot after each scenario step and then attach it to the scenario. It will then attach the same when the scenario logs in the extent report. Now, let's enclose the above code inside a conditional statement such that it only executes if the scenario fails.
Consequently, it will give us the following code snippet:
	@AfterStep
	public void addScreenshot(Scenario scenario){

		//validate if scenario has failed
		if(scenario.isFailed()) {
			final byte[] screenshot = ((TakesScreenshot) driver).getScreenshotAs(OutputType.BYTES);
			scenario.attach(screenshot, "image/png", "image");
		}

	}
In the above statement, we used an "if statement" to check if the scenario is in failed state or not. If the scenario fails, then only the screenshot code block will be executed.
To check this code, let's simulate a fail condition. We can use an assert true statement and pass a false value to it anywhere in our step definition. For example, we added the following code to our last step in the step definition file, i.e., the step we want to fail.
Assert.assertTrue(false);
Subsequently, let's run the scenarios from the TestRunner file and see the results.
In the generated report folder:
As we can see in the above image, the report and the screenshot folders generate. If we navigate to the "Screenshot" folder, we will view all the failed scenario screenshots.
As we have only one failed step, so only one screenshot has been taken, as seen in the above image. Now, let's navigate to the reports folder and open the generated report.
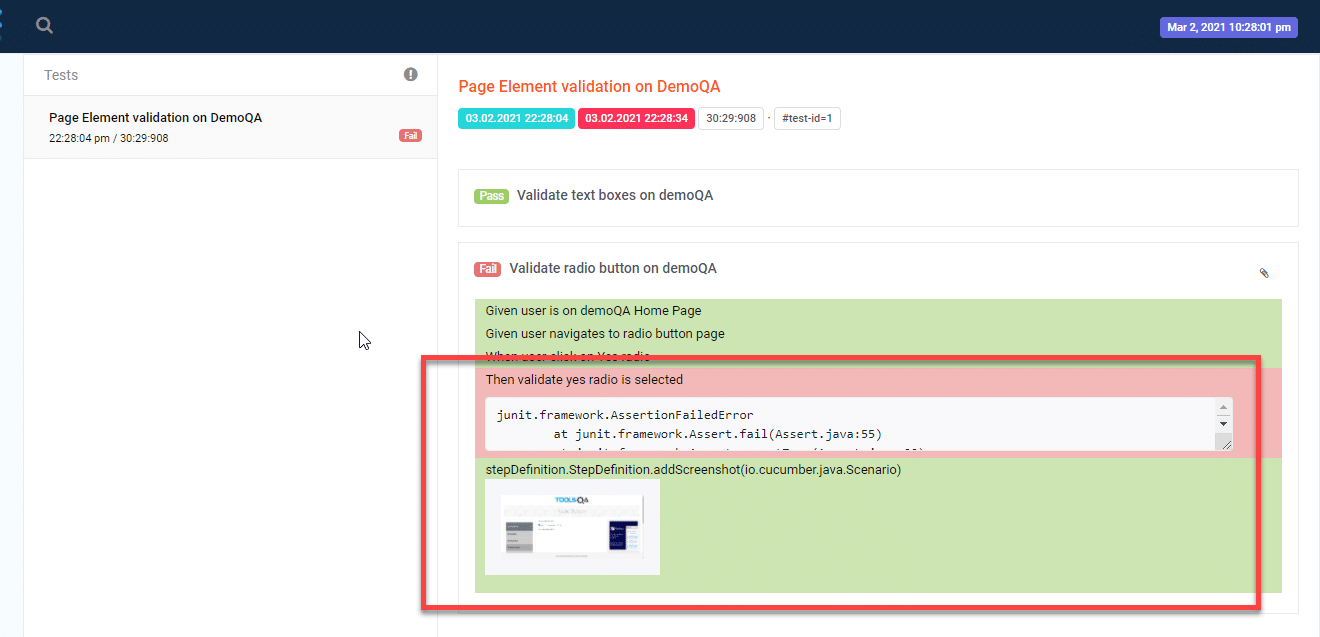
As we can see from the above image failed step has been logged into the report along with the screenshot. Similarly, any failure that may occur during test execution will log in the report along with the screenshot of the failure.
Key Takeaways
- Extent reporting provides an easy and comprehensive way to generate reports. Additionally, Extent reports provide a detailed and readable report that we can share with concerned stakeholders.
- In addition to the above, Cucumber on its own doesn't directly support the extent report; it needs an adapter plugin to connect the cucumber with the extent reporter. Using the Grasshopper adapter plugin makes it easier to integrate the Extent report with the cucumber framework.
- Moreover, integrating plugin allows automatic generation of reports with details, including features, scenarios, and test steps.
Finally, it concludes our tutorial. In the upcoming tutorial, we will look at how we can generate an Extent report using Cucumber TestNG.